Page 3692 of 4500
Thoroughly clean all parts to be assembled.
Before installing the parts, apply new engine oil to all sliding and rotating surfaces.
Replace all gaskets, O-rings and oil seals with new parts.
1.REMOVE CYLINDER BLOCK DRAIN COCK SUB-ASSY AND WATER SEAL PLATE
a. Remove the 2 nuts and seal plate.
b. Remove the RH and LH drain unions.
Fig. 408: Identifying Seal Plate
Courtesy of TOYOTA MOTOR SALES, U.S.A., INC.
Page 3701 of 4500

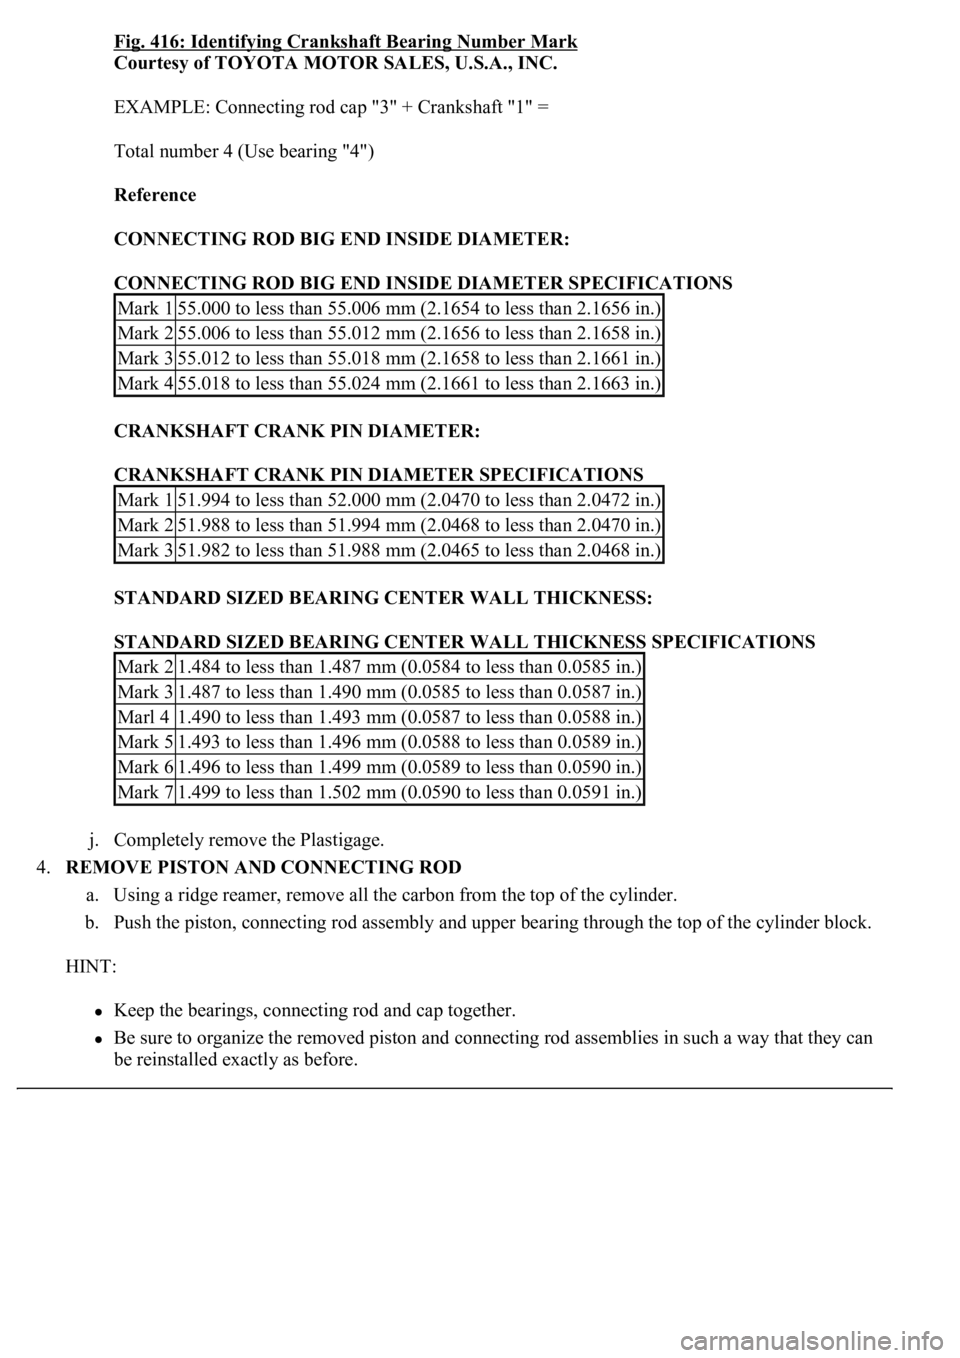
Fig. 416: Identifying Crankshaft Bearing Number Mark
Courtesy of TOYOTA MOTOR SALES, U.S.A., INC.
EXAMPLE: Connecting rod cap "3" + Crankshaft "1" =
Total number 4 (Use bearing "4")
Reference
CONNECTING ROD BIG END INSIDE DIAMETER:
CONNECTING ROD BIG END INSIDE DIAMETER SPECIFICATIONS
CRANKSHAFT CRANK PIN DIAMETER:
CRANKSHAFT CRANK PIN DIAMETER SPECIFICATIONS
STANDARD SIZED BEARING CENTER WALL THICKNESS:
STANDARD SIZED BEARING CENTER WALL THICKNESS SPECIFICATIONS
j. Completely remove the Plastigage.
4.REMOVE PISTON AND CONNECTING ROD
a. Using a ridge reamer, remove all the carbon from the top of the cylinder.
b. Push the piston, connecting rod assembly and upper bearing through the top of the cylinder block.
HINT:
<002e00480048005300030057004b004800030045004800440055004c0051004a0056000f00030046005200510051004800460057004c0051004a000300550052004700030044005100470003004600440053000300570052004a00480057004b0048005500
1100030003[
Be sure to organize the removed piston and connecting rod assemblies in such a way that they can
be reinstalled exactly as before.
Mark 155.000 to less than 55.006 mm (2.1654 to less than 2.1656 in.)
Mark 255.006 to less than 55.012 mm (2.1656 to less than 2.1658 in.)
Mark 355.012 to less than 55.018 mm (2.1658 to less than 2.1661 in.)
Mark 455.018 to less than 55.024 mm (2.1661 to less than 2.1663 in.)
Mark 151.994 to less than 52.000 mm (2.0470 to less than 2.0472 in.)
Mark 251.988 to less than 51.994 mm (2.0468 to less than 2.0470 in.)
Mark 351.982 to less than 51.988 mm (2.0465 to less than 2.0468 in.)
Mark 21.484 to less than 1.487 mm (0.0584 to less than 0.0585 in.)
Mark 31.487 to less than 1.490 mm (0.0585 to less than 0.0587 in.)
Marl 41.490 to less than 1.493 mm (0.0587 to less than 0.0588 in.)
Mark 51.493 to less than 1.496 mm (0.0588 to less than 0.0589 in.)
Mark 61.496 to less than 1.499 mm (0.0589 to less than 0.0590 in.)
Mark 71.499 to less than 1.502 mm (0.0590 to less than 0.0591 in.)
Page 3712 of 4500
Keep the upper bearings together with the cylinder block.
f. Clean each crankshaft journal and bearing.
g. Check each crankshaft journal and bearing for pitting and scratches.
If the journal or bearing is damaged, replace the bearings. If necessary, replace the crankshaft.
h. Install the 10 crankshaft bearings and 5 crankshaft bearing caps with the 30 bolts (see step 25). Do
not install the crankshaft.
Fig. 427: Installing Crankshaft Bearing Caps
Courtesy of TOYOTA MOTOR SALES, U.S.A., INC.
Page 3714 of 4500
MAXIMUM CLEARANCE
If the oil clearance is greater than the maximum, replace the bearings. If necessary, replace the
crankshaft.
HINT:If using a standard bearing, replace it with one that has the same number. If the number of
the bearing cannot be determined, select the correct bearing by adding together the numbers
imprinted on the cylinder block and crankshaft, then refer to the table on the next page for the
appropriate bearing number. There are 5 sizes of the standard bearings. For No. 1 and No. 5
<005300520056004c0057004c0052005100030045004800440055004c0051004a0056000f000300580056004800030045004800440055004c0051004a00560003005000440055004e0048004700030016000f00030017000f00030018000f00030019000300
44005100470003001a00110003002900520055000300520057[her position bearings, use bearings
marked 1,2,3,4 and 5.
No. 1, No. 5:
No. 1 and No. 50.043 mm (0.0017 in.)
Others0.055 mm (0.0022 in.)
Page 3716 of 4500
Courtesy of TOYOTA MOTOR SALES, U.S.A., INC.
Fig. 430: Upper And Lower Bearing Reference Table (1 Of 2)
Courtesy of TOYOTA MOTOR SALES, U.S.A., INC.
EXAMPLE:
Cylinder block "08" + Crankshaft "06" =
Total number 14 (Use bearing "4" (Upper), "5" (Lower))
Others:
Page 3717 of 4500
Fig. 431: Upper And Lower Bearing Reference Table (2 Of 2)
Courtesy of TOYOTA MOTOR SALES, U.S.A., INC.
EXAMPLE:
Cylinder block "08" + Crankshaft "06" =
Total number 14 (Use bearing "2" (Upper), "3" (Lower))
Reference
CYLINDER BLOCK CRANKSHAFT JOURNAL BORE DIAMETER (A):
CYLINDER BLOCK CRANKSHAFT JOURNAL BORE DIAMETER SPECIFICATIONS
Mark 0072.000 mm (2.8346 in.)
Mark 0172.001 mm (2.8347 in.)
Mark 0272.002 mm (2.8347 in.)
Mark 0372.003 mm (2.8348 in.)
Mark 0472.004 mm (2.8348 in.)
Mark 0572.005 mm (2.8348 in.)
Mark 0672.006 mm (2.8349 in.)
Mark 0772.007 mm (2.8349 in.)
Mark 0872.008 mm (2.8350 in.)
Mark 0972.009 mm (2.8350 in.)
Mark 1072.010 mm (2.8350 in.)
Mark 1172.011 mm (2.8351 in.)
Page 3719 of 4500
(a) to b (c) on the previous pages).
m. Remove the 5 upper crankshaft bearings from the cylinder block.
HINT:
<0025004800030056005800550048000300570052000300520055004a00440051004c005d004800030057004b004800030045004800440055004c0051004a00030046004400530056000f00030045004800440055004c0051004a0056000300440051004700
030057004b00550058005600570003005a00440056004b0048[rs in such a way that they can be
reinstalled exactly as before.
Fig. 432: Removing Crankshaft Bearing Caps Bolts
Courtesy of TOYOTA MOTOR SALES, U.S.A., INC.
8.INSPECT CYLINDER BLOCK SUB-ASSY
a. Clean the cylinder block.Using a gasket scraper, remove all the gasket material from the top surface
of the cylinder block.
b. Using a soft brush and solvent, thoroughly clean the cylinder block.
Page 3720 of 4500
Fig. 433: Cleaning Cylinder Block Using Gasket Scraper
Courtesy of TOYOTA MOTOR SALES, U.S.A., INC.
c. Inspect for warpage.
1. Using a precision straight edge and feeler gauge, measure the surfaces contacting the cylinder
head and main bearing cap for warpage.
Maximum warpage: 0.07 mm (0.0028 in.)
If the warpa
ge is greater than the maximum, replace the cylinder block sub-assy.