Page 2862 of 4500
OK: Go to next step
3.INSPECT TRANSMISSION VALVE BODY ASSY (See chapter 2 in PROBLEM
SYMPTOMS TABLE )
OK:
There are no foreign objects on each valve and they operate smoothly.
NG: REPAIR OR REPLACE TRANSMISSION VALVE BODY ASSY (See step 6 on
REPLACEMENT
)
OK: Go to next step
4.INSPECT TORQUE CONVERTER CLUTCH ASSY (See INSPECTION
)
OK:
The torque converter clutch operates normally.
NG: REPLACE TORQUE CONVERTER CLUTCH ASSY
OK: REPAIR OR REPLACE AUTOMATIC TRANSMISSION ASSY (See
COMPONENTS
)
DTC P2716: PRESSURE CONTROL SOLENOID "D" ELECTRICAL (SHIFT SOLENOID SLT)
CIRCUIT DESCRIPTION
See DTC P2714 PRESSURE CONTROL SOLENOID "D" PERFORMANCE (SHIFT SOLENOID
VALVE SLT) .
Fig. 166: DTC Reference Chart
Courtesy of TOYOTA MOTOR SALES, U.S.A., INC.
MONITOR DESCRIPTION
When an open or short in the linear solenoid valve (SLT) circuit is detected, the ECM interprets this as a fault.
The ECM will turn ON the MIL and store the DTC.
MONITOR STRATEGY
Page 2869 of 4500
OK: REPAIR OR REPLACE TRANSMISSION WIRE (See step 5 on REPLACEMENT)
DTC P2757: TORQUE CONVERTER CLUTCH PRESSURE CONTROL SOLENOID
PERFORMANCE (SHIFT SOLENOID VALVE SLU)
SYSTEM DESCRIPTION
The ECM uses the signals from the throttle position sensor, Air-flow meter, turbine (input) speed sensor, output
speed sensor and crankshaft position sensor to monitor the engagement condition of the lock-up clutch.
Then the ECM compares the engagement condition of the lock-up clutch with the lock-up schedule in the ECM
memory to detect a mechanical problems of the shift solenoid valve SLU, valve body and torque converter
clutch.
Fig. 173: Identifying Manual Transmission
Courtesy of TOYOTA MOTOR SALES, U.S.A., INC.
Page 2871 of 4500

relay valve and locks the torque converter clutch.
If the ECM detects no lock-up after lock-up has been requested or if it detects lock-up when it is not requested,
the ECM interprets this as a fault in the shift solenoid valve SLU or lock-up system performance.
The ECM will turn on the MIL and store the DTC.
Example:
When any of the following is met, the system judges it as a malfunction.
a. There is a difference in rotation between before and after torque converters even when the ECM
commands lock-up.
(Engine speed is at least 75 rpm greater than input turbine speed.)
b. There is no difference in rotation between before and after torque converters even when the ECM
commands lock-up off.
(The difference between engine speed and input turbine speed is less than 35 rpm.)
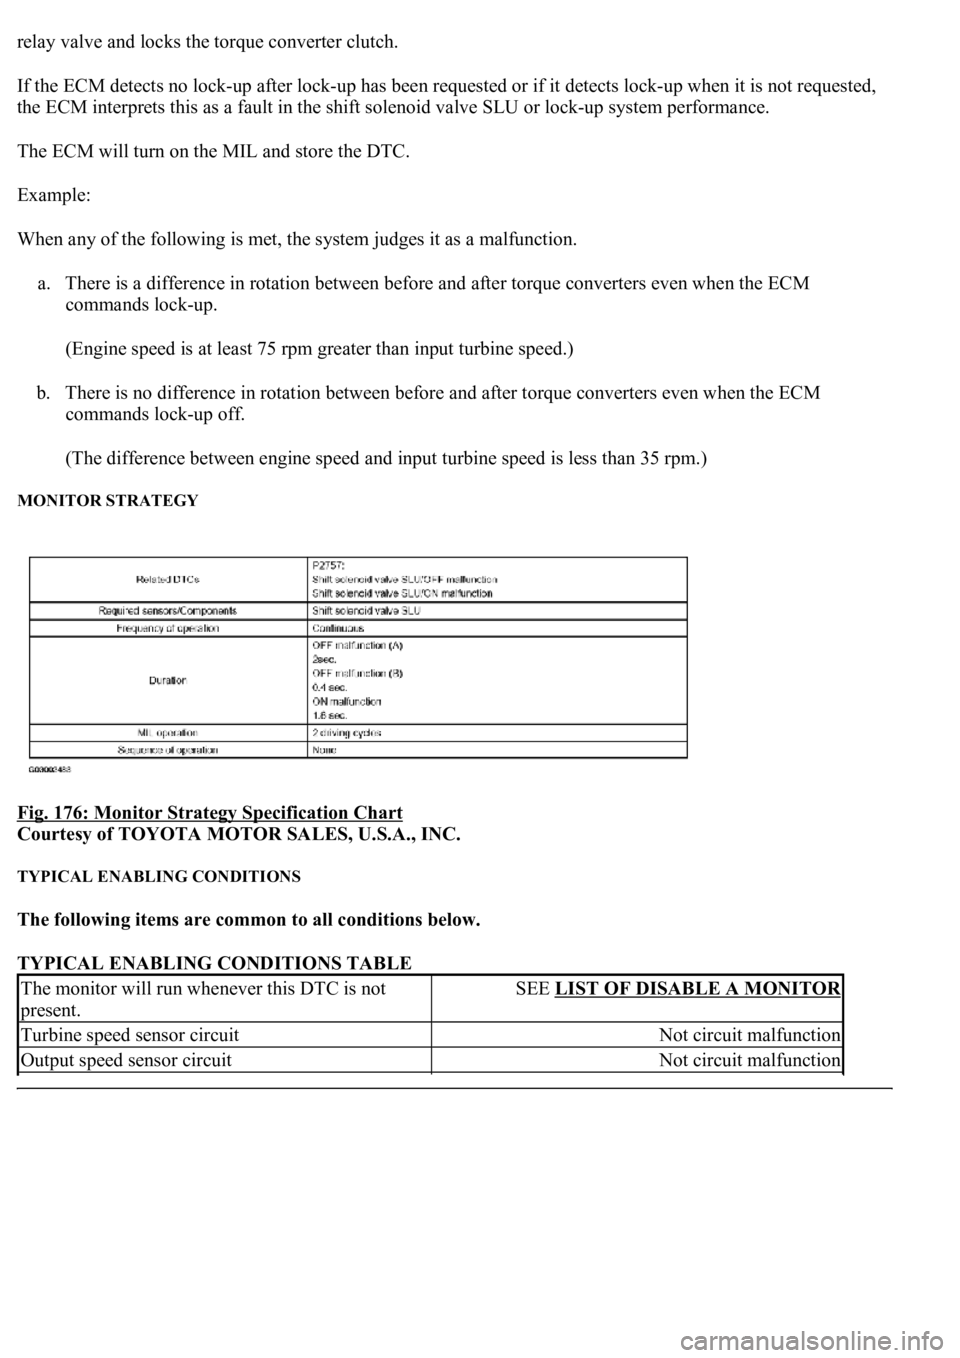
MONITOR STRATEGY
Fig. 176: Monitor Strategy Specification Chart
Courtesy of TOYOTA MOTOR SALES, U.S.A., INC.
TYPICAL ENABLING CONDITIONS
The following items are common to all conditions below.
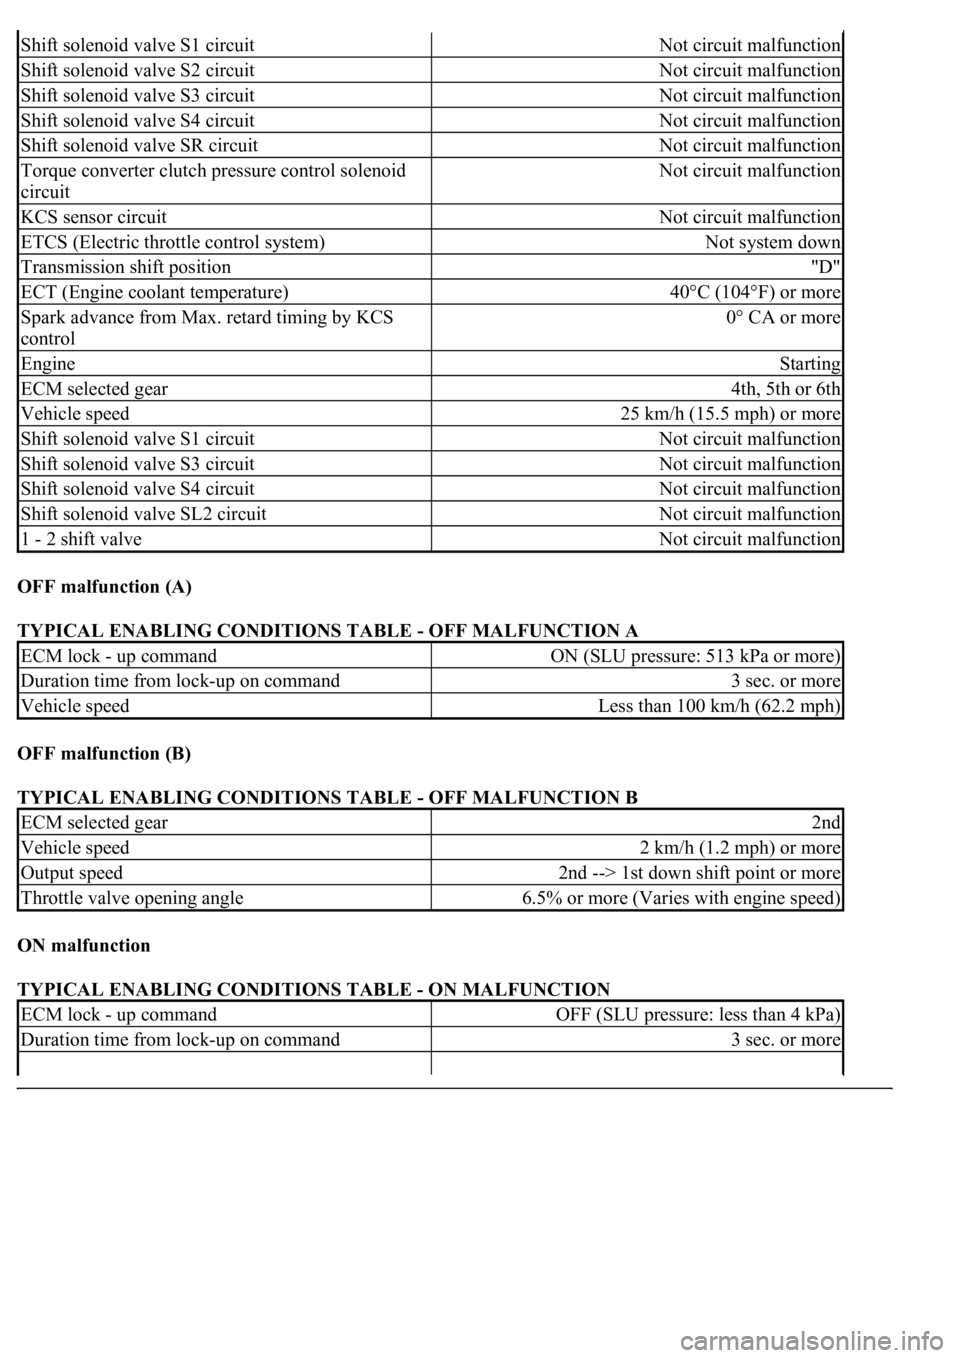
TYPICAL ENABLING CONDITIONS TABLE
The monitor will run whenever this DTC is not
present.SEE LIST OF DISABLE A MONITOR
Turbine speed sensor circuitNot circuit malfunction
Output speed sensor circuitNot circuit malfunction
Page 2872 of 4500

OFF malfunction (A)
TYPICAL ENABLING CONDITIONS TABLE - OFF MALFUNCTION A
OFF malfunction (B)
TYPICAL ENABLING CONDITIONS TABLE - OFF MALFUNCTION B
ON malfunction
TYPICAL ENABLING CONDITIONS TABLE - ON MALFUNCTION
Shift solenoid valve S1 circuitNot circuit malfunction
Shift solenoid valve S2 circuitNot circuit malfunction
Shift solenoid valve S3 circuitNot circuit malfunction
Shift solenoid valve S4 circuitNot circuit malfunction
Shift solenoid valve SR circuitNot circuit malfunction
Torque converter clutch pressure control solenoid
circuitNot circuit malfunction
KCS sensor circuitNot circuit malfunction
ETCS (Electric throttle control system)Not system down
Transmission shift position"D"
ECT (Engine coolant temperature)40°C (104°F) or more
Spark advance from Max. retard timing by KCS
control0° CA or more
EngineStarting
ECM selected gear4th, 5th or 6th
Vehicle speed25 km/h (15.5 mph) or more
Shift solenoid valve S1 circuitNot circuit malfunction
Shift solenoid valve S3 circuitNot circuit malfunction
Shift solenoid valve S4 circuitNot circuit malfunction
Shift solenoid valve SL2 circuitNot circuit malfunction
1 - 2 shift valveNot circuit malfunction
ECM lock - up commandON (SLU pressure: 513 kPa or more)
Duration time from lock-up on command3 sec. or more
Vehicle speedLess than 100 km/h (62.2 mph)
ECM selected gear2nd
Vehicle speed2 km/h (1.2 mph) or more
Output speed2nd --> 1st down shift point or more
Throttle valve opening angle6.5% or more (Varies with engine speed)
ECM lock - up commandOFF (SLU pressure: less than 4 kPa)
Duration time from lock-up on command3 sec. or more
Page 2877 of 4500

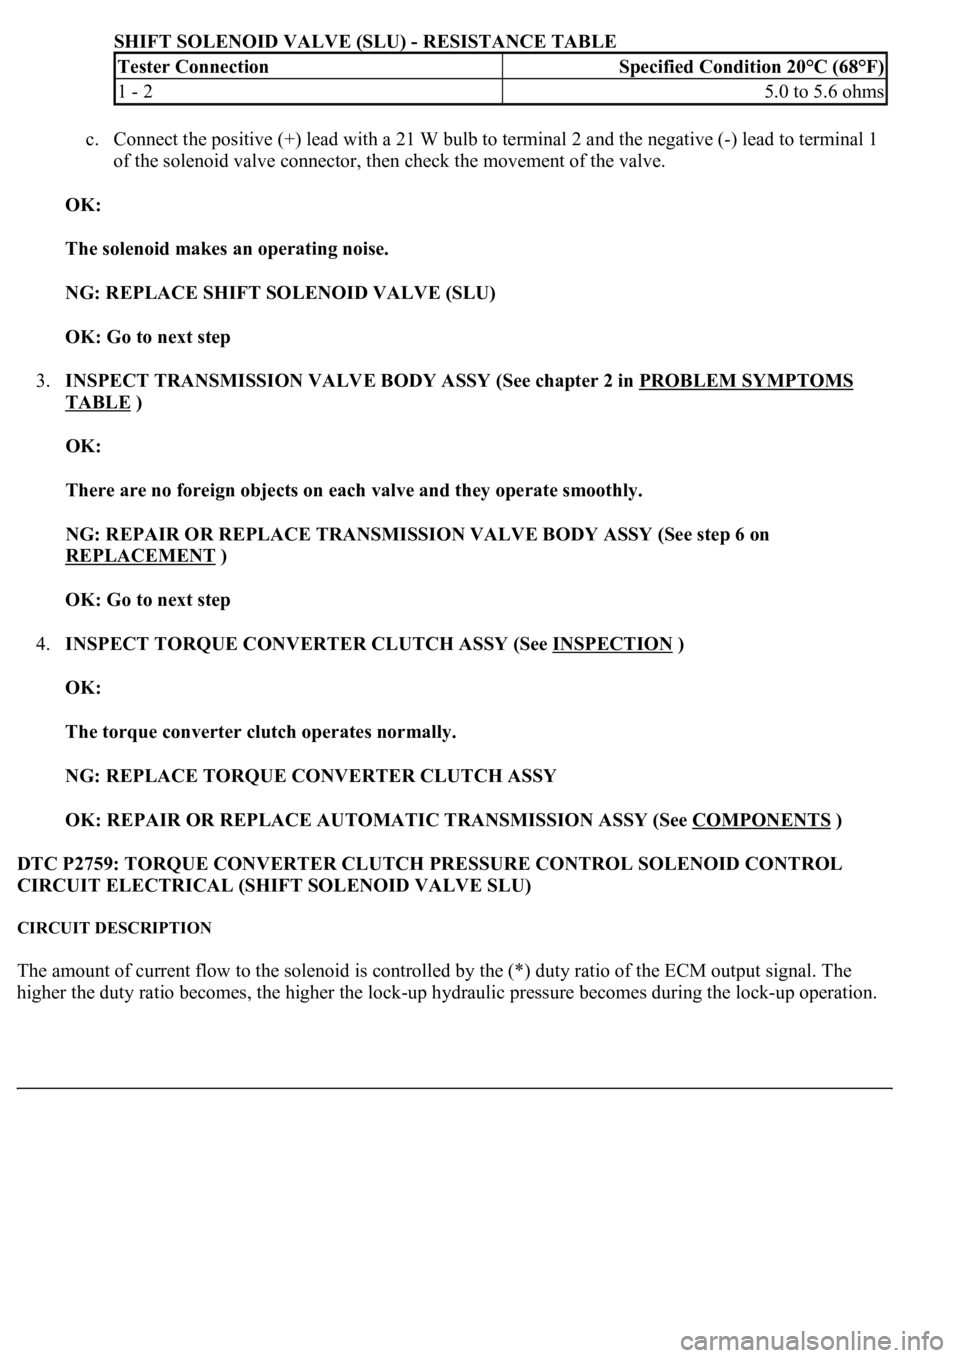
SHIFT SOLENOID VALVE (SLU) - RESISTANCE TABLE
c. Connect the positive (+) lead with a 21 W bulb to terminal 2 and the negative (-) lead to terminal 1
of the solenoid valve connector, then check the movement of the valve.
OK:
The solenoid makes an operating noise.
NG: REPLACE SHIFT SOLENOID VALVE (SLU)
OK: Go to next step
3.INSPECT TRANSMISSION VALVE BODY ASSY (See chapter 2 in PROBLEM SYMPTOMS
TABLE )
OK:
There are no foreign objects on each valve and they operate smoothly.
NG: REPAIR OR REPLACE TRANSMISSION VALVE BODY ASSY (See step 6 on
REPLACEMENT
)
OK: Go to next step
4.INSPECT TORQUE CONVERTER CLUTCH ASSY (See INSPECTION
)
OK:
The torque converter clutch operates normally.
NG: REPLACE TORQUE CONVERTER CLUTCH ASSY
OK: REPAIR OR REPLACE AUTOMATIC TRANSMISSION ASSY (See COMPONENTS
)
DTC P2759: TORQUE CONVERTER CLUTCH PRESSURE CONTROL SOLENOID CONTROL
CIRCUIT ELECTRICAL (SHIFT SOLENOID VALVE SLU)
CIRCUIT DESCRIPTION
The amount of current flow to the solenoid is controlled by the (*) duty ratio of the ECM output signal. The
hi
gher the duty ratio becomes, the higher the lock-up hydraulic pressure becomes during the lock-up operation.
Tester ConnectionSpecified Condition 20°C (68°F)
1 - 25.0 to 5.6 ohms
Page 2894 of 4500
Fig. 198: Transmission Control Switch Reference Chart
Courtesy of TOYOTA MOTOR SALES, U.S.A., INC.
NG: REPAIR OR REPLACE HARNESS OR CONNECTOR (See ELECTRONIC CIRCUIT
INSPECTION PROCEDURE )
OK: PROCEED TO NEXT CIRCUIT INSPECTION SHOWN IN PROBLEM SYMPTOMS
TABLE
PATTERN SELECT SWITCH CIRCUIT (PWR)
CIRCUIT DESCRIPTION
Passenger side J/B ECU receives pattern select switch information, and sends it through the multiplex
communication system and CAN system to the ECM.
The ECM memory contains the shift programs for the NORMAL, POWER and SNOW patterns, 2 position, L
position and the loc
k-up patterns. By following the programs corresponding to the signals from the pattern
select switch, the neutral start and other various sensors, the ECM switches the solenoid valves ON and OFF,
and controls the transmission gear change and the lock-up clutch operation.
WIRING DIAGRAM
Page 3318 of 4500
Fig. 38: Lifting Engine Out Of Vehicle
Courtesy of TOYOTA MOTOR SALES, U.S.A., INC.
43.DISCONNECT ENGINE WIRE
a. Disconnect the engine wire from the transmission.
1. Disconnect the VSV connector.
2. Disconnect the PNP switch connector.
3. Disconnect the solenoid connector.
4. Disconnect the direct clutch speed sensor connector.
5. Disconnect the engine wire from the 3 wire clamps.
6. Disconnect the oil level sensor connector.
44.REMOVE TRANSMISSION OIL FILTER TUBE SUB-ASSY
45.REMOVE OIL COOLER OUTLET TUBE NO.1
46.REMOVE OIL COOLER INLET TUBE NO.1
47.REMOVE AUTOMATIC TRANSMISSION ASSY
a. Remove the torque converter clutch bolts.
1. Remove the 2 bolts and fl
ywheel housing under cover.
Page 3319 of 4500
2. Turn the crankshaft damper bolt to gain access to each bolt.
3. Hold the crankshaft damper bolt with a wrench, and remove the 6 bolts.
b. Remove the 10 bolts and ground strap.
c. Remove the transmission together with the torque converter clutch from the engine.
Fig. 39: Removing Flywheel Housing Under Cover
Courtesy of TOYOTA MOTOR SALES, U.S.A., INC.
48.REMOVE DRIVE PLATE & RING GEAR SUB-ASSY
a. Remove the 8 bolts, rear spacer, ring gear and front spacer.
49.INSTALL ENGINE STAND
50.REMOVE THROTTLE BODY ASSY (See REPLACEMENT
)
51.REMOVE INTAKE MANIFOLD ASSY
a. Disconnect the VSV connector for EVAP.
b. Disconnect the EVAP hose from the VSV for EVAP.
c. Remove the bolt, disconnect the VSV for EVAP from the upper intake manifold.
d. Remove the bolt and V-bank cover bracket No. 2.
e. Remove the bolt and V-
bank cover bracket No. 3.