Page 2000 of 4500

that the A/C control is turned on and off.
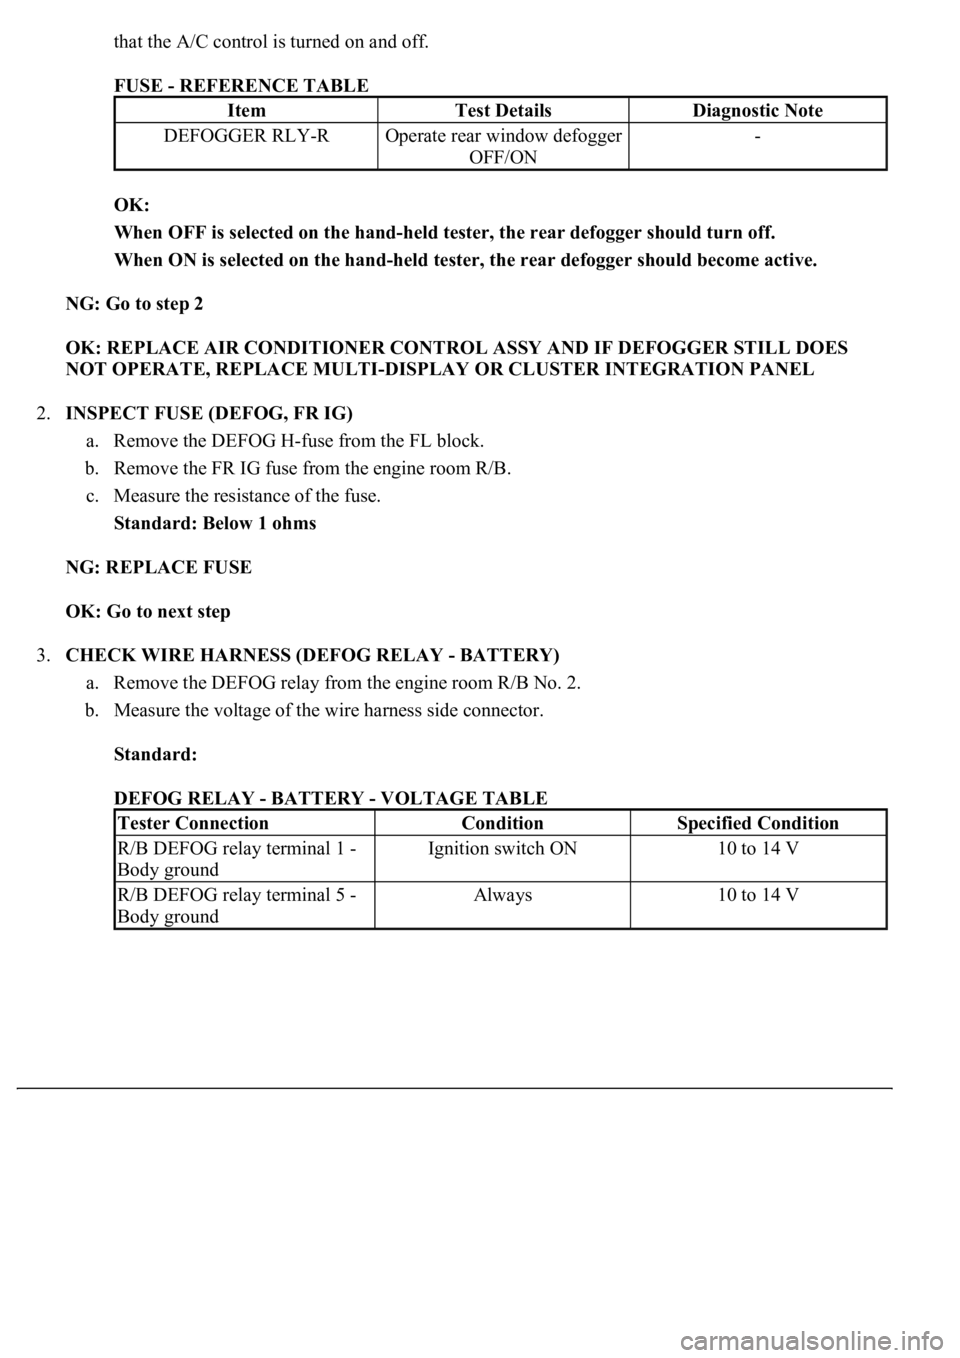
FUSE - REFERENCE TABLE
OK:
When OFF is selected on the hand-held tester, the rear defogger should turn off.
When ON is selected on the hand-held tester, the rear defogger should become active.
NG: Go to step 2
OK: REPLACE AIR CONDITIONER CONTROL ASSY AND IF DEFOGGER STILL DOES
NOT OPERATE, REPLACE MULTI-DISPLAY OR CLUSTER INTEGRATION PANEL
2.INSPECT FUSE (DEFOG, FR IG)
a. Remove the DEFOG H-fuse from the FL block.
b. Remove the FR IG fuse from the engine room R/B.
c. Measure the resistance of the fuse.
Standard: Below 1 ohms
NG: REPLACE FUSE
OK: Go to next step
3.CHECK WIRE HARNESS (DEFOG RELAY - BATTERY)
a. Remove the DEFOG relay from the engine room R/B No. 2.
b. Measure the voltage of the wire harness side connector.
Standard:
DEFOG RELAY - BATTERY - VOLTAGE TABLE
ItemTest DetailsDiagnostic Note
DEFOGGER RLY-ROperate rear window defogger
OFF/ON-
Tester ConnectionConditionSpecified Condition
R/B DEFOG relay terminal 1 -
Body groundIgnition switch ON10 to 14 V
R/B DEFOG relay terminal 5 -
Body groundAlways10 to 14 V
Page 2196 of 4500

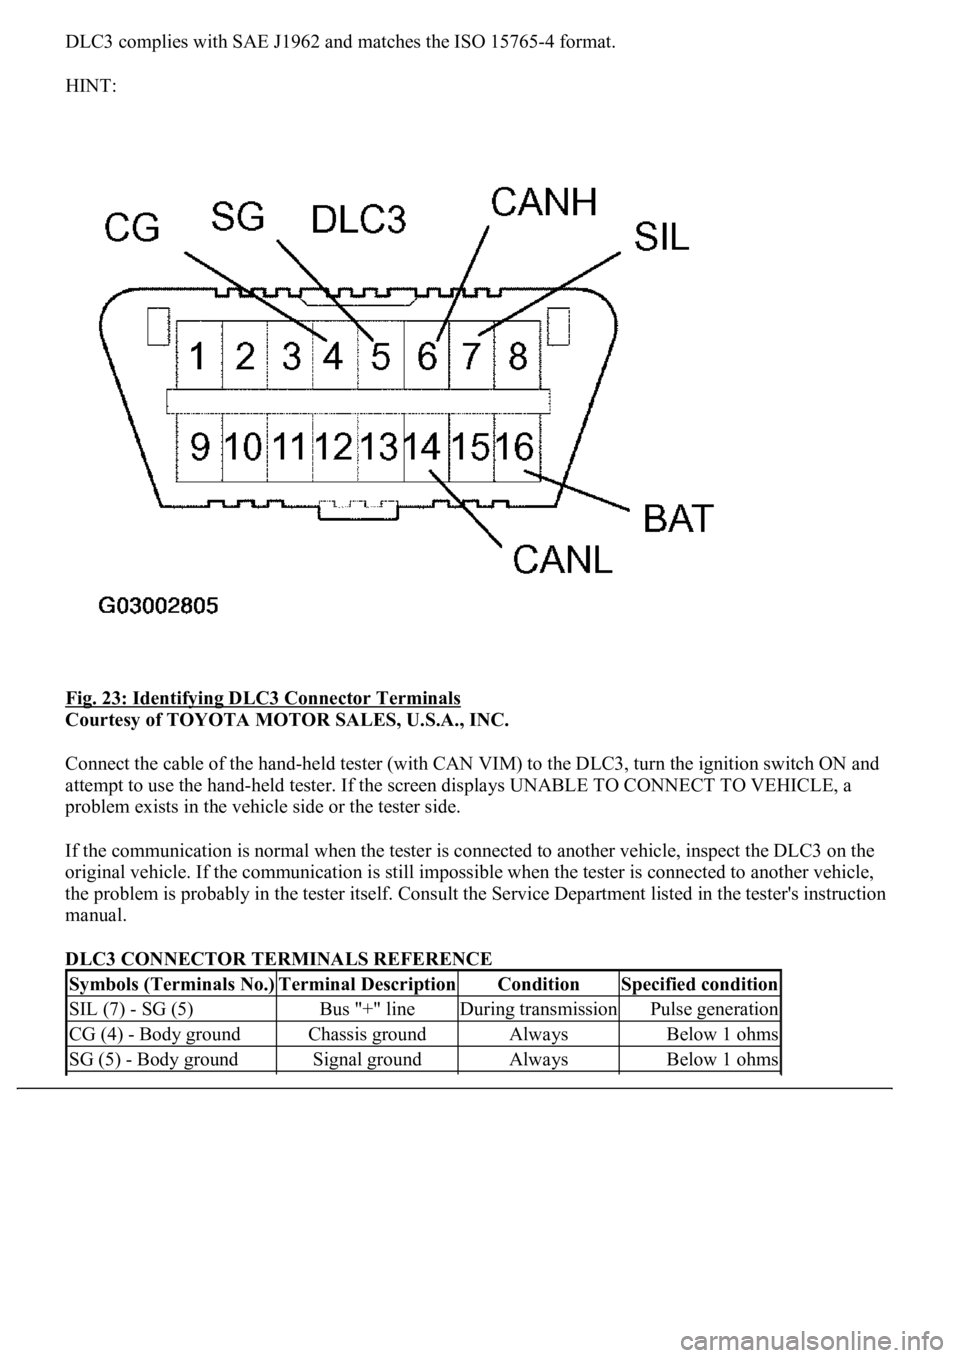
DLC3 complies with SAE J1962 and matches the ISO 15765-4 format.
HINT:
Fig. 23: Identifying DLC3 Connector Terminals
Courtesy of TOYOTA MOTOR SALES, U.S.A., INC.
Connect the cable of the hand-held tester (with CAN VIM) to the DLC3, turn the ignition switch ON and
attempt to use the hand-held tester. If the screen displays UNABLE TO CONNECT TO VEHICLE, a
problem exists in the vehicle side or the tester side.
If the communication is normal when the tester is connected to another vehicle, inspect the DLC3 on the
original vehicle. If the communication is still impossible when the tester is connected to another vehicle,
the problem is probably in the tester itself. Consult the Service Department listed in the tester's instruction
manual.
DLC3 CONNECTOR TERMINALS REFERENCE
Symbols (Terminals No.)Terminal DescriptionConditionSpecified condition
SIL (7) - SG (5)Bus "+" lineDuring transmissionPulse generation
CG (4) - Body groundChassis groundAlwaysBelow 1 ohms
SG (5) - Body groundSignal groundAlwaysBelow 1 ohms
Page 2198 of 4500

Courtesy of TOYOTA MOTOR SALES, U.S.A., INC.
2.CLEAR DTC
a. Connect the hand-held tester to the Controller Area Network Vehicle Interface Module (CAN
VIM). Then connect the CAN VIM to the DLC3.
b. Turn the ignition switch ON.
c. Erase the DTCs by following the prompts on the tester screen.
HINT:
Refer to the hand-held tester operator's manual for further details.
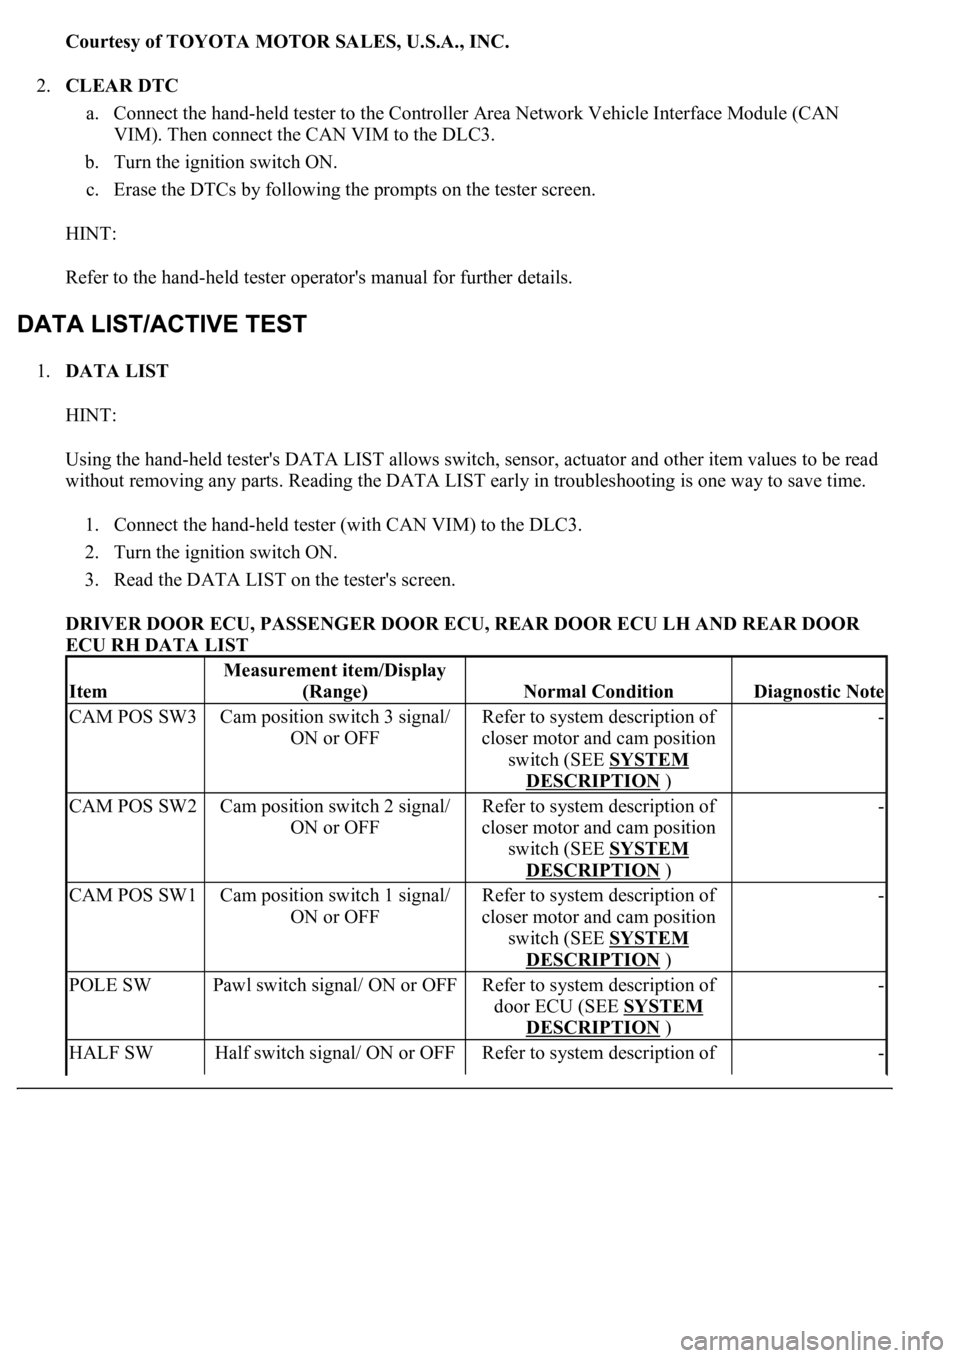
1.DATA LIST
HINT:
Using the hand-held tester's DATA LIST allows switch, sensor, actuator and other item values to be read
without removing any parts. Reading the DATA LIST early in troubleshooting is one way to save time.
1. Connect the hand-held tester (with CAN VIM) to the DLC3.
2. Turn the ignition switch ON.
3. Read the DATA LIST on the tester's screen.
DRIVER DOOR ECU, PASSENGER DOOR ECU, REAR DOOR ECU LH AND REAR DOOR
ECU RH DATA LIST
Item
Measurement item/Display
(Range)
Normal ConditionDiagnostic Note
CAM POS SW3Cam position switch 3 signal/
ON or OFFRefer to system description of
closer motor and cam position
switch (SEE SYSTEM
DESCRIPTION )
-
CAM POS SW2Cam position switch 2 signal/
ON or OFFRefer to system description of
closer motor and cam position
switch (SEE SYSTEM
DESCRIPTION )
-
CAM POS SW1Cam position switch 1 signal/
ON or OFFRefer to system description of
closer motor and cam position
switch (SEE SYSTEM
DESCRIPTION )
-
POLE SWPawl switch signal/ ON or OFFRefer to system description of
door ECU (SEE SYSTEM
DESCRIPTION )
-
HALF SWHalf switch signal/ ON or OFFRefer to system description of -
Page 2199 of 4500
If a malfunction code is displayed during the DTC check, check the circuit listed for that code in the table
below.
DIAGNOSTIC TROUBLE CODE CHART
Fig. 25: Diagnostic Trouble Code Information Chart
Courtesy of TOYOTA MOTOR SALES, U.S.A., INC.
CIRCUIT DESCRIPTION
This DTC is output when a malfunction is detected in the cam position circuit.
door ECU (SEE SYSTEM
DESCRIPTION )
FULL SWFull switch signal/ ON or OFFRefer to system description of
door ECU (SEE SYSTEM
DESCRIPTION )
-
DTCDescription
DTC B2211DOOR CLOSER MOTOR MALFUNCTION ON DRIVER SIDE DOOR
DTC B2212DOOR CLOSER MOTOR MALFUNCTION ON PASSENGER SIDE DOOR
DTC B2213DOOR CLOSER MOTOR MALFUNCTION ON REAR RIGHT SIDE
DOOR
DTC B2214DOOR CLOSER MOTOR MALFUNCTION ON REAR LEFT SIDE DOOR
Page 2200 of 4500
Fig. 26: Door Closer Motor Malfunction On Driver Side Door - Description Chart
Courtesy of TOYOTA MOTOR SALES, U.S.A., INC.
WIRING DIAGRAM
Fig. 27: Door Closer Motor Malfunction On Driver Side Door
- Wiring Diagram
Courtesy of TOYOTA MOTOR SALES, U.S.A., INC.
INSPECTION PROCEDURE
1.READ VALUE OF DATA LIST (CAM POSITION SWITCH)
a. Check the DATA LIST for proper functioning of the cam position switches.
DRIVER DOOR ECU
Item
Measurement item/ Display
(Range)
Normal ConditionDiagnostic Note
CAM
POS
SW3Cam position switch 3 (OFF/ON)Refer to system description of closer
motor and position switch (SEE
SYSTEM DESCRIPTION
)
-
CAM
POS
SW2Cam position switch 2 (OFF/ON)Refer to system description of closer
motor and position switch (SEE
SYSTEM DESCRIPTION
)
-
Page 2203 of 4500
Fig. 30: Door Closer Motor Malfunction On Passenger Side Door - Description Chart
Courtesy of TOYOTA MOTOR SALES, U.S.A., INC.
WIRING DIAGRAM
Fig. 31: Door Closer Motor Malfunction On Passenger Side Door
- Wiring Diagram
Courtesy of TOYOTA MOTOR SALES, U.S.A., INC.
INSPECTION PROCEDURE
1.READ VALUE OF DATA LIST (CAM POSITION SWITCH)
a. Check the DATA LIST for proper functioning of the cam position switches.
PASSENGER DOOR ECU
Item
Measurement item/ Display
(Range)
Normal ConditionDiagnostic Note
CAM
POS SW3Cam position switch 3
(OFF/ON)Refer to system description of closer
motor and position switch (SEE
SYSTEM DESCRIPTION
)
-
CAM
POS SW2Cam position switch 2
(OFF/ON)Refer to system description of closer
motor and position switch (SEE
SYSTEM DESCRIPTION
)
-
Page 2206 of 4500
Fig. 34: Door Closer Motor Malfunction On Rear Right Side Door - Description Chart
Courtesy of TOYOTA MOTOR SALES, U.S.A., INC.
WIRING DIAGRAM
Fig. 35: Door Closer Motor Malfunction On Rear Right Side Door
- Wiring Diagram
Courtesy of TOYOTA MOTOR SALES, U.S.A., INC.
INSPECTION PROCEDURE
1.READ VALUE OF DATA LIST (CAM POSITION SWITCH)
a. Check the DATA LIST for proper functioning of the cam position switches.
REAR DOOR ECU RH
Item
Measurement item/ Display
(Range)
Normal ConditionDiagnostic Note
CAM POS
SW3Cam position switch 3
(OFF/ON)Refer to system description of closer
motor and position switch (see
SYSTEM DESCRIPTION
)
-
CAM POS
SW2Cam position switch 2
(OFF/ON)Refer to system description of closer
motor and position switch (SEE
SYSTEM DESCRIPTION
)
-
CAM POS
SW1Cam position switch 1
(OFF/ON)Refer to system description of closer
motor and position switch (SEE -
Page 2209 of 4500
Fig. 38: Door Closer Motor Malfunction On Rear Left Side Door - Description Chart
Courtesy of TOYOTA MOTOR SALES, U.S.A., INC.
WIRING DIAGRAM
Fig. 39: Door Closer Motor Malfunction On Rear Left Side Door
- Wiring Diagram
Courtesy of TOYOTA MOTOR SALES, U.S.A., INC.
INSPECTION PROCEDURE
1.READ VALUE OF DATA LIST (CAM POSITION SWITCH)
a. Check the DATA LIST for proper functioning of the cam position switches.
REAR DOOR ECU LH
Item
Measurement item/ Display
(Range)
Normal ConditionDiagnostic Note
CAM POS
SW3Cam position switch 3
(OFF/ON)Refer to system description of closer
motor and position switch (SEE
SYSTEM DESCRIPTION
)
-
CAM POS
SW2Cam position switch 2
(OFF/ON)Refer to system description of closer
motor and position switch (SEE
SYSTEM DESCRIPTION
)
-
CAM POS
SW1Cam position switch 1
(OFF/ON)Refer to system description of closer
motor and position switch (SEE -