2003 BMW 760LI SEDAN navigation system
[x] Cancel search: navigation systemPage 47 of 229
At a glance
Controls
Driving tips
Communications
Navigation
Entertainment
Mobility
Reference
45
Adjustments
Sit safely
The ideal sitting position can make a vital
contribution to relaxed driving that is as
fatigue-free as possible. The sitting posi-
tion plays an important role together with
the safety belts and airbags in providing
occupants with maximum levels of passive
safety in an accident. To ensure that the
safety systems operate with optimal effi-
ciency, we strongly urge you to observe the
instructions contained in the following sec-
tion.
For additional information on transporting
children safely, refer to page 57.
Sitting safely with airbags
Always maintain an adequate dis-
tance between yourself and the air-
bags. Always hold the steering wheel by
its rim with hands at the 9 o'clock and
3 o'clock positions, to minimize the risk of
injuries to your hands and arms in the event
of airbag deployment.
No one and nothing is to come between the
airbags and the seat occupant.
To prevent possible leg injuries should the
knee airbag deploy in an accident, ensure
that the front passenger assumes a correct
sitting position. Do not use the cover of the
front airbag on the front passenger side as
a storage area for objects, or as a rest for
feet or legs.<
For airbag locations and additional infor-
mation on airbags, refer to page 55.
Safe sitting position with safety belts
For the safety of all vehicle occupants,
please comply with the following instruc-
tions for wearing safety belts.
Never allow more than one person to
wear a single safety belt. Never allow
infants or small children to ride in a pas-
senger's lap.
Avoid twisting the belt while routing it firmly
across the hips and shoulder. Wear it as snugly against your body as possible. Do
not allow the belt to rest against hard or
fragile objects.
Do not route the belt across your neck, or
run it across sharp edges. Be sure that the
belt does not become caught or jammed.
Avoid wearing loose or bulky clothing that
would prevent the belt from resting
securely against your body; pull on the
shoulder strap periodically to keep it ten-
sioned.
In the event of a frontal impact, a loose lap
belt could slide over your hips, leading to
abdominal injury. In addition, the safety
belt's restraint effectiveness is reduced if
the belt is worn loosely.
Expectant mothers should always wear
their safety belts, taking care to position
the lap belt against the lower hips, where it
will not exert pressure against the abdom-
inal area.<
For putting on safety belts, refer to
page 50.
Seats
For your personal safety when adjusting
the seat position, please follow the instruc-
tions below carefully.
Never attempt to adjust your seat
while operating the vehicle. The seat
could respond with unexpected move-
ment, and the ensuing loss of vehicle con-
trol could lead to an accident.
Never recline the backrest to an extremely
horizontal position while operating the
vehicle Ð this precaution is especially
important for front passengers and the
occupants of electric power rear seats to
remember. Failure to observe these pre-
cautions can prevent the belts from pro-
viding effective protection against injury, as
passengers could slide under the belts in
an accident.<
Page 49 of 229
At a glance
Controls
Driving tips
Communications
Navigation
Entertainment
Mobility
Reference
47
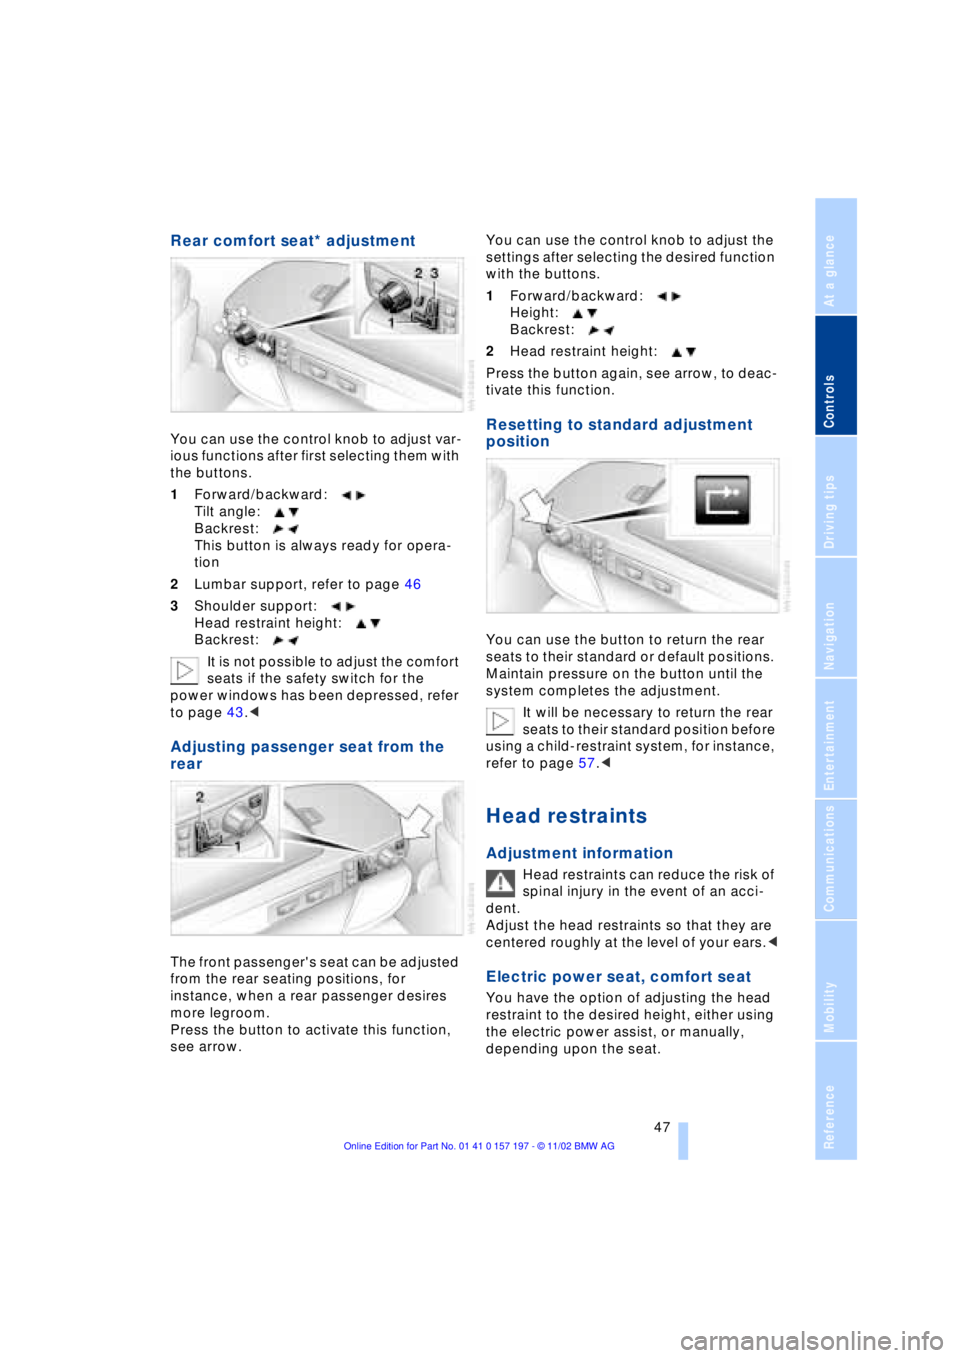
Rear comfort seat* adjustment
You can use the control knob to adjust var-
ious functions after first selecting them with
the buttons.
1Forward/backward:
Tilt angle:
Backrest:
This button is always ready for opera-
tion
2Lumbar support, refer to page 46
3Shoulder support:
Head restraint height:
Backrest:
It is not possible to adjust the comfort
seats if the safety switch for the
power windows has been depressed, refer
to page 43.<
Adjusting passenger seat from the
rear
The front passenger's seat can be adjusted
from the rear seating positions, for
instance, when a rear passenger desires
more legroom.
Press the button to activate this function,
see arrow. You can use the control knob to adjust the
settings after selecting the desired function
with the buttons.
1Forward/backward:
Height:
Backrest:
2Head restraint height:
Press the button again, see arrow, to deac-
tivate this function.
Resetting to standard adjustment
position
You can use the button to return the rear
seats to their standard or default positions.
Maintain pressure on the button until the
system completes the adjustment.
It will be necessary to return the rear
seats to their standard position before
using a child-restraint system, for instance,
refer to page 57.<
Head restraints
Adjustment information
Head restraints can reduce the risk of
spinal injury in the event of an acci-
dent.
Adjust the head restraints so that they are
centered roughly at the level of your ears.<
Electric power seat, comfort seat
You have the option of adjusting the head
restraint to the desired height, either using
the electric power assist, or manually,
depending upon the seat.
Page 51 of 229
At a glance
Controls
Driving tips
Communications
Navigation
Entertainment
Mobility
Reference
49
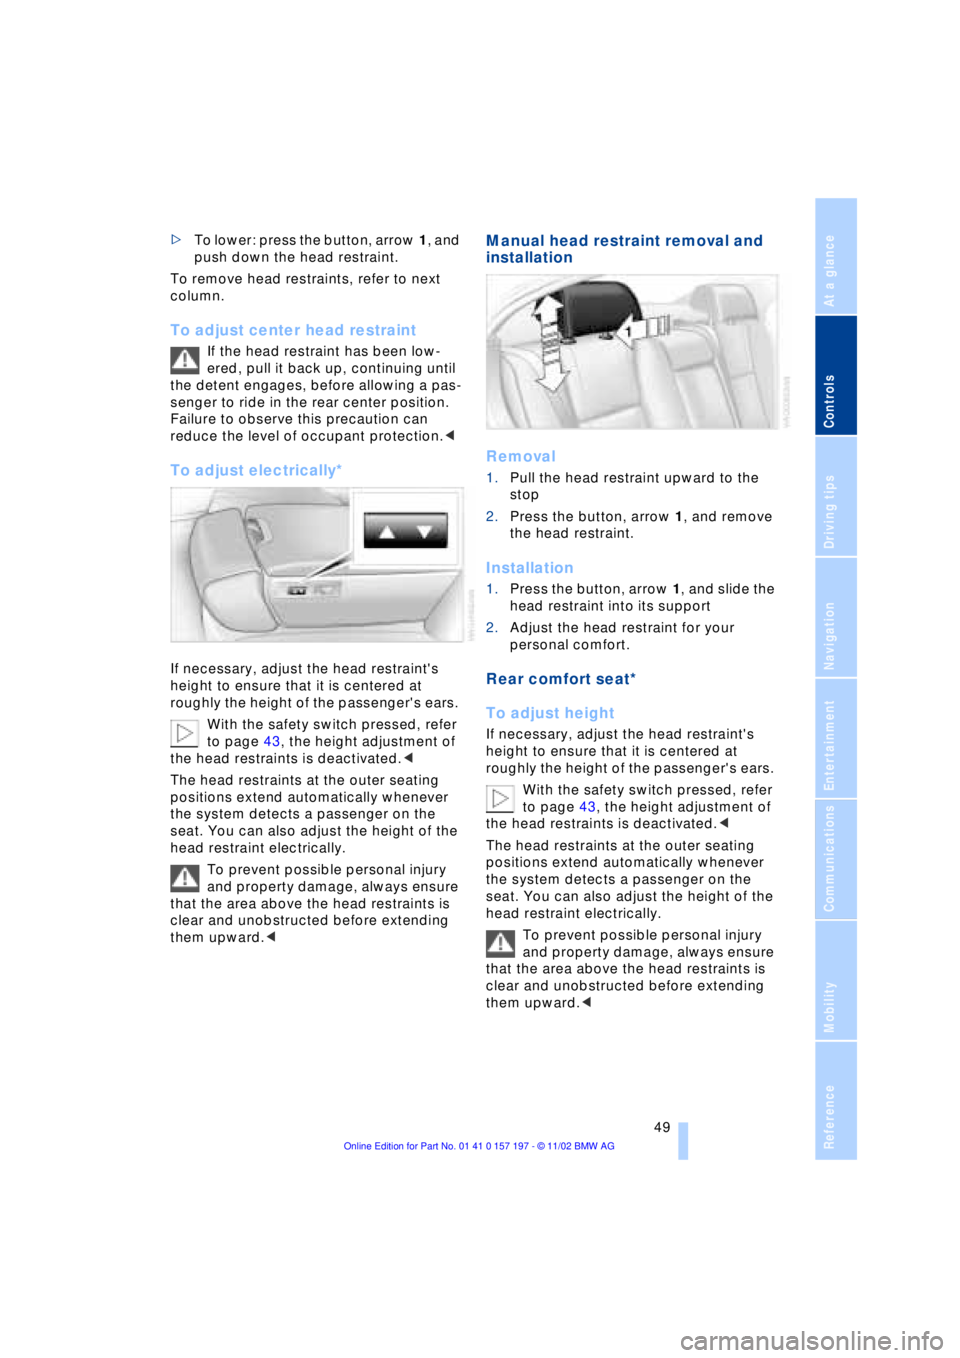
>To lower: press the button, arrow 1, and
push down the head restraint.
To remove head restraints, refer to next
column.
To adjust center head restraint
If the head restraint has been low-
ered, pull it back up, continuing until
the detent engages, before allowing a pas-
senger to ride in the rear center position.
Failure to observe this precaution can
reduce the level of occupant protection.<
To adjust electrically*
If necessary, adjust the head restraint's
height to ensure that it is centered at
roughly the height of the passenger's ears.
With the safety switch pressed, refer
to page 43, the height adjustment of
the head restraints is deactivated.<
The head restraints at the outer seating
positions extend automatically whenever
the system detects a passenger on the
seat. You can also adjust the height of the
head restraint electrically.
To prevent possible personal injury
and property damage, always ensure
that the area above the head restraints is
clear and unobstructed before extending
them upward.<
Manual head restraint removal and
installation
Removal
1.Pull the head restraint upward to the
stop
2.Press the button, arrow 1, and remove
the head restraint.
Installation
1.Press the button, arrow 1, and slide the
head restraint into its support
2.Adjust the head restraint for your
personal comfort.
Rear comfort seat*
To adjust height
If necessary, adjust the head restraint's
height to ensure that it is centered at
roughly the height of the passenger's ears.
With the safety switch pressed, refer
to page 43, the height adjustment of
the head restraints is deactivated.<
The head restraints at the outer seating
positions extend automatically whenever
the system detects a passenger on the
seat. You can also adjust the height of the
head restraint electrically.
To prevent possible personal injury
and property damage, always ensure
that the area above the head restraints is
clear and unobstructed before extending
them upward.<
Page 53 of 229
At a glance
Controls
Driving tips
Communications
Navigation
Entertainment
Mobility
Reference
51
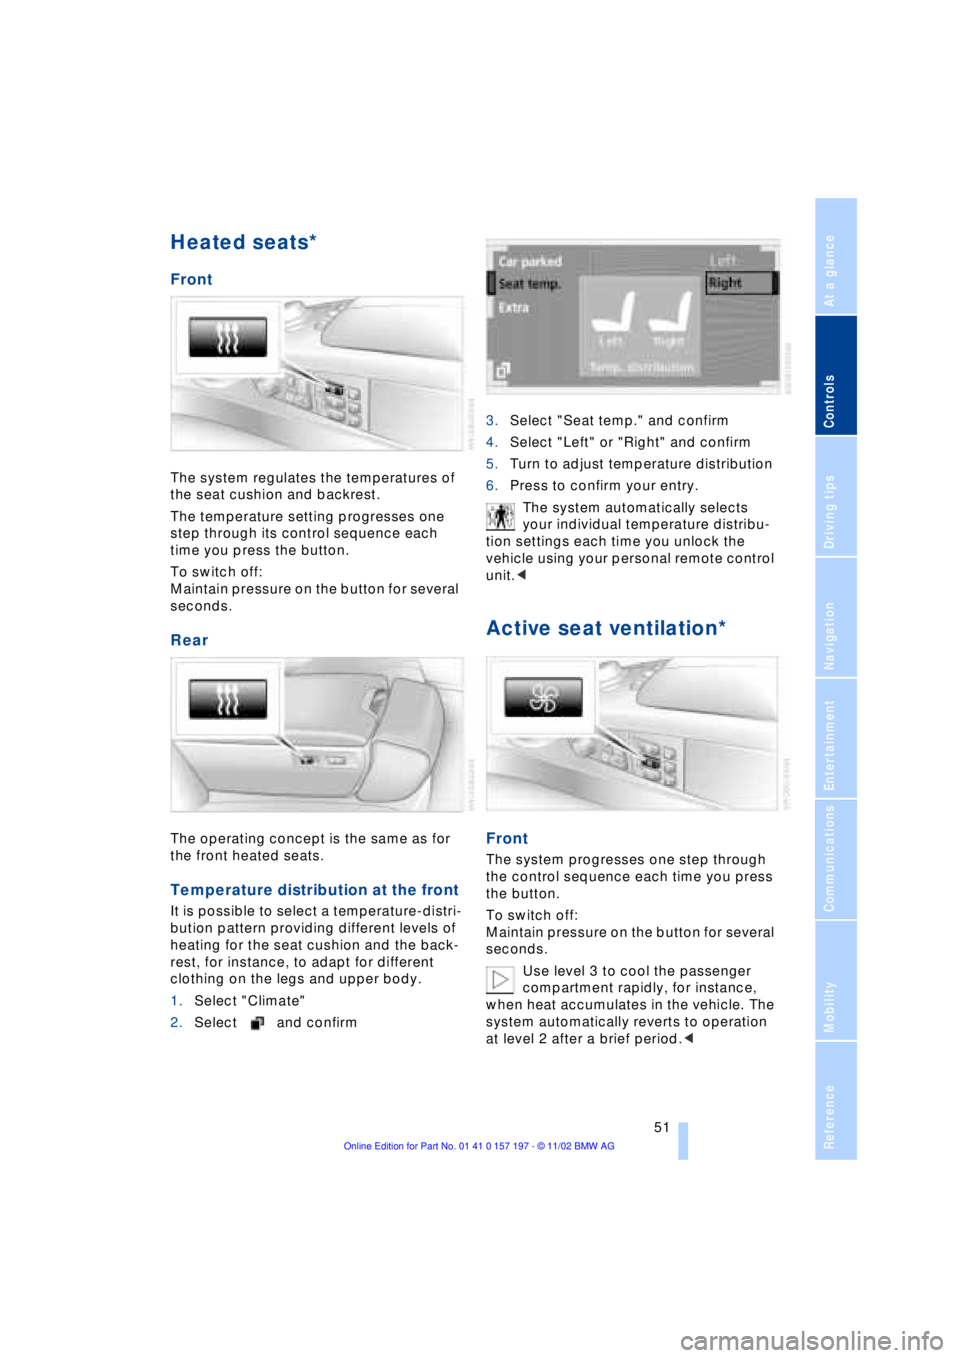
Heated seats*
Front
The system regulates the temperatures of
the seat cushion and backrest.
The temperature setting progresses one
step through its control sequence each
time you press the button.
To switch off:
Maintain pressure on the button for several
seconds.
Rear
The operating concept is the same as for
the front heated seats.
Temperature distribution at the front
It is possible to select a temperature-distri-
bution pattern providing different levels of
heating for the seat cushion and the back-
rest, for instance, to adapt for different
clothing on the legs and upper body.
1.Select "Climate"
2.Select and confirm3.Select "Seat temp." and confirm
4.Select "Left" or "Right" and confirm
5.Turn to adjust temperature distribution
6.Press to confirm your entry.
The system automatically selects
your individual temperature distribu-
tion settings each time you unlock the
vehicle using your personal remote control
unit.<
Active seat ventilation*
Front
The system progresses one step through
the control sequence each time you press
the button.
To switch off:
Maintain pressure on the button for several
seconds.
Use level 3 to cool the passenger
compartment rapidly, for instance,
when heat accumulates in the vehicle. The
system automatically reverts to operation
at level 2 after a brief period.<
Page 55 of 229
At a glance
Controls
Driving tips
Communications
Navigation
Entertainment
Mobility
Reference
53
The mirrors automatically revert to their
clear, undimmed mode whenever you
place the selector lever into reverse.
For trouble-free operation, keep the
photocells clean and do not cover the
area between the interior rearview mirror
and the windshield. Do not attach any kind
of stickers on the windshield in front of the
mirror, either.<
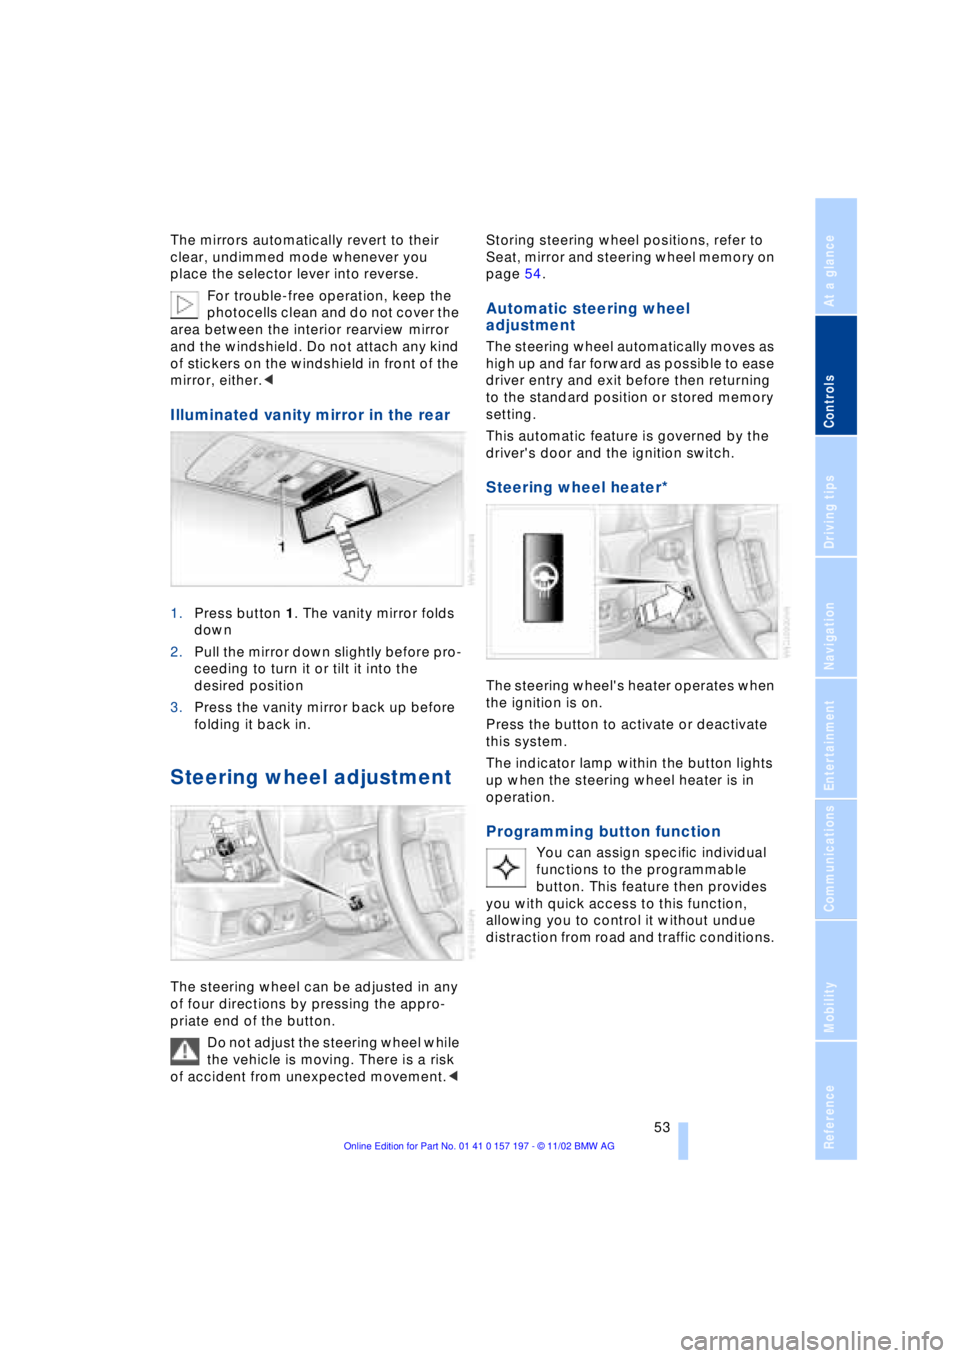
Illuminated vanity mirror in the rear
1.Press button 1. The vanity mirror folds
down
2.Pull the mirror down slightly before pro-
ceeding to turn it or tilt it into the
desired position
3.Press the vanity mirror back up before
folding it back in.
Steering wheel adjustment
The steering wheel can be adjusted in any
of four directions by pressing the appro-
priate end of the button.
Do not adjust the steering wheel while
the vehicle is moving. There is a risk
of accident from unexpected movement.< Storing steering wheel positions, refer to
Seat, mirror and steering wheel memory on
page 54.
Automatic steering wheel
adjustment
The steering wheel automatically moves as
high up and far forward as possible to ease
driver entry and exit before then returning
to the standard position or stored memory
setting.
This automatic feature is governed by the
driver's door and the ignition switch.
Steering wheel heater*
The steering wheel's heater operates when
the ignition is on.
Press the button to activate or deactivate
this system.
The indicator lamp within the button lights
up when the steering wheel heater is in
operation.
Programming button function
You can assign specific individual
functions to the programmable
button. This feature then provides
you with quick access to this function,
allowing you to control it without undue
distraction from road and traffic conditions.
Page 56 of 229
Adjustments
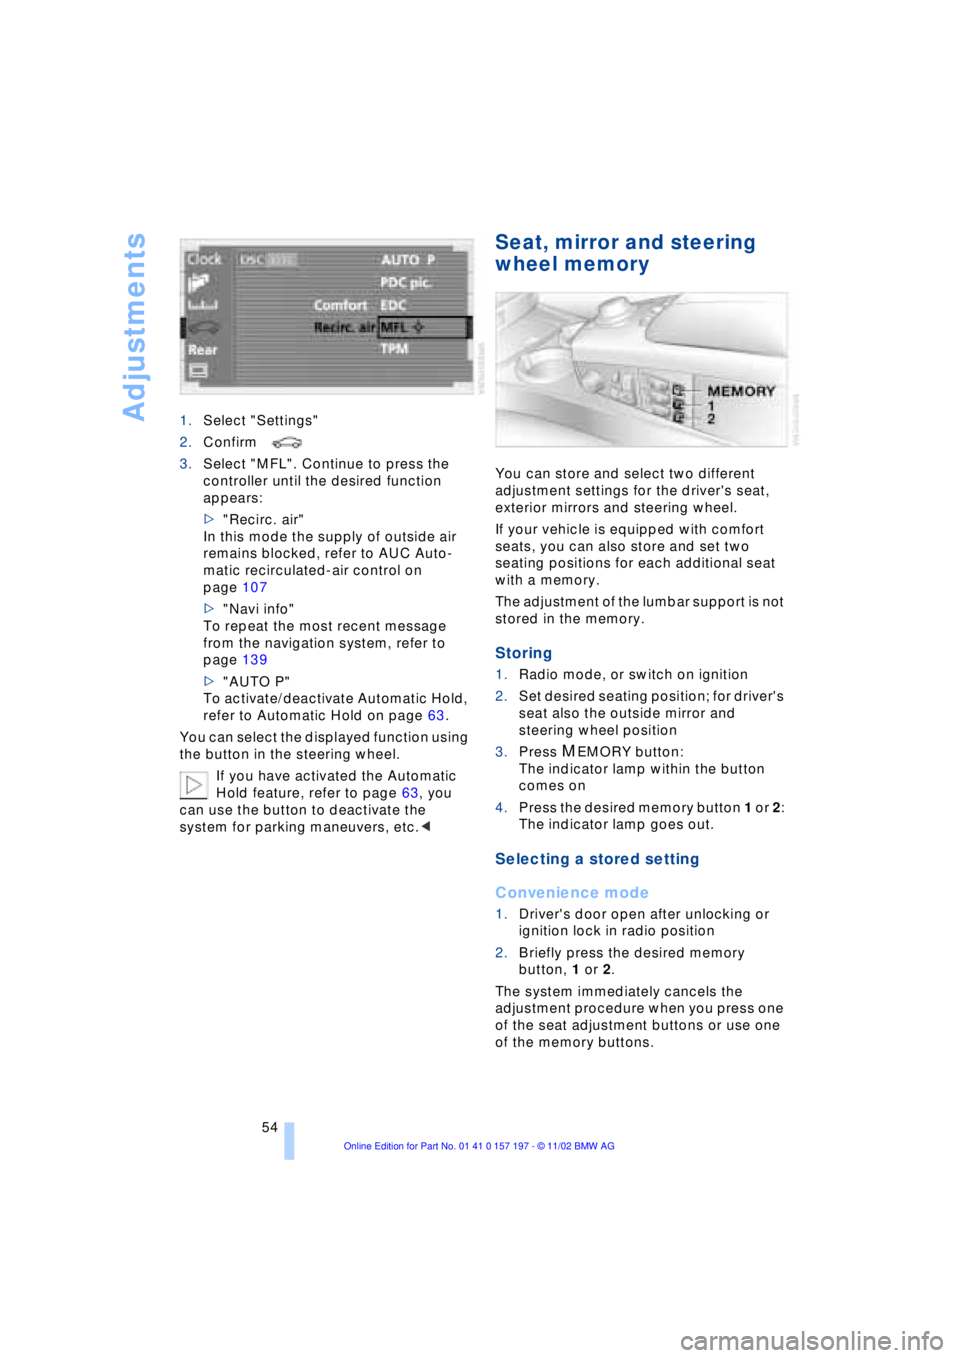
54 1.Select "Settings"
2.Confirm
3.Select "MFL". Continue to press the
controller until the desired function
appears:
>"Recirc. air"
In this mode the supply of outside air
remains blocked, refer to AUC Auto-
matic recirculated-air control on
page 107
>"Navi info"
To repeat the most recent message
from the navigation system, refer to
page 139
>"AUTO P"
To activate/deactivate Automatic Hold,
refer to Automatic Hold on page 63.
You can select the displayed function using
the button in the steering wheel.
If you have activated the Automatic
Hold feature, refer to page 63, you
can use the button to deactivate the
system for parking maneuvers, etc.<
Seat, mirror and steering
wheel memory
You can store and select two different
adjustment settings for the driver's seat,
exterior mirrors and steering wheel.
If your vehicle is equipped with comfort
seats, you can also store and set two
seating positions for each additional seat
with a memory.
The adjustment of the lumbar support is not
stored in the memory.
Storing
1.Radio mode, or switch on ignition
2.Set desired seating position; for driver's
seat also the outside mirror and
steering wheel position
3.Press
MEMORY button:
The indicator lamp within the button
comes on
4.Press the desired memory button 1 or 2:
The indicator lamp goes out.
Selecting a stored setting
Convenience mode
1.Driver's door open after unlocking or
ignition lock in radio position
2.Briefly press the desired memory
button, 1 or 2.
The system immediately cancels the
adjustment procedure when you press one
of the seat adjustment buttons or use one
of the memory buttons.
Page 59 of 229
At a glance
Controls
Driving tips
Communications
Navigation
Entertainment
Mobility
Reference
57
near the side airbag. Therefore, we recom-
mend that the rear side airbags, if provided,
be deactivated if you plan to transport chil-
dren in the rear seat.
The rear seat side airbags may already
have been deactivated, either at the time of
manufacture or by a BMW center. Labels in
the rear door opening should indicate the
status of your rear seat side airbags. If you
are uncertain of their status, or wish to have
the airbags activated or deactivated,
please contact your BMW center.<
Even when all these guidelines are
observed, there is still a small residual risk
of injuries to the face, hands and arms
occurring from airbag deployment in iso-
lated instances. The ignition and inflation
noise may provoke a mild temporary
hearing loss in extremely sensitive individ-
uals.
Airbag warning information is also provided
on the sun visors.
Indicator lamp
The indicator lamp shows the
airbag and belt-tensioner system's
operational status as soon as you
insert the remote control unit in the ignition.
System operational:
>The indicator lamp comes on briefly.
System malfunction:
>The indicator lamp fails to come on or
>it remains on continuously.
A system malfunction could prevent the
system from responding to an impact
occurring within its normal response range.
Please respond to any signs of malfunction
by having the airbag system inspected
immediately at a BMW center.
Transporting children safely
Commercially-available child-restraint sys-
tems are designed to be secured with a lap
belt or with the lap belt portion of a combi-
nation lap/shoulder belt. Improperly or
inadequately installed restraint systems can increase the risk of injury to children.
Always read and follow the instructions that
come with the system.
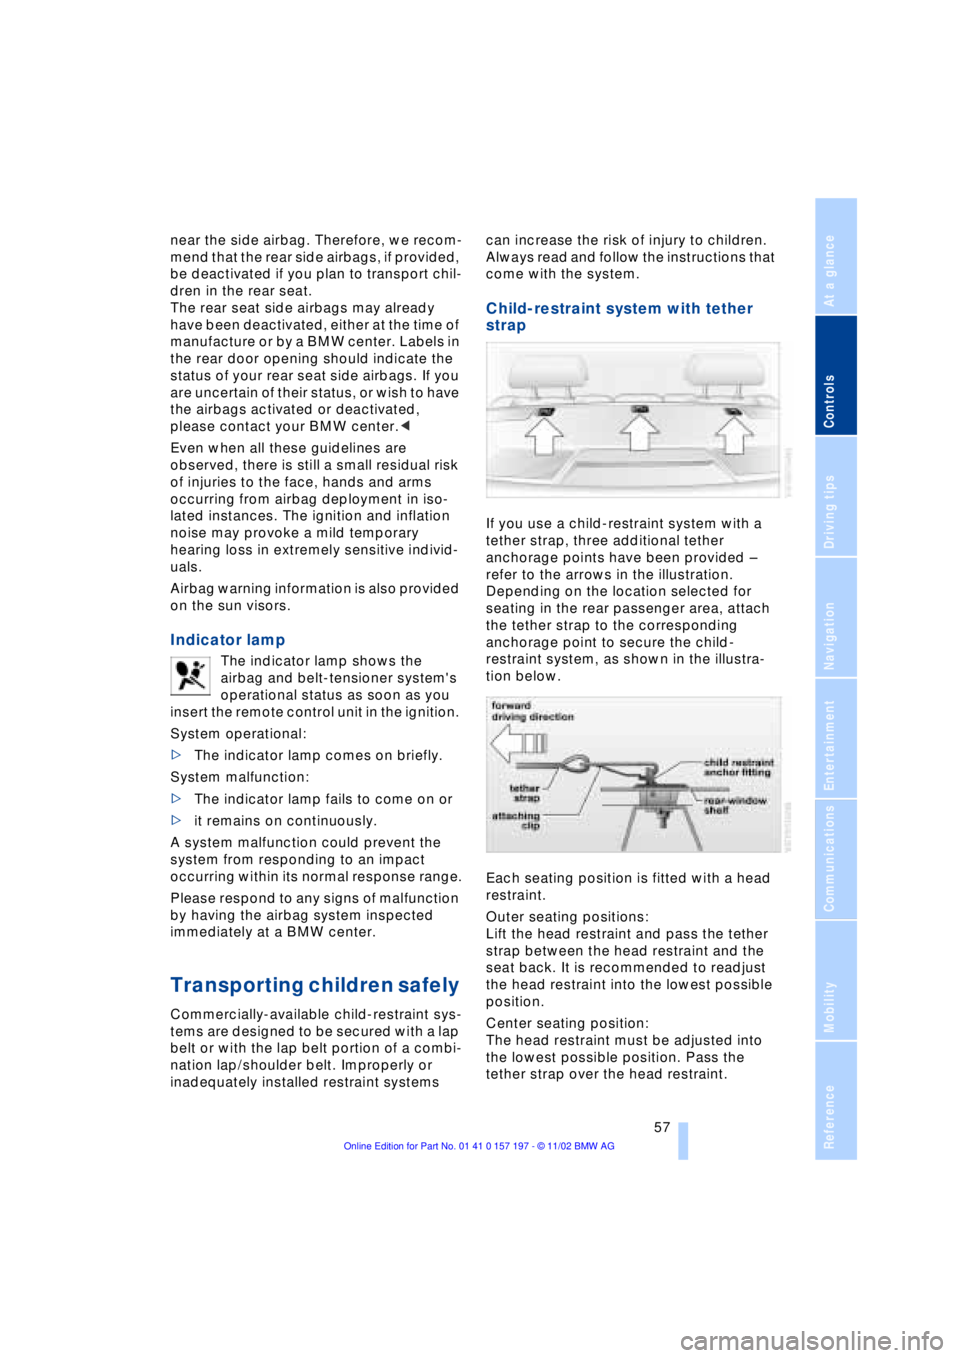
Child-restraint system with tether
strap
If you use a child-restraint system with a
tether strap, three additional tether
anchorage points have been provided Ð
refer to the arrows in the illustration.
Depending on the location selected for
seating in the rear passenger area, attach
the tether strap to the corresponding
anchorage point to secure the child-
restraint system, as shown in the illustra-
tion below.
Each seating position is fitted with a head
restraint.
Outer seating positions:
Lift the head restraint and pass the tether
strap between the head restraint and the
seat back. It is recommended to readjust
the head restraint into the lowest possible
position.
Center seating position:
The head restraint must be adjusted into
the lowest possible position. Pass the
tether strap over the head restraint.
Page 61 of 229
At a glance
Controls
Driving tips
Communications
Navigation
Entertainment
Mobility
Reference
59
LATCH* child-restraint
system
LATCH: Lower Anchor and Tethers for
CHildren.
If the vehicle is equipped with electric
power seats, these must be returned
to their standard adjustment setting before
a LATCH child-restraint system can be
used, refer to page 47.<
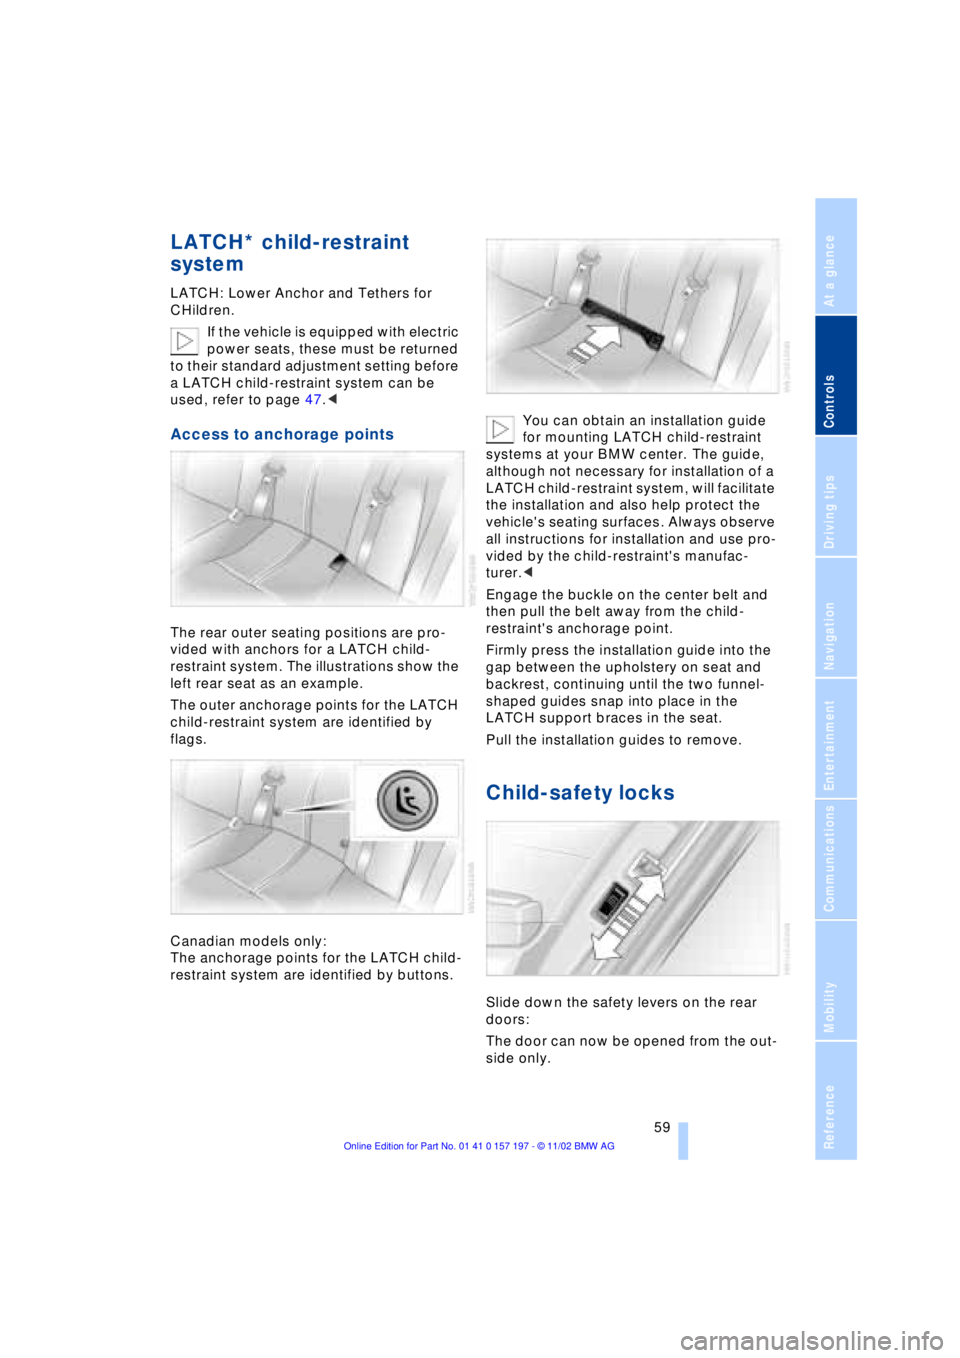
Access to anchorage points
The rear outer seating positions are pro-
vided with anchors for a LATCH child-
restraint system. The illustrations show the
left rear seat as an example.
The outer anchorage points for the LATCH
child-restraint system are identified by
flags.
Canadian models only:
The anchorage points for the LATCH child-
restraint system are identified by buttons.You can obtain an installation guide
for mounting LATCH child-restraint
systems at your BMW center. The guide,
although not necessary for installation of a
LATCH child-restraint system, will facilitate
the installation and also help protect the
vehicle's seating surfaces. Always observe
all instructions for installation and use pro-
vided by the child-restraint's manufac-
turer.<
Engage the buckle on the center belt and
then pull the belt away from the child-
restraint's anchorage point.
Firmly press the installation guide into the
gap between the upholstery on seat and
backrest, continuing until the two funnel-
shaped guides snap into place in the
LATCH support braces in the seat.
Pull the installation guides to remove.
Child-safety locks
Slide down the safety levers on the rear
doors:
The door can now be opened from the out-
side only.