2003 BMW 760LI SEDAN reset
[x] Cancel search: resetPage 16 of 229
Cockpit
14
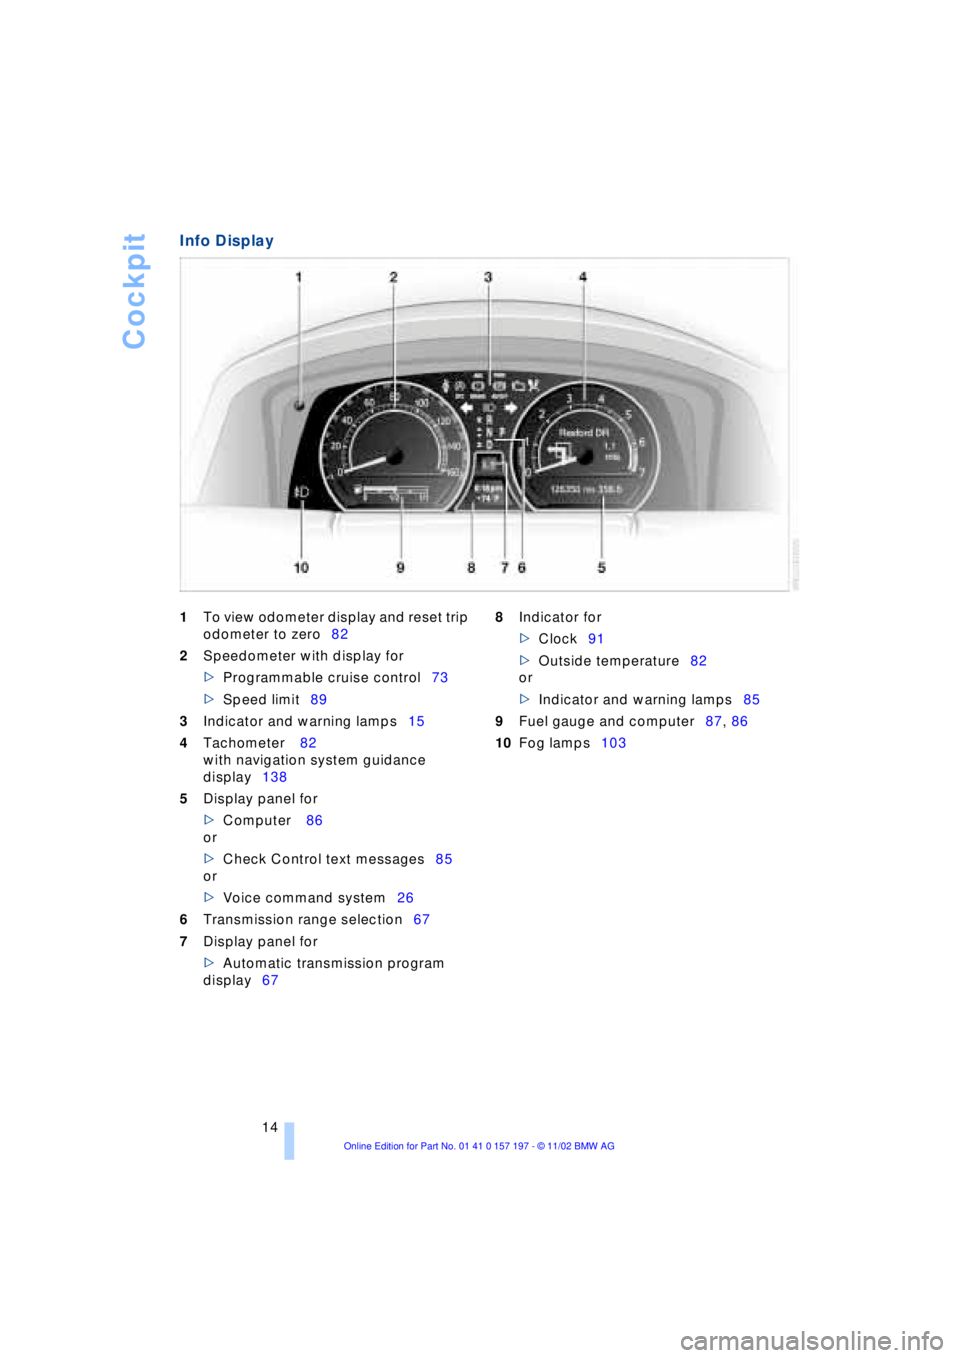
Info Display
1To view odometer display and reset trip
odometer to zero82
2Speedometer with display for
>Programmable cruise control73
>Speed limit89
3Indicator and warning lamps15
4Tachometer 82
with navigation system guidance
display138
5Display panel for
>Computer 86
or
>Check Control text messages85
or
>Voice command system26
6Transmission range selection67
7Display panel for
>Automatic transmission program
display67 8Indicator for
>Clock91
>Outside temperature82
or
>Indicator and warning lamps85
9Fuel gauge and computer87, 86
10Fog lamps103
Page 49 of 229
At a glance
Controls
Driving tips
Communications
Navigation
Entertainment
Mobility
Reference
47
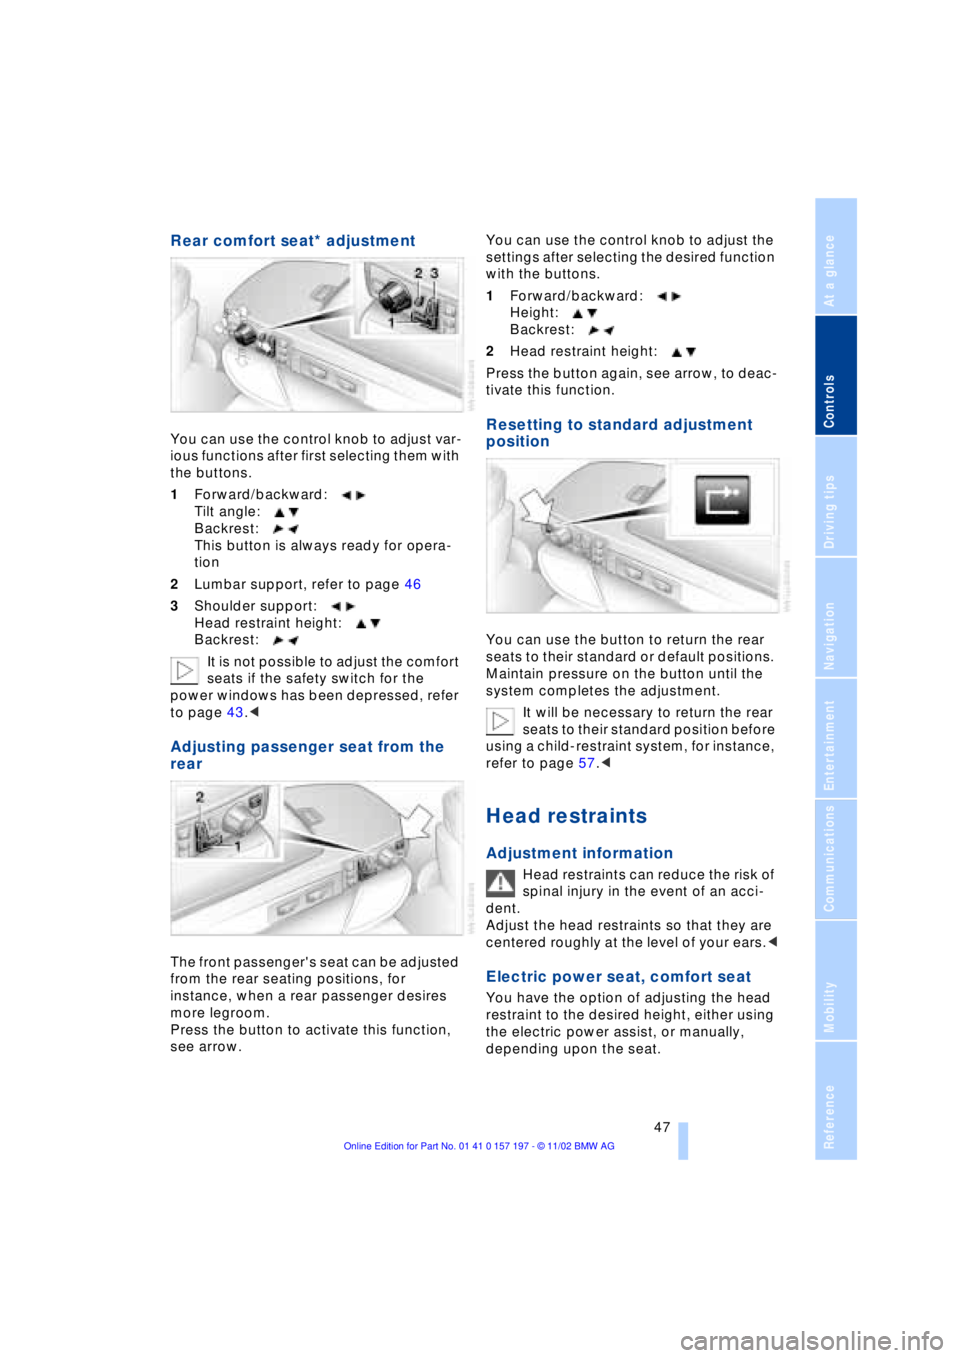
Rear comfort seat* adjustment
You can use the control knob to adjust var-
ious functions after first selecting them with
the buttons.
1Forward/backward:
Tilt angle:
Backrest:
This button is always ready for opera-
tion
2Lumbar support, refer to page 46
3Shoulder support:
Head restraint height:
Backrest:
It is not possible to adjust the comfort
seats if the safety switch for the
power windows has been depressed, refer
to page 43.<
Adjusting passenger seat from the
rear
The front passenger's seat can be adjusted
from the rear seating positions, for
instance, when a rear passenger desires
more legroom.
Press the button to activate this function,
see arrow. You can use the control knob to adjust the
settings after selecting the desired function
with the buttons.
1Forward/backward:
Height:
Backrest:
2Head restraint height:
Press the button again, see arrow, to deac-
tivate this function.
Resetting to standard adjustment
position
You can use the button to return the rear
seats to their standard or default positions.
Maintain pressure on the button until the
system completes the adjustment.
It will be necessary to return the rear
seats to their standard position before
using a child-restraint system, for instance,
refer to page 57.<
Head restraints
Adjustment information
Head restraints can reduce the risk of
spinal injury in the event of an acci-
dent.
Adjust the head restraints so that they are
centered roughly at the level of your ears.<
Electric power seat, comfort seat
You have the option of adjusting the head
restraint to the desired height, either using
the electric power assist, or manually,
depending upon the seat.
Page 62 of 229
Adjustments
60
Vehicle Memory, Key
Memory
How the system functions
Doubtless you have often reflected on how
great it would be if you could configure
your vehicle's various adjustment settings
to meet your own personal requirements. In
developing your vehicle, BMW has incor-
porated a number of options for personal
adjustment which you can set in the Con-
trol Center. You can have these pro-
grammed at your BMW center.
The available configuration settings fall into
two categories, according to whether their
primary orientation is the vehicle Ð Vehicle
Memory Ð or the individual Ð Key Memory.
You can have up to four different basic set-
tings adjusted for four different persons.
The only requirement is that each person
uses his or her own remote control.
When your vehicle is unlocked with the
remote control, the vehicle recognizes the
individual user by means of a data
exchange with the key, and makes adjust-
ments accordingly.
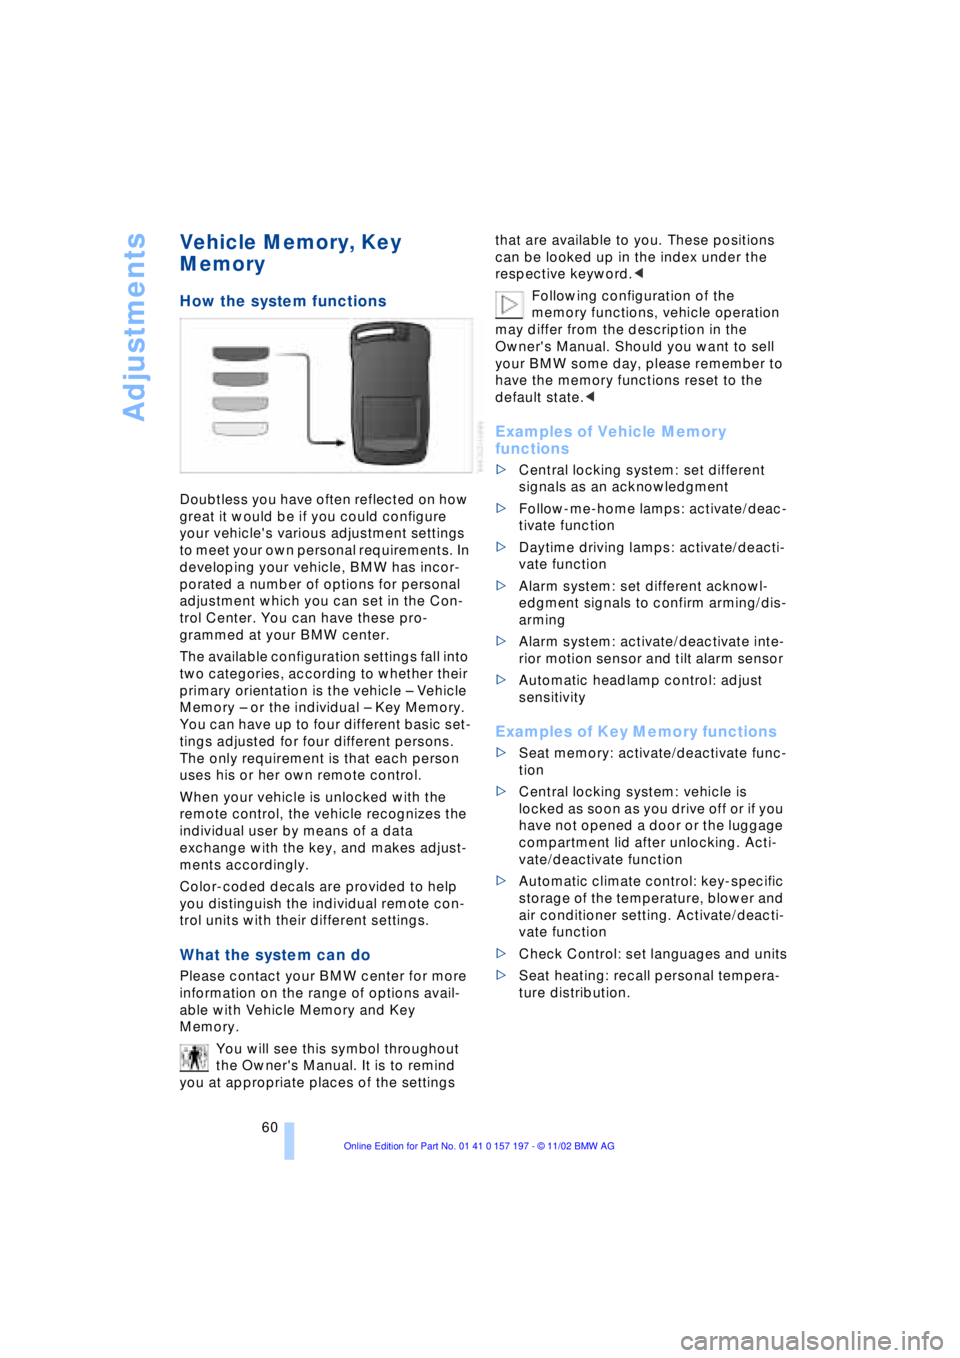
Color-coded decals are provided to help
you distinguish the individual remote con-
trol units with their different settings.
What the system can do
Please contact your BMW center for more
information on the range of options avail-
able with Vehicle Memory and Key
Memory.
You will see this symbol throughout
the Owner's Manual. It is to remind
you at appropriate places of the settings that are available to you. These positions
can be looked up in the index under the
respective keyword.<
Following configuration of the
memory functions, vehicle operation
may differ from the description in the
Owner's Manual. Should you want to sell
your BMW some day, please remember to
have the memory functions reset to the
default state.<
Examples of Vehicle Memory
functions
>Central locking system: set different
signals as an acknowledgment
>Follow-me-home lamps: activate/deac-
tivate function
>Daytime driving lamps: activate/deacti-
vate function
>Alarm system: set different acknowl-
edgment signals to confirm arming/dis-
arming
>Alarm system: activate/deactivate inte-
rior motion sensor and tilt alarm sensor
>Automatic headlamp control: adjust
sensitivity
Examples of Key Memory functions
>Seat memory: activate/deactivate func-
tion
>Central locking system: vehicle is
locked as soon as you drive off or if you
have not opened a door or the luggage
compartment lid after unlocking. Acti-
vate/deactivate function
>Automatic climate control: key-specific
storage of the temperature, blower and
air conditioner setting. Activate/deacti-
vate function
>Check Control: set languages and units
>Seat heating: recall personal tempera-
ture distribution.
Page 75 of 229
At a glance
Controls
Driving tips
Communications
Navigation
Entertainment
Mobility
Reference
73
Selecting wiper fold-out position
Important for changing wiper blades, when
folding away from windshield to prevent
blades from sticking when ice forms, etc.
1.Switch off the engine and remove the
remote control unit from the ignition
lock
2.Press the wiper lever up and maintain
pressure for about 3 seconds until the
wipers are roughly vertical Ð this is the
fold-out position.
After folding the wipers back against the
windshield you will need to reactivate the
wiper system:
1.Insert the remote control unit to activate
the radio mode in the ignition lock
2.Apply brief upward pressure to the
wiper lever. The wipers return to their
retracted position and are ready for
normal operation.
To prevent damage to the wipers,
always fold them back against the
windshield before switching on either the
radio mode or the ignition.<
Washer fluid
Windshield and headlamp washer
system
Capacity: 6.3 US quarts (6 liters).
Fill with water and Ð if required Ð with a
washer antifreeze, according to manufac-
turer's recommendations.
We recommend that you mix the
washer fluid before adding it to the
reservoir.< Washer fluid antifreeze is flammable.
Always keep it well away from sparks
and open flames, and store it in tightly
closed containers well out of the reach of
children. Always observe the instructions
for use provided on the container.<
Programmable cruise
control
The concept
The programmable cruise control is avail-
able for use at speeds of approx. 20 mph
(30 km/h) and higher. The vehicle maintains
and stores the speed that you set using the
lever mounted on the steering column.
You can also use the multilevel preset
mode to store 6 desired speeds for later
selection with the lever on the steering
column, refer to page 75.
This feature assists you in quickly adapting
the vehicle speed to specific road condi-
tions, e.g. changes in speeds limits.
Do not use the cruise control when
driving on winding roads, in case of
heavy traffic or poor road conditions Ð
snow, rain, ice, loose road surface Ð that do
not permit a constant speed.<
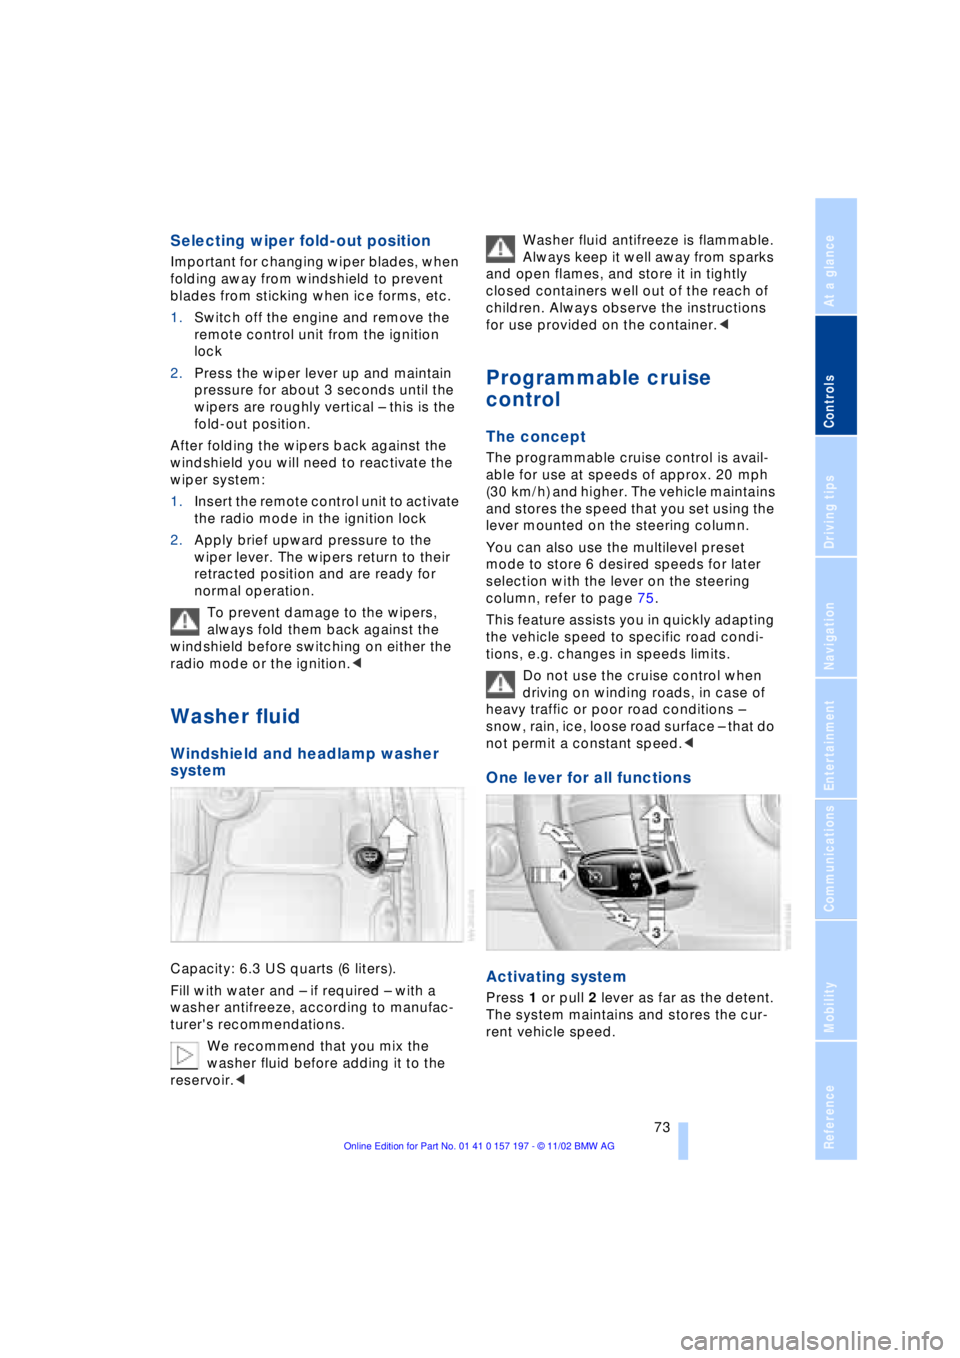
One lever for all functions
Activating system
Press 1 or pull 2 lever as far as the detent.
The system maintains and stores the cur-
rent vehicle speed.
Page 76 of 229
Driving
74
1 Maintaining and storing speed,
accelerating
Press the lever as far as the detent:
The system maintains and stores the cur-
rent vehicle speed. Every time you tap the
lever the vehicle's speed increases by
roughly 1 mph (1 km/h).
Press the lever longer:
The vehicle accelerates without pressure
on the accelerator pedal. The system main-
tains and stores your current speed as
soon as you release the lever.
The vehicle may accelerate beyond
the preset speed on steep downhill
stretches where the engine's braking effect
alone may not be sufficient to slow the
vehicle. Speed can drop on uphill grades if
the engine output is insufficient.<
2 Maintaining and storing speed,
decelerating
Pull lever back to detent:
The system maintains and stores the cur-
rent vehicle speed. Every time you tap the
lever the vehicle's speed decreases by
roughly 1 mph (1 km/h).
Pull the lever longer:
The throttle aperture is automatically
reduced, slowing the vehicle. The system
maintains and stores your current speed as
soon as you release the lever.
3 Interrupting cruise control
Briefly press the lever up or down while the
cruise control is active.
In addition, cruise control is interrupted
automatically
>when you apply pressure to the brake
pedal
>when you select the automatic trans-
mission's neutral range N
>when the DSC system, Dynamic Sta-
bility Control, is in active operation.
4 Recalling stored speed
Briefly press button 4:
The vehicle accelerates to and maintains
the last speed stored.
Deactivating system
When the ignition is switched off, the
system is deactivated and the stored speed
is deleted.
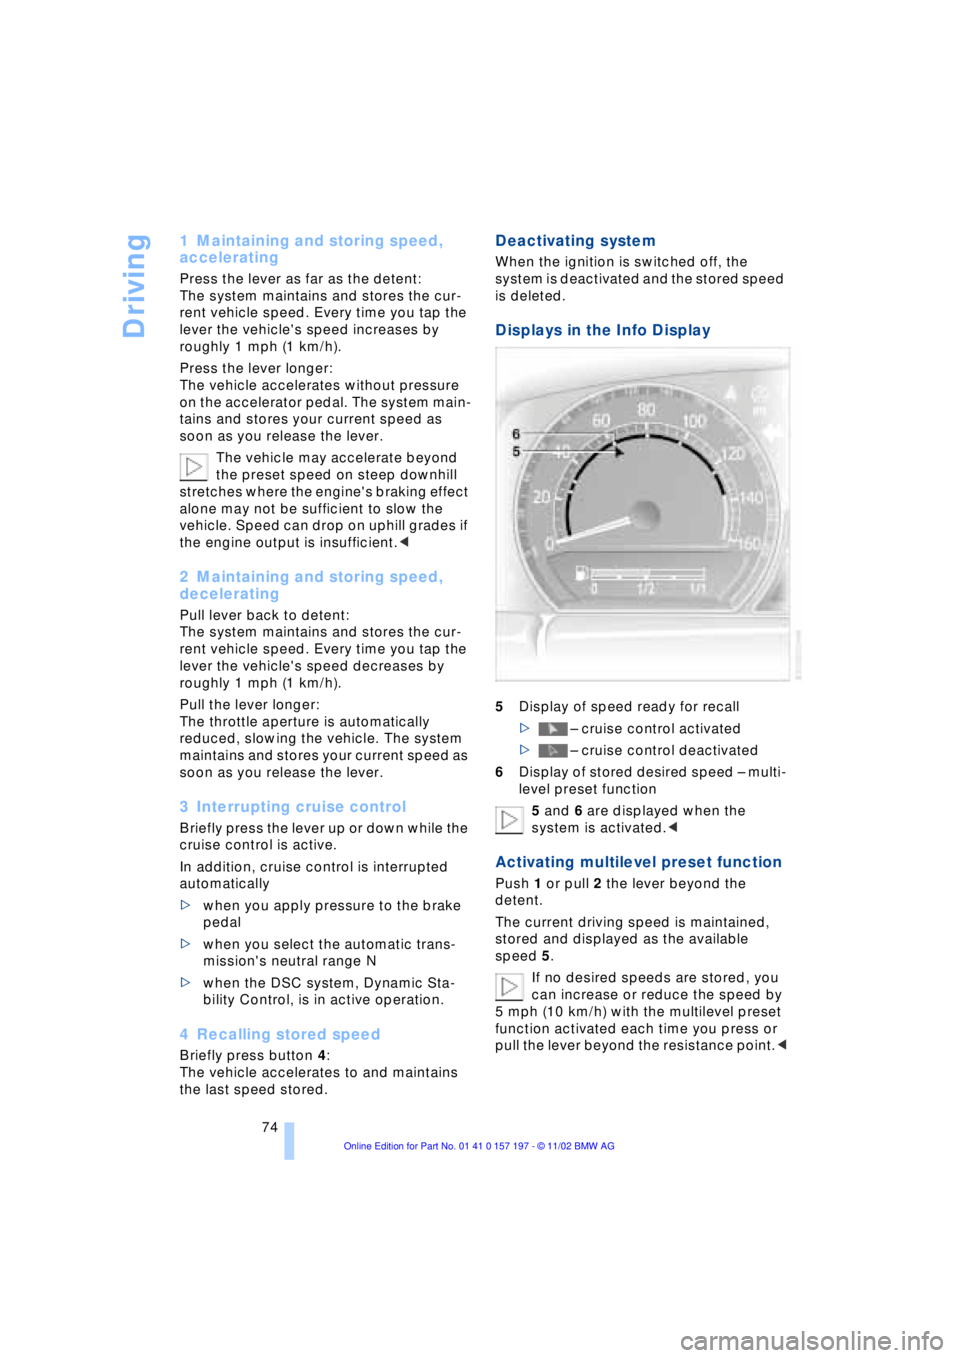
Displays in the Info Display
5Display of speed ready for recall
> Ð cruise control activated
> Ð cruise control deactivated
6Display of stored desired speed Ð multi-
level preset function
5 and 6 are displayed when the
system is activated.<
Activating multilevel preset function
Push 1 or pull 2 the lever beyond the
detent.
The current driving speed is maintained,
stored and displayed as the available
speed 5.
If no desired speeds are stored, you
can increase or reduce the speed by
5 mph (10 km/h) with the multilevel preset
function activated each time you press or
pull the lever beyond the resistance point.<
Page 77 of 229
At a glance
Controls
Driving tips
Communications
Navigation
Entertainment
Mobility
Reference
75
Changing preset level
Push 1 or pull 2 the lever beyond the
detent. The preset speed progresses to the
next desired speed. The lowest speed that
is possible to select is roughly 20 mph
(30 km/h).
Interrupting the cruise control
With the cruise control active, briefly tap
the lever up or down.
Hiding display for multilevel preset
function
When activated, press the lever upward or
downward for approx. 3 seconds.
Showing display for multilevel preset
function again
Press 1 or pull 2 the lever beyond the
detent.
Deactivating the multilevel preset
function
The multilevel preset function is also deac-
tivated when you switch off the ignition.
Storing desired speeds
With vehicle stationary
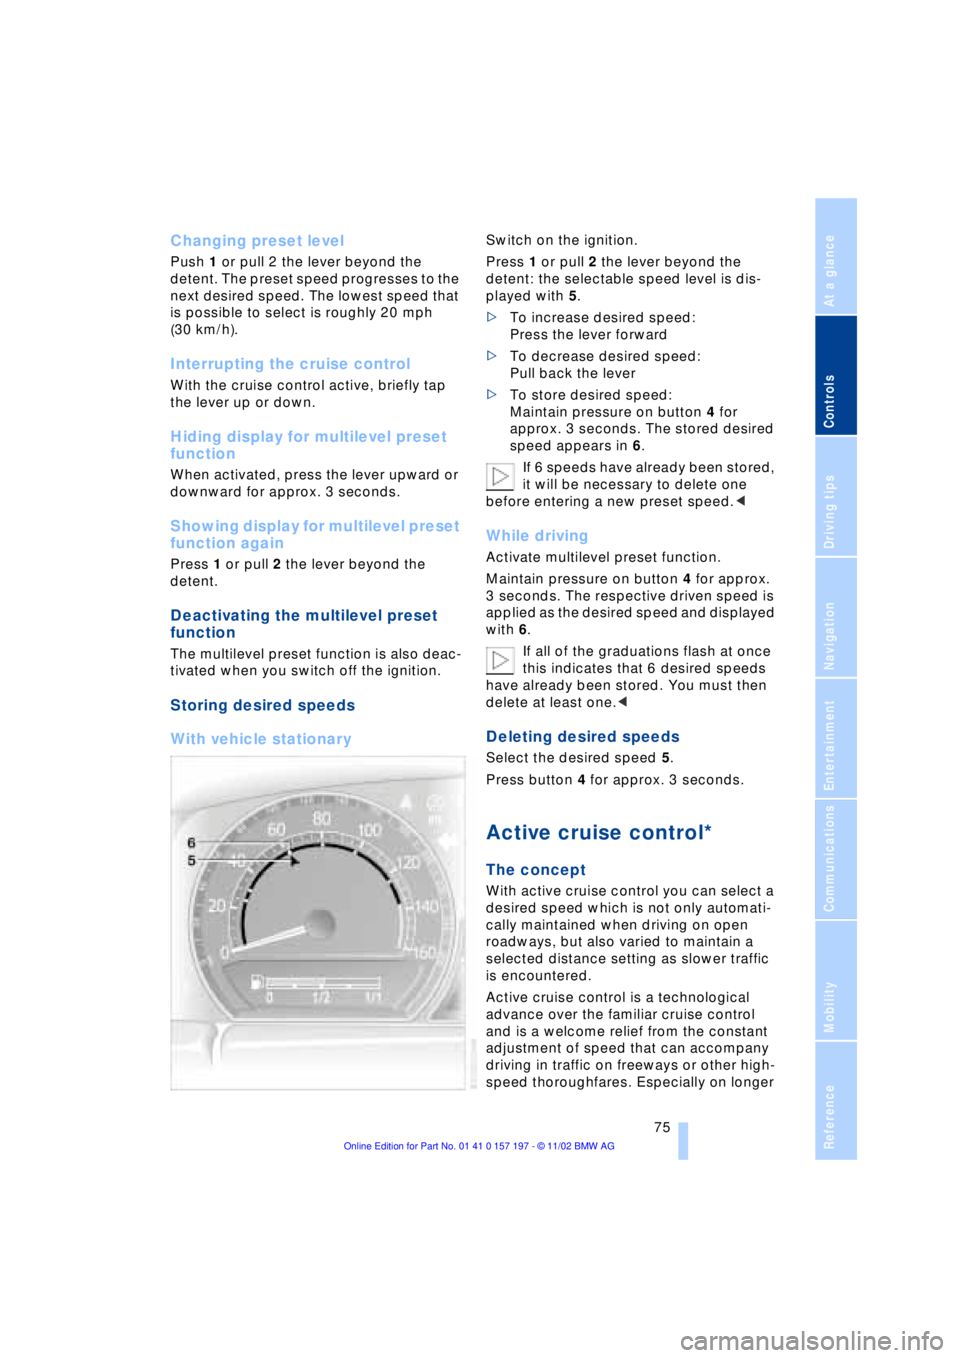
Switch on the ignition.
Press 1 or pull 2 the lever beyond the
detent: the selectable speed level is dis-
played with 5.
>To increase desired speed:
Press the lever forward
>To decrease desired speed:
Pull back the lever
>To store desired speed:
Maintain pressure on button 4 for
approx. 3 seconds. The stored desired
speed appears in 6.
If 6 speeds have already been stored,
it will be necessary to delete one
before entering a new preset speed.<
While driving
Activate multilevel preset function.
Maintain pressure on button 4 for approx.
3 seconds. The respective driven speed is
applied as the desired speed and displayed
with 6.
If all of the graduations flash at once
this indicates that 6 desired speeds
have already been stored. You must then
delete at least one.<
Deleting desired speeds
Select the desired speed 5.
Press button 4 for approx. 3 seconds.
Active cruise control*
The concept
With active cruise control you can select a
desired speed which is not only automati-
cally maintained when driving on open
roadways, but also varied to maintain a
selected distance setting as slower traffic
is encountered.
Active cruise control is a technological
advance over the familiar cruise control
and is a welcome relief from the constant
adjustment of speed that can accompany
driving in traffic on freeways or other high-
speed thoroughfares. Especially on longer
Page 84 of 229
Everything under control
82
Everything under control
Odometer, outside temperature display, clock
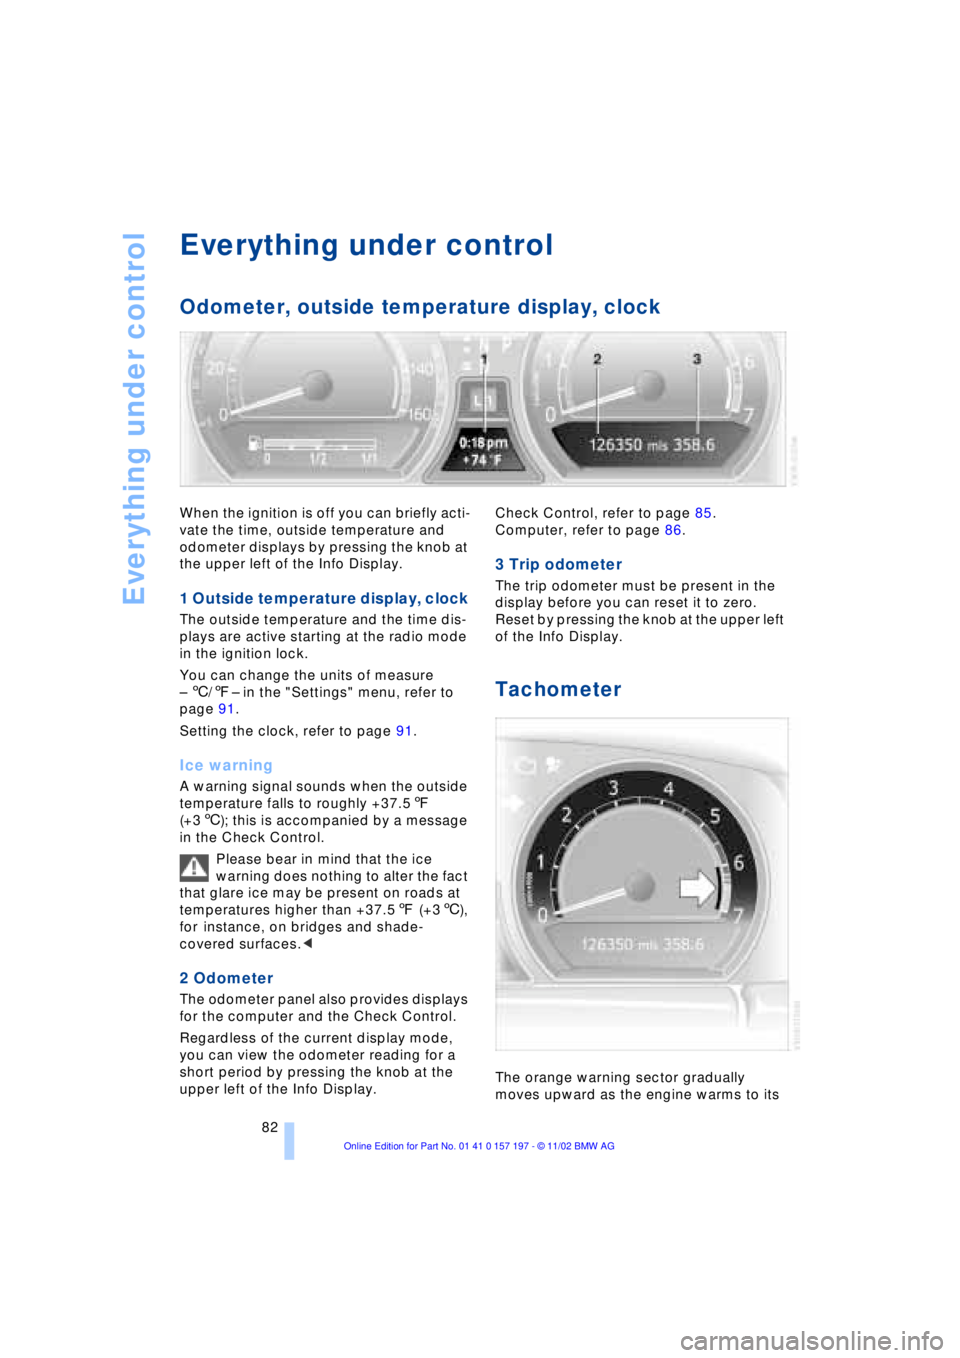
When the ignition is off you can briefly acti-
vate the time, outside temperature and
odometer displays by pressing the knob at
the upper left of the Info Display.
1 Outside temperature display, clock
The outside temperature and the time dis-
plays are active starting at the radio mode
in the ignition lock.
You can change the units of measure
Ð 6/7Ð in the "Settings" menu, refer to
page 91.
Setting the clock, refer to page 91.
Ice warning
A warning signal sounds when the outside
temperature falls to roughly +37.57
(+36); this is accompanied by a message
in the Check Control.
Please bear in mind that the ice
warning does nothing to alter the fact
that glare ice may be present on roads at
temperatures higher than +37.57 (+36),
for instance, on bridges and shade-
covered surfaces.<
2 Odometer
The odometer panel also provides displays
for the computer and the Check Control.
Regardless of the current display mode,
you can view the odometer reading for a
short period by pressing the knob at the
upper left of the Info Display. Check Control, refer to page 85.
Computer, refer to page 86.
3 Trip odometer
The trip odometer must be present in the
display before you can reset it to zero.
Reset by pressing the knob at the upper left
of the Info Display.
Tachometer
The orange warning sector gradually
moves upward as the engine warms to its
Page 86 of 229
Everything under control
84 Confirm to exit the display.
The Service Interval Display does not
continue counting down to the next
service during periods when the vehicle is
stored with the battery disconnected or the
battery switch OFF.
Please remember that brake fluid should
be changed every two years at the latest,
even if the display does not yet indicate
that service is required, refer to page 192.
This same precaution applies to all of the
other service and maintenance operations
scheduled according to periodic intervals,
as opposed to mileage.<
Displaying and entering dates for
legally prescribed emission and
vehicle inspections
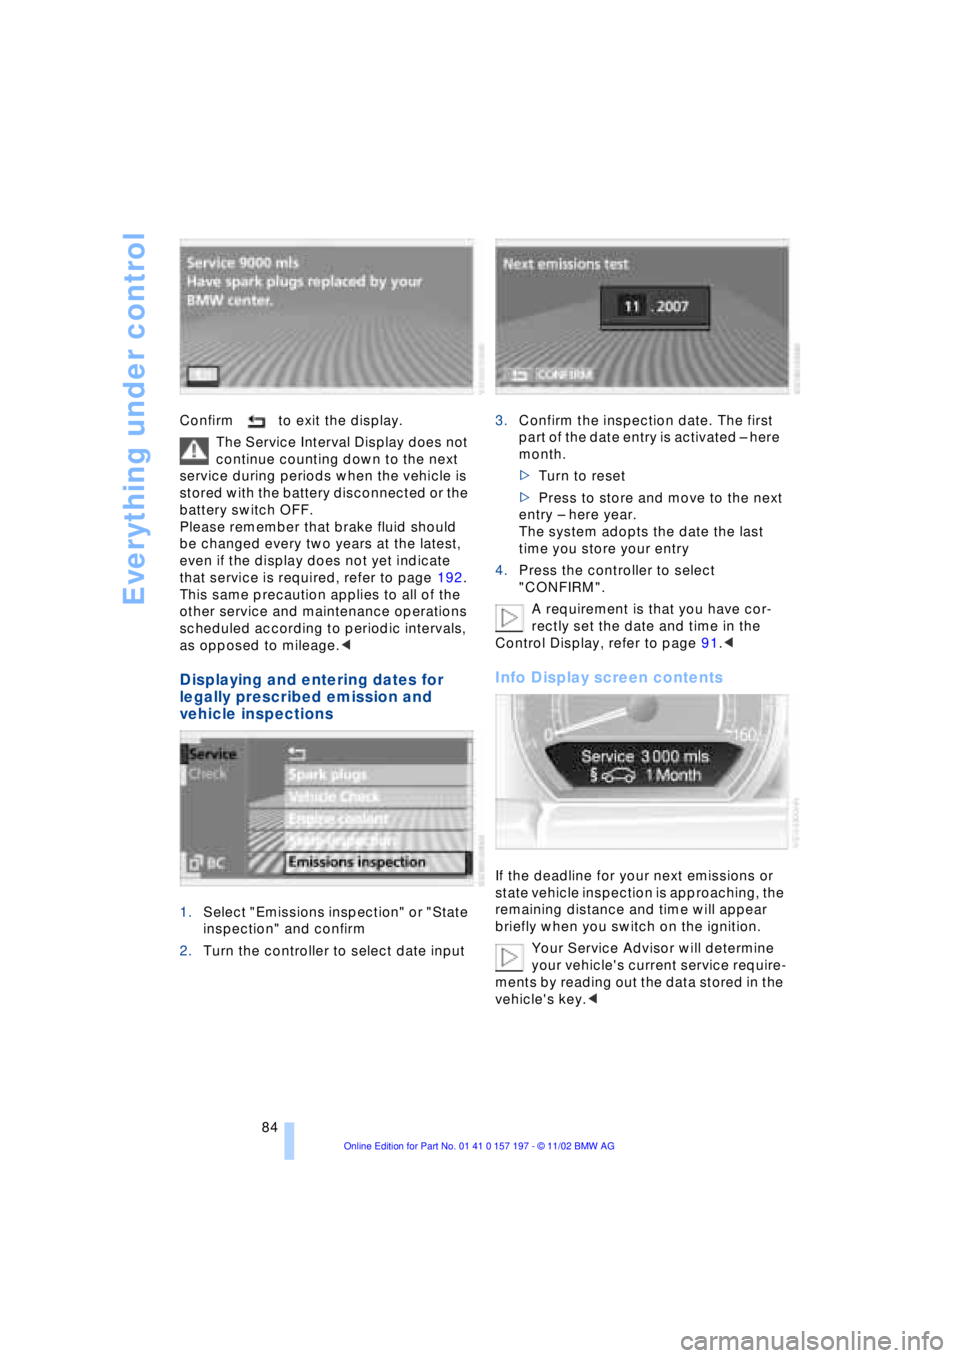
1.Select "Emissions inspection" or "State
inspection" and confirm
2.Turn the controller to select date input3.Confirm the inspection date. The first
part of the date entry is activated Ð here
month.
>Turn to reset
>Press to store and move to the next
entry Ð here year.
The system adopts the date the last
time you store your entry
4.Press the controller to select
"CONFIRM".
A requirement is that you have cor-
rectly set the date and time in the
Control Display, refer to page 91.<
Info Display screen contents
If the deadline for your next emissions or
state vehicle inspection is approaching, the
remaining distance and time will appear
briefly when you switch on the ignition.
Your Service Advisor will determine
your vehicle's current service require-
ments by reading out the data stored in the
vehicle's key.<