2003 BMW 760LI SEDAN clock
[x] Cancel search: clockPage 5 of 229
At a glance
Operation
Driving tips
Communications
Navigation
Entertainment
Mobility
Reference
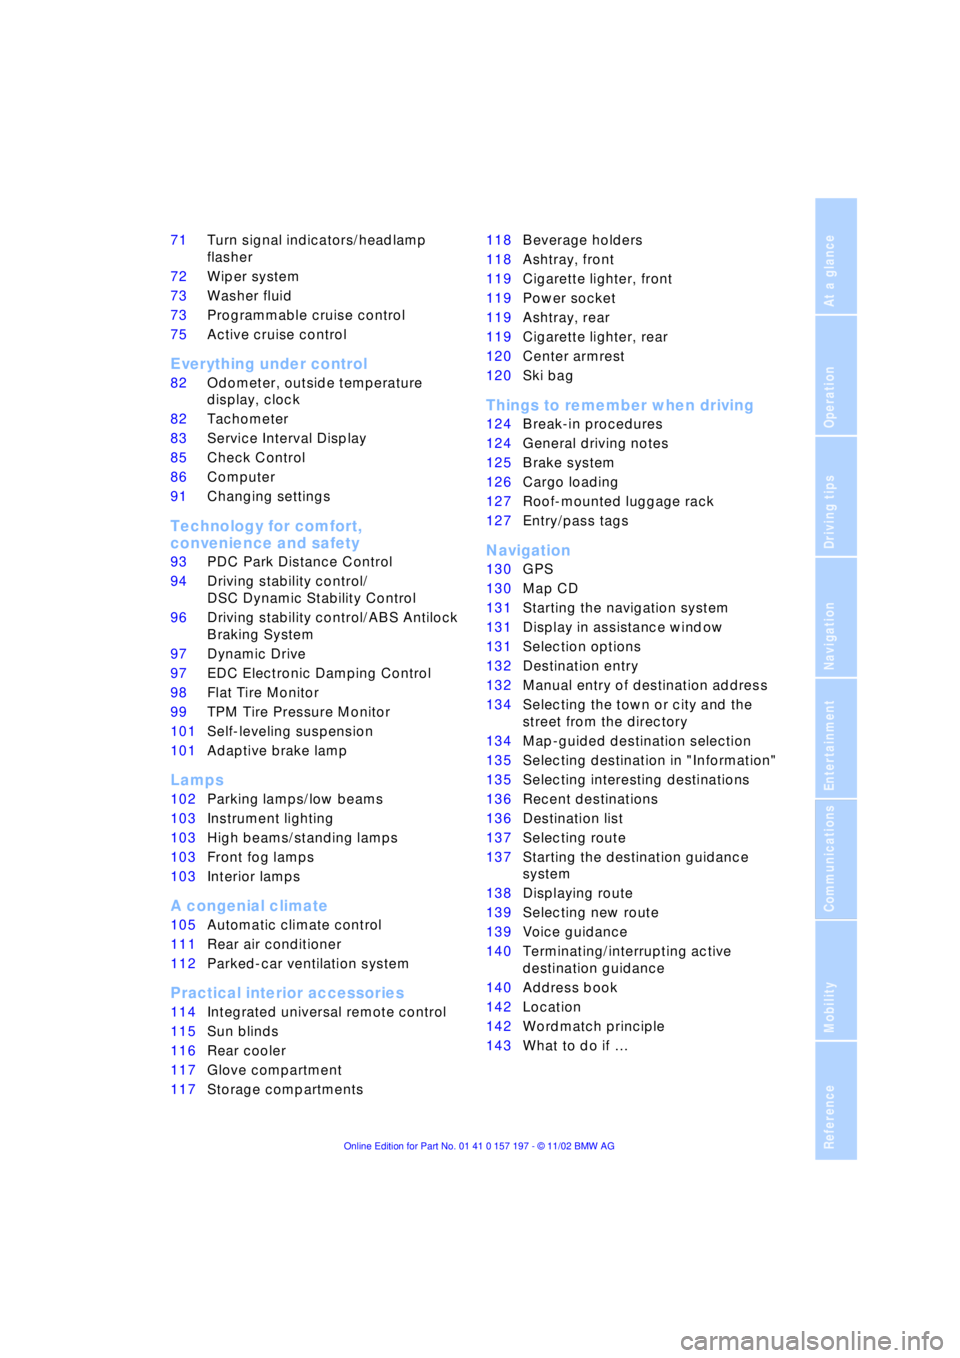
71Turn signal indicators/headlamp
flasher
72Wiper system
73Washer fluid
73Programmable cruise control
75Active cruise control
*
Everything under control
82Odometer, outside temperature
display, clock
82Tachometer
83Service Interval Display
85Check Control
86Computer
91Changing settings
Technology for comfort,
convenience and safety
93PDC Park Distance Control
*
94Driving stability control/
DSC Dynamic Stability Control
96Driving stability control/ABS Antilock
Braking System
97Dynamic Drive
97EDC Electronic Damping Control
*
98Flat Tire Monitor
*
99TPM Tire Pressure Monitor
*
101Self-leveling suspension
*
101Adaptive brake lamp
Lamps
102Parking lamps/low beams
103Instrument lighting
103High beams/standing lamps
103Front fog lamps
103Interior lamps
A congenial climate
105Automatic climate control
111Rear air conditioner
*
112Parked-car ventilation system
Practical interior accessories
114Integrated universal remote control
*
115Sun blinds
*
116Rear cooler
*
117Glove compartment
117Storage compartments118Beverage holders
118Ashtray, front
119Cigarette lighter, front
119Power socket
119Ashtray, rear
119Cigarette lighter, rear
120Center armrest
120Ski bag
*
Things to remember when driving
124Break-in procedures
124General driving notes
125Brake system
126Cargo loading
127Roof-mounted luggage rack
*
127Entry/pass tags
Navigation
130GPS
130Map CD
131Starting the navigation system
131Display in assistance window
*
131Selection options
132Destination entry
132Manual entry of destination address
134Selecting the town or city and the
street from the directory
134Map-guided destination selection
135Selecting destination in "Information"
135Selecting interesting destinations
136Recent destinations
136Destination list
137Selecting route
137Starting the destination guidance
system
138Displaying route
139Selecting new route
139Voice guidance
140Terminating/interrupting active
destination guidance
140Address book
142Location
142Wordmatch principle
143What to do if É
Page 16 of 229
Cockpit
14
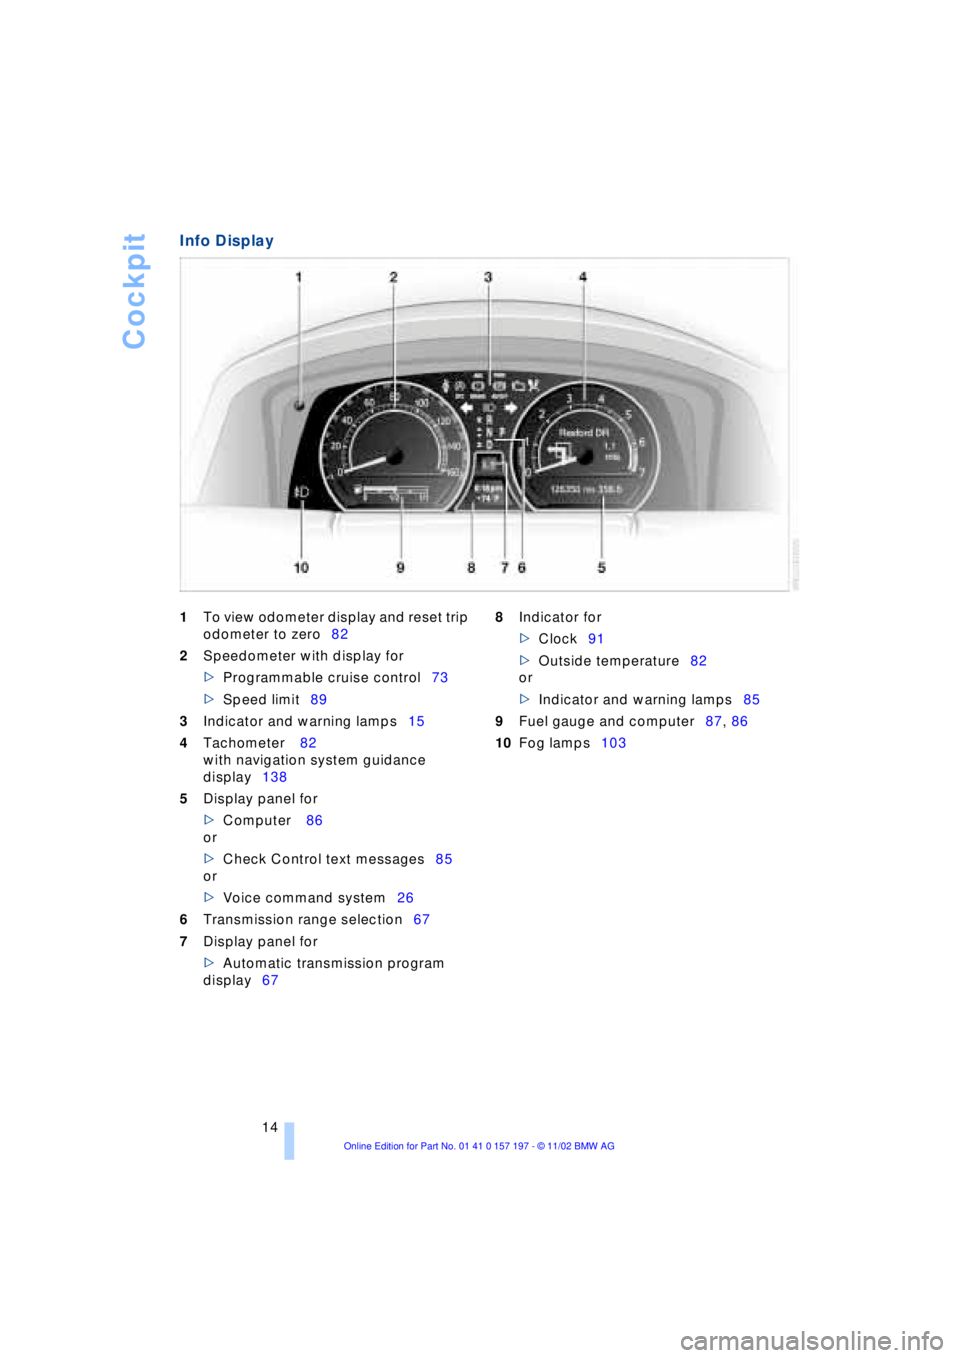
Info Display
1To view odometer display and reset trip
odometer to zero82
2Speedometer with display for
>Programmable cruise control73
>Speed limit89
3Indicator and warning lamps15
4Tachometer 82
with navigation system guidance
display138
5Display panel for
>Computer 86
or
>Check Control text messages85
or
>Voice command system26
6Transmission range selection67
7Display panel for
>Automatic transmission program
display67 8Indicator for
>Clock91
>Outside temperature82
or
>Indicator and warning lamps85
9Fuel gauge and computer87, 86
10Fog lamps103
Page 22 of 229
Control Center
20
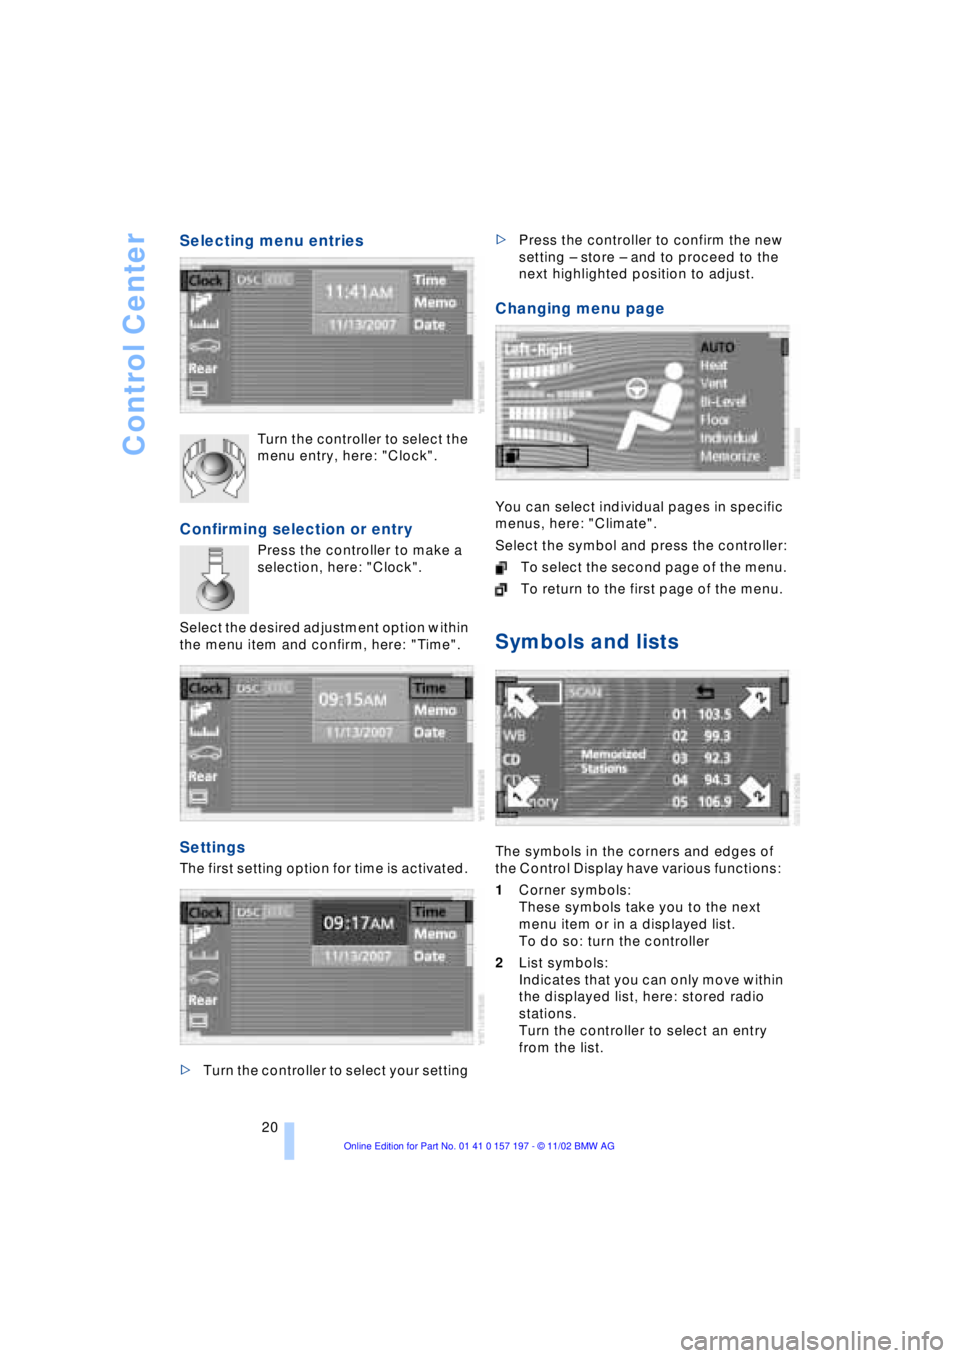
Selecting menu entries
Turn the controller to select the
menu entry, here: "Clock".
Confirming selection or entry
Press the controller to make a
selection, here: "Clock".
Select the desired adjustment option within
the menu item and confirm, here: "Time".
Settings
The first setting option for time is activated.
>Turn the controller to select your setting >Press the controller to confirm the new
setting Ð store Ð and to proceed to the
next highlighted position to adjust.
Changing menu page
You can select individual pages in specific
menus, here: "Climate".
Select the symbol and press the controller:
To select the second page of the menu.
To return to the first page of the menu.
Symbols and lists
The symbols in the corners and edges of
the Control Display have various functions:
1Corner symbols:
These symbols take you to the next
menu item or in a displayed list.
To do so: turn the controller
2List symbols:
Indicates that you can only move within
the displayed list, here: stored radio
stations.
Turn the controller to select an entry
from the list.
Page 47 of 229
At a glance
Controls
Driving tips
Communications
Navigation
Entertainment
Mobility
Reference
45
Adjustments
Sit safely
The ideal sitting position can make a vital
contribution to relaxed driving that is as
fatigue-free as possible. The sitting posi-
tion plays an important role together with
the safety belts and airbags in providing
occupants with maximum levels of passive
safety in an accident. To ensure that the
safety systems operate with optimal effi-
ciency, we strongly urge you to observe the
instructions contained in the following sec-
tion.
For additional information on transporting
children safely, refer to page 57.
Sitting safely with airbags
Always maintain an adequate dis-
tance between yourself and the air-
bags. Always hold the steering wheel by
its rim with hands at the 9 o'clock and
3 o'clock positions, to minimize the risk of
injuries to your hands and arms in the event
of airbag deployment.
No one and nothing is to come between the
airbags and the seat occupant.
To prevent possible leg injuries should the
knee airbag deploy in an accident, ensure
that the front passenger assumes a correct
sitting position. Do not use the cover of the
front airbag on the front passenger side as
a storage area for objects, or as a rest for
feet or legs.<
For airbag locations and additional infor-
mation on airbags, refer to page 55.
Safe sitting position with safety belts
For the safety of all vehicle occupants,
please comply with the following instruc-
tions for wearing safety belts.
Never allow more than one person to
wear a single safety belt. Never allow
infants or small children to ride in a pas-
senger's lap.
Avoid twisting the belt while routing it firmly
across the hips and shoulder. Wear it as snugly against your body as possible. Do
not allow the belt to rest against hard or
fragile objects.
Do not route the belt across your neck, or
run it across sharp edges. Be sure that the
belt does not become caught or jammed.
Avoid wearing loose or bulky clothing that
would prevent the belt from resting
securely against your body; pull on the
shoulder strap periodically to keep it ten-
sioned.
In the event of a frontal impact, a loose lap
belt could slide over your hips, leading to
abdominal injury. In addition, the safety
belt's restraint effectiveness is reduced if
the belt is worn loosely.
Expectant mothers should always wear
their safety belts, taking care to position
the lap belt against the lower hips, where it
will not exert pressure against the abdom-
inal area.<
For putting on safety belts, refer to
page 50.
Seats
For your personal safety when adjusting
the seat position, please follow the instruc-
tions below carefully.
Never attempt to adjust your seat
while operating the vehicle. The seat
could respond with unexpected move-
ment, and the ensuing loss of vehicle con-
trol could lead to an accident.
Never recline the backrest to an extremely
horizontal position while operating the
vehicle Ð this precaution is especially
important for front passengers and the
occupants of electric power rear seats to
remember. Failure to observe these pre-
cautions can prevent the belts from pro-
viding effective protection against injury, as
passengers could slide under the belts in
an accident.<
Page 72 of 229
Driving
70 To obtain maximum acceleration, for
passing maneuvers, etc., during
operation in the manual mode, use the
kickdown or downshift manually.<
Malfunctions
A status report will appear in the Check
Control to alert you to any malfunctions in
the transmission-control system. Please
note any supplementary information that
appears in the Control Display. The direc-
tional arrows also start to flash in the Info
Display.
While it will remain still possible to move
the selector lever to any desired position,
the transmission will revert to operation in
its default mode with only a limited number
of forward gears.
Some types of malfunction will make it
impossible to engage all gears.
The engine may respond with reduced
output when accelerating from a standing
start.
If this happens, avoid extreme engine loads
and consult the nearest BMW center.
If no status messages appear in the
Info Display you should accelerate
carefully to confirm that you are driving in
the desired direction.
Never work in the engine compartment
with any of the forward or reverse gears
engaged, as the vehicle could start to
move. Engage the parking brake, refer to
page 62.<
Releasing transmission lockout
manually
You can respond to any interruptions in the
supply of electrical power, for instance, if
the battery is discharged or disconnected,
by releasing the transmission lockout man-
ually.
To prevent the drive wheels from
locking up and sliding, the transmis-
sion lockout must always be released man-
ually before the vehicle is towed.< Press the brake pedal before
releasing the transmission lockout
manually. If the brakes are not applied, the
vehicle could start to roll if parked on a
steep slope.
The transmission lockout should only be
released for towing. Remember to engage
the transmission lockout when you repark
the vehicle after moving it.
Should it also be necessary to release the
parking brake manually, owing to a dis-
charged battery, etc., always adhere to the
following sequence:
1.Start by manually releasing the parking
brake, refer to page 65
2.Then proceed to manually release the
transmission lockout.<
Jump-starting and towing, refer to
pages 202 and 203.
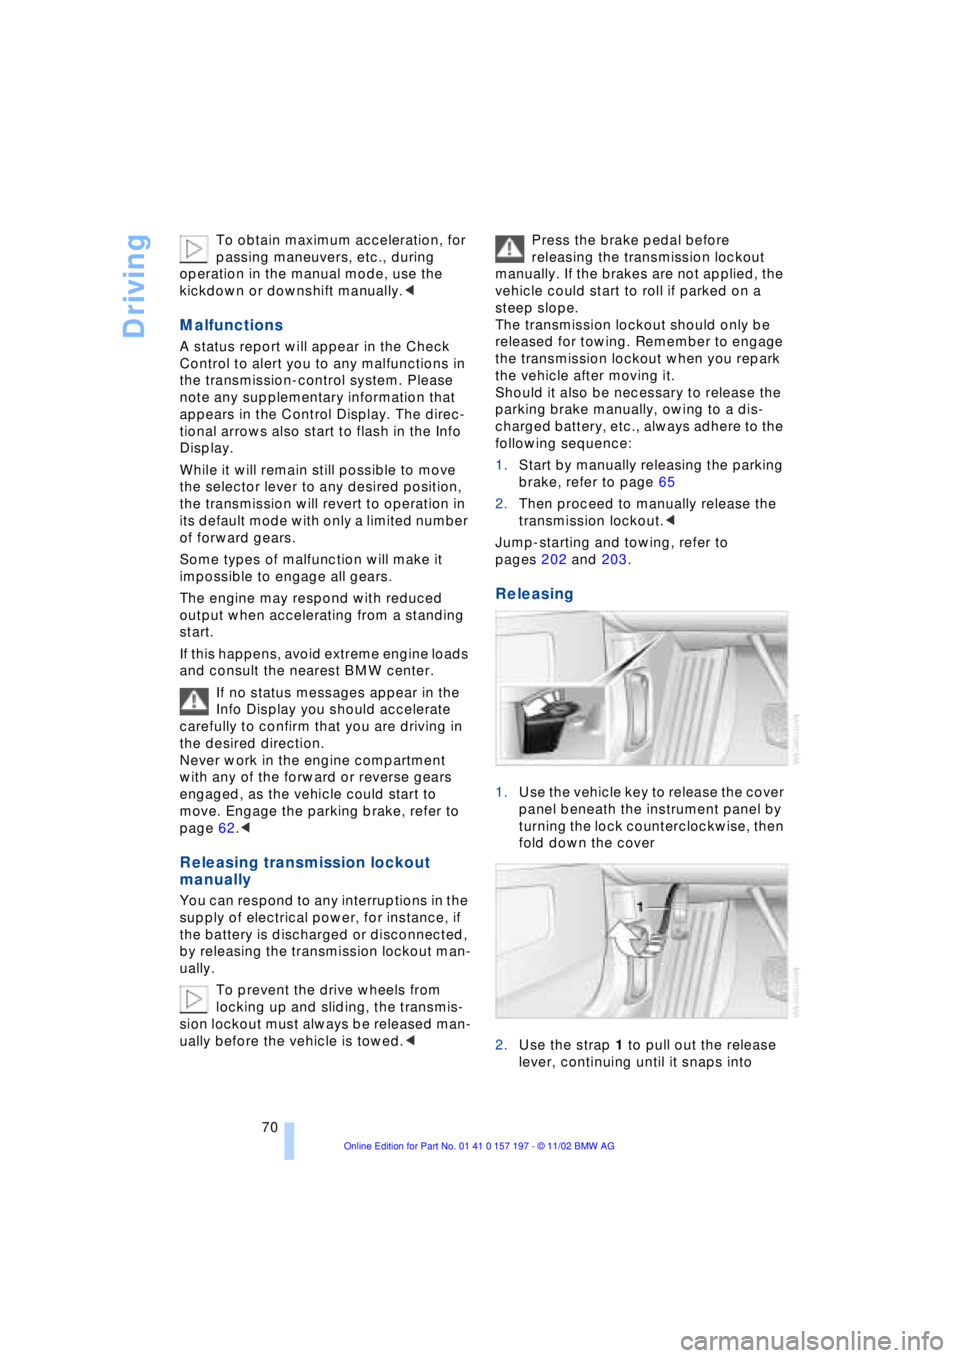
Releasing
1.Use the vehicle key to release the cover
panel beneath the instrument panel by
turning the lock counterclockwise, then
fold down the cover
2.Use the strap 1 to pull out the release
lever, continuing until it snaps into
Page 84 of 229
Everything under control
82
Everything under control
Odometer, outside temperature display, clock
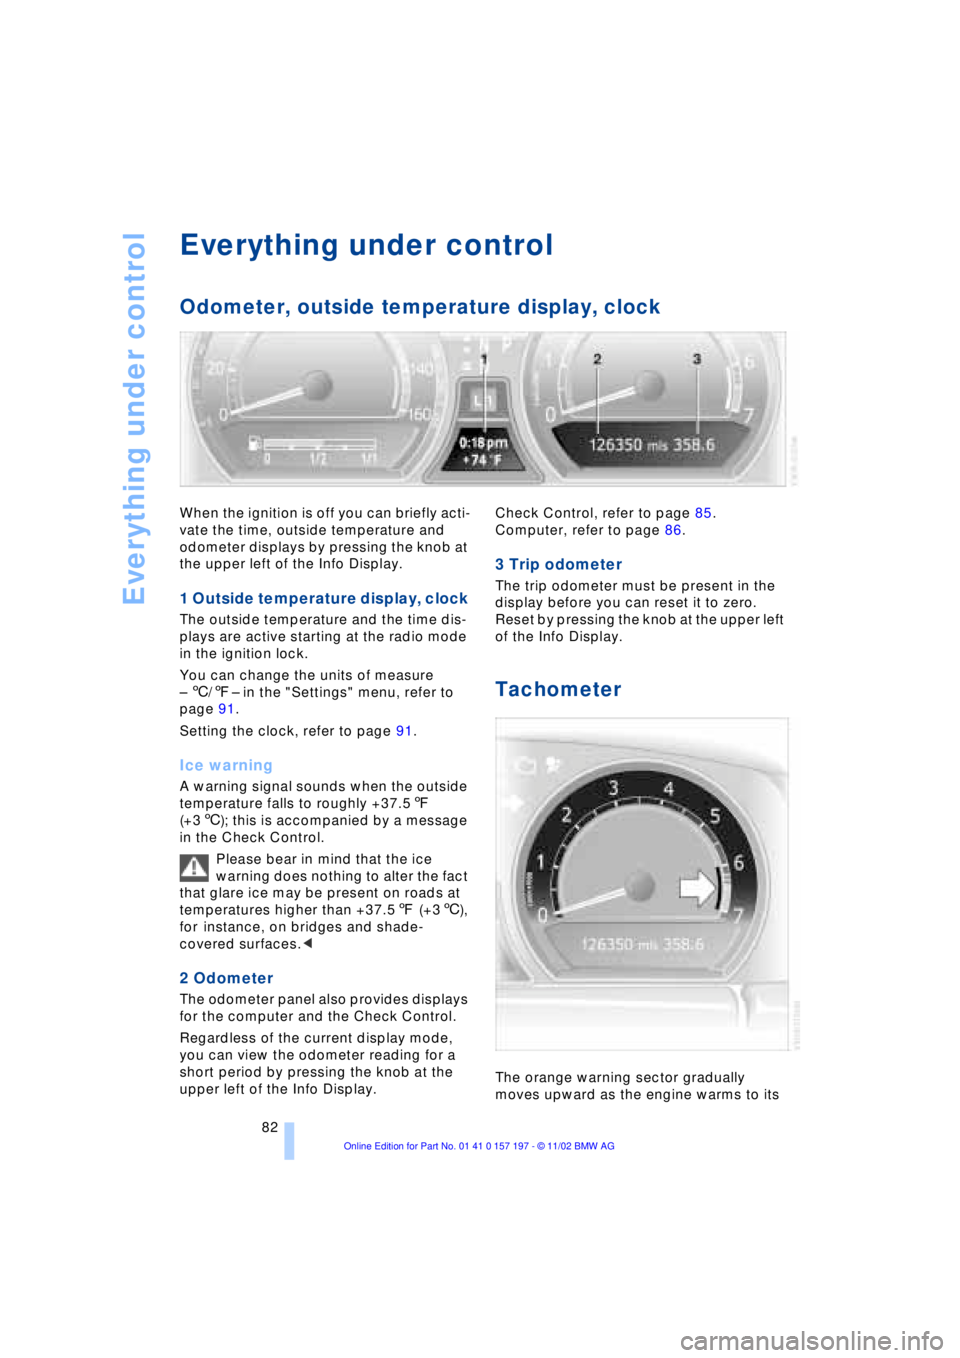
When the ignition is off you can briefly acti-
vate the time, outside temperature and
odometer displays by pressing the knob at
the upper left of the Info Display.
1 Outside temperature display, clock
The outside temperature and the time dis-
plays are active starting at the radio mode
in the ignition lock.
You can change the units of measure
Ð 6/7Ð in the "Settings" menu, refer to
page 91.
Setting the clock, refer to page 91.
Ice warning
A warning signal sounds when the outside
temperature falls to roughly +37.57
(+36); this is accompanied by a message
in the Check Control.
Please bear in mind that the ice
warning does nothing to alter the fact
that glare ice may be present on roads at
temperatures higher than +37.57 (+36),
for instance, on bridges and shade-
covered surfaces.<
2 Odometer
The odometer panel also provides displays
for the computer and the Check Control.
Regardless of the current display mode,
you can view the odometer reading for a
short period by pressing the knob at the
upper left of the Info Display. Check Control, refer to page 85.
Computer, refer to page 86.
3 Trip odometer
The trip odometer must be present in the
display before you can reset it to zero.
Reset by pressing the knob at the upper left
of the Info Display.
Tachometer
The orange warning sector gradually
moves upward as the engine warms to its
Page 93 of 229
At a glance
Controls
Driving tips
Communications
Navigation
Entertainment
Mobility
Reference
91
Importing display
1.Select the desired function and confirm
Ð here, computer "BC"
2.Select and confirm. This resets
the stopwatch to zero and then restarts
it. The function appears in the assis-
tance window.
The symbol is highlighted if
the function displayed in the asssis-
tance window is selected in the Control
Display. You can also choose to view brief
help texts explaining selected menu
entries, refer to page 23, or the travel route
on vehicles equipped with a GPS naviga-
tion system, refer to page 131.<
Changing settings
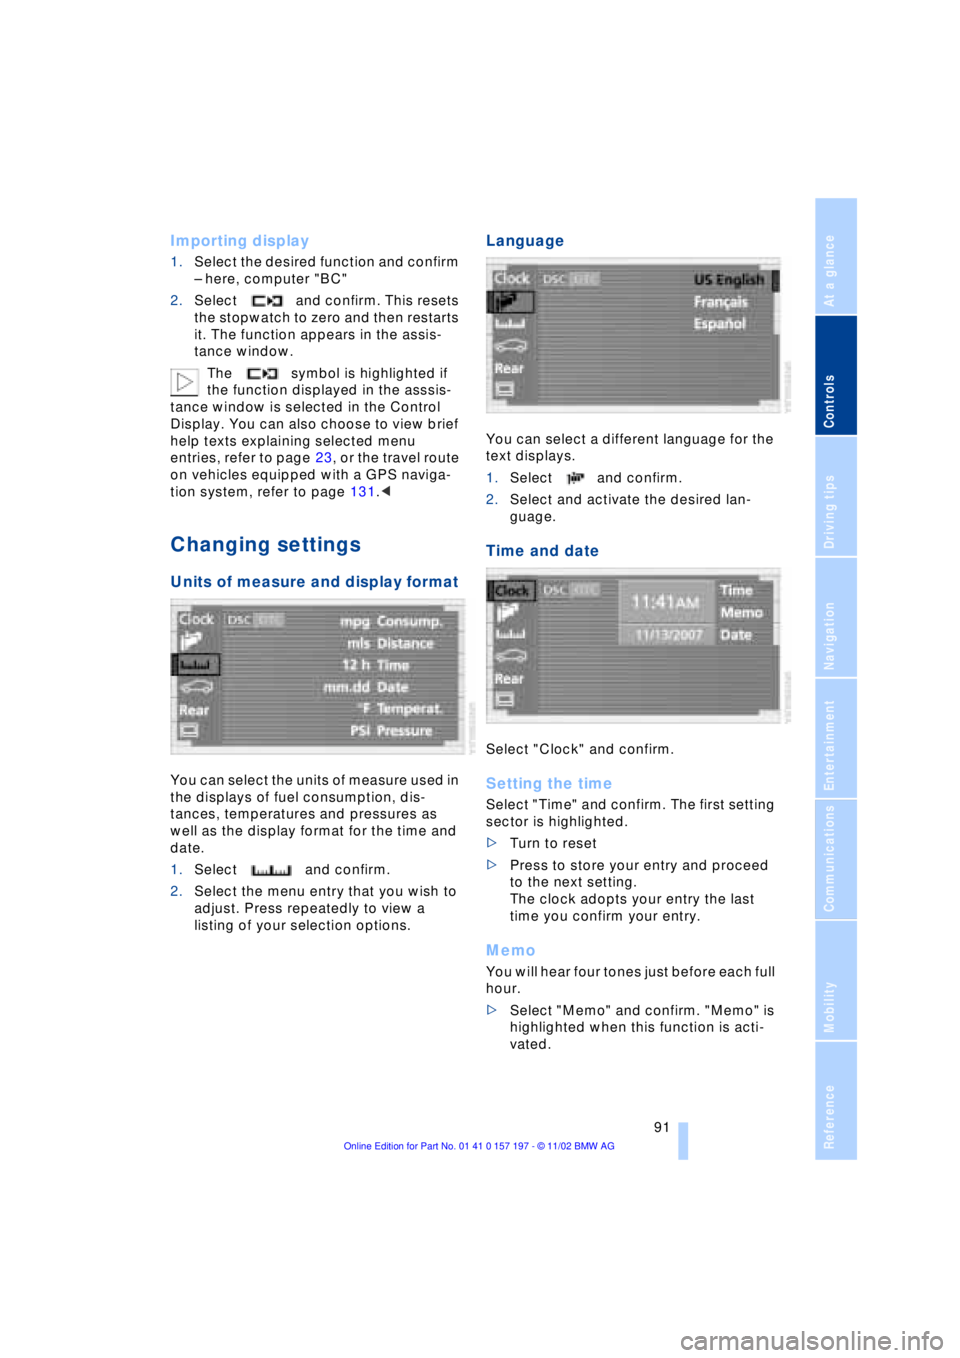
Units of measure and display format
You can select the units of measure used in
the displays of fuel consumption, dis-
tances, temperatures and pressures as
well as the display format for the time and
date.
1.Select and confirm.
2.Select the menu entry that you wish to
adjust. Press repeatedly to view a
listing of your selection options.
Language
You can select a different language for the
text displays.
1.Select and confirm.
2.Select and activate the desired lan-
guage.
Time and date
Select "Clock" and confirm.
Setting the time
Select "Time" and confirm. The first setting
sector is highlighted.
>Turn to reset
>Press to store your entry and proceed
to the next setting.
The clock adopts your entry the last
time you confirm your entry.
Memo
You will hear four tones just before each full
hour.
>Select "Memo" and confirm. "Memo" is
highlighted when this function is acti-
vated.
Page 194 of 229
Under the hood
192
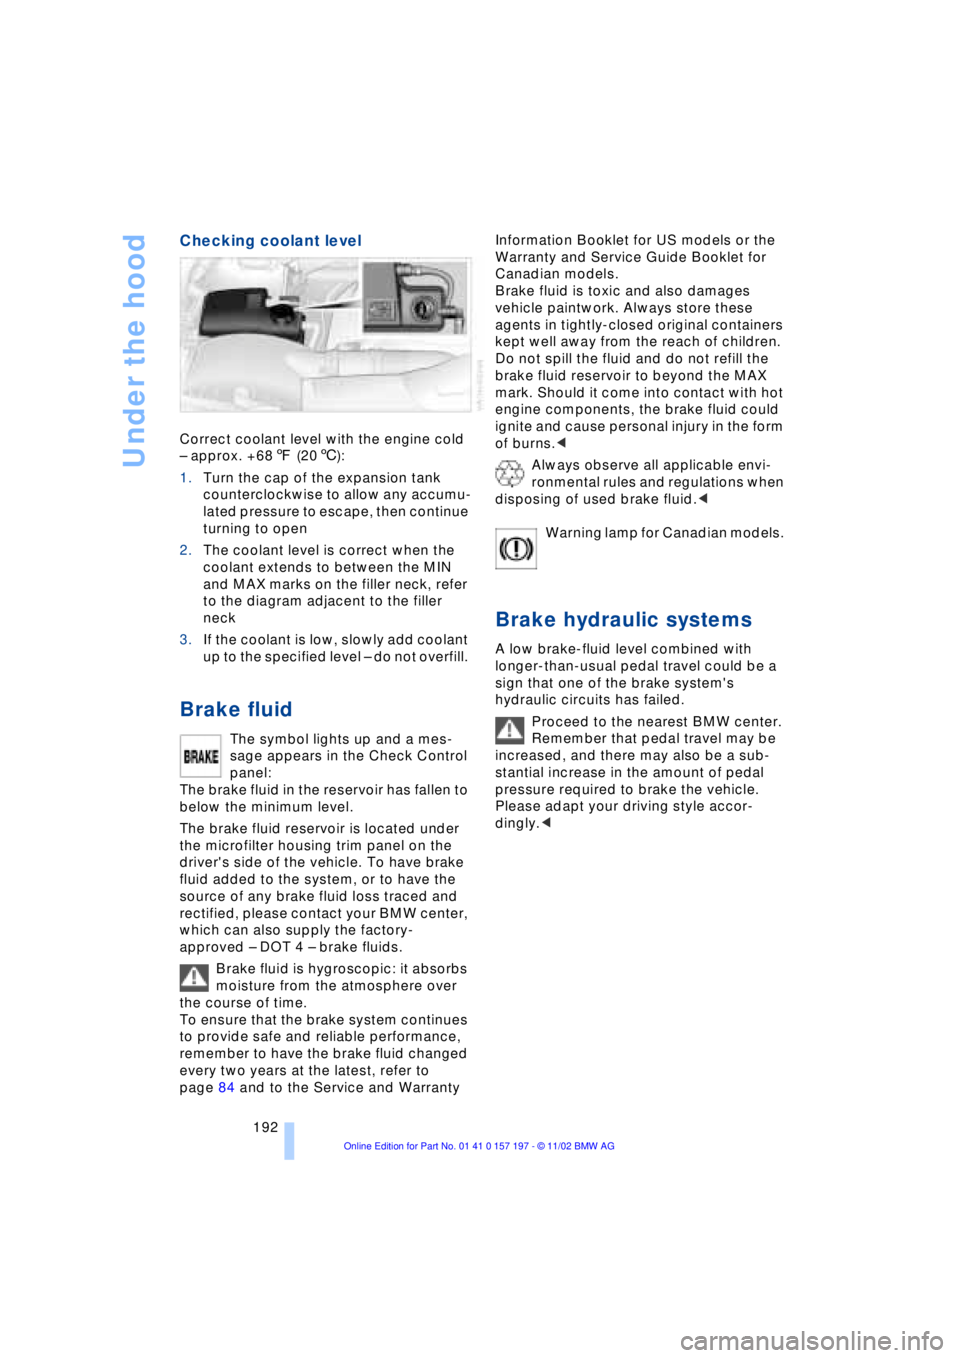
Checking coolant level
Correct coolant level with the engine cold
Ð approx. +687 (206):
1.Turn the cap of the expansion tank
counterclockwise to allow any accumu-
lated pressure to escape, then continue
turning to open
2.The coolant level is correct when the
coolant extends to between the MIN
and MAX marks on the filler neck, refer
to the diagram adjacent to the filler
neck
3.If the coolant is low, slowly add coolant
up to the specified level Ð do not overfill.
Brake fluid
The symbol lights up and a mes-
sage appears in the Check Control
panel:
The brake fluid in the reservoir has fallen to
below the minimum level.
The brake fluid reservoir is located under
the microfilter housing trim panel on the
driver's side of the vehicle. To have brake
fluid added to the system, or to have the
source of any brake fluid loss traced and
rectified, please contact your BMW center,
which can also supply the factory-
approved Ð DOT 4 Ð brake fluids.
Brake fluid is hygroscopic: it absorbs
moisture from the atmosphere over
the course of time.
To ensure that the brake system continues
to provide safe and reliable performance,
remember to have the brake fluid changed
every two years at the latest, refer to
page 84 and to the Service and Warranty Information Booklet for US models or the
Warranty and Service Guide Booklet for
Canadian models.
Brake fluid is toxic and also damages
vehicle paintwork. Always store these
agents in tightly-closed original containers
kept well away from the reach of children.
Do not spill the fluid and do not refill the
brake fluid reservoir to beyond the MAX
mark. Should it come into contact with hot
engine components, the brake fluid could
ignite and cause personal injury in the form
of burns.<
Always observe all applicable envi-
ronmental rules and regulations when
disposing of used brake fluid.<
Warning lamp for Canadian models.
Brake hydraulic systems
A low brake-fluid level combined with
longer-than-usual pedal travel could be a
sign that one of the brake system's
hydraulic circuits has failed.
Proceed to the nearest BMW center.
Remember that pedal travel may be
increased, and there may also be a sub-
stantial increase in the amount of pedal
pressure required to brake the vehicle.
Please adapt your driving style accor-
dingly.<