2002 BMW 745LI SEDAN instrument panel
[x] Cancel search: instrument panelPage 57 of 208
Adjustments
56
Important safety notes
Do not apply adhesive materials to
the cover panels of the airbags, cover
them or modify them in any other way.
Do not attempt to remove the airbag
restraint system from the vehicle. If you
note any indication of system malfunction,
if you desire to have an airbag deactivated,
or if the airbags are triggered in response
to an accident, you should always entrust
all inspection, repair and dismantling oper-
ations to your BMW center.
Never modify or tamper with either the
wiring or the individual components in the
airbag system. This category includes the
upholstery in the center of the steering
wheel, on the instrument panel, the side
trim panels on the front and rear doors, and
the roof pillars along with the sides of the
headliner. Do not attempt to remove or
dismantle the steering wheel.
To ensure compliance with official safety
regulations, entrust disposal of airbag
generators to a BMW center.
Unprofessional attempts to service the
system could lead to failure in an emer-
gency or undesired airbag activation, either
of which could result in personal injury. Do
not touch the individual components
directly after the system has been trig-
gered, because there is a danger of
burns.<
At all times, occupants should sit
upright and be properly restrained Ð
infants and small children in appropriate
child-restraint systems; larger children and
adults using the safety belts. Never let an
occupant's head rest near or on a side
airbag because the inflating airbag could
cause a serious or fatal injury. Please note
that the word "Airbag" imprinted on the
door trim panel indicates the airbag's loca-
tion.
Never install a rear-facing child-restraint
device on the front passenger seat. If you
do so, the child could be injured when the
airbag is triggered.
Children should always ride in the rear and
the restraint systems should be secured
with the vehicle's belts.Accident research shows that the safest
place for children in an automobile is in the
rear seat. However, a child sitting in the
rear seat and not properly restrained may
place his or her head on or near the airbag,
if so equipped.
For example, a child Ñ even though belted
Ñ may fall asleep with his or her head
against the side airbag. It may be difficult
for a driver to ensure that children in the
rear seat will remain properly positioned at
all times and do not place their heads on or
near the side airbag. Therefore, we recom-
mend that the rear side airbags, if provided,
be deactivated if you plan to transport chil-
dren in the rear seat.
The rear seat side airbags may already
have been deactivated, either at the time of
manufacture or by a BMW center. Labels in
the rear door opening should indicate the
status of your rear-seat side airbags. If you
are uncertain of their status, or wish to have
the airbags activated or deactivated,
please contact your BMW center.<
Even when all these guidelines are
observed, there is still a small residual risk
of injuries to the face, hands and arms
occurring from airbag deployment in
isolated instances. The ignition and infla-
tion noise may provoke a mild temporary
hearing loss in extremely sensitive individ-
uals.
Airbag warning information is also provided
on the sun blinds.
Indicator lamp
The indicator lamp shows the
airbag and belt-tensioner system's
operational status as soon as you
insert the remote control unit in the ignition
(radio mode).
System operational:
>The indicator lamp comes on briefly.
System malfunction:
>The indicator lamp fails to come on or
>it remains on continuously.
Page 58 of 208
At a glanceControlsDriving tipsCommunicationsNavigationEntertainmentMobilityReference
57
A system malfunction could prevent the
system from responding to an impact
occurring within its normal response range.
Please respond to any signs of malfunction
by having the airbag system inspected
immediately at a BMW center. Transporting children safely Commercially-available child-restraint
systems are designed to be secured with a
lap belt or with the lap belt portion of a
combination lap/shoulder belt. Improperly
or inadequately installed restraint systems
can increase the risk of injury to children.
Always read and follow the instructions that
come with the system. Child-restraint system with tether
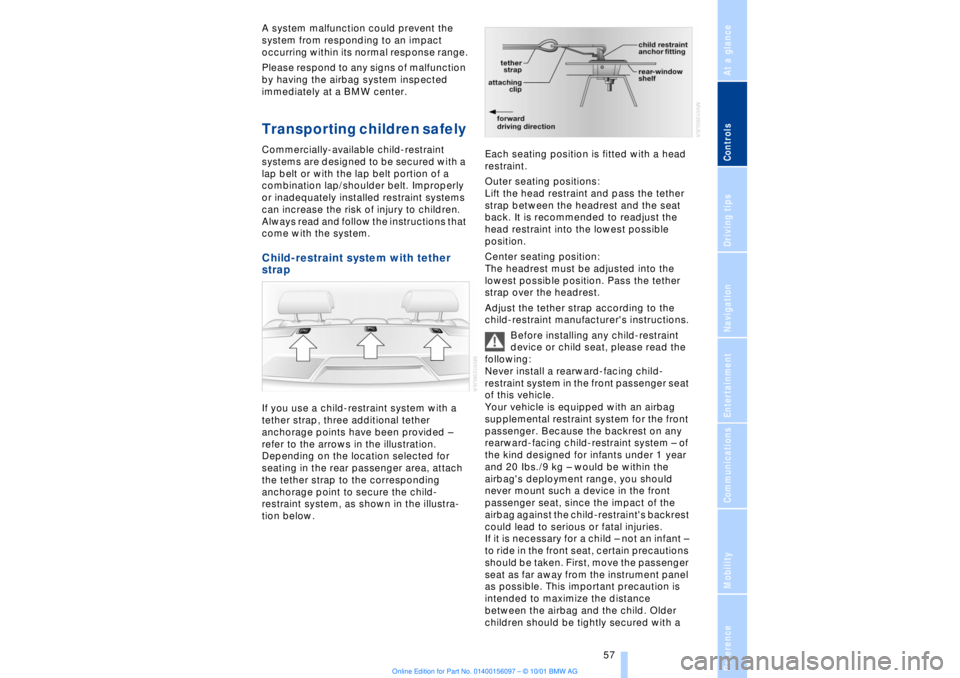
strap If you use a child-restraint system with a
tether strap, three additional tether
anchorage points have been provided Ð
refer to the arrows in the illustration.
Depending on the location selected for
seating in the rear passenger area, attach
the tether strap to the corresponding
anchorage point to secure the child-
restraint system, as shown in the illustra-
tion below. Each seating position is fitted with a head
restraint.
Outer seating positions:
Lift the head restraint and pass the tether
strap between the headrest and the seat
back. It is recommended to readjust the
head restraint into the lowest possible
position.
Center seating position:
The headrest must be adjusted into the
lowest possible position. Pass the tether
strap over the headrest.
Adjust the tether strap according to the
child-restraint manufacturer's instructions.
Before installing any child-restraint
device or child seat, please read the
following:
Never install a rearward-facing child-
restraint system in the front passenger seat
of this vehicle.
Your vehicle is equipped with an airbag
supplemental restraint system for the front
passenger. Because the backrest on any
rearward-facing child-restraint system Ð of
the kind designed for infants under 1 year
and 20 Ibs./9 kg Ð would be within the
airbag's deployment range, you should
never mount such a device in the front
passenger seat, since the impact of the
airbag against the child-restraint's backrest
could lead to serious or fatal injuries.
If it is necessary for a child Ð not an infant Ð
to ride in the front seat, certain precautions
should be taken. First, move the passenger
seat as far away from the instrument panel
as possible. This important precaution is
intended to maximize the distance
between the airbag and the child. Older
children should be tightly secured with a
Page 71 of 208
Driving
70 To obtain maximum acceleration (for
passing maneuvers, etc.) during
operation in the manual mode, use the
kickdown or downshift manually.<
Malfunctions A status message will appear in the Check
Control panel to alert you to any malfunc-
tions in the transmission-control system.
Please note any supplementary information
that appears in the Control Display. The
directional arrows also start to flash in the
Info Display.
While it will remain still possible to move
the selector lever to any desired position,
the transmission will revert to operation in
its default mode with only a limited number
of forward gears.
Some types of malfunction will make it
impossible to engage all gears.
The engine may respond with reduced
output when accelerating from a standing
start.
If this happens, avoid extreme engine loads
and consult the nearest BMW center.
If no status messages appear in the
Info Display you should accelerate
carefully to confirm that you are driving in
the desired direction.
Never work in the engine compartment
with any of the forward or reverse gears
engaged, as the vehicle could start to
move. Engage the parking brake, refer to
page 62.< Manual release of transmission
lockout You can respond to any interruptions in the
supply of electrical power, for instance, if
the battery is discharged or disconnected,
by releasing the transmission lockout
manually.
To prevent the drive wheels from
locking up and sliding, the transmis-
sion lockout must always be released
manually before the vehicle is towed.<
Press the brake pedal before
releasing the transmission lockout manually. If the brakes are not applied, the
vehicle could start to roll if parked on a
steep slope.
The transmission lockout should only be
released for towing. Remember to engage
the transmission lockout when you repark
the vehicle after moving it.
Should it also be necessary to release the
parking brake manually (owing to a
discharged battery, etc.), always adhere to
the following sequence:
1.Start by manually releasing the parking
brake, refer to page 65
2.Then proceed to manually release the
transmission lockout.<
Jump-starting and towing, refer to
pages 187 and 188.
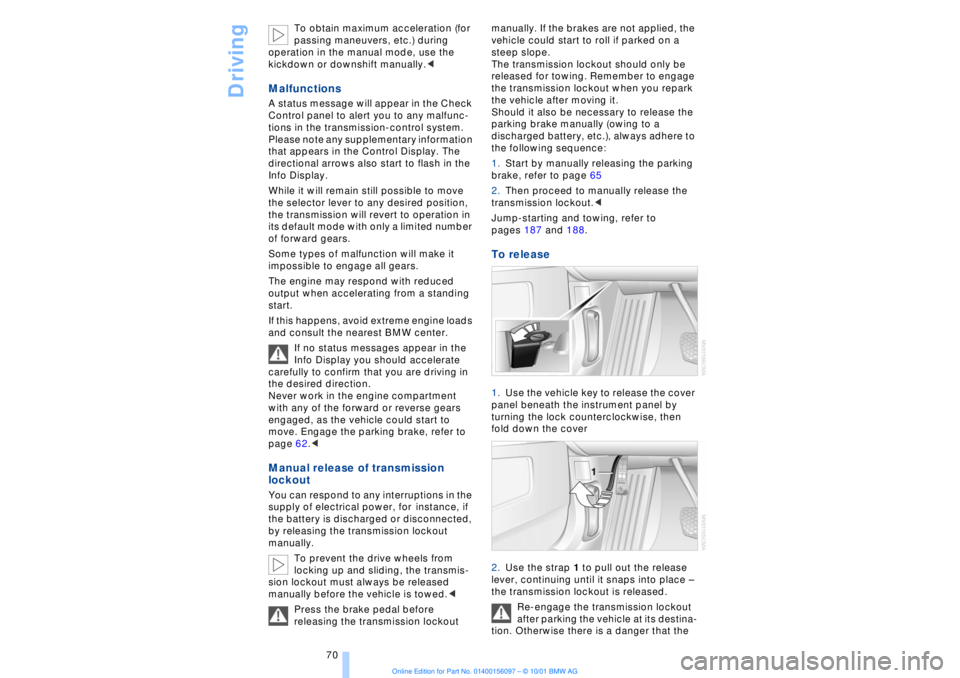
To release 1.Use the vehicle key to release the cover
panel beneath the instrument panel by
turning the lock counterclockwise, then
fold down the cover
2.Use the strap 1 to pull out the release
lever, continuing until it snaps into place Ð
the transmission lockout is released.
Re-engage the transmission lockout
after parking the vehicle at its destina-
tion. Otherwise there is a danger that the
Page 102 of 208
At a glanceControlsDriving tipsCommunicationsNavigationEntertainmentMobilityReference
101
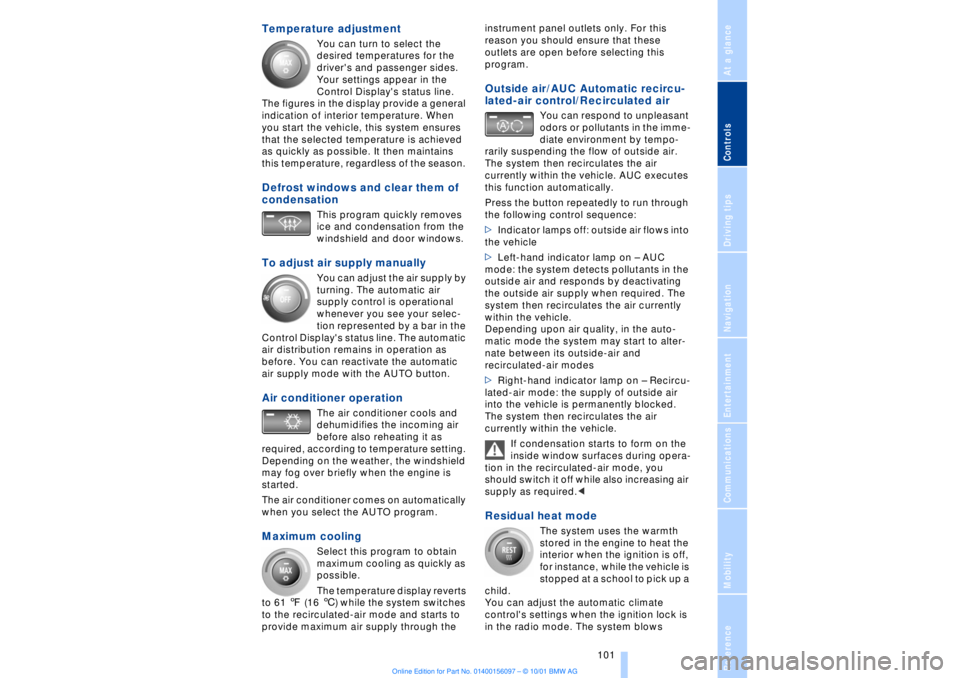
Temperature adjustment
You can turn to select the
desired temperatures for the
driver's and passenger sides.
Your settings appear in the
Control Display's status line.
The figures in the display provide a general
indication of interior temperature. When
you start the vehicle, this system ensures
that the selected temperature is achieved
as quickly as possible. It then maintains
this temperature, regardless of the season.
Defrost windows and clear them of
condensation
This program quickly removes
ice and condensation from the
windshield and door windows.
To adjust air supply manually
You can adjust the air supply by
turning. The automatic air
supply control is operational
whenever you see your selec-
tion represented by a bar in the
Control Display's status line. The automatic
air distribution remains in operation as
before. You can reactivate the automatic
air supply mode with the AUTO button.
Air conditioner operation
The air conditioner cools and
dehumidifies the incoming air
before also reheating it as
required, according to temperature setting.
Depending on the weather, the windshield
may fog over briefly when the engine is
started.
The air conditioner comes on automatically
when you select the AUTO program.
Maximum cooling
Select this program to obtain
maximum cooling as quickly as
possible.
The temperature display reverts
to 61 7 (16 6) while the system switches
to the recirculated-air mode and starts to
provide maximum air supply through the instrument panel outlets only. For this
reason you should ensure that these
outlets are open before selecting this
program.
Outside air/AUC Automatic recircu-
lated-air control/Recirculated air
You can respond to unpleasant
odors or pollutants in the imme-
diate environment by tempo-
rarily suspending the flow of outside air.
The system then recirculates the air
currently within the vehicle. AUC executes
this function automatically.
Press the button repeatedly to run through
the following control sequence:
>Indicator lamps off: outside air flows into
the vehicle
>Left-hand indicator lamp on Ð AUC
mode: the system detects pollutants in the
outside air and responds by deactivating
the outside air supply when required. The
system then recirculates the air currently
within the vehicle.
Depending upon air quality, in the auto-
matic mode the system may start to alter-
nate between its outside-air and
recirculated-air modes
>Right-hand indicator lamp on Ð Recircu-
lated-air mode: the supply of outside air
into the vehicle is permanently blocked.
The system then recirculates the air
currently within the vehicle.
If condensation starts to form on the
inside window surfaces during opera-
tion in the recirculated-air mode, you
should switch it off while also increasing air
supply as required.<
Residual heat mode
The system uses the warmth
stored in the engine to heat the
interior when the ignition is off,
for instance, while the vehicle is
stopped at a school to pick up a
child.
You can adjust the automatic climate
control's settings when the ignition lock is
in the radio mode. The system blows
Page 106 of 208
At a glanceControlsDriving tipsCommunicationsNavigationEntertainmentMobilityReference
105
Rear air conditioner* The following settings and operating
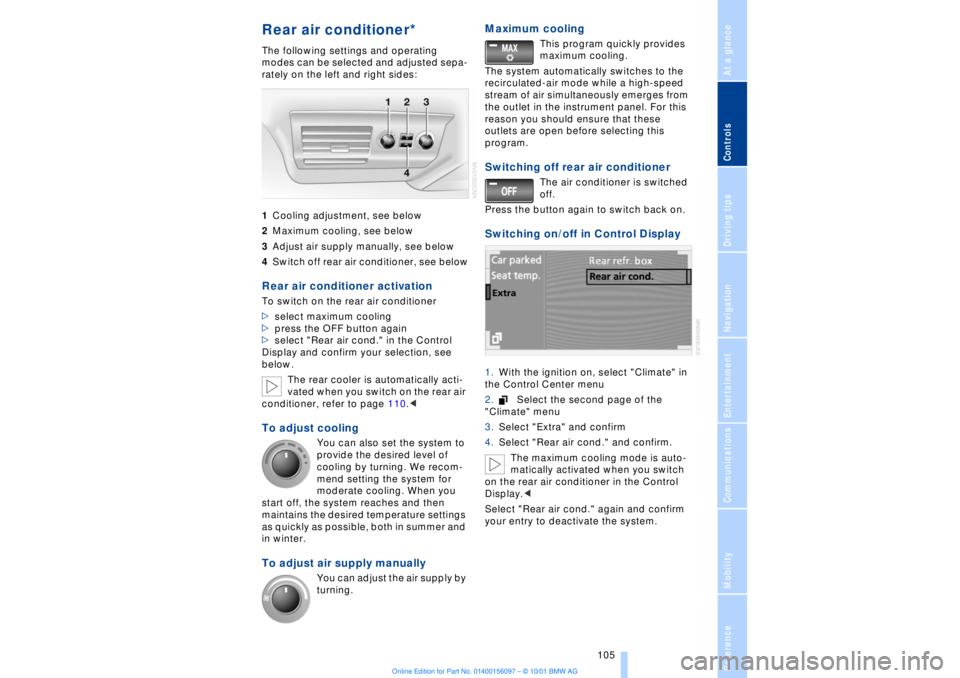
modes can be selected and adjusted sepa-
rately on the left and right sides:
1Cooling adjustment, see below
2Maximum cooling, see below
3Adjust air supply manually, see below
4Switch off rear air conditioner, see belowRear air conditioner activation To switch on the rear air conditioner
>select maximum cooling
>press the OFF button again
>select "Rear air cond." in the Control
Display and confirm your selection, see
below.
The rear cooler is automatically acti-
vated when you switch on the rear air
conditioner, refer to page 110.< To adjust cooling
You can also set the system to
provide the desired level of
cooling by turning. We recom-
mend setting the system for
moderate cooling. When you
start off, the system reaches and then
maintains the desired temperature settings
as quickly as possible, both in summer and
in winter.
To adjust air supply manually
You can adjust the air supply by
turning.
Maximum cooling
This program quickly provides
maximum cooling.
The system automatically switches to the
recirculated-air mode while a high-speed
stream of air simultaneously emerges from
the outlet in the instrument panel. For this
reason you should ensure that these
outlets are open before selecting this
program.
Switching off rear air conditioner
The air conditioner is switched
off.
Press the button again to switch back on.
Switching on/off in Control Display 1.With the ignition on, select "Climate" in
the Control Center menu
2.Select the second page of the
"Climate" menu
3.Select "Extra" and confirm
4.Select "Rear air cond." and confirm.
The maximum cooling mode is auto-
matically activated when you switch
on the rear air conditioner in the Control
Display.<
Select "Rear air cond." again and confirm
your entry to deactivate the system.
Page 107 of 208
A congenial climate
106
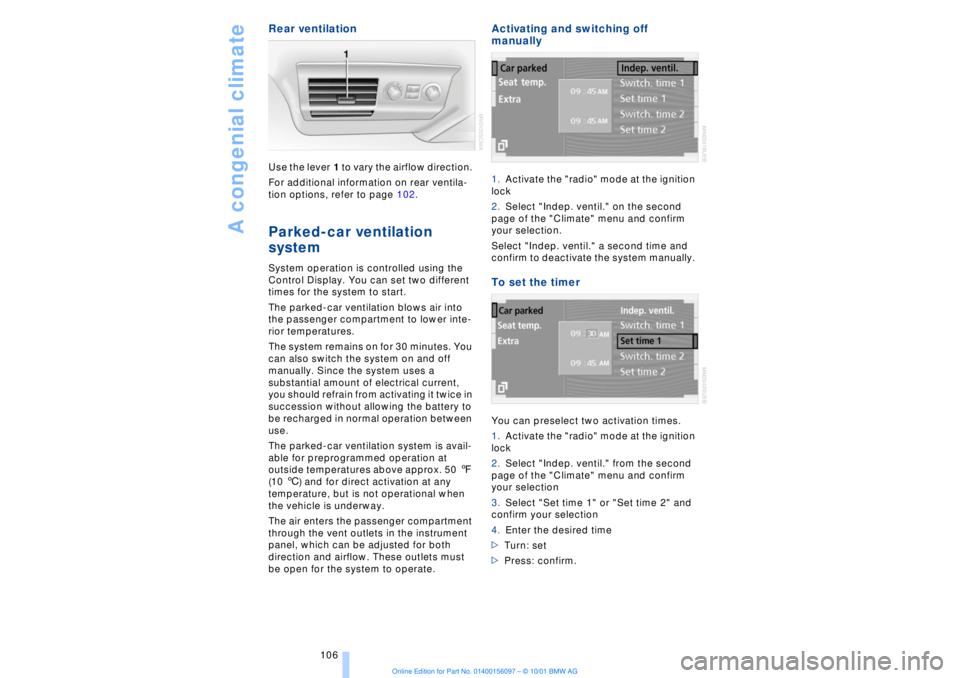
Rear ventilation Use the lever 1 to vary the airflow direction.
For additional information on rear ventila-
tion options, refer to page 102. Parked-car ventilation
system
System operation is controlled using the
Control Display. You can set two different
times for the system to start.
The parked-car ventilation blows air into
the passenger compartment to lower inte-
rior temperatures.
The system remains on for 30 minutes. You
can also switch the system on and off
manually. Since the system uses a
substantial amount of electrical current,
you should refrain from activating it twice in
succession without allowing the battery to
be recharged in normal operation between
use.
The parked-car ventilation system is avail-
able for preprogrammed operation at
outside temperatures above approx. 50 7
(10 6) and for direct activation at any
temperature, but is not operational when
the vehicle is underway.
The air enters the passenger compartment
through the vent outlets in the instrument
panel, which can be adjusted for both
direction and airflow. These outlets must
be open for the system to operate.
Activating and switching off
manually 1.Activate the "radio" mode at the ignition
lock
2.Select "Indep. ventil." on the second
page of the "Climate" menu and confirm
your selection.
Select "Indep. ventil." a second time and
confirm to deactivate the system manually. To set the timer You can preselect two activation times.
1.Activate the "radio" mode at the ignition
lock
2.Select "Indep. ventil." from the second
page of the "Climate" menu and confirm
your selection
3.Select "Set time 1" or "Set time 2" and
confirm your selection
4.Enter the desired time
>Turn: set
>Press: confirm.
Page 141 of 208
Sound system
140
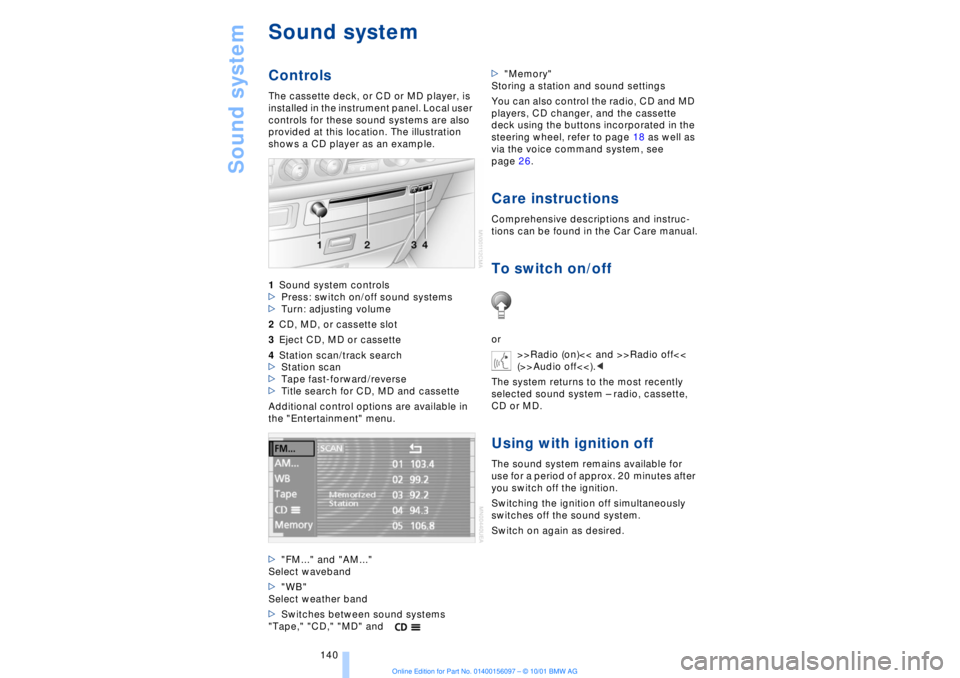
Sound systemControlsThe cassette deck, or CD or MD player, is
installed in the instrument panel. Local user
controls for these sound systems are also
provided at this location. The illustration
shows a CD player as an example.
1Sound system controls
>Press: switch on/off sound systems
>Turn: adjusting volume
2CD, MD, or cassette slot
3Eject CD, MD or cassette
4Station scan/track search
>Station scan
>Tape fast-forward/reverse
>Title search for CD, MD and cassette
Additional control options are available in
the "Entertainment" menu.
>"FM..." and "AM..."
Select waveband
>"WB"
Select weather band
>Switches between sound systems
"Tape," "CD," "MD" and>"Memory"
Storing a station and sound settings
You can also control the radio, CD and MD
players, CD changer, and the cassette
deck using the buttons incorporated in the
steering wheel, refer to page 18 as well as
via the voice command system, see
page 26.
Care instructionsComprehensive descriptions and instruc-
tions can be found in the Car Care manual.To switch on/offor
>>Radio (on)<< and >>Radio off<<
(>>Audio off<<).<
The system returns to the most recently
selected sound system Ð radio, cassette,
CD or MD.Using with ignition offThe sound system remains available for
use for a period of approx. 20 minutes after
you switch off the ignition.
Switching the ignition off simultaneously
switches off the sound system.
Switch on again as desired.
Page 176 of 208
At a glanceControlsDriving tipsCommunicationsNavigationEntertainmentMobilityReference
175
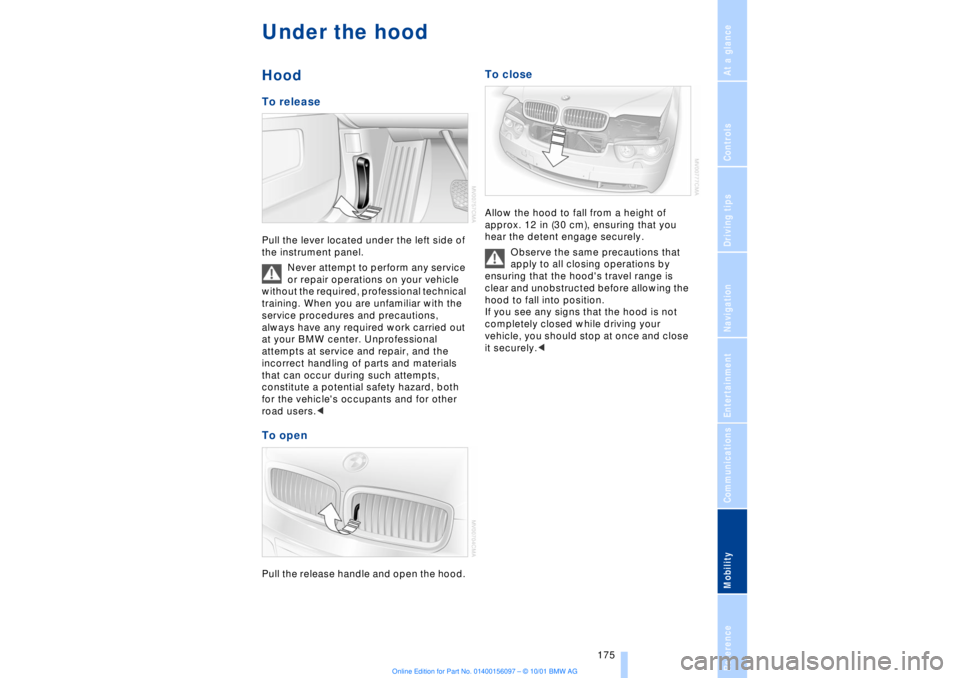
Under the hood Hood To release Pull the lever located under the left side of
the instrument panel.
Never attempt to perform any service
or repair operations on your vehicle
without the required, professional technical
training. When you are unfamiliar with the
service procedures and precautions,
always have any required work carried out
at your BMW center. Unprofessional
attempts at service and repair, and the
incorrect handling of parts and materials
that can occur during such attempts,
constitute a potential safety hazard, both
for the vehicle's occupants and for other
road users.< To open Pull the release handle and open the hood.
To close Allow the hood to fall from a height of
approx. 12 in (30 cm), ensuring that you
hear the detent engage securely.
Observe the same precautions that
apply to all closing operations by
ensuring that the hood's travel range is
clear and unobstructed before allowing the
hood to fall into position.
If you see any signs that the hood is not
completely closed while driving your
vehicle, you should stop at once and close
it securely.<