2002 BMW 745LI SEDAN ignition
[x] Cancel search: ignitionPage 3 of 208
Inhaltsverzeichnis
Contents
Notes
6Using this Owner's Manual
6Symbols used
7The individual vehicle
7Editorial notice
8For you own safety
9REPORTING SAFETY DEFECTS
Cockpit
12Driver's side Ð Controls and displays
16Comfort and convenience Ð Controls
and displays
18Buttons in steering wheel
Control Center
19The concept
19Controller
19Control Display
20Symbols and lists
22Menus in Control Display
23Assistance window*
Voice command
25Voice command system*
25Voice commands
27Notices
27The notebook
29Brief commands
Opening and closing
34Keys
35Central locking system
35Opening and closing Ð from outside
37Opening and closing Ð from inside
38Doors
38Luggage compartment lid 40Luggage compartment
40Alarm system
42Electric power windows
43Sliding/tilt sunroof*
Adjustments
45Correct sitting position
45Seats
48Head restraints
50Safety belts
50Heated seats*
51Active seat ventilation*
52Active seat*
52Mirror
53Steering wheel adjustment
54Seat, mirror and steering wheel
memory
55Airbags
57Transporting children safely
58LATCH child-restraint system
59Child-safety locks
59Car Memory, Key Memory
Driving
61Ignition lock
62Starting the engine
62Switching off engine
62Parking brake
66Automatic transmission with L mode
69Automatic transmission with
Steptronic
71Turn signal indicators/headlamp
flasher
71Wiper system
73Washer fluid
© 2001 Bayerische Motoren Werke
Aktiengesellschaft
Munich, Germany
Reprints, in whole or part, approved
exclusively with written permission of
BMW AG, Munich.
Order No. 01 40 0 156 097
US X/2001
Printed in Germany
Printed on environmentally friendly paper
(bleached without chlorine, suitable for
recycling).
Page 4 of 208
At a glanceControlsDriving tipsCommunicationsNavigationEntertainmentMobilityReference
73Programmable cruise control
Everything under control
77Odometer, outside temperature
display, clock
77Tachometer
78Service Interval Display
80Check Control
81Computer
86Changing settings
Technology for comfort,
convenience and safety
88PDC Park Distance Control*
89Driving stability control/
DSC Dynamic Stability Control
91Driving stability control/ABS Antilock
Brake System
91Dynamic Drive
92EDC Electronic Damping Control*
92RDC Tire Pressure Monitor*
94Self-leveling suspension*
94Adaptive brake lamp
Lamps
96Parking lamps/low beams
97Instrument lighting
97High beams/standing lamps
97Front fog lamps
97Interior lamps
A congenial climate
99Automatic climate control
105Rear air conditioner*
106Parked-car ventilation system
Practical interior accessories
108Universal Garage Door Opener*
109Sun blinds*
110Rear cooler*
110Glove compartment
111Storage compartments
112Beverage holders
112Ashtray, front
113Cigarette lighter, front
113Power socket
113Ashtray, rear
113Cigarette lighter, rear113Center armrest
114Ski bag*
Things to remember when driving
118Break-in procedures
118General driving notes
119Brake system
120Cargo loading
120Roof-mounted luggage rack*
Navigation
124Safety
124GPS
124Map CD
125Starting the navigation system
125Display in assistance window*
126Selection options
126Destination entry
126Manual entry of destination address
128Select the town or city and the street
from the directory
128Map-guided destination selection
129Selecting destination in Information
129Selecting interesting destinations
130Recent destinations
130Destination list
130Route selection
131Starting the destination guidance
system
132Displaying route
133Select new route
133Voice messages
134Terminate/interrupt active guidance
134Creating a directory
135Location
136Wordmatch principle
136What to do if É
Sound system
140Controls
140Care instructions
140To switch on/off
140Using with ignition off
141Volume adjustment
141Tone control
Page 14 of 208

At a glanceControlsDriving tipsCommunicationsNavigationEntertainmentMobilityReference
13
1
Rear window sun blind109
2
Rear window safety switch42
3
Electric power windows42
4
Exterior mirrors52
5
Parking brake62
6
Parking lamps and low beams96
7
Instrument lighting97
8
Turn signal indicators71
High beams, headlamp flasher97
Computer81,
Check Control80
Computer81
Standing lamps97
9
Steering wheel18
10
Info Display14
11
Automatic transmission lever66
12
Ignition lock61
13
Switching ignition on and off,
starting the engine62
14
Windshield wipers71
Rain sensor71
15
Park Distance Control (PDC)88
16
Horn: the entire surface
17
Steering wheel heating53
Steering wheel adjustment53
18
Unlocking the luggage
compartment39
19
Programmable cruise control73
20
Front fog lamps97
Front fog lamps
21
Opening the hood175
Page 16 of 208
At a glanceControlsDriving tipsCommunicationsNavigationEntertainmentMobilityReference
15
Indicator and warning lamps
Technology that monitors itself
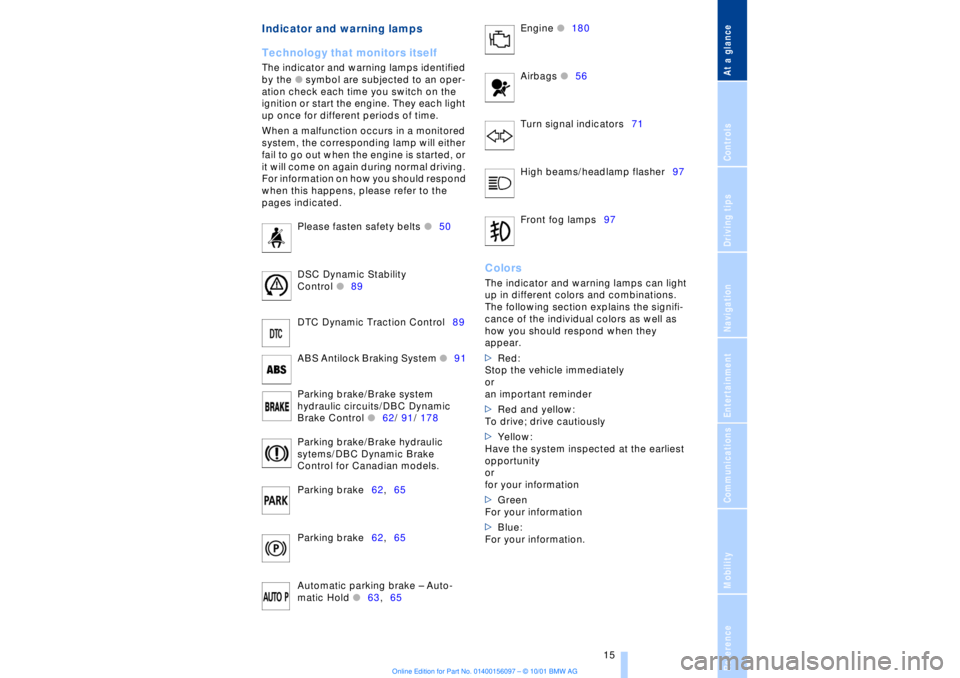
The indicator and warning lamps identified
by the
l
symbol are subjected to an oper-
ation check each time you switch on the
ignition or start the engine. They each light
up once for different periods of time.
When a malfunction occurs in a monitored
system, the corresponding lamp will either
fail to go out when the engine is started, or
it will come on again during normal driving.
For information on how you should respond
when this happens, please refer to the
pages indicated.
Please fasten safety belts
l
50
DSC Dynamic Stability
Control
l
89
DTC Dynamic Traction Control89
ABS Antilock Braking System
l
91
Parking brake/Brake system
hydraulic circuits/DBC Dynamic
Brake Control
l
62/ 91/ 178
Parking brake/Brake hydraulic
sytems/DBC Dynamic Brake
Control for Canadian models.
Parking brake62,65
Parking brake62,65
Automatic parking brake Ð Auto-
matic Hold
l
63,65 Engine
l
180
Airbags
l56
Turn signal indicators71
High beams/headlamp flasher97
Front fog lamps97
ColorsThe indicator and warning lamps can light
up in different colors and combinations.
The following section explains the signifi-
cance of the individual colors as well as
how you should respond when they
appear.
>Red:
Stop the vehicle immediately
or
an important reminder
>Red and yellow:
To drive; drive cautiously
>Yellow:
Have the system inspected at the earliest
opportunity
or
for your information
>Green
For your information
>Blue:
For your information.
Page 35 of 208
Opening and closing
34
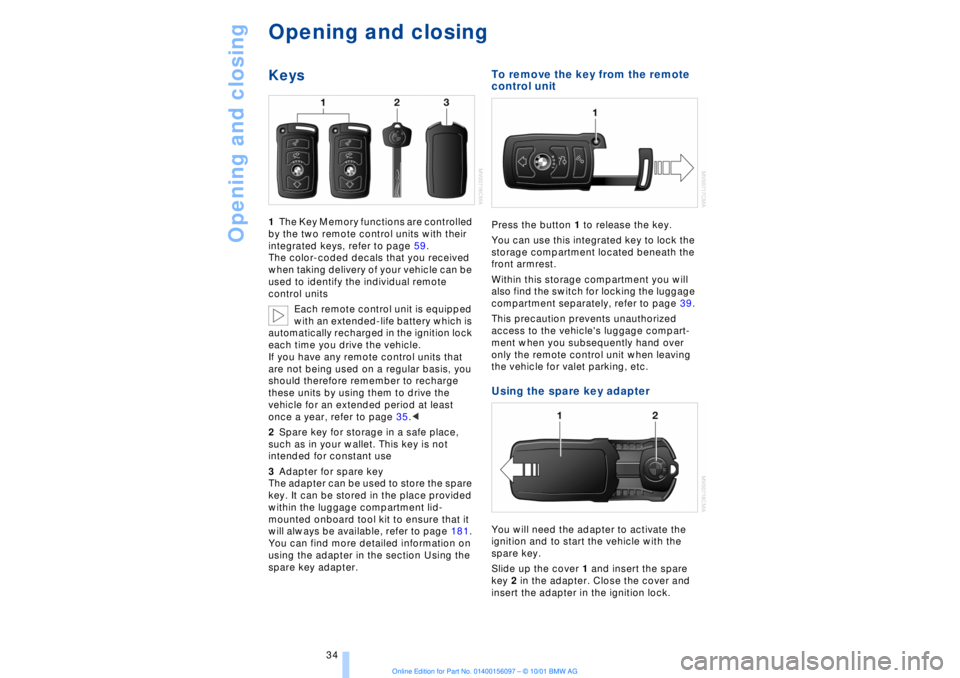
Opening and closingKeys1The Key Memory functions are controlled
by the two remote control units with their
integrated keys, refer to page 59.
The color-coded decals that you received
when taking delivery of your vehicle can be
used to identify the individual remote
control units
Each remote control unit is equipped
with an extended-life battery which is
automatically recharged in the ignition lock
each time you drive the vehicle.
If you have any remote control units that
are not being used on a regular basis, you
should therefore remember to recharge
these units by using them to drive the
vehicle for an extended period at least
once a year, refer to page 35.<
2Spare key for storage in a safe place,
such as in your wallet. This key is not
intended for constant use
3Adapter for spare key
The adapter can be used to store the spare
key. It can be stored in the place provided
within the luggage compartment lid-
mounted onboard tool kit to ensure that it
will always be available, refer to page 181.
You can find more detailed information on
using the adapter in the section Using the
spare key adapter.
To remove the key from the remote
control unit Press the button 1 to release the key.
You can use this integrated key to lock the
storage compartment located beneath the
front armrest.
Within this storage compartment you will
also find the switch for locking the luggage
compartment separately, refer to page 39.
This precaution prevents unauthorized
access to the vehicle's luggage compart-
ment when you subsequently hand over
only the remote control unit when leaving
the vehicle for valet parking, etc. Using the spare key adapter You will need the adapter to activate the
ignition and to start the vehicle with the
spare key.
Slide up the cover 1 and insert the spare
key 2 in the adapter. Close the cover and
insert the adapter in the ignition lock.
Page 36 of 208
At a glanceControlsDriving tipsCommunicationsNavigationEntertainmentMobilityReference
35
Central locking system The concept The central locking system is ready for
operation whenever the driver's door is
closed. This simultaneously engages and
releases the locks on the following:
>Doors
>Luggage compartment lid
>Fuel filler door.
The central locking system can be oper-
ated
>from outside via the remote control as
well as via the driver's door lock
>from inside via the button for the central
locking system.
When the system is locked from inside, the
fuel filler door remains unlocked, refer to
page 37.
The anti-theft system is automatically
armed whenever you activate the central
locking system from outside the vehicle.
The alarm system is armed/deactivated at
the same time.
In the event of an accident, the central
locking system unlocks automatically (only
those doors which were not locked sepa-
rately with the safety lock buttons). Refer to
page 38. In addition, the hazard warning
flashers and interior lamps come on.Opening and closing Ð from
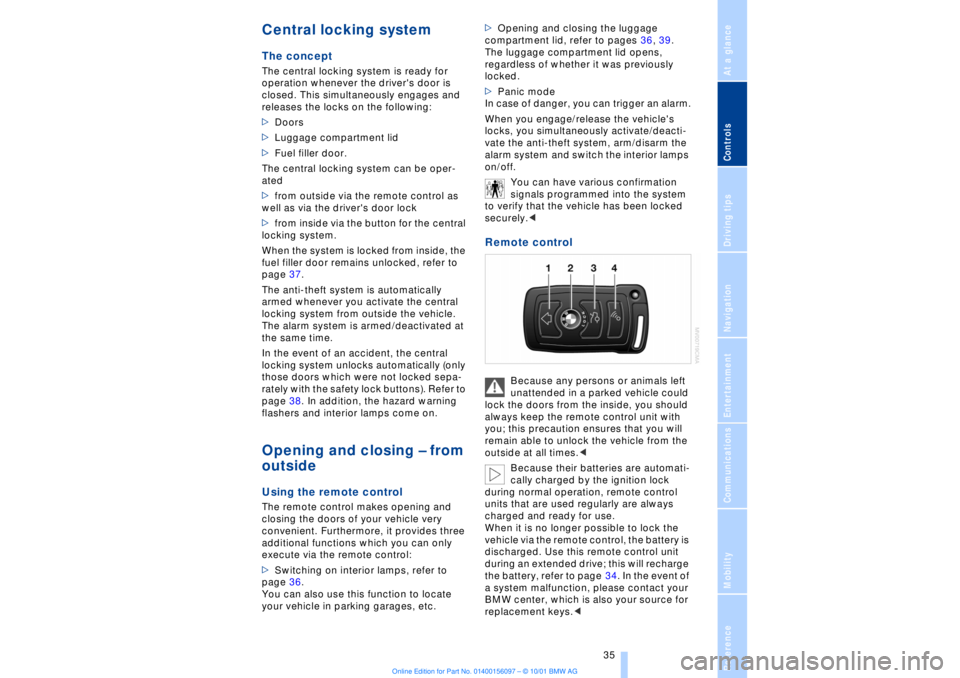
outside Using the remote control The remote control makes opening and
closing the doors of your vehicle very
convenient. Furthermore, it provides three
additional functions which you can only
execute via the remote control:
>Switching on interior lamps, refer to
page 36.
You can also use this function to locate
your vehicle in parking garages, etc. >Opening and closing the luggage
compartment lid, refer to pages 36, 39.
The luggage compartment lid opens,
regardless of whether it was previously
locked.
>Panic mode
In case of danger, you can trigger an alarm.
When you engage/release the vehicle's
locks, you simultaneously activate/deacti-
vate the anti-theft system, arm/disarm the
alarm system
and switch the interior lamps
on/off.
You can have various confirmation
signals programmed into the system
to verify that the vehicle has been locked
securely.<
Remote control
Because any persons or animals left
unattended in a parked vehicle could
lock the doors from the inside, you should
always keep the remote control unit with
you; this precaution ensures that you will
remain able to unlock the vehicle from the
outside at all times.<
Because their batteries are automati-
cally charged by the ignition lock
during normal operation, remote control
units that are used regularly are always
charged and ready for use.
When it is no longer possible to lock the
vehicle via the remote control, the battery is
discharged. Use this remote control unit
during an extended drive; this will recharge
the battery, refer to page 34. In the event of
a system malfunction, please contact your
BMW center, which is also your source for
replacement keys.<
Page 40 of 208
At a glanceControlsDriving tipsCommunicationsNavigationEntertainmentMobilityReference
39
>unlock the vehicle using the remote
control, refer to page 36, or
>insert the remote control all the way into
the ignition lock, engaging the detent.< Secure separately The switch position will vary according to
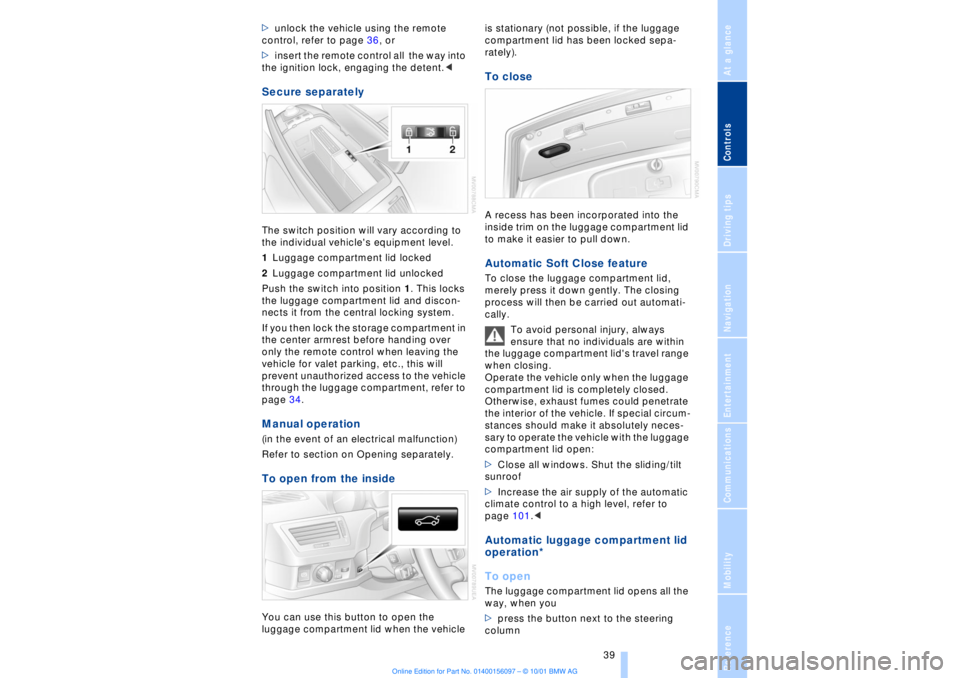
the individual vehicle's equipment level.
1Luggage compartment lid locked
2Luggage compartment lid unlocked
Push the switch into position 1. This locks
the luggage compartment lid and discon-
nects it from the central locking system.
If you then lock the storage compartment in
the center armrest before handing over
only the remote control when leaving the
vehicle for valet parking, etc., this will
prevent unauthorized access to the vehicle
through the luggage compartment, refer to
page 34. Manual operation (in the event of an electrical malfunction)
Refer to section on Opening separately.To open from the insideYou can use this button to open the
luggage compartment lid when the vehicle is stationary (not possible, if the luggage
compartment lid has been locked sepa-
rately).
To closeA recess has been incorporated into the
inside trim on the luggage compartment lid
to make it easier to pull down. Automatic Soft Close feature To close the luggage compartment lid,
merely press it down gently. The closing
process will then be carried out automati-
cally.
To avoid personal injury, always
ensure that no individuals are within
the luggage compartment lid's travel range
when closing.
Operate the vehicle only when the luggage
compartment lid is completely closed.
Otherwise, exhaust fumes could penetrate
the interior of the vehicle. If special circum-
stances should make it absolutely neces-
sary to operate the vehicle with the luggage
compartment lid open:
>Close all windows. Shut the sliding/tilt
sunroof
>Increase the air supply of the automatic
climate control to a high level, refer to
page 101.< Automatic luggage compartment lid
operation*
To openThe luggage compartment lid opens all the
way, when you
>press the button next to the steering
column
Page 42 of 208

At a glanceControlsDriving tipsCommunicationsNavigationEntertainmentMobilityReference
41
>The hazard warning flashers for approx.
five minutes
>The high beams, which flash on and off
in the same rhythm.To arm and disarm the alarm system When you lock (or unlock) the vehicle,
either with the remote control unit or at the
door lock, the alarm system is armed (or
disarmed) at the same time.
The system indicates that is has been
correctly armed by switching on the hazard
warning flashers for a single cycle and by
emitting an acoustic signal.
You can have different acknowledg-
ment signals set to confirm arming
and disarming.<
Even with the alarm system armed, you can
open the luggage compartment lid using
the button 3on the remote control
unit, refer to page 36. The alarm system will
start to monitor the luggage compartment
lid again as soon as it is reclosed. Indicator lamp displays>The indicator lamp below the interior
rearview mirror flashes continuously: the
system is armed
>The indicator lamp flashes when the
system is armed: door(s), the hood or
luggage compartment lid are not
completely closed. Even if you do not close
the alerted area, the system begins to
monitor the remaining areas, and the indi-
cator lamp flashes continuously after
10 seconds. However, the interior motion
sensor is not activated >If the indicator lamp goes out when the
system is disarmed: no manipulation or
attempted intrusions have been detected in
the period since the system was armed
>If the indicator lamp flashes for roughly
5 minutes when you disarm the system, or
until the remote control unit is inserted in
the ignition lock: an attempted entry has
been detected in the period since the
system was armed.
Following triggering of an alarm, the indi-
cator lamp will flash continuously.
Avoiding unintentional alarms The tilt alarm sensor and interior motion
sensor may be switched off at the same
time. You can do this to prevent a false
alarm from being triggered (in garages with
elevator ramps, for instance), or when the
vehicle is transported by trailer or train:
Lock the vehicle, i. e., arm the alarm system
twice in a row by pressing button 2 on the
remote control unit twice in succession,
refer to page 36, or lock the vehicle twice
using the key, refer to page 37.
The indicator lamp flashes briefly and then
flashes continuously. The tilt alarm sensor
and the interior motion sensor are switched
off long as the system is armed.
If you desire, the
>tilt alarm sensor, and
>interior motion sensor
can be switched off permanently. Please
contact your BMW center for assistance.< Interior motion sensor In order for the interior motion sensor to
function properly, the windows and sliding/
tilt sunroof must be completely closed.
Be sure to deactivate the interior motion
sensor, see section on Avoiding uninten-
tional alarms, when you wish to leave the
windows or sliding/tilt sunroof open.