2002 BMW 745LI SEDAN steering
[x] Cancel search: steeringPage 3 of 208
Inhaltsverzeichnis
Contents
Notes
6Using this Owner's Manual
6Symbols used
7The individual vehicle
7Editorial notice
8For you own safety
9REPORTING SAFETY DEFECTS
Cockpit
12Driver's side Ð Controls and displays
16Comfort and convenience Ð Controls
and displays
18Buttons in steering wheel
Control Center
19The concept
19Controller
19Control Display
20Symbols and lists
22Menus in Control Display
23Assistance window*
Voice command
25Voice command system*
25Voice commands
27Notices
27The notebook
29Brief commands
Opening and closing
34Keys
35Central locking system
35Opening and closing Ð from outside
37Opening and closing Ð from inside
38Doors
38Luggage compartment lid 40Luggage compartment
40Alarm system
42Electric power windows
43Sliding/tilt sunroof*
Adjustments
45Correct sitting position
45Seats
48Head restraints
50Safety belts
50Heated seats*
51Active seat ventilation*
52Active seat*
52Mirror
53Steering wheel adjustment
54Seat, mirror and steering wheel
memory
55Airbags
57Transporting children safely
58LATCH child-restraint system
59Child-safety locks
59Car Memory, Key Memory
Driving
61Ignition lock
62Starting the engine
62Switching off engine
62Parking brake
66Automatic transmission with L mode
69Automatic transmission with
Steptronic
71Turn signal indicators/headlamp
flasher
71Wiper system
73Washer fluid
© 2001 Bayerische Motoren Werke
Aktiengesellschaft
Munich, Germany
Reprints, in whole or part, approved
exclusively with written permission of
BMW AG, Munich.
Order No. 01 40 0 156 097
US X/2001
Printed in Germany
Printed on environmentally friendly paper
(bleached without chlorine, suitable for
recycling).
Page 14 of 208

At a glanceControlsDriving tipsCommunicationsNavigationEntertainmentMobilityReference
13
1
Rear window sun blind109
2
Rear window safety switch42
3
Electric power windows42
4
Exterior mirrors52
5
Parking brake62
6
Parking lamps and low beams96
7
Instrument lighting97
8
Turn signal indicators71
High beams, headlamp flasher97
Computer81,
Check Control80
Computer81
Standing lamps97
9
Steering wheel18
10
Info Display14
11
Automatic transmission lever66
12
Ignition lock61
13
Switching ignition on and off,
starting the engine62
14
Windshield wipers71
Rain sensor71
15
Park Distance Control (PDC)88
16
Horn: the entire surface
17
Steering wheel heating53
Steering wheel adjustment53
18
Unlocking the luggage
compartment39
19
Programmable cruise control73
20
Front fog lamps97
Front fog lamps
21
Opening the hood175
Page 18 of 208
At a glanceControlsDriving tipsCommunicationsNavigationEntertainmentMobilityReference
17
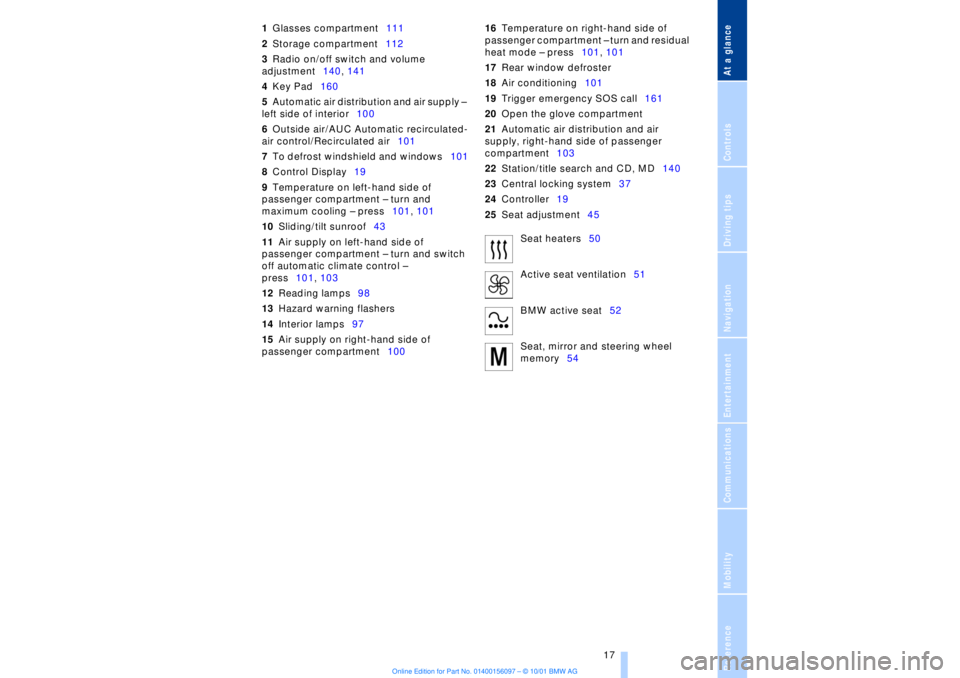
1Glasses compartment111
2Storage compartment112
3Radio on/off switch and volume
adjustment140, 141
4Key Pad160
5Automatic air distribution and air supply Ð
left side of interior100
6Outside air/AUC Automatic recirculated-
air control/Recirculated air101
7To defrost windshield and windows101
8Control Display19
9Temperature on left-hand side of
passenger compartment Ð turn and
maximum cooling Ð press101, 101
10Sliding/tilt sunroof43
11Air supply on left-hand side of
passenger compartment Ð turn and switch
off automatic climate control Ð
press101, 103
12Reading lamps98
13Hazard warning flashers
14Interior lamps97
15Air supply on right-hand side of
passenger compartment10016Temperature on right-hand side of
passenger compartment Ð turn and residual
heat mode Ð press101, 101
17Rear window defroster
18Air conditioning101
19Trigger emergency SOS call161
20Open the glove compartment
21Automatic air distribution and air
supply, right-hand side of passenger
compartment103
22Station/title search and CD, MD140
23Central locking system37
24Controller19
25Seat adjustment45
Seat heaters50
Active seat ventilation51
BMW active seat52
Seat, mirror and steering wheel
memory54
Page 19 of 208
Cockpit
18
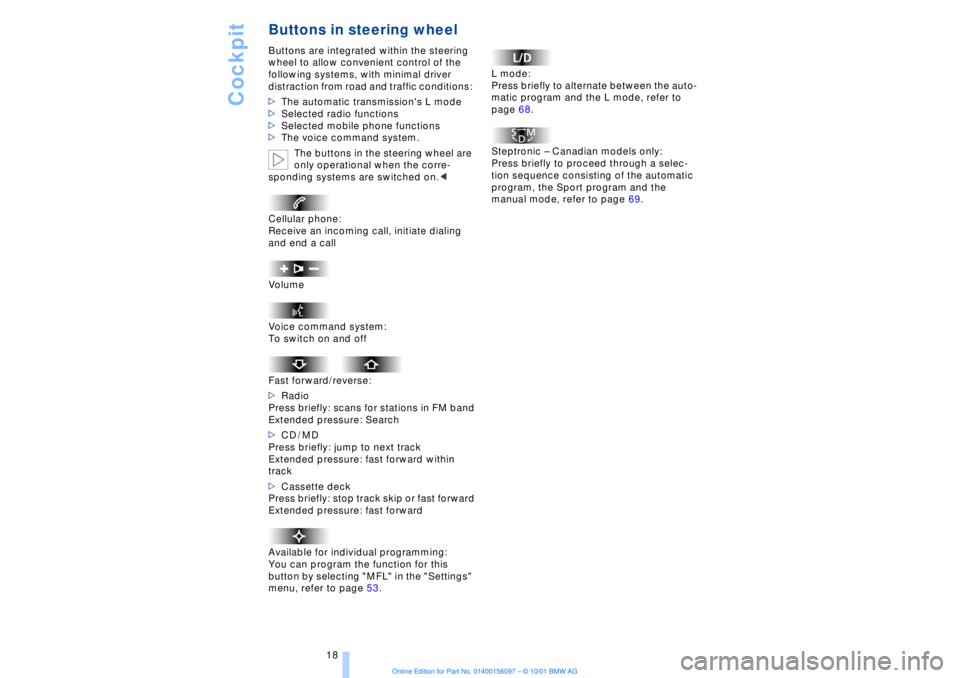
Buttons in steering wheel Buttons are integrated within the steering
wheel to allow convenient control of the
following systems, with minimal driver
distraction from road and traffic conditions:
>The automatic transmission's L mode
>Selected radio functions
>Selected mobile phone functions
>The voice command system.
The buttons in the steering wheel are
only operational when the corre-
sponding systems are switched on.<
Cellular phone:
Receive an incoming call, initiate dialing
and end a call
Volume
Voice command system:
To switch on and off
Fast forward/reverse:
>Radio
Press briefly: scans for stations in FM band
Extended pressure: Search
>CD / MD
Press briefly: jump to next track
Extended pressure: fast forward within
track
>Cassette deck
Press briefly: stop track skip or fast forward
Extended pressure: fast forward
Available for individual programming:
You can program the function for this
button by selecting "MFL" in the "Settings"
menu, refer to page 53. L mode:
Press briefly to alternate between the auto-
matic program and the L mode, refer to
page 68.
Steptronic Ð Canadian models only:
Press briefly to proceed through a selec-
tion sequence consisting of the automatic
program, the Sport program and the
manual mode, refer to page 69.
Page 26 of 208
At a glanceControlsDriving tipsCommunicationsNavigationEntertainmentMobilityReference
25
Voice commandVoice command system*The conceptThe voice command system allows you to
control operation of various vehicle
systems without ever removing your hands
from the steering wheel. The system oper-
ates on the basis of voice commands that
you will learn easily after using them a few
times. You issue your commands in the
form of instructions or in dialogs. The
dialog functions provide you with additional
support in the form of questions and infor-
mation.
The voice command system transforms
your commands and dialog answers into
control signals for the selected systems.
Please take the time to acquaint your-
self with how a particular system
operates before proceeding to control it
using the voice command system. At the
time of publication the voice command
system was available for use with the
English and German languages. Other
languages are currently in preparation.
When the voice command system is active
you can adjust the volume, refer to
page 141.
command system.<
>>...<< identifies commands used in the
voice command system. It is not necessary
to speak the words in parentheses.
>...< identifies the answers provided by the
voice command system.
Systems available for use with voice
command>Mobile phone, refer to page 158
>>Telephone (menu)<<
>Navigation system, refer to page 124
>>Navigation (menu)<< or
>>Navi (menu)<<>Radio, refer to page 140
>>Radio (menu)<<
>CD, refer to page 146
>>CD (menu)<<
>CD changer, refer to page 148
>>CD changer (menu)<<
>MiniDisc, refer to page 151
>>MiniDisc (menu)<<
>Cassette, refer to page 153
>>Tape (menu)<<
>Notebook, refer to page 28
>>Notepad (menu)<< or
>>Notebook (menu)<< or >>Note
recorder (menu)<<
Either the system that you are now control-
ling, or any current error messages will
appear in the Info Display, refer to page 14.
Voice commandsTo activate voice command systemActivate by briefly pressing the
button in the steering wheel.
A signal tone and "SVS" in the Info Display
indicate that the system is ready for use.
You automatically proceed to the orienta-
tion menu.
Except in dialogs, always press
the button again before issuing voice
commands.
During dialogs that include entry of text or
numbers, the information that the voice
command system has registered will
appear on the Info Display screen, refer to
page 14.To cancel voice command entryYou can terminate execution of a command
or dialog with >>Cancel<<, >>Exit<< or by
pressing the button in the steering
wheel.
Page 40 of 208
At a glanceControlsDriving tipsCommunicationsNavigationEntertainmentMobilityReference
39
>unlock the vehicle using the remote
control, refer to page 36, or
>insert the remote control all the way into
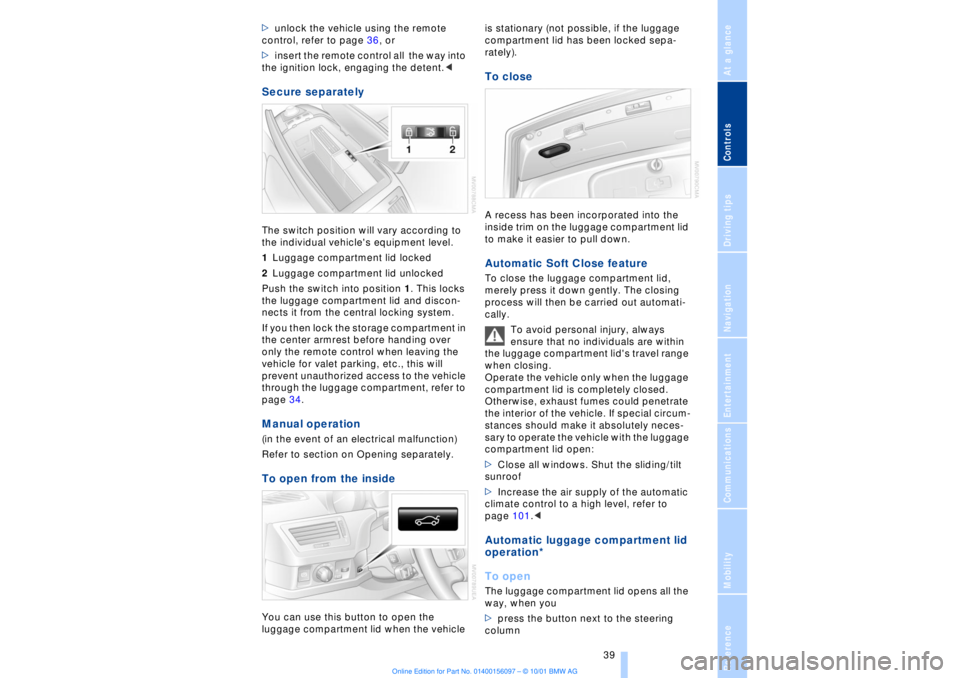
the ignition lock, engaging the detent.< Secure separately The switch position will vary according to
the individual vehicle's equipment level.
1Luggage compartment lid locked
2Luggage compartment lid unlocked
Push the switch into position 1. This locks
the luggage compartment lid and discon-
nects it from the central locking system.
If you then lock the storage compartment in
the center armrest before handing over
only the remote control when leaving the
vehicle for valet parking, etc., this will
prevent unauthorized access to the vehicle
through the luggage compartment, refer to
page 34. Manual operation (in the event of an electrical malfunction)
Refer to section on Opening separately.To open from the insideYou can use this button to open the
luggage compartment lid when the vehicle is stationary (not possible, if the luggage
compartment lid has been locked sepa-
rately).
To closeA recess has been incorporated into the
inside trim on the luggage compartment lid
to make it easier to pull down. Automatic Soft Close feature To close the luggage compartment lid,
merely press it down gently. The closing
process will then be carried out automati-
cally.
To avoid personal injury, always
ensure that no individuals are within
the luggage compartment lid's travel range
when closing.
Operate the vehicle only when the luggage
compartment lid is completely closed.
Otherwise, exhaust fumes could penetrate
the interior of the vehicle. If special circum-
stances should make it absolutely neces-
sary to operate the vehicle with the luggage
compartment lid open:
>Close all windows. Shut the sliding/tilt
sunroof
>Increase the air supply of the automatic
climate control to a high level, refer to
page 101.< Automatic luggage compartment lid
operation*
To openThe luggage compartment lid opens all the
way, when you
>press the button next to the steering
column
Page 46 of 208
At a glanceControlsDriving tipsCommunicationsNavigationEntertainmentMobilityReference
45
Adjustments Correct sitting position
The ideal sitting position can make a vital
contribution to relaxed, fatigue-free driving.
The correct sitting position also works
together with the safety belts and airbags
to provide occupants with maximum levels
of passive safety in an accident. To ensure
that the safety systems operate with
optimal efficiency, we strongly urge you to
observe the instructions contained in the
following section.
For additional information on transporting
children safely, refer to page 57. Correct sitting position with airbags
Always maintain an adequate
distance between yourself and the
airbags. Always hold the steering wheel by
its rim with hands at the 9 o'clock and
3 o'clock positions, to minimize the risk of
injuries to your hands and arms in the event
of airbag deployment. No one and nothing
is to come between the airbags and the
seat occupant.
To prevent possible leg injuries should the
knee airbag deploy in an accident, ensure
that the front passenger assumes a correct
sitting position. Do not use the cover of the
front airbag on the front passenger side as
a storage area for objects, or as a rest for
feet or legs.<
For airbag locations and additional infor-
mation on airbags, refer to page 55.
Correct sitting position with safety
belts For the safety of all vehicle occupants,
please comply with the following instruc-
tions for wearing safety belts.
Never allow more than one person to
wear a single safety belt. Never allow
infants or small children to ride in a
passenger's lap. Avoid twisting the belt
while routing it firmly across the hips and
shoulder. Wear it as snugly against your body as possible. Do not allow the belt to
rest against hard or fragile objects.
Do not route the belt across your neck, or
run it across sharp edges. Be sure that the
belt does not become caught or jammed.
Avoid wearing loose or bulky clothing that
would prevent the belt from resting
securely against your body; pull on the
shoulder strap periodically to keep it
tensioned. In the event of a frontal impact,
a loose lap belt could slide over your hips,
leading to abdominal injury. In addition, the
safety belt's restraint effectiveness is
reduced if the belt is worn loosely.
Expectant mothers should always wear
their safety belts, taking care to position
the lap belt against the lower hips, where it
will not exert pressure against the abdom-
inal area.<
For putting on safety belts, refer to
page 50.
Seats For your personal safety when adjusting
the seat position, please follow the instruc-
tions below carefully.
Never attempt to adjust your seat
while operating the vehicle. The seat
could respond with unexpected move-
ment, and the ensuing loss of vehicle
control could lead to an accident.
Never recline the backrest to an extremely
horizontal position while the vehicle is
underway Ð this precaution is especially
important for front passengers and the
occupants of electric power rear seats to
remember. Failure to observe these
precautions can prevent the belts from
providing effective protection against
injury, as passengers could slide under the
belts in an accident.<
Please observe the information on using
safety belts provided on page 50 and the
Page 53 of 208
Adjustments
52
Active seat* "Active" adjustment of the seat cushion's
contours reduces muscular tension and
fatigue to help prevent lower back pain.
To activate: press the button, the indicator
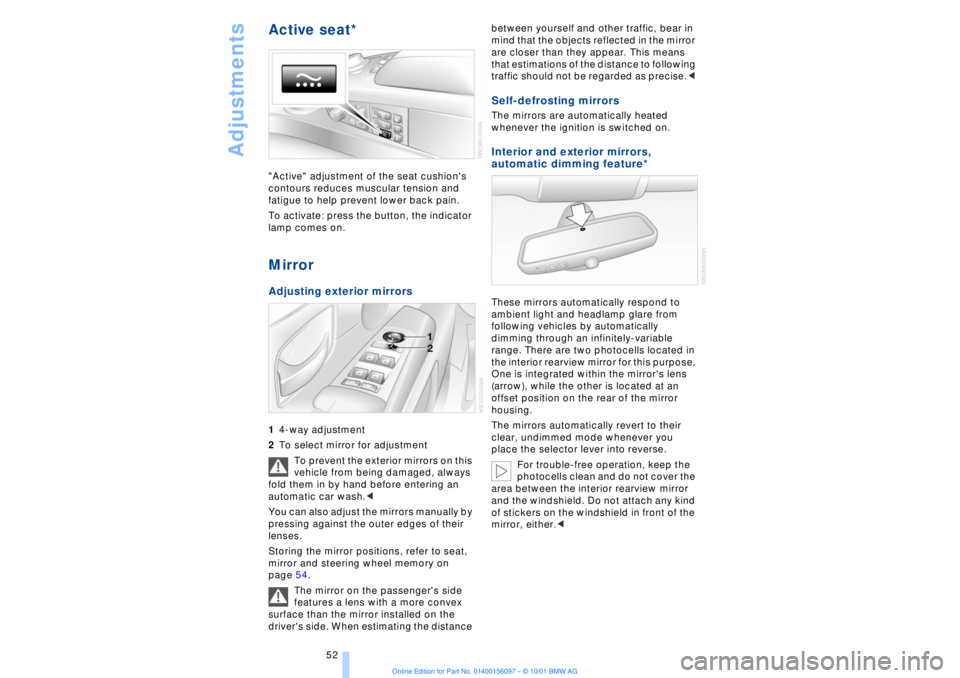
lamp comes on. MirrorAdjusting exterior mirrors 14-way adjustment
2To select mirror for adjustment
To prevent the exterior mirrors on this
vehicle from being damaged, always
fold them in by hand before entering an
automatic car wash.<
You can also adjust the mirrors manually by
pressing against the outer edges of their
lenses.
Storing the mirror positions, refer to seat,
mirror and steering wheel memory on
page 54.
The mirror on the passenger's side
features a lens with a more convex
surface than the mirror installed on the
driver's side. When estimating the distance between yourself and other traffic, bear in
mind that the objects reflected in the mirror
are closer than they appear. This means
that estimations of the distance to following
traffic should not be regarded as precise.<
Self-defrosting mirrors The mirrors are automatically heated
whenever the ignition is switched on. Interior and exterior mirrors,
automatic dimming feature*
These mirrors automatically respond to
ambient light and headlamp glare from
following vehicles by automatically
dimming through an infinitely-variable
range. There are two photocells located in
the interior rearview mirror for this purpose.
One is integrated within the mirror's lens
(arrow), while the other is located at an
offset position on the rear of the mirror
housing.
The mirrors automatically revert to their
clear, undimmed mode whenever you
place the selector lever into reverse.
For trouble-free operation, keep the
photocells clean and do not cover the
area between the interior rearview mirror
and the windshield. Do not attach any kind
of stickers on the windshield in front of the
mirror, either.<