2002 BMW 745LI SEDAN turn signal bulb
[x] Cancel search: turn signal bulbPage 72 of 208

At a glanceControlsDriving tipsCommunicationsNavigationEntertainmentMobilityReference
71
vehicle could start to roll if parked on a
steep slope.< To re-engage the lockout 1.Disengage the release lever by pressing
it together with the red detent lever,
arrow 1
2.Guide the release lever all the way back
into its original position Ð the transmission
lockout is again engaged
3.Fold up and lock the cover panel. Now Ð
and not before Ð the key may be removed.
Once the transmission lockout has
been re-engaged, the warning in the
Check Control should disappear, and the
symbol in the Info Display should change
from N to P. Should this fail to happen,
there is a danger that the vehicle could
start to roll.<
Information on jump-starting, tow-starting
and towing begins on page 187. Turn signal indicators/
headlamp flasher1High beams Ð blue indicator lamp
2Headlamp flasher Ð blue indicator lamp 3Turn signal indicators Ð the green indi-
cator lamp flashes, accompanied by a peri-
odic ticking from the turn signal indicator
relay.
To use the turn signal indicatorsMove the lever beyond the detent position.
It then returns to the center position when
released. Press the lever as far as the
detent to switch off the turn signals. To signal brieflyPress the lever up to but not beyond the
detent. It then returns to the center position
when released.
If the flashing of the indicator lamp and the
ticking from the relay are both faster than
normal, this indicates that one of the bulbs
is defective; if a trailer is attached, this
could also indicate that one of its turn
signal indicator bulbs is defective. Wiper system1Standard wiper speed: press briefly one
time.
Fast wipe: briefly press twice
2To switch off wipers or for brief wipe
3To activate/deactivate rain sensor
4Cleaning windshield
5Adjusting rain sensor sensitivity level.
The lever automatically returns to its
initial position when released.<
Page 183 of 208

Replacing components
182
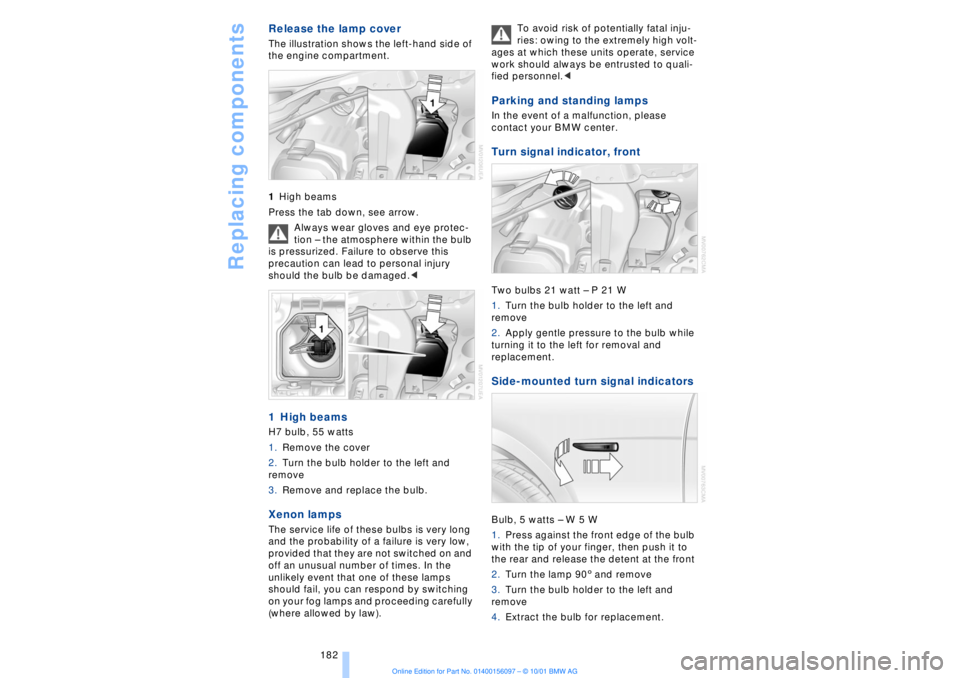
Release the lamp cover The illustration shows the left-hand side of
the engine compartment.
1High beams
Press the tab down, see arrow.
Always wear gloves and eye protec-
tion Ð the atmosphere within the bulb
is pressurized. Failure to observe this
precaution can lead to personal injury
should the bulb be damaged.< 1 High beams H7 bulb, 55 watts
1.Remove the cover
2.Turn the bulb holder to the left and
remove
3.Remove and replace the bulb. Xenon lamps
The service life of these bulbs is very long
and the probability of a failure is very low,
provided that they are not switched on and
off an unusual number of times. In the
unlikely event that one of these lamps
should fail, you can respond by switching
on your fog lamps and proceeding carefully
(where allowed by law). To avoid risk of potentially fatal inju-
ries: owing to the extremely high volt-
ages at which these units operate, service
work should always be entrusted to quali-
fied personnel.<
Parking and standing lamps In the event of a malfunction, please
contact your BMW center. Turn signal indicator, front Two bulbs 21 watt Ð P 21 W
1.Turn the bulb holder to the left and
remove
2.Apply gentle pressure to the bulb while
turning it to the left for removal and
replacement. Side-mounted turn signal indicators Bulb, 5 watts Ð W 5 W
1.Press against the front edge of the bulb
with the tip of your finger, then push it to
the rear and release the detent at the front
2.Turn the lamp 903 and remove
3.Turn the bulb holder to the left and
remove
4.Extract the bulb for replacement.
Page 184 of 208

OverviewControlsDriving tipsCommunicationsNavigationEntertainmentMobilityReference
183
Side marker lamps, front and rear Please contact your BMW center for
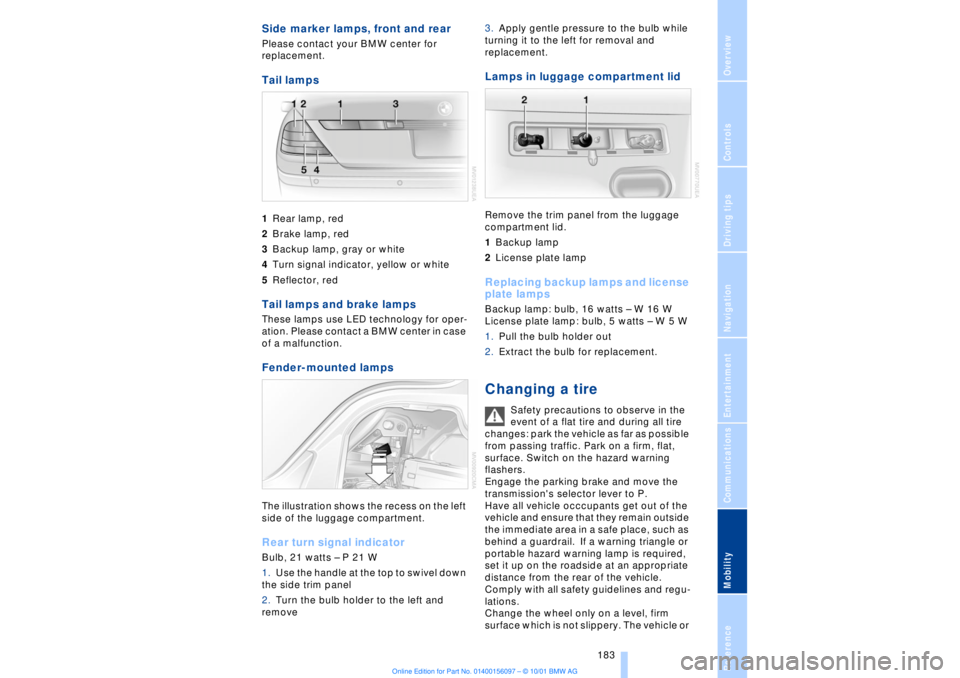
replacement. Tail lamps 1Rear lamp, red
2Brake lamp, red
3Backup lamp, gray or white
4Turn signal indicator, yellow or white
5Reflector, redTail lamps and brake lamps These lamps use LED technology for oper-
ation. Please contact a BMW center in case
of a malfunction. Fender-mounted lamps The illustration shows the recess on the left
side of the luggage compartment.Rear turn signal indicatorBulb, 21 watts Ð P 21 W
1.Use the handle at the top to swivel down
the side trim panel
2.Turn the bulb holder to the left and
remove 3.Apply gentle pressure to the bulb while
turning it to the left for removal and
replacement.
Lamps in luggage compartment lid Remove the trim panel from the luggage
compartment lid.
1Backup lamp
2License plate lamp Replacing backup lamps and license
plate lamps Backup lamp: bulb, 16 watts Ð W 16 W
License plate lamp: bulb, 5 watts Ð W 5 W
1.Pull the bulb holder out
2.Extract the bulb for replacement. Changing a tire
Safety precautions to observe in the
event of a flat tire and during all tire
changes: park the vehicle as far as possible
from passing traffic. Park on a firm, flat,
surface. Switch on the hazard warning
flashers.
Engage the parking brake and move the
transmission's selector lever to P.
Have all vehicle occcupants get out of the
vehicle and ensure that they remain outside
the immediate area in a safe place, such as
behind a guardrail. If a warning triangle or
portable hazard warning lamp is required,
set it up on the roadside at an appropriate
distance from the rear of the vehicle.
Comply with all safety guidelines and regu-
lations.
Change the wheel only on a level, firm
surface which is not slippery. The vehicle or
Page 198 of 208

197
At a glanceControlsDriving tipsCommunicationsNavigationEntertainmentMobilityReference
Computer 81
Ð automatic climate
control 103
Ð "BC" 84
Ð changing settings 86
Ð changing time and
date 86
Ð Control Display screen
contents 83
Ð displays, menus 22
Ð language selection 86
Ð status lines 24
Ð symbols 20
Computer, refer to Control
Center 19
Condition Based Service
(CBS) 179
Connecting car vacuum
cleaner 113
Consumption display 82
Control Center 19
Ð assistance window 23
Ð automatic climate
control 103
Ð changing menu page 20
Ð changing settings 86
Ð confirm selection or
entry 20
Ð display help texts 23
Ð displays, menus 22
Ð language selection 86
Ð lists 20
Ð menu entry selection 19
Ð selecting units of measure
and display format 86
Ð setting time and date 86
Ð status lines 24
Ð symbols 20
Ð symbols and lists 20
Control Display 19
Controller, refer to Control
Center 19
Convenience operation of
windows and sliding/tilt
sunroof 36, 37
Convenience starting
feature 62
"Coolant" 179
Coolant 176, 177
Cooler, refer to Rear
cooler 110Cooling adjustment
Ð rear air conditioner 105
Copyright 2
Cornering Brake Control
(CBC) 91
Courtesy lamps 98
Cruise control 73
Cruise control, see Pro-
grammable cruise
control 73
Cruising range 82
Cup holder, refer to Bever-
age holder 112
Curb lamp
Ð bulb replacement 182
Curb weight 194
Current fuel
consumption 83
D"Date" 86
Daytime driving lamp
mode 96
DBC (Dynamic Brake
Control) 91
Deactivating
Ð tilt alarm sensor 36, 41
Defrosting, windows 101
Defrost setting 101
"DELETE" for
navigation 130
Destination entry 126
Destination for navigation
system
Ð selecting in
"Information" 129
Destination memory 129
"Destinations" 126
"Dest. input" 126
Dialed numbers 164
Dimensions 193
Dimming mirrors 52
Dipstick, engine oil 176
Direction
Ð arrow 132
Ð to destination 131
Ð voice instructions 133
Directional indicators, see
Turn signal indicators 71Directory creation
Ð with navigation
system 134
"Dir. of travel" with naviga-
tion system 132
"Dir. to north" with naviga-
tion system 132
Disc brakes 119
Displacement 192
Display, refer to Control
Display 19
Display format and units of
measure in Control
Display, changing 86
Display illumination, refer to
Instrument lighting 97
Displays 14
Ð computer 22
Ð Control Center 22
Distance 83
Distance to destination 83
Distance warning 88
Door keys 34
Doors
Ð locking and unlocking 35
Ð manual operation 37
Ð remote control 35
DOT Quality Grades 172
Draft-free ventilation 102
Drink holders, refer to
Beverage holders 112
Driving stability control 89
Driving tips 118
"DSC" 90
DSC (Dynamic Stability
Control) 89
"DTC" 90
DTC (Dynamic Traction
Control) 15, 90
Dynamic Brake Control
(DBC) 91
Dynamic Drive 91
Dynamic Stability Control
(DSC) 89
Dynamic Traction Control
(DTC) 15, 90
EEBV (Electronic Brake-
force Distribution) 91
Page 204 of 208

203
At a glanceControlsDriving tipsCommunicationsNavigationEntertainmentMobilityReference
Steptronic 69
Stopwatch 85
Storage, refer to Car care
manual
Storage compartments 111
Storing preset speeds,
refer to Programmable
cruise control 75
Straps, refer to
Loading 120
Summer tires 173
Sun blinds 109
Switch for battery 185
Switching air conditioner
on and off 101
Switching off the engine 62
Switching off with mobile
phone 162
Switching on
Ð audio 140
Ð cassette deck 153
Ð CD changer 149
Ð CD player 146
Ð MD player 151
Ð radio 140
Symbols 6
Ð Control Center 20
System failure reports, refer
to Check Control 80TTachometer 77
Tail lamps 183
Ð bulb replacement 183
"Tape" 140, 153
Technical
modifications 8, 98
Telephone, refer to Mobile
phone 158
Telephone directory
Ð creating voice command
telephone directory 162
Ð dialing numbers 163
Ð updating voice command
telephone directory 162
"Temp. distribution" 51
Temperature
adjustment 101
Temperature display, out-
side temperature 77Third brake lamp 183
Tilt function, passenger-
side mirror 54
Time
Ð of arrival, estimated 83
Timing 85
Tire change 184
Tire inflation pressures 170
Tire pressure monitor 92
Tire Quality Grading 172
Tires
Ð flat tire 184
Ð tire changes 184
Ð tire damage 171
Ð tire inflation
pressures 170
Ð tire pressure monitoring
system 92
Ð tire replacement 172
Ð tire size, refer to Wheel
and tire
combinations 173
Ð tire tread 171
Ð tire tread wear
indicators 171
Title search
Ð cassette deck 154
Tone in audio operation
Ð adjusting 141
"Tone" in sound system
operation 141
Tools 181
"TOP 8" 163
Torque 192
Tow fittings 188
Towing 188
Track 193
Traction Control System,
refer to DSC 89
Traffic congestion, refer to
Selecting new route 133
Transmission
Ð automatic transmission
with L mode 66
Ð automatic transmission
with Steptronic 69
Transmission
lockout 67, 70
Ð manual release 70
Travel route, see Route 132
Tread depth, tires 171"Treble" in sound system
operation 141
Trip odometer 77
Trunk lid
Ð emergency release 40
Ð refer to luggage compart-
ment lid 38
Turning circle 193
Turn signal indicators 71
Ð bulb
replacement 182, 183
UUndercoating, refer to Car
care manual
Uniform Tire Quality Gra-
ding (UTQR) 172
Universal garage door
opener 108
Upholstery care, refer
to Car Care
Used batteries 186
User controls 16
"Using motorway" 130VVacuum cleaner
connection 113
Valve caps 185
Vanity mirror 53
Vehicle battery 185
Vehicle dimensions 193
Vehicle keys 34
Vehicle stability control 89
Ventilation 102
Ventilation, draft-free 102
Ventilation while
parked 106
Vents, ventilation 99
"View" with navigation
system 132, 133
Viscosity 177
Voice command
system 18, 25
Voice command system
notebook 27