2002 BMW 745LI SEDAN change time
[x] Cancel search: change timePage 21 of 208
Control Center
20 Among the available menu entries:
>Adjustment options
>Program
>Function
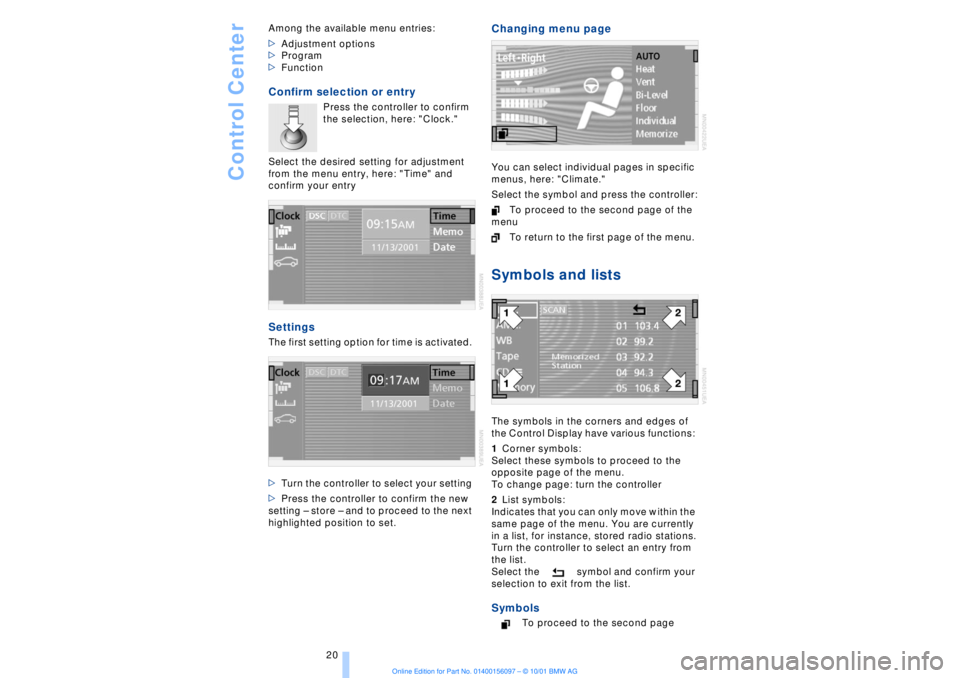
Confirm selection or entry
Press the controller to confirm
the selection, here: "Clock."
Select the desired setting for adjustment
from the menu entry, here: "Time" and
confirm your entry
Settings The first setting option for time is activated.
>Turn the controller to select your setting
>Press the controller to confirm the new
setting Ð store Ð and to proceed to the next
highlighted position to set.
Changing menu page You can select individual pages in specific
menus, here: "Climate."
Select the symbol and press the controller:
To proceed to the second page of the
menu
To return to the first page of the menu. Symbols and listsThe symbols in the corners and edges of
the Control Display have various functions:
1Corner symbols:
Select these symbols to proceed to the
opposite page of the menu.
To change page: turn the controller
2List symbols:
Indicates that you can only move within the
same page of the menu. You are currently
in a list, for instance, stored radio stations.
Turn the controller to select an entry from
the list.
Select the symbol and confirm your
selection to exit from the list. Symbols
To proceed to the second page
Page 23 of 208
Control Center
22
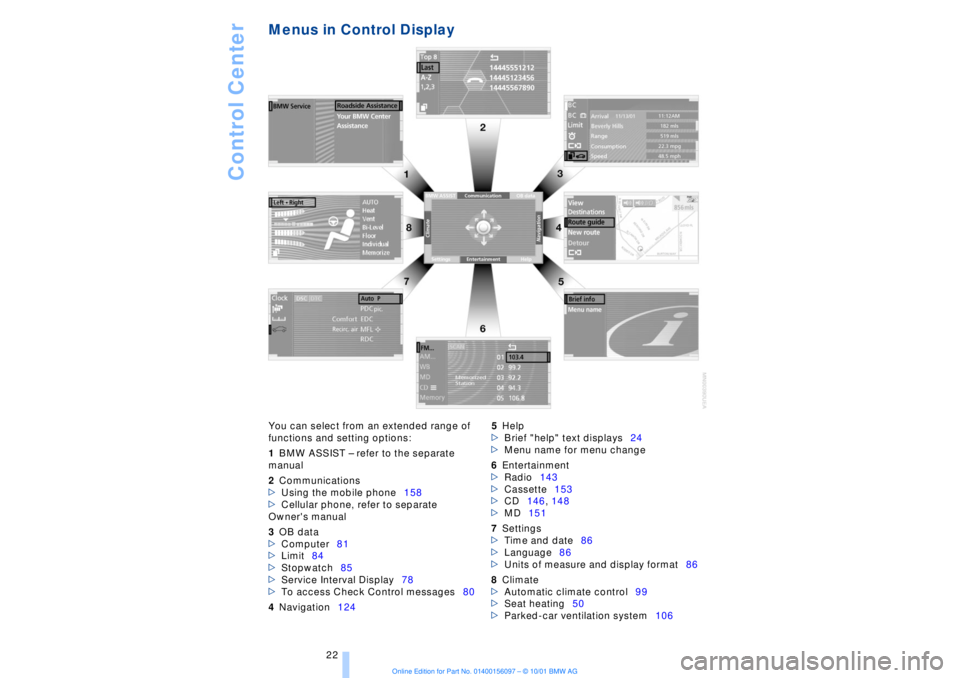
Menus in Control Display You can select from an extended range of
functions and setting options:
1BMW ASSIST Ð refer to the separate
manual
2Communications
>Using the mobile phone158
>Cellular phone, refer to separate
Owner's manual
3OB data
>Computer81
>Limit84
>Stopwatch85
>Service Interval Display78
>To access Check Control messages80
4Navigation1245Help
>Brief "help" text displays24
>Menu name for menu change
6Entertainment
>Radio143
>Cassette153
>CD146, 148
>MD151
7Settings
>Time and date86
>Language86
>Units of measure and display format86
8Climate
>Automatic climate control99
>Seat heating50
>Parked-car ventilation system106
Page 26 of 208
At a glanceControlsDriving tipsCommunicationsNavigationEntertainmentMobilityReference
25
Voice commandVoice command system*The conceptThe voice command system allows you to
control operation of various vehicle
systems without ever removing your hands
from the steering wheel. The system oper-
ates on the basis of voice commands that
you will learn easily after using them a few
times. You issue your commands in the
form of instructions or in dialogs. The
dialog functions provide you with additional
support in the form of questions and infor-
mation.
The voice command system transforms
your commands and dialog answers into
control signals for the selected systems.
Please take the time to acquaint your-
self with how a particular system
operates before proceeding to control it
using the voice command system. At the
time of publication the voice command
system was available for use with the
English and German languages. Other
languages are currently in preparation.
When the voice command system is active
you can adjust the volume, refer to
page 141.
command system.<
>>...<< identifies commands used in the
voice command system. It is not necessary
to speak the words in parentheses.
>...< identifies the answers provided by the
voice command system.
Systems available for use with voice
command>Mobile phone, refer to page 158
>>Telephone (menu)<<
>Navigation system, refer to page 124
>>Navigation (menu)<< or
>>Navi (menu)<<>Radio, refer to page 140
>>Radio (menu)<<
>CD, refer to page 146
>>CD (menu)<<
>CD changer, refer to page 148
>>CD changer (menu)<<
>MiniDisc, refer to page 151
>>MiniDisc (menu)<<
>Cassette, refer to page 153
>>Tape (menu)<<
>Notebook, refer to page 28
>>Notepad (menu)<< or
>>Notebook (menu)<< or >>Note
recorder (menu)<<
Either the system that you are now control-
ling, or any current error messages will
appear in the Info Display, refer to page 14.
Voice commandsTo activate voice command systemActivate by briefly pressing the
button in the steering wheel.
A signal tone and "SVS" in the Info Display
indicate that the system is ready for use.
You automatically proceed to the orienta-
tion menu.
Except in dialogs, always press
the button again before issuing voice
commands.
During dialogs that include entry of text or
numbers, the information that the voice
command system has registered will
appear on the Info Display screen, refer to
page 14.To cancel voice command entryYou can terminate execution of a command
or dialog with >>Cancel<<, >>Exit<< or by
pressing the button in the steering
wheel.
Page 38 of 208
At a glanceControlsDriving tipsCommunicationsNavigationEntertainmentMobilityReference
37
Compliance statement:
This device complies with part 15 of the
FCC Rules. Operation is subject to the
following two conditions:
>This device may not cause harmful inter-
ference, and
>this device must accept any interference
received, including interference that may
cause undesired operation.
Any unauthorized modifications or
changes to these devices could void
the user's authority to operate this equip-
ment.
Turning the key a second time unlocks all of
the remaining doors, the luggage compart-
ment lid and the fuel filler door.
You can have a signal set as an
acknowledgment message that the
vehicle is closed correctly.< Convenience operation You also have the option of operating the
windows and the sliding/tilt sunroof from
the driver's door lock.
>To open:
With the door closed, turn the key to the
"unlock" position and hold it there
>To close:
With the door closed, turn the key to the
"lock" position and hold it there.
Watch during the closing process to
be sure that no one is injured.
Releasing the key stops the operation.<
Manual operation (in the event of an electrical malfunction)
You can turn the key all the way to the right
or left in the door lock or engage or release
the locking mechanism in the driver's door. Opening and closing Ð from
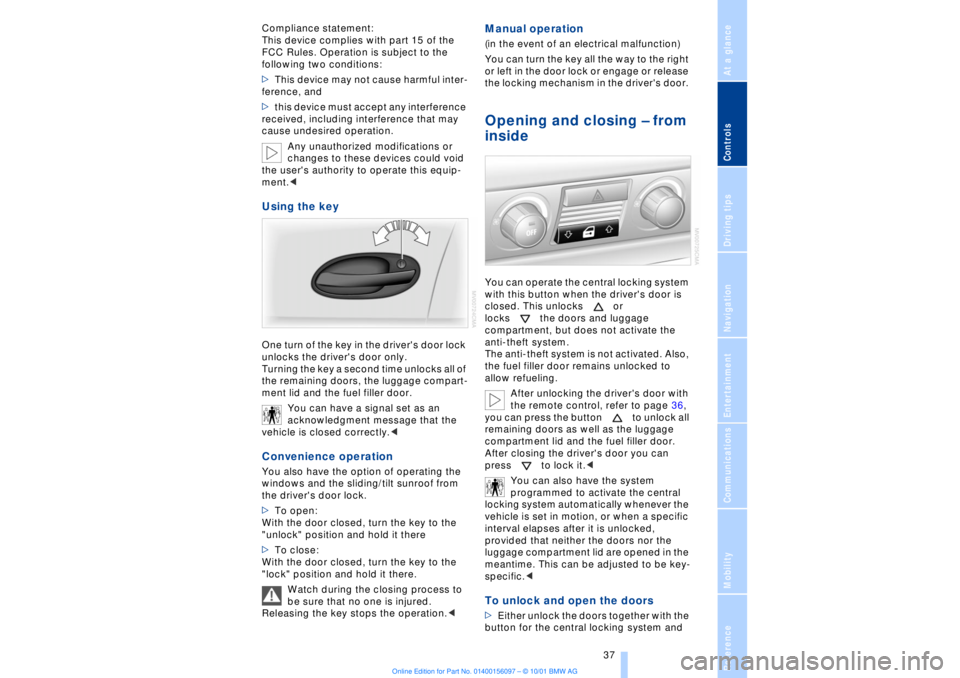
inside You can operate the central locking system
with this button when the driver's door is
closed. This unlocks or
locks the doors and luggage
compartment, but does not activate the
anti-theft system.
The anti-theft system is not activated. Also,
the fuel filler door remains unlocked to
allow refueling.
After unlocking the driver's door with
the remote control, refer to page 36,
you can press the button to unlock all
remaining doors as well as the luggage
compartment lid and the fuel filler door.
After closing the driver's door you can
press to lock it.<
You can also have the system
programmed to activate the central
locking system automatically whenever the
vehicle is set in motion, or when a specific
interval elapses after it is unlocked,
provided that neither the doors nor the
luggage compartment lid are opened in the
meantime. This can be adjusted to be key-
specific.< To unlock and open the doors >Either unlock the doors together with the
button for the central locking system and
Page 64 of 208
At a glanceControlsDriving tipsCommunicationsNavigationEntertainmentMobilityReference
63
You have two separate options for
engaging the parking brake:
>Manually, by briefly pressing the button
>Automatically, through activation of the
Automatic Hold mode, refer to next
column.
An electrohydraulic mechanism then
engages the parking brakes to prevent the
rear wheels from turning whenever you
switch off the engine.
When the engine is running, parking brake
engagement is controlled by the brake
system's hydraulic circuits, which act on
the disc brakes at the front and rear
wheels. Brake pedal feel Because this function is activated using the
brake system's hydraulic circuits, the
response of the brake pedal may change
slightly. Engagement may also be accom-
panied by activation noise Ð this is normal. Manual engagement
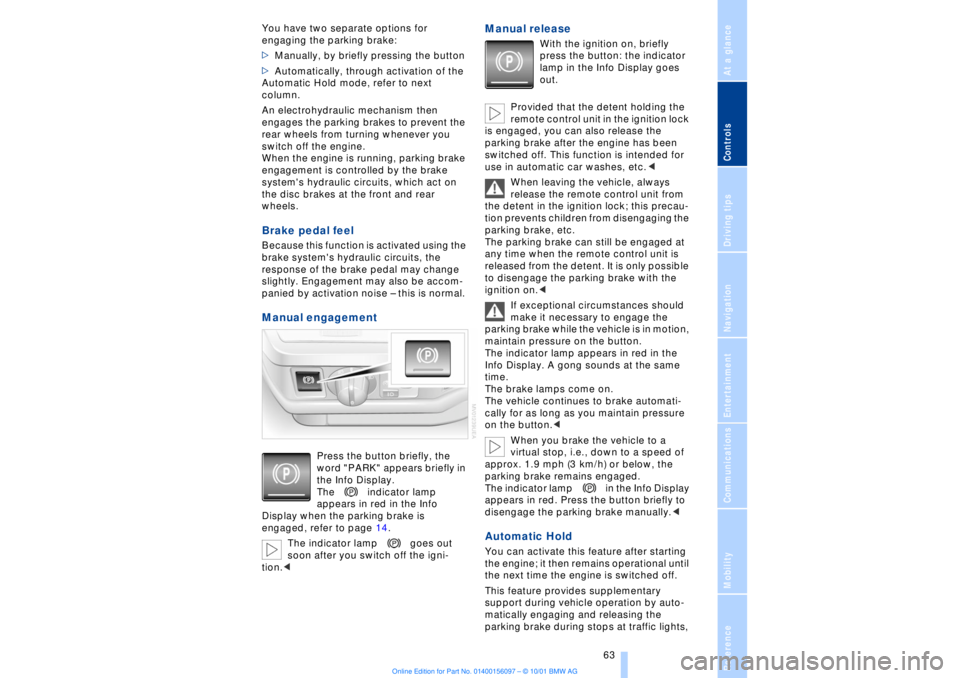
Press the button briefly, the
word "PARK" appears briefly in
the Info Display.
The indicator lamp
appears in red in the Info
Display when the parking brake is
engaged, refer to page 14.
The indicator lamp goes out
soon after you switch off the igni-
tion.<
Manual release
With the ignition on, briefly
press the button: the indicator
lamp in the Info Display goes
out.
Provided that the detent holding the
remote control unit in the ignition lock
is engaged, you can also release the
parking brake after the engine has been
switched off. This function is intended for
use in automatic car washes, etc.<
When leaving the vehicle, always
release the remote control unit from
the detent in the ignition lock; this precau-
tion prevents children from disengaging the
parking brake, etc.
The parking brake can still be engaged at
any time when the remote control unit is
released from the detent. It is only possible
to disengage the parking brake with the
ignition on.<
If exceptional circumstances should
make it necessary to engage the
parking brake while the vehicle is in motion,
maintain pressure on the button.
The indicator lamp appears in red in the
Info Display. A gong sounds at the same
time.
The brake lamps come on.
The vehicle continues to brake automati-
cally for as long as you maintain pressure
on the button.<
When you brake the vehicle to a
virtual stop, i.e., down to a speed of
approx. 1.9 mph (3 km/h) or below, the
parking brake remains engaged.
The indicator lamp in the Info Display
appears in red. Press the button briefly to
disengage the parking brake manually.<
Automatic Hold You can activate this feature after starting
the engine; it then remains operational until
the next time the engine is switched off.
This feature provides supplementary
support during vehicle operation by auto-
matically engaging and releasing the
parking brake during stops at traffic lights,
Page 72 of 208

At a glanceControlsDriving tipsCommunicationsNavigationEntertainmentMobilityReference
71
vehicle could start to roll if parked on a
steep slope.< To re-engage the lockout 1.Disengage the release lever by pressing
it together with the red detent lever,
arrow 1
2.Guide the release lever all the way back
into its original position Ð the transmission
lockout is again engaged
3.Fold up and lock the cover panel. Now Ð
and not before Ð the key may be removed.
Once the transmission lockout has
been re-engaged, the warning in the
Check Control should disappear, and the
symbol in the Info Display should change
from N to P. Should this fail to happen,
there is a danger that the vehicle could
start to roll.<
Information on jump-starting, tow-starting
and towing begins on page 187. Turn signal indicators/
headlamp flasher1High beams Ð blue indicator lamp
2Headlamp flasher Ð blue indicator lamp 3Turn signal indicators Ð the green indi-
cator lamp flashes, accompanied by a peri-
odic ticking from the turn signal indicator
relay.
To use the turn signal indicatorsMove the lever beyond the detent position.
It then returns to the center position when
released. Press the lever as far as the
detent to switch off the turn signals. To signal brieflyPress the lever up to but not beyond the
detent. It then returns to the center position
when released.
If the flashing of the indicator lamp and the
ticking from the relay are both faster than
normal, this indicates that one of the bulbs
is defective; if a trailer is attached, this
could also indicate that one of its turn
signal indicator bulbs is defective. Wiper system1Standard wiper speed: press briefly one
time.
Fast wipe: briefly press twice
2To switch off wipers or for brief wipe
3To activate/deactivate rain sensor
4Cleaning windshield
5Adjusting rain sensor sensitivity level.
The lever automatically returns to its
initial position when released.<
Page 78 of 208
At a glanceControlsDriving tipsCommunicationsNavigationEntertainmentMobilityReference
77
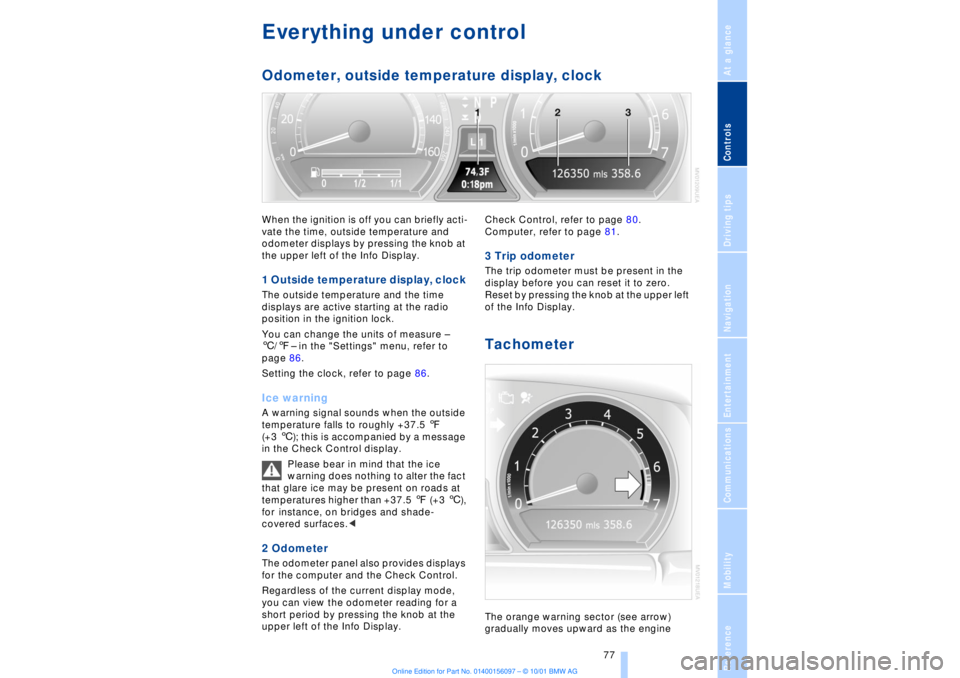
Everything under control Odometer, outside temperature display, clockWhen the ignition is off you can briefly acti-
vate the time, outside temperature and
odometer displays by pressing the knob at
the upper left of the Info Display. 1 Outside temperature display, clock The outside temperature and the time
displays are active starting at the radio
position in the ignition lock.
You can change the units of measure Ð
6/7Ð in the "Settings" menu, refer to
page 86.
Setting the clock, refer to page 86.Ice warning A warning signal sounds when the outside
temperature falls to roughly +37.5 7
(+3 6); this is accompanied by a message
in the Check Control display.
Please bear in mind that the ice
warning does nothing to alter the fact
that glare ice may be present on roads at
temperatures higher than +37.5 7 (+3 6),
for instance, on bridges and shade-
covered surfaces.< 2 Odometer The odometer panel also provides displays
for the computer and the Check Control.
Regardless of the current display mode,
you can view the odometer reading for a
short period by pressing the knob at the
upper left of the Info Display. Check Control, refer to page 80.
Computer, refer to page 81.
3 Trip odometer The trip odometer must be present in the
display before you can reset it to zero.
Reset by pressing the knob at the upper left
of the Info Display. Tachometer The orange warning sector (see arrow)
gradually moves upward as the engine
Page 80 of 208
At a glanceControlsDriving tipsCommunicationsNavigationEntertainmentMobilityReference
79
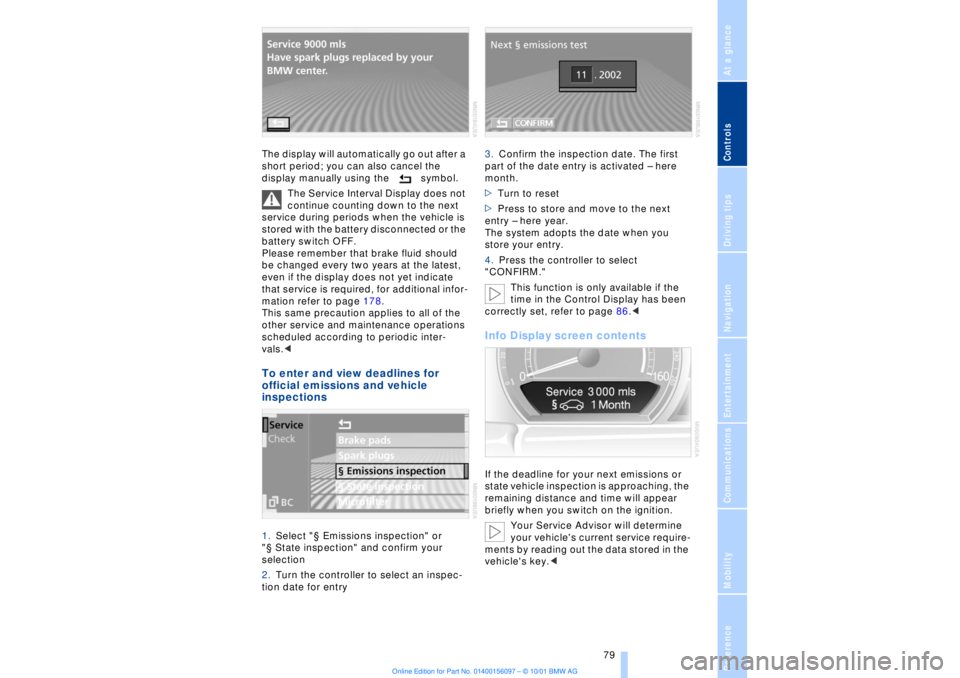
The display will automatically go out after a
short period; you can also cancel the
display manually using the symbol.
The Service Interval Display does not
continue counting down to the next
service during periods when the vehicle is
stored with the battery disconnected or the
battery switch OFF.
Please remember that brake fluid should
be changed every two years at the latest,
even if the display does not yet indicate
that service is required, for additional infor-
mation refer to page 178.
This same precaution applies to all of the
other service and maintenance operations
scheduled according to periodic inter-
vals.< To enter and view deadlines for
official emissions and vehicle
inspections 1.Select "¤ Emissions inspection" or
"¤ State inspection" and confirm your
selection
2.Turn the controller to select an inspec-
tion date for entry 3.Confirm the inspection date. The first
part of the date entry is activated Ð here
month.
>Turn to reset
>Press to store and move to the next
entry Ð here year.
The system adopts the date when you
store your entry.
4.Press the controller to select
"CONFIRM."
This function is only available if the
time in the Control Display has been
correctly set, refer to page 86.<
Info Display screen contents If the deadline for your next emissions or
state vehicle inspection is approaching, the
remaining distance and time will appear
briefly when you switch on the ignition.
Your Service Advisor will determine
your vehicle's current service require-
ments by reading out the data stored in the
vehicle's key.<