2002 BMW 745LI SEDAN jump start
[x] Cancel search: jump startPage 5 of 208
Inhaltsverzeichnis
Radio
143Select the frequency band
143Station selection
144Storing and retrieving a station
145Weather Band
CD Compact Disc
146Using the buttons to search for music
tracks
147Searching for music tracks in the
Control Display
CD changer
149Starting and stopping the CD changer
149Status displays
149Searching for music tracks in the
Control Display
150Using the buttons to search for music
tracks
MiniDisc MD
151Using the buttons to search for music
tracks
152Searching for music tracks in the
Control Display
Cassette
153Noise suppression
154Music track search
Using your mobile phone
158Safety notice
159Care instructions
159Operation
161Hands-free system
161To make SOS call
161Initial operation
162Getting started
162Telephone directory
163To select a number from the Top 8 list
164Redialing, including numbers not
initially reached
164Missed calls
Refueling
168Fuel filler door
169Fuel specifications
Wheels and tires
170Tire inflation pressure
171Tire condition
172Tire replacement
173Wheel and tire combinations
173Special characteristics of winter tires
173Snow chains*
Under the hood
175Hood
176Engine compartment
176Engine oil
177Coolant
178Brake fluid
Maintenance
179The BMW Maintenance System
179Care
Rules and regulations
180California Proposition 65 Warning
180OBD connector
Replacing components
181Onboard tool kit
181Windshield wiper blades
181Lamps and bulbs
183Changing a tire
185Battery
186Fuses
Help Ð Giving and receiving
187Warning triangle*
187First-aid kit*
187Jump-starting
188Towing
Technical data
192Engine specifications
193Dimensions
194Weights
194Capacities
Everything from A to Z
195Contents
Page 66 of 208
At a glanceControlsDriving tipsCommunicationsNavigationEntertainmentMobilityReference
65
>the hood is opened while the engine is
running
>the luggage compartment is opened
with the transmission in reverse while the
engine is running, and
>when the parking brake is used to bring
the vehicle to a stop.
The indicator lamp shifts from green
to red, and the "Auto P" message disap-
pears from the Info Display.
Before starting off again, briefly press the
button to disengage the parking brake
manually, refer to page 63, or reactivate
Automatic Hold, refer to page 64.
Before leaving the vehicle with the
engine running, always move the
automatic transmission's selector lever to
position P and ensure that the parking
brake is engaged. The vehicle could start to
roll if you fail to observe these precautions.
Never leave an unattended vehicle with the
engine running, as such a vehicle repre-
sents a potential safety hazard.<
Automatic Hold is automatically
deactivated whenever the system
detects any tendency for the wheels to spin
in response to slippery road surfaces. Note
the status displays in the Check Control
panel. You can find more detailed informa-
tion on Check Control on page 80.< Malfunctions In the event of malfunction, the indicator
lamp in the Info Display will light up
yellow, and a status report will appear in
the Check Control panel. Please remember
to observe the supplementary information
provided in the Control Display. To disengage the parking brake
manually You can respond to any interruptions in the
supply of electrical power, for instance, if
the battery is discharged or disconnected,
by releasing the parking brake manually.
Before proceeding to release the
parking brake manually, and each
time you park the vehicle without engaging the parking brake, always ensure that the
automatic transmission's selector lever is
in position P, refer to page 66. Note the
range indicated in the Info Display.
If it is not possible to avoid parking on an
extremely steep slope, use some supple-
mentary means, such as a wheel chock, to
make certain that the vehicle will not roll,
refer to page 184. Otherwise the danger
exists that the vehicle could roll when
parked on a very steep hill.<
Should it be necessary to release the auto-
matic transmission's lockout manually, for
instance, if the battery is discharged,
always adhere to the following sequence:
1.If necessary, start by manually releasing
the parking brake
2.Then release the automatic transmis-
sion's lockout manually, refer to page 70.
Towing and jump-starting, refer to
pages 187 and 188.
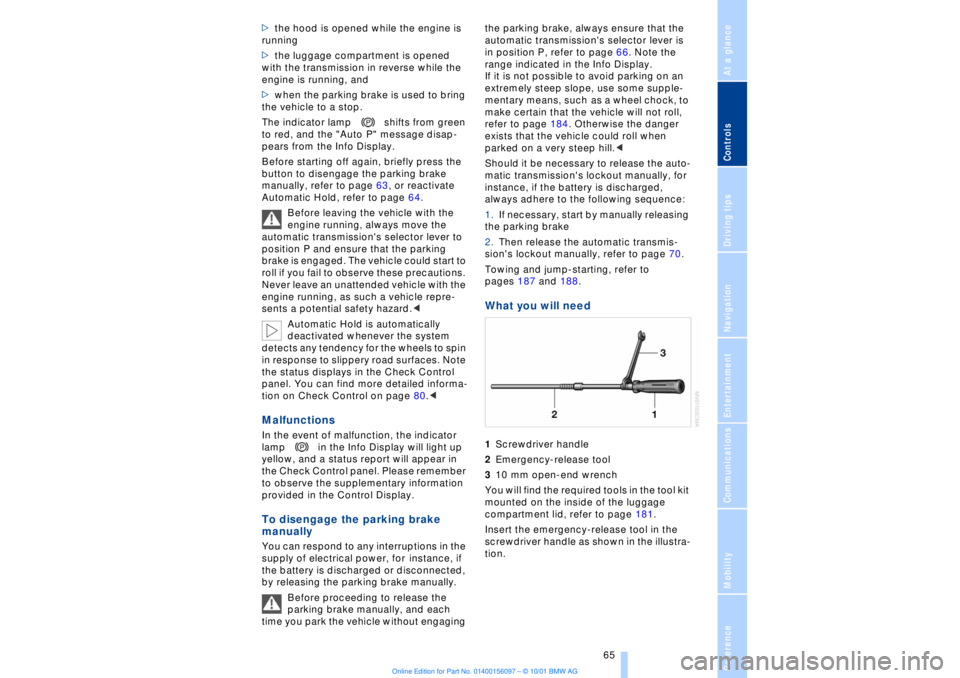
What you will need 1Screwdriver handle
2Emergency-release tool
310 mm open-end wrench
You will find the required tools in the tool kit
mounted on the inside of the luggage
compartment lid, refer to page 181.
Insert the emergency-release tool in the
screwdriver handle as shown in the illustra-
tion.
Page 71 of 208
Driving
70 To obtain maximum acceleration (for
passing maneuvers, etc.) during
operation in the manual mode, use the
kickdown or downshift manually.<
Malfunctions A status message will appear in the Check
Control panel to alert you to any malfunc-
tions in the transmission-control system.
Please note any supplementary information
that appears in the Control Display. The
directional arrows also start to flash in the
Info Display.
While it will remain still possible to move
the selector lever to any desired position,
the transmission will revert to operation in
its default mode with only a limited number
of forward gears.
Some types of malfunction will make it
impossible to engage all gears.
The engine may respond with reduced
output when accelerating from a standing
start.
If this happens, avoid extreme engine loads
and consult the nearest BMW center.
If no status messages appear in the
Info Display you should accelerate
carefully to confirm that you are driving in
the desired direction.
Never work in the engine compartment
with any of the forward or reverse gears
engaged, as the vehicle could start to
move. Engage the parking brake, refer to
page 62.< Manual release of transmission
lockout You can respond to any interruptions in the
supply of electrical power, for instance, if
the battery is discharged or disconnected,
by releasing the transmission lockout
manually.
To prevent the drive wheels from
locking up and sliding, the transmis-
sion lockout must always be released
manually before the vehicle is towed.<
Press the brake pedal before
releasing the transmission lockout manually. If the brakes are not applied, the
vehicle could start to roll if parked on a
steep slope.
The transmission lockout should only be
released for towing. Remember to engage
the transmission lockout when you repark
the vehicle after moving it.
Should it also be necessary to release the
parking brake manually (owing to a
discharged battery, etc.), always adhere to
the following sequence:
1.Start by manually releasing the parking
brake, refer to page 65
2.Then proceed to manually release the
transmission lockout.<
Jump-starting and towing, refer to
pages 187 and 188.
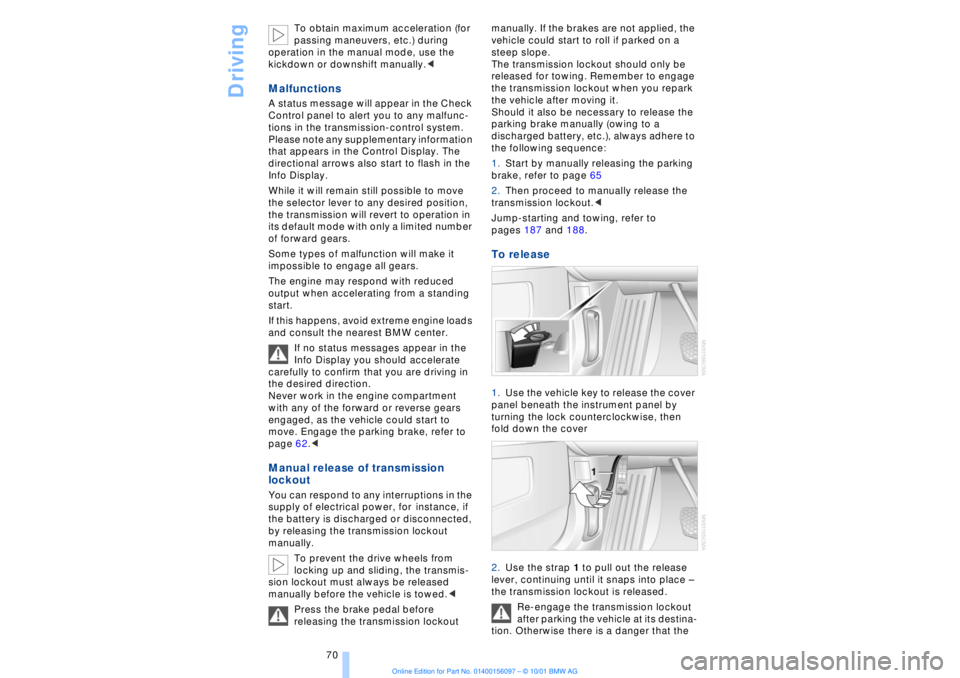
To release 1.Use the vehicle key to release the cover
panel beneath the instrument panel by
turning the lock counterclockwise, then
fold down the cover
2.Use the strap 1 to pull out the release
lever, continuing until it snaps into place Ð
the transmission lockout is released.
Re-engage the transmission lockout
after parking the vehicle at its destina-
tion. Otherwise there is a danger that the
Page 72 of 208

At a glanceControlsDriving tipsCommunicationsNavigationEntertainmentMobilityReference
71
vehicle could start to roll if parked on a
steep slope.< To re-engage the lockout 1.Disengage the release lever by pressing
it together with the red detent lever,
arrow 1
2.Guide the release lever all the way back
into its original position Ð the transmission
lockout is again engaged
3.Fold up and lock the cover panel. Now Ð
and not before Ð the key may be removed.
Once the transmission lockout has
been re-engaged, the warning in the
Check Control should disappear, and the
symbol in the Info Display should change
from N to P. Should this fail to happen,
there is a danger that the vehicle could
start to roll.<
Information on jump-starting, tow-starting
and towing begins on page 187. Turn signal indicators/
headlamp flasher1High beams Ð blue indicator lamp
2Headlamp flasher Ð blue indicator lamp 3Turn signal indicators Ð the green indi-
cator lamp flashes, accompanied by a peri-
odic ticking from the turn signal indicator
relay.
To use the turn signal indicatorsMove the lever beyond the detent position.
It then returns to the center position when
released. Press the lever as far as the
detent to switch off the turn signals. To signal brieflyPress the lever up to but not beyond the
detent. It then returns to the center position
when released.
If the flashing of the indicator lamp and the
ticking from the relay are both faster than
normal, this indicates that one of the bulbs
is defective; if a trailer is attached, this
could also indicate that one of its turn
signal indicator bulbs is defective. Wiper system1Standard wiper speed: press briefly one
time.
Fast wipe: briefly press twice
2To switch off wipers or for brief wipe
3To activate/deactivate rain sensor
4Cleaning windshield
5Adjusting rain sensor sensitivity level.
The lever automatically returns to its
initial position when released.<
Page 177 of 208
Under the hood
176
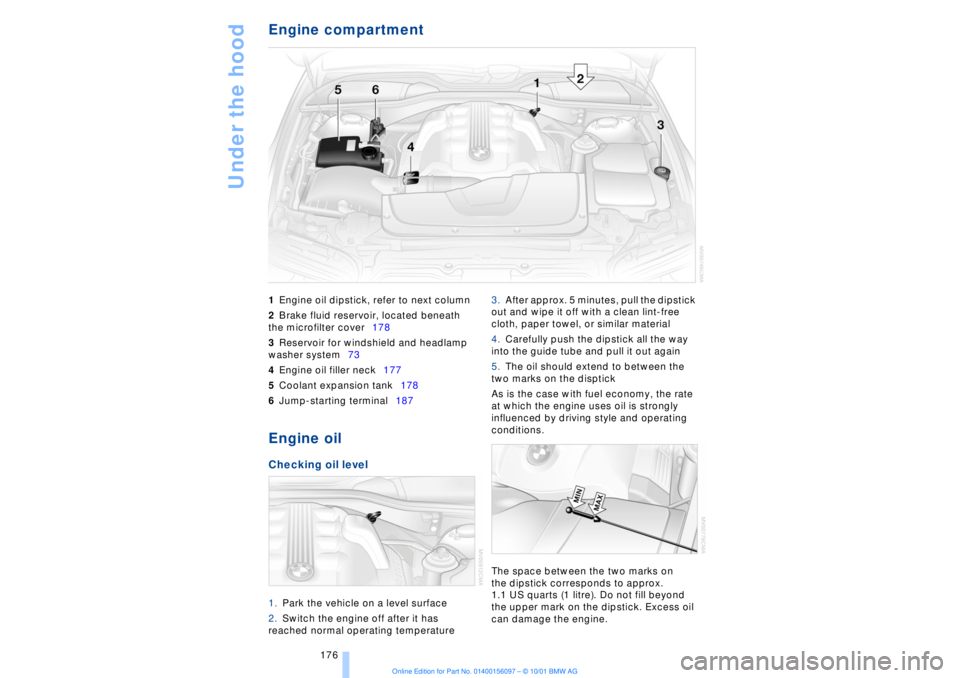
Engine compartment 1Engine oil dipstick, refer to next column
2Brake fluid reservoir, located beneath
the microfilter cover178
3Reservoir for windshield and headlamp
washer system73
4Engine oil filler neck177
5Coolant expansion tank178
6Jump-starting terminal187 Engine oilChecking oil level1.Park the vehicle on a level surface
2.Switch the engine off after it has
reached normal operating temperature 3.After approx. 5 minutes, pull the dipstick
out and wipe it off with a clean lint-free
cloth, paper towel, or similar material
4.Carefully push the dipstick all the way
into the guide tube and pull it out again
5.The oil should extend to between the
two marks on the disptick
As is the case with fuel economy, the rate
at which the engine uses oil is strongly
influenced by driving style and operating
conditions.
The space between the two marks on
the dipstick corresponds to approx.
1.1 US quarts (1 litre). Do not fill beyond
the upper mark on the dipstick. Excess oil
can damage the engine.
Page 186 of 208
OverviewControlsDriving tipsCommunicationsNavigationEntertainmentMobilityReference
185
additional precautions to secure the
vehicle from rolling.
3.Loosen the lug bolts 1/2 a turn
4.Set up the jack beneath the jacking
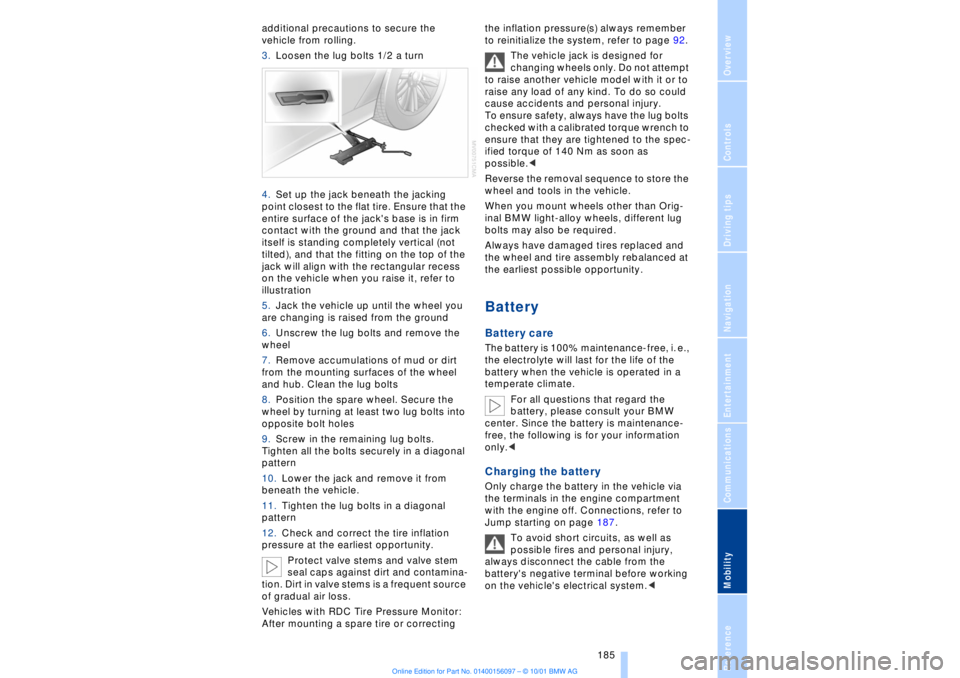
point closest to the flat tire. Ensure that the
entire surface of the jack's base is in firm
contact with the ground and that the jack
itself is standing completely vertical (not
tilted), and that the fitting on the top of the
jack will align with the rectangular recess
on the vehicle when you raise it, refer to
illustration
5.Jack the vehicle up until the wheel you
are changing is raised from the ground
6.Unscrew the lug bolts and remove the
wheel
7.Remove accumulations of mud or dirt
from the mounting surfaces of the wheel
and hub. Clean the lug bolts
8.Position the spare wheel. Secure the
wheel by turning at least two lug bolts into
opposite bolt holes
9.Screw in the remaining lug bolts.
Tighten all the bolts securely in a diagonal
pattern
10.Lower the jack and remove it from
beneath the vehicle.
11.Tighten the lug bolts in a diagonal
pattern
12.Check and correct the tire inflation
pressure at the earliest opportunity.
Protect valve stems and valve stem
seal caps against dirt and contamina-
tion. Dirt in valve stems is a frequent source
of gradual air loss.
Vehicles with RDC Tire Pressure Monitor:
After mounting a spare tire or correcting the inflation pressure(s) always remember
to reinitialize the system, refer to page 92.
The vehicle jack is designed for
changing wheels only. Do not attempt
to raise another vehicle model with it or to
raise any load of any kind. To do so could
cause accidents and personal injury.
To ensure safety, always have the lug bolts
checked with a calibrated torque wrench to
ensure that they are tightened to the spec-
ified torque of 140 Nm as soon as
possible.<
Reverse the removal sequence to store the
wheel and tools in the vehicle.
When you mount wheels other than Orig-
inal BMW light-alloy wheels, different lug
bolts may also be required.
Always have damaged tires replaced and
the wheel and tire assembly rebalanced at
the earliest possible opportunity.
Battery Battery care The battery is 100% maintenance-free, i. e.,
the electrolyte will last for the life of the
battery when the vehicle is operated in a
temperate climate.
For all questions that regard the
battery, please consult your BMW
center. Since the battery is maintenance-
free, the following is for your information
only.< Charging the battery Only charge the battery in the vehicle via
the terminals in the engine compartment
with the engine off. Connections, refer to
Jump starting on page 187.
To avoid short circuits, as well as
possible fires and personal injury,
always disconnect the cable from the
battery's negative terminal before working
on the vehicle's electrical system.<
Page 188 of 208
At a glanceControlsDriving tipsCommunicationsNavigationEntertainmentMobilityReference
187
Help Ð Giving and receiving Warning triangle*
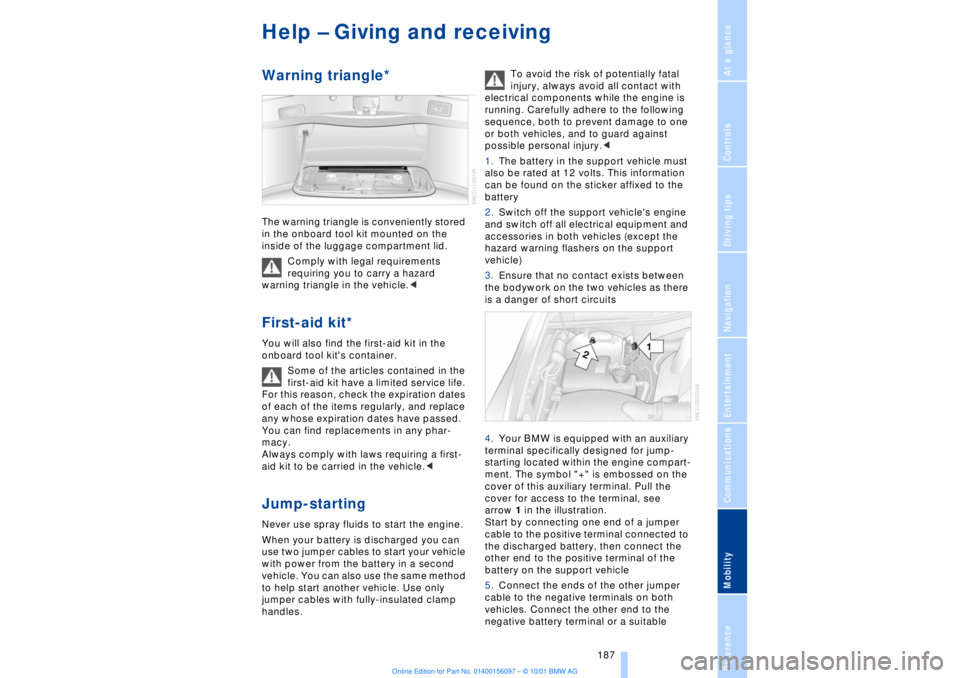
The warning triangle is conveniently stored
in the onboard tool kit mounted on the
inside of the luggage compartment lid.
Comply with legal requirements
requiring you to carry a hazard
warning triangle in the vehicle.< First-aid kit*
You will also find the first-aid kit in the
onboard tool kit's container.
Some of the articles contained in the
first-aid kit have a limited service life.
For this reason, check the expiration dates
of each of the items regularly, and replace
any whose expiration dates have passed.
You can find replacements in any phar-
macy.
Always comply with laws requiring a first-
aid kit to be carried in the vehicle.< Jump-starting Never use spray fluids to start the engine.
When your battery is discharged you can
use two jumper cables to start your vehicle
with power from the battery in a second
vehicle. You can also use the same method
to help start another vehicle. Use only
jumper cables with fully-insulated clamp
handles. To avoid the risk of potentially fatal
injury, always avoid all contact with
electrical components while the engine is
running. Carefully adhere to the following
sequence, both to prevent damage to one
or both vehicles, and to guard against
possible personal injury.<
1.The battery in the support vehicle must
also be rated at 12 volts. This information
can be found on the sticker affixed to the
battery
2.Switch off the support vehicle's engine
and switch off all electrical equipment and
accessories in both vehicles (except the
hazard warning flashers on the support
vehicle)
3.Ensure that no contact exists between
the bodywork on the two vehicles as there
is a danger of short circuits
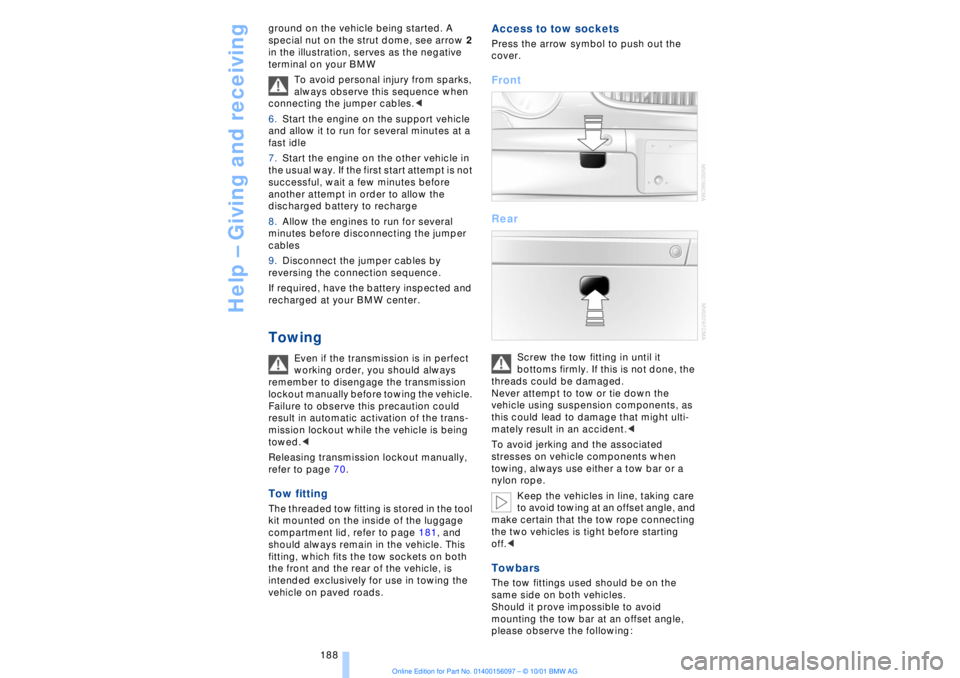
4.Your BMW is equipped with an auxiliary
terminal specifically designed for jump-
starting located within the engine compart-
ment. The symbol "+" is embossed on the
cover of this auxiliary terminal. Pull the
cover for access to the terminal, see
arrow 1 in the illustration.
Start by connecting one end of a jumper
cable to the positive terminal connected to
the discharged battery, then connect the
other end to the positive terminal of the
battery on the support vehicle
5.Connect the ends of the other jumper
cable to the negative terminals on both
vehicles. Connect the other end to the
negative battery terminal or a suitable
Page 189 of 208
Help Ð Giving and receiving
188 ground on the vehicle being started. A
special nut on the strut dome, see arrow 2
in the illustration, serves as the negative
terminal on your BMW
To avoid personal injury from sparks,
always observe this sequence when
connecting the jumper cables.<
6.Start the engine on the support vehicle
and allow it to run for several minutes at a
fast idle
7.Start the engine on the other vehicle in
the usual way. If the first start attempt is not
successful, wait a few minutes before
another attempt in order to allow the
discharged battery to recharge
8.Allow the engines to run for several
minutes before disconnecting the jumper
cables
9.Disconnect the jumper cables by
reversing the connection sequence.
If required, have the battery inspected and
recharged at your BMW center.
Towing
Even if the transmission is in perfect
working order, you should always
remember to disengage the transmission
lockout manually before towing the vehicle.
Failure to observe this precaution could
result in automatic activation of the trans-
mission lockout while the vehicle is being
towed.<
Releasing transmission lockout manually,
refer to page 70.
Tow fittingThe threaded tow fitting is stored in the tool
kit mounted on the inside of the luggage
compartment lid, refer to page 181, and
should always remain in the vehicle. This
fitting, which fits the tow sockets on both
the front and the rear of the vehicle, is
intended exclusively for use in towing the
vehicle on paved roads.
Access to tow sockets Press the arrow symbol to push out the
cover. Front
Rear
Screw the tow fitting in until it
bottoms firmly. If this is not done, the
threads could be damaged.
Never attempt to tow or tie down the
vehicle using suspension components, as
this could lead to damage that might ulti-
mately result in an accident.<
To avoid jerking and the associated
stresses on vehicle components when
towing, always use either a tow bar or a
nylon rope.
Keep the vehicles in line, taking care
to avoid towing at an offset angle, and
make certain that the tow rope connecting
the two vehicles is tight before starting
off.<
Towbars The tow fittings used should be on the
same side on both vehicles.
Should it prove impossible to avoid
mounting the tow bar at an offset angle,
please observe the following: