2002 BMW 745LI SEDAN tow
[x] Cancel search: towPage 4 of 208
At a glanceControlsDriving tipsCommunicationsNavigationEntertainmentMobilityReference
73Programmable cruise control
Everything under control
77Odometer, outside temperature
display, clock
77Tachometer
78Service Interval Display
80Check Control
81Computer
86Changing settings
Technology for comfort,
convenience and safety
88PDC Park Distance Control*
89Driving stability control/
DSC Dynamic Stability Control
91Driving stability control/ABS Antilock
Brake System
91Dynamic Drive
92EDC Electronic Damping Control*
92RDC Tire Pressure Monitor*
94Self-leveling suspension*
94Adaptive brake lamp
Lamps
96Parking lamps/low beams
97Instrument lighting
97High beams/standing lamps
97Front fog lamps
97Interior lamps
A congenial climate
99Automatic climate control
105Rear air conditioner*
106Parked-car ventilation system
Practical interior accessories
108Universal Garage Door Opener*
109Sun blinds*
110Rear cooler*
110Glove compartment
111Storage compartments
112Beverage holders
112Ashtray, front
113Cigarette lighter, front
113Power socket
113Ashtray, rear
113Cigarette lighter, rear113Center armrest
114Ski bag*
Things to remember when driving
118Break-in procedures
118General driving notes
119Brake system
120Cargo loading
120Roof-mounted luggage rack*
Navigation
124Safety
124GPS
124Map CD
125Starting the navigation system
125Display in assistance window*
126Selection options
126Destination entry
126Manual entry of destination address
128Select the town or city and the street
from the directory
128Map-guided destination selection
129Selecting destination in Information
129Selecting interesting destinations
130Recent destinations
130Destination list
130Route selection
131Starting the destination guidance
system
132Displaying route
133Select new route
133Voice messages
134Terminate/interrupt active guidance
134Creating a directory
135Location
136Wordmatch principle
136What to do if É
Sound system
140Controls
140Care instructions
140To switch on/off
140Using with ignition off
141Volume adjustment
141Tone control
Page 5 of 208
Inhaltsverzeichnis
Radio
143Select the frequency band
143Station selection
144Storing and retrieving a station
145Weather Band
CD Compact Disc
146Using the buttons to search for music
tracks
147Searching for music tracks in the
Control Display
CD changer
149Starting and stopping the CD changer
149Status displays
149Searching for music tracks in the
Control Display
150Using the buttons to search for music
tracks
MiniDisc MD
151Using the buttons to search for music
tracks
152Searching for music tracks in the
Control Display
Cassette
153Noise suppression
154Music track search
Using your mobile phone
158Safety notice
159Care instructions
159Operation
161Hands-free system
161To make SOS call
161Initial operation
162Getting started
162Telephone directory
163To select a number from the Top 8 list
164Redialing, including numbers not
initially reached
164Missed calls
Refueling
168Fuel filler door
169Fuel specifications
Wheels and tires
170Tire inflation pressure
171Tire condition
172Tire replacement
173Wheel and tire combinations
173Special characteristics of winter tires
173Snow chains*
Under the hood
175Hood
176Engine compartment
176Engine oil
177Coolant
178Brake fluid
Maintenance
179The BMW Maintenance System
179Care
Rules and regulations
180California Proposition 65 Warning
180OBD connector
Replacing components
181Onboard tool kit
181Windshield wiper blades
181Lamps and bulbs
183Changing a tire
185Battery
186Fuses
Help Ð Giving and receiving
187Warning triangle*
187First-aid kit*
187Jump-starting
188Towing
Technical data
192Engine specifications
193Dimensions
194Weights
194Capacities
Everything from A to Z
195Contents
Page 20 of 208
At a glanceControlsDriving tipsCommunicationsNavigationEntertainmentMobilityReference
19
Control CenterThe concept The Control Center has been designed to
avoid the unnecessary complexity created
by an extended number of switches and
controls. It consists of the controller and
the Control Display.
The controller is used to select the func-
tions that will appear in the Control Display.
In addition, the Control Display also shows
you Check Control messages.Controller You can slide, turn and press the controller
to enter commands. You can use it for all of
the functions in the Control Display.
To avoid posing an unnecessary
hazard, both to your own vehicle's
occupants and to other road users: never
attempt to use the controls or make adjust-
ments unless traffic and road conditions
allow.<
The following introduction illustrates how
easy it is to use the Control Center.
You can find detailed instructions
describing how to use the individual
systems in the separate sections.
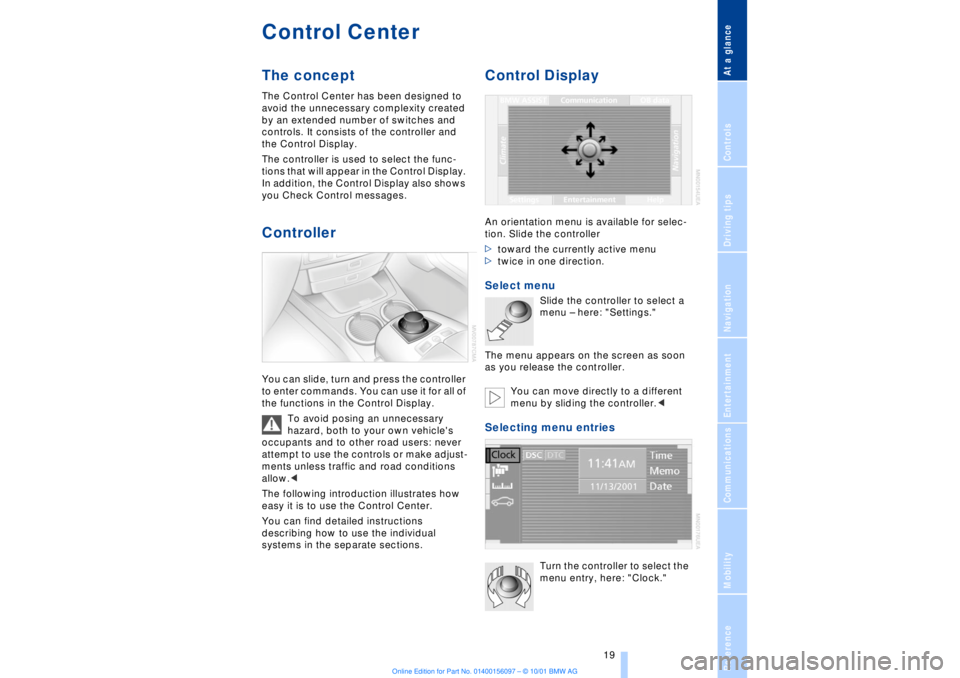
Control DisplayAn orientation menu is available for selec-
tion. Slide the controller
>toward the currently active menu
>twice in one direction. Select menu
Slide the controller to select a
menu Ð here: "Settings."
The menu appears on the screen as soon
as you release the controller.
You can move directly to a different
menu by sliding the controller.<
Selecting menu entries
Turn the controller to select the
menu entry, here: "Clock."
Page 28 of 208
At a glanceControlsDriving tipsCommunicationsNavigationEntertainmentMobilityReference
27
Notices
Do not use the voice command
system to make emergency SOS
calls. Your voice and habitual tone could be
affected by stressful situations, as a result
of which the process of establishing the
telephone connection could be unneces-
sarily delayed. Instead, you should use the
emergency SOS button located adjacent to
the rearview mirror, refer to page 161.<
Environmental conditionsThe voice command system uses a special
microphone located on the front headliner
of your vehicle. Although the system is
designed to filter out ambient noise, you
can help ensure that your commands will
be understood by observing the following
instructions:
>Speak smoothly and clearly, at a normal
volume. Do not place any unusual stress on
individual syllables, and avoid pauses
>Do not speak while the voice command
system is talking
>Keep the doors, windows and sunroof
closed to prevent interference from
ambient noise
>Avoid other sources of noise in the
vehicle while speaking, and ask other
vehicle occupants to refrain from talking
while you are using the system.
>The hands-free microphone is aimed
toward the driver. This means that the
system may be unable to register the
voices of other vehicle occupants properly;
passengers should use the mobile phone
instead.
The notebookRecording a note
>>Record note<<<
You can store approx. ten minutes of
spoken text Ð either as a single entry or as
multiple entries of any desired length.
To terminate recording:
Apply extended pressure to
the button.
The voice command system does not
respond to the commands
>>Cancel<< and >>Exit<< while you are
recording a note. The standard utility that
scans for system commands is deactivated
in the note mode to allow you to record any
text desired, without artificial restrictions.
This feature saves you from having to
concentrate on avoiding these words while
recording.<
To listen to a notebook entryListening to recorded notebook entries:
1.>>Read out (note)<<
or >>Listen to (note)<<
The system plays back roughly the first
3 seconds of the first memorandum.
2.Respond to the query >Note and then<
by selecting the desired function
>To listen to the entire note:
>>Read (note)<<
(>>Listen to (note)<<)
>To hear the next notebook entry:
>>Next note<< (>>(Note) next<<)
>To hear the entry again:
>>(Note) back<<
or
>>Once again<< (>>Repeat<<, >>Read
out<<).<
Page 41 of 208
Opening and closing
40 >press the button on the outside of the
luggage compartment lid, refer to page 38
>press the button 3on the remote
control unit, refer to page 36.
During opening the luggage compart-
ment lid pivots upward and to the
rear. Ensure that adequate clearance is
available before opening.<
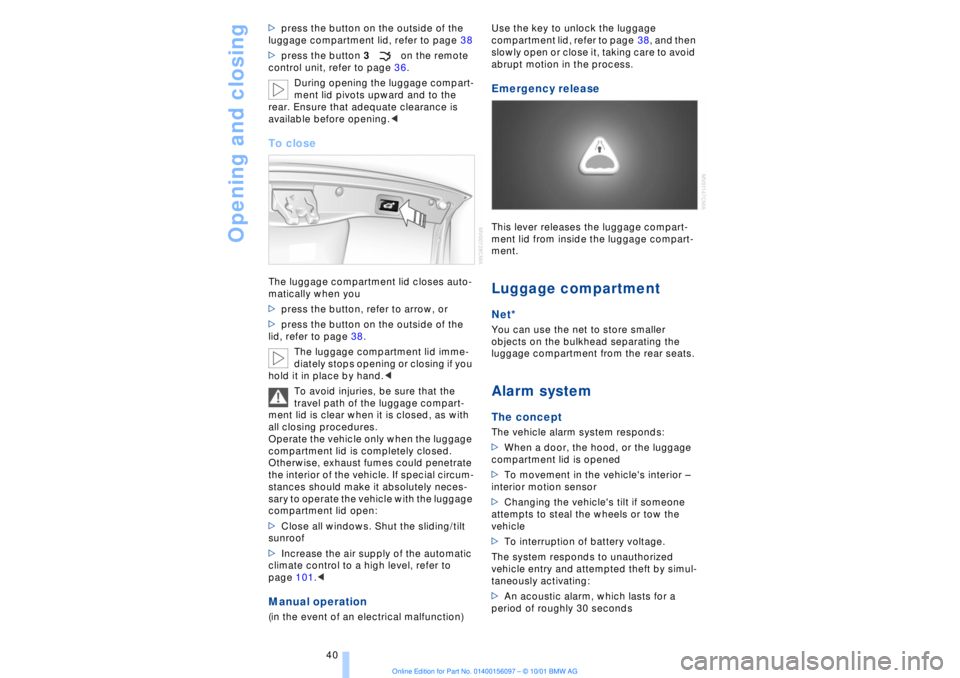
To closeThe luggage compartment lid closes auto-
matically when you
>press the button, refer to arrow, or
>press the button on the outside of the
lid, refer to page 38.
The luggage compartment lid imme-
diately stops opening or closing if you
hold it in place by hand.<
To avoid injuries, be sure that the
travel path of the luggage compart-
ment lid is clear when it is closed, as with
all closing procedures.
Operate the vehicle only when the luggage
compartment lid is completely closed.
Otherwise, exhaust fumes could penetrate
the interior of the vehicle. If special circum-
stances should make it absolutely neces-
sary to operate the vehicle with the luggage
compartment lid open:
>Close all windows. Shut the sliding/tilt
sunroof
>Increase the air supply of the automatic
climate control to a high level, refer to
page 101.< Manual operation(in the event of an electrical malfunction) Use the key to unlock the luggage
compartment lid, refer to page 38, and then
slowly open or close it, taking care to avoid
abrupt motion in the process.
Emergency release This lever releases the luggage compart-
ment lid from inside the luggage compart-
ment. Luggage compartmentNet*You can use the net to store smaller
objects on the bulkhead separating the
luggage compartment from the rear seats. Alarm system The conceptThe vehicle alarm system responds:
>When a door, the hood, or the luggage
compartment lid is opened
>To movement in the vehicle's interior Ð
interior motion sensor
>Changing the vehicle's tilt if someone
attempts to steal the wheels or tow the
vehicle
>To interruption of battery voltage.
The system responds to unauthorized
vehicle entry and attempted theft by simul-
taneously activating:
>An acoustic alarm, which lasts for a
period of roughly 30 seconds
Page 66 of 208
At a glanceControlsDriving tipsCommunicationsNavigationEntertainmentMobilityReference
65
>the hood is opened while the engine is
running
>the luggage compartment is opened
with the transmission in reverse while the
engine is running, and
>when the parking brake is used to bring
the vehicle to a stop.
The indicator lamp shifts from green
to red, and the "Auto P" message disap-
pears from the Info Display.
Before starting off again, briefly press the
button to disengage the parking brake
manually, refer to page 63, or reactivate
Automatic Hold, refer to page 64.
Before leaving the vehicle with the
engine running, always move the
automatic transmission's selector lever to
position P and ensure that the parking
brake is engaged. The vehicle could start to
roll if you fail to observe these precautions.
Never leave an unattended vehicle with the
engine running, as such a vehicle repre-
sents a potential safety hazard.<
Automatic Hold is automatically
deactivated whenever the system
detects any tendency for the wheels to spin
in response to slippery road surfaces. Note
the status displays in the Check Control
panel. You can find more detailed informa-
tion on Check Control on page 80.< Malfunctions In the event of malfunction, the indicator
lamp in the Info Display will light up
yellow, and a status report will appear in
the Check Control panel. Please remember
to observe the supplementary information
provided in the Control Display. To disengage the parking brake
manually You can respond to any interruptions in the
supply of electrical power, for instance, if
the battery is discharged or disconnected,
by releasing the parking brake manually.
Before proceeding to release the
parking brake manually, and each
time you park the vehicle without engaging the parking brake, always ensure that the
automatic transmission's selector lever is
in position P, refer to page 66. Note the
range indicated in the Info Display.
If it is not possible to avoid parking on an
extremely steep slope, use some supple-
mentary means, such as a wheel chock, to
make certain that the vehicle will not roll,
refer to page 184. Otherwise the danger
exists that the vehicle could roll when
parked on a very steep hill.<
Should it be necessary to release the auto-
matic transmission's lockout manually, for
instance, if the battery is discharged,
always adhere to the following sequence:
1.If necessary, start by manually releasing
the parking brake
2.Then release the automatic transmis-
sion's lockout manually, refer to page 70.
Towing and jump-starting, refer to
pages 187 and 188.
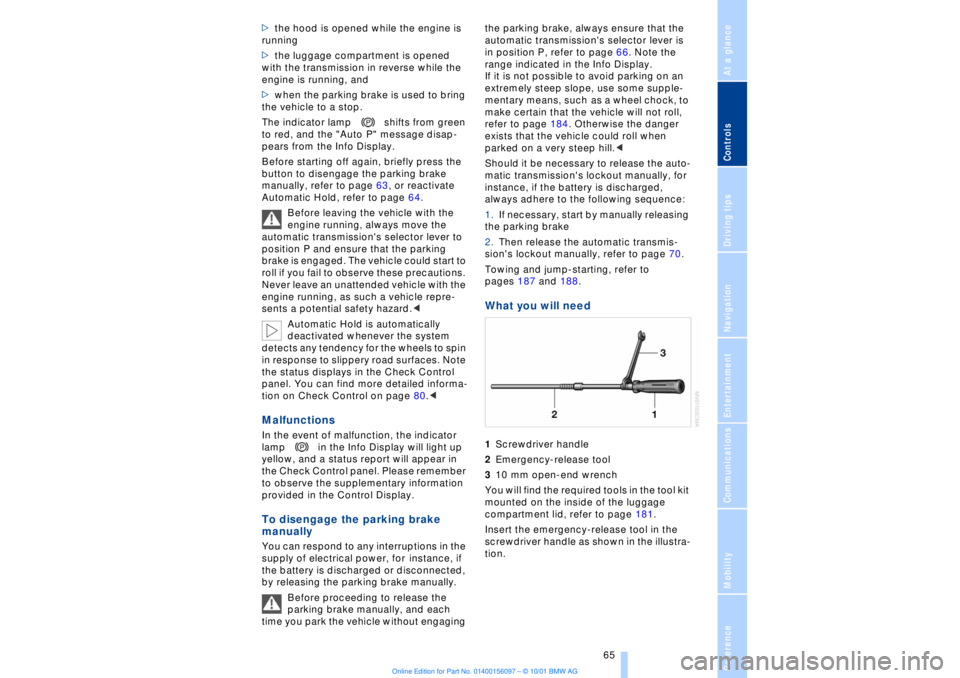
What you will need 1Screwdriver handle
2Emergency-release tool
310 mm open-end wrench
You will find the required tools in the tool kit
mounted on the inside of the luggage
compartment lid, refer to page 181.
Insert the emergency-release tool in the
screwdriver handle as shown in the illustra-
tion.
Page 68 of 208
At a glanceControlsDriving tipsCommunicationsNavigationEntertainmentMobilityReference
67
P R N D Program displayL1 Ð L6 Buttons on steering wheel L/D Ð Selecting transmission range
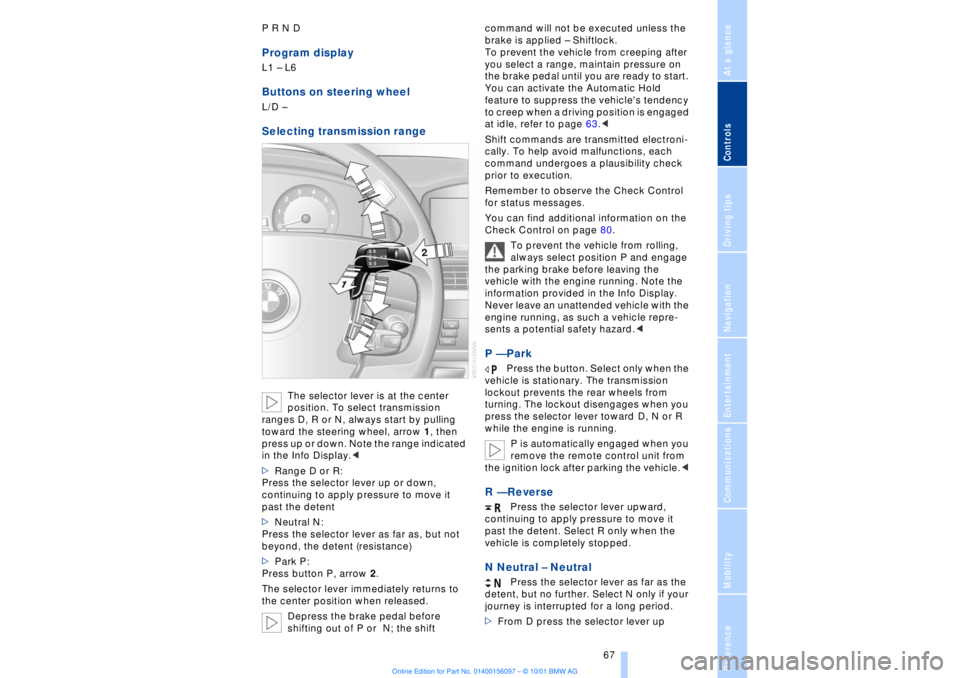
The selector lever is at the center
position. To select transmission
ranges D, R or N, always start by pulling
toward the steering wheel, arrow 1, then
press up or down. Note the range indicated
in the Info Display.<
>Range D or R:
Press the selector lever up or down,
continuing to apply pressure to move it
past the detent
>Neutral N:
Press the selector lever as far as, but not
beyond, the detent (resistance)
>Park P:
Press button P, arrow 2.
The selector lever immediately returns to
the center position when released.
Depress the brake pedal before
shifting out of P or N; the shift command will not be executed unless the
brake is applied Ð Shiftlock.
To prevent the vehicle from creeping after
you select a range, maintain pressure on
the brake pedal until you are ready to start.
You can activate the Automatic Hold
feature to suppress the vehicle's tendency
to creep when a driving position is engaged
at idle, refer to page 63.<
Shift commands are transmitted electroni-
cally. To help avoid malfunctions, each
command undergoes a plausibility check
prior to execution.
Remember to observe the Check Control
for status messages.
You can find additional information on the
Check Control on page 80.
To prevent the vehicle from rolling,
always select position P and engage
the parking brake before leaving the
vehicle with the engine running. Note the
information provided in the Info Display.
Never leave an unattended vehicle with the
engine running, as such a vehicle repre-
sents a potential safety hazard.<
P Ñ Park
Press the button. Select only when the
vehicle is stationary. The transmission
lockout prevents the rear wheels from
turning. The lockout disengages when you
press the selector lever toward D, N or R
while the engine is running.
P is automatically engaged when you
remove the remote control unit from
the ignition lock after parking the vehicle.<
R Ñ Reverse
Press the selector lever upward,
continuing to apply pressure to move it
past the detent. Select R only when the
vehicle is completely stopped.
N Neutral Ð Neutral
Press the selector lever as far as the
detent, but no further. Select N only if your
journey is interrupted for a long period.
>From D press the selector lever up
Page 71 of 208
Driving
70 To obtain maximum acceleration (for
passing maneuvers, etc.) during
operation in the manual mode, use the
kickdown or downshift manually.<
Malfunctions A status message will appear in the Check
Control panel to alert you to any malfunc-
tions in the transmission-control system.
Please note any supplementary information
that appears in the Control Display. The
directional arrows also start to flash in the
Info Display.
While it will remain still possible to move
the selector lever to any desired position,
the transmission will revert to operation in
its default mode with only a limited number
of forward gears.
Some types of malfunction will make it
impossible to engage all gears.
The engine may respond with reduced
output when accelerating from a standing
start.
If this happens, avoid extreme engine loads
and consult the nearest BMW center.
If no status messages appear in the
Info Display you should accelerate
carefully to confirm that you are driving in
the desired direction.
Never work in the engine compartment
with any of the forward or reverse gears
engaged, as the vehicle could start to
move. Engage the parking brake, refer to
page 62.< Manual release of transmission
lockout You can respond to any interruptions in the
supply of electrical power, for instance, if
the battery is discharged or disconnected,
by releasing the transmission lockout
manually.
To prevent the drive wheels from
locking up and sliding, the transmis-
sion lockout must always be released
manually before the vehicle is towed.<
Press the brake pedal before
releasing the transmission lockout manually. If the brakes are not applied, the
vehicle could start to roll if parked on a
steep slope.
The transmission lockout should only be
released for towing. Remember to engage
the transmission lockout when you repark
the vehicle after moving it.
Should it also be necessary to release the
parking brake manually (owing to a
discharged battery, etc.), always adhere to
the following sequence:
1.Start by manually releasing the parking
brake, refer to page 65
2.Then proceed to manually release the
transmission lockout.<
Jump-starting and towing, refer to
pages 187 and 188.
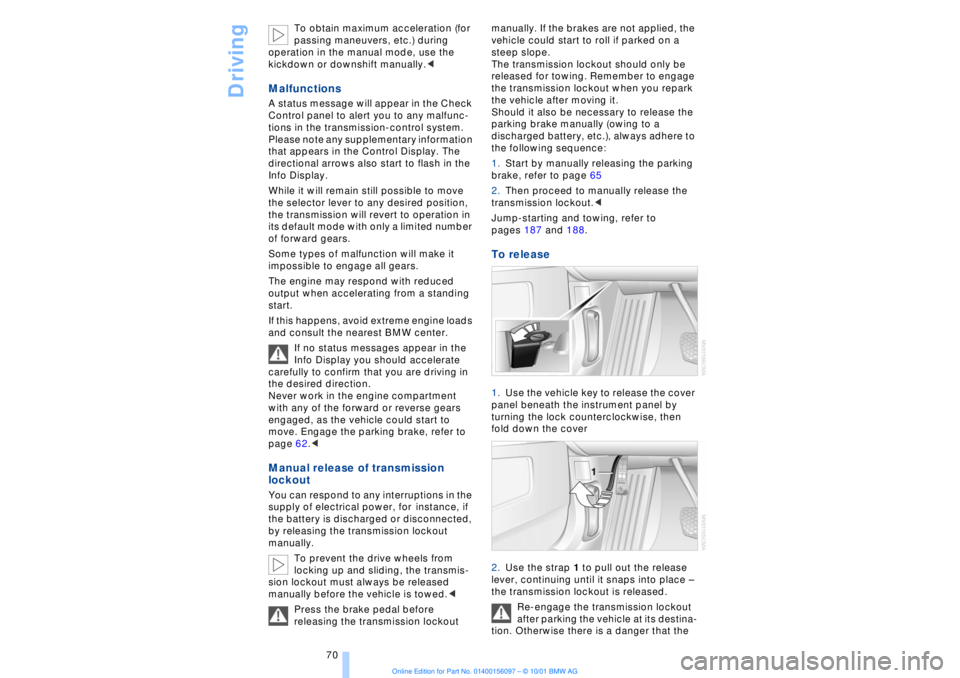
To release 1.Use the vehicle key to release the cover
panel beneath the instrument panel by
turning the lock counterclockwise, then
fold down the cover
2.Use the strap 1 to pull out the release
lever, continuing until it snaps into place Ð
the transmission lockout is released.
Re-engage the transmission lockout
after parking the vehicle at its destina-
tion. Otherwise there is a danger that the