2002 BMW 745LI SEDAN clock
[x] Cancel search: clockPage 4 of 208
At a glanceControlsDriving tipsCommunicationsNavigationEntertainmentMobilityReference
73Programmable cruise control
Everything under control
77Odometer, outside temperature
display, clock
77Tachometer
78Service Interval Display
80Check Control
81Computer
86Changing settings
Technology for comfort,
convenience and safety
88PDC Park Distance Control*
89Driving stability control/
DSC Dynamic Stability Control
91Driving stability control/ABS Antilock
Brake System
91Dynamic Drive
92EDC Electronic Damping Control*
92RDC Tire Pressure Monitor*
94Self-leveling suspension*
94Adaptive brake lamp
Lamps
96Parking lamps/low beams
97Instrument lighting
97High beams/standing lamps
97Front fog lamps
97Interior lamps
A congenial climate
99Automatic climate control
105Rear air conditioner*
106Parked-car ventilation system
Practical interior accessories
108Universal Garage Door Opener*
109Sun blinds*
110Rear cooler*
110Glove compartment
111Storage compartments
112Beverage holders
112Ashtray, front
113Cigarette lighter, front
113Power socket
113Ashtray, rear
113Cigarette lighter, rear113Center armrest
114Ski bag*
Things to remember when driving
118Break-in procedures
118General driving notes
119Brake system
120Cargo loading
120Roof-mounted luggage rack*
Navigation
124Safety
124GPS
124Map CD
125Starting the navigation system
125Display in assistance window*
126Selection options
126Destination entry
126Manual entry of destination address
128Select the town or city and the street
from the directory
128Map-guided destination selection
129Selecting destination in Information
129Selecting interesting destinations
130Recent destinations
130Destination list
130Route selection
131Starting the destination guidance
system
132Displaying route
133Select new route
133Voice messages
134Terminate/interrupt active guidance
134Creating a directory
135Location
136Wordmatch principle
136What to do if É
Sound system
140Controls
140Care instructions
140To switch on/off
140Using with ignition off
141Volume adjustment
141Tone control
Page 15 of 208
Cockpit
14
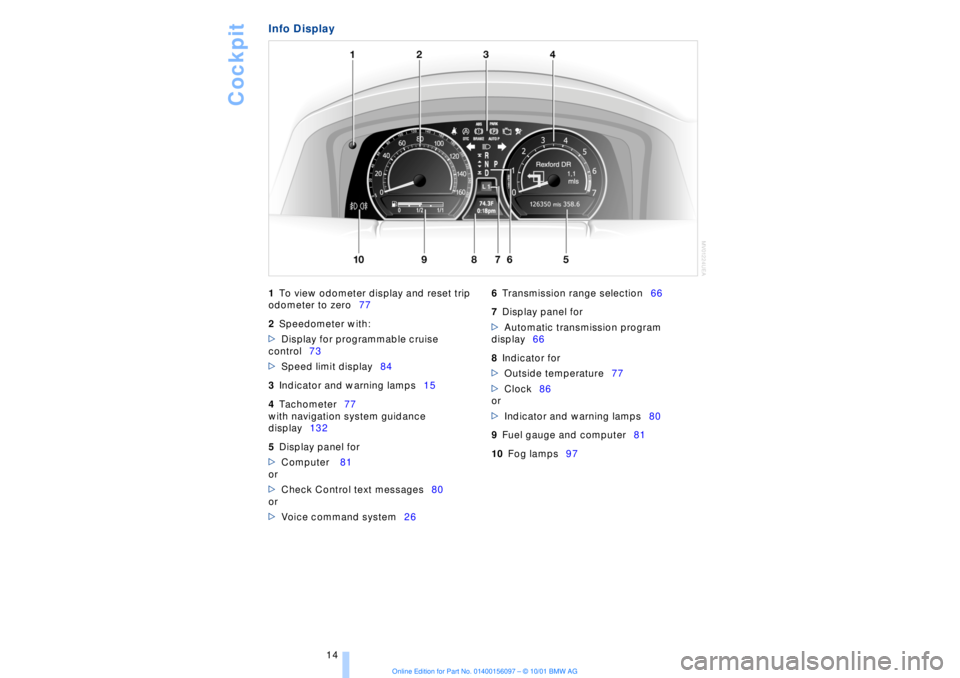
Info Display
1
To view odometer display and reset trip
odometer to zero77
2
Speedometer with:
>
Display for programmable cruise
control73
>
Speed limit display84
3
Indicator and warning lamps15
4
Tachometer77
with navigation system guidance
display132
5
Display panel for
>
Computer 81
or
>
Check Control text messages80
or
>
Voice command system26
6
Transmission range selection66
7
Display panel for
>
Automatic transmission program
display66
8
Indicator for
>
Outside temperature77
>
Clock86
or
>
Indicator and warning lamps80
9
Fuel gauge and computer81
10
Fog lamps97
Page 20 of 208
At a glanceControlsDriving tipsCommunicationsNavigationEntertainmentMobilityReference
19
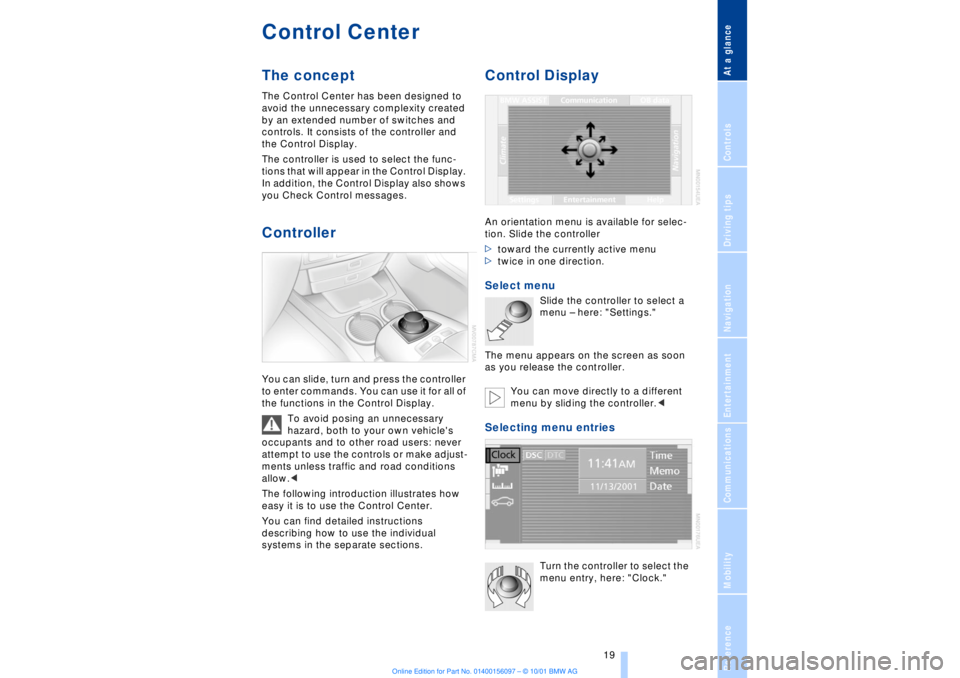
Control CenterThe concept The Control Center has been designed to
avoid the unnecessary complexity created
by an extended number of switches and
controls. It consists of the controller and
the Control Display.
The controller is used to select the func-
tions that will appear in the Control Display.
In addition, the Control Display also shows
you Check Control messages.Controller You can slide, turn and press the controller
to enter commands. You can use it for all of
the functions in the Control Display.
To avoid posing an unnecessary
hazard, both to your own vehicle's
occupants and to other road users: never
attempt to use the controls or make adjust-
ments unless traffic and road conditions
allow.<
The following introduction illustrates how
easy it is to use the Control Center.
You can find detailed instructions
describing how to use the individual
systems in the separate sections.
Control DisplayAn orientation menu is available for selec-
tion. Slide the controller
>toward the currently active menu
>twice in one direction. Select menu
Slide the controller to select a
menu Ð here: "Settings."
The menu appears on the screen as soon
as you release the controller.
You can move directly to a different
menu by sliding the controller.<
Selecting menu entries
Turn the controller to select the
menu entry, here: "Clock."
Page 21 of 208
Control Center
20 Among the available menu entries:
>Adjustment options
>Program
>Function
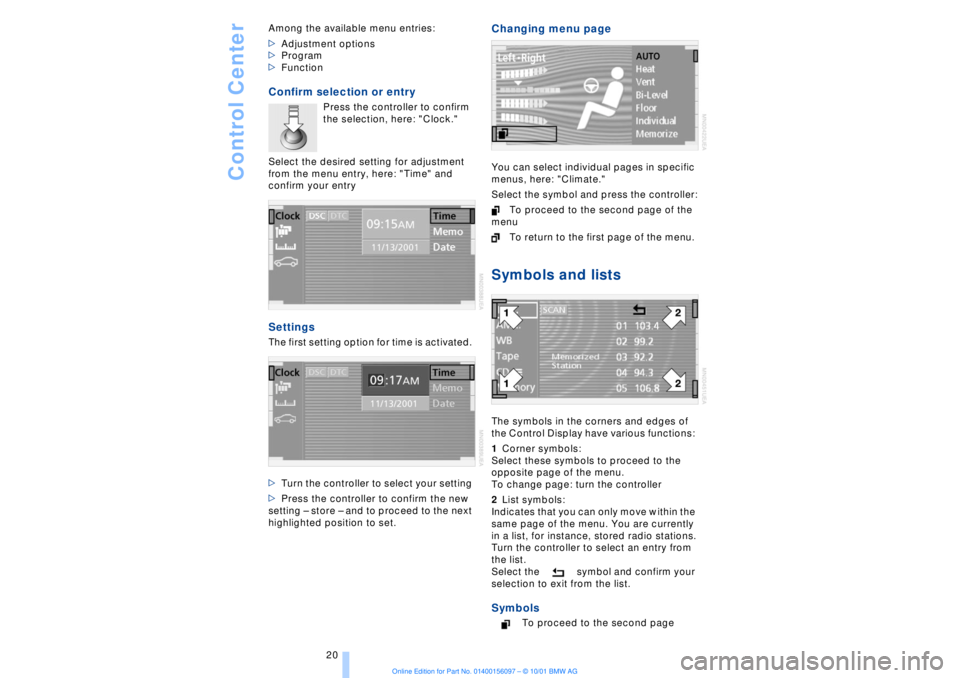
Confirm selection or entry
Press the controller to confirm
the selection, here: "Clock."
Select the desired setting for adjustment
from the menu entry, here: "Time" and
confirm your entry
Settings The first setting option for time is activated.
>Turn the controller to select your setting
>Press the controller to confirm the new
setting Ð store Ð and to proceed to the next
highlighted position to set.
Changing menu page You can select individual pages in specific
menus, here: "Climate."
Select the symbol and press the controller:
To proceed to the second page of the
menu
To return to the first page of the menu. Symbols and listsThe symbols in the corners and edges of
the Control Display have various functions:
1Corner symbols:
Select these symbols to proceed to the
opposite page of the menu.
To change page: turn the controller
2List symbols:
Indicates that you can only move within the
same page of the menu. You are currently
in a list, for instance, stored radio stations.
Turn the controller to select an entry from
the list.
Select the symbol and confirm your
selection to exit from the list. Symbols
To proceed to the second page
Page 46 of 208
At a glanceControlsDriving tipsCommunicationsNavigationEntertainmentMobilityReference
45
Adjustments Correct sitting position
The ideal sitting position can make a vital
contribution to relaxed, fatigue-free driving.
The correct sitting position also works
together with the safety belts and airbags
to provide occupants with maximum levels
of passive safety in an accident. To ensure
that the safety systems operate with
optimal efficiency, we strongly urge you to
observe the instructions contained in the
following section.
For additional information on transporting
children safely, refer to page 57. Correct sitting position with airbags
Always maintain an adequate
distance between yourself and the
airbags. Always hold the steering wheel by
its rim with hands at the 9 o'clock and
3 o'clock positions, to minimize the risk of
injuries to your hands and arms in the event
of airbag deployment. No one and nothing
is to come between the airbags and the
seat occupant.
To prevent possible leg injuries should the
knee airbag deploy in an accident, ensure
that the front passenger assumes a correct
sitting position. Do not use the cover of the
front airbag on the front passenger side as
a storage area for objects, or as a rest for
feet or legs.<
For airbag locations and additional infor-
mation on airbags, refer to page 55.
Correct sitting position with safety
belts For the safety of all vehicle occupants,
please comply with the following instruc-
tions for wearing safety belts.
Never allow more than one person to
wear a single safety belt. Never allow
infants or small children to ride in a
passenger's lap. Avoid twisting the belt
while routing it firmly across the hips and
shoulder. Wear it as snugly against your body as possible. Do not allow the belt to
rest against hard or fragile objects.
Do not route the belt across your neck, or
run it across sharp edges. Be sure that the
belt does not become caught or jammed.
Avoid wearing loose or bulky clothing that
would prevent the belt from resting
securely against your body; pull on the
shoulder strap periodically to keep it
tensioned. In the event of a frontal impact,
a loose lap belt could slide over your hips,
leading to abdominal injury. In addition, the
safety belt's restraint effectiveness is
reduced if the belt is worn loosely.
Expectant mothers should always wear
their safety belts, taking care to position
the lap belt against the lower hips, where it
will not exert pressure against the abdom-
inal area.<
For putting on safety belts, refer to
page 50.
Seats For your personal safety when adjusting
the seat position, please follow the instruc-
tions below carefully.
Never attempt to adjust your seat
while operating the vehicle. The seat
could respond with unexpected move-
ment, and the ensuing loss of vehicle
control could lead to an accident.
Never recline the backrest to an extremely
horizontal position while the vehicle is
underway Ð this precaution is especially
important for front passengers and the
occupants of electric power rear seats to
remember. Failure to observe these
precautions can prevent the belts from
providing effective protection against
injury, as passengers could slide under the
belts in an accident.<
Please observe the information on using
safety belts provided on page 50 and the
Page 71 of 208
Driving
70 To obtain maximum acceleration (for
passing maneuvers, etc.) during
operation in the manual mode, use the
kickdown or downshift manually.<
Malfunctions A status message will appear in the Check
Control panel to alert you to any malfunc-
tions in the transmission-control system.
Please note any supplementary information
that appears in the Control Display. The
directional arrows also start to flash in the
Info Display.
While it will remain still possible to move
the selector lever to any desired position,
the transmission will revert to operation in
its default mode with only a limited number
of forward gears.
Some types of malfunction will make it
impossible to engage all gears.
The engine may respond with reduced
output when accelerating from a standing
start.
If this happens, avoid extreme engine loads
and consult the nearest BMW center.
If no status messages appear in the
Info Display you should accelerate
carefully to confirm that you are driving in
the desired direction.
Never work in the engine compartment
with any of the forward or reverse gears
engaged, as the vehicle could start to
move. Engage the parking brake, refer to
page 62.< Manual release of transmission
lockout You can respond to any interruptions in the
supply of electrical power, for instance, if
the battery is discharged or disconnected,
by releasing the transmission lockout
manually.
To prevent the drive wheels from
locking up and sliding, the transmis-
sion lockout must always be released
manually before the vehicle is towed.<
Press the brake pedal before
releasing the transmission lockout manually. If the brakes are not applied, the
vehicle could start to roll if parked on a
steep slope.
The transmission lockout should only be
released for towing. Remember to engage
the transmission lockout when you repark
the vehicle after moving it.
Should it also be necessary to release the
parking brake manually (owing to a
discharged battery, etc.), always adhere to
the following sequence:
1.Start by manually releasing the parking
brake, refer to page 65
2.Then proceed to manually release the
transmission lockout.<
Jump-starting and towing, refer to
pages 187 and 188.
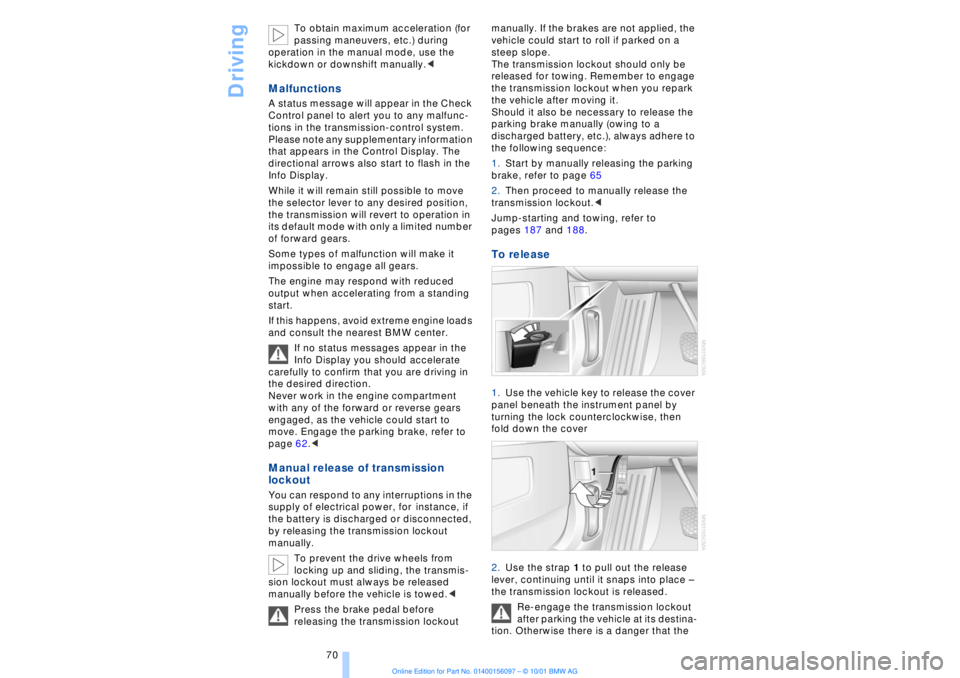
To release 1.Use the vehicle key to release the cover
panel beneath the instrument panel by
turning the lock counterclockwise, then
fold down the cover
2.Use the strap 1 to pull out the release
lever, continuing until it snaps into place Ð
the transmission lockout is released.
Re-engage the transmission lockout
after parking the vehicle at its destina-
tion. Otherwise there is a danger that the
Page 78 of 208
At a glanceControlsDriving tipsCommunicationsNavigationEntertainmentMobilityReference
77
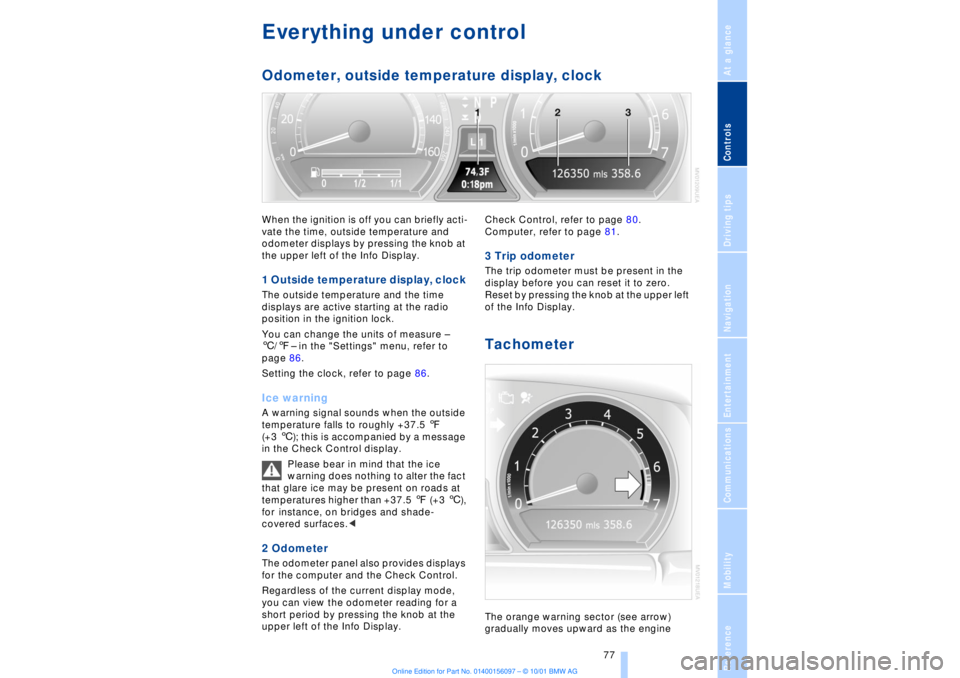
Everything under control Odometer, outside temperature display, clockWhen the ignition is off you can briefly acti-
vate the time, outside temperature and
odometer displays by pressing the knob at
the upper left of the Info Display. 1 Outside temperature display, clock The outside temperature and the time
displays are active starting at the radio
position in the ignition lock.
You can change the units of measure Ð
6/7Ð in the "Settings" menu, refer to
page 86.
Setting the clock, refer to page 86.Ice warning A warning signal sounds when the outside
temperature falls to roughly +37.5 7
(+3 6); this is accompanied by a message
in the Check Control display.
Please bear in mind that the ice
warning does nothing to alter the fact
that glare ice may be present on roads at
temperatures higher than +37.5 7 (+3 6),
for instance, on bridges and shade-
covered surfaces.< 2 Odometer The odometer panel also provides displays
for the computer and the Check Control.
Regardless of the current display mode,
you can view the odometer reading for a
short period by pressing the knob at the
upper left of the Info Display. Check Control, refer to page 80.
Computer, refer to page 81.
3 Trip odometer The trip odometer must be present in the
display before you can reset it to zero.
Reset by pressing the knob at the upper left
of the Info Display. Tachometer The orange warning sector (see arrow)
gradually moves upward as the engine
Page 87 of 208
Everything under control
86
To import display 1.Select and confirm the desired function
Ð here: computer
2.Select and confirm. The function
appears in the assistance window.
The symbol is highlighted if
the function shown in the assistance
window has been selected in the Control
Display.
You can also choose to view brief "Help"
texts explaining selected menu entries,
refer to page 24, or the travel route on vehi-
cles equipped with a GPS navigation
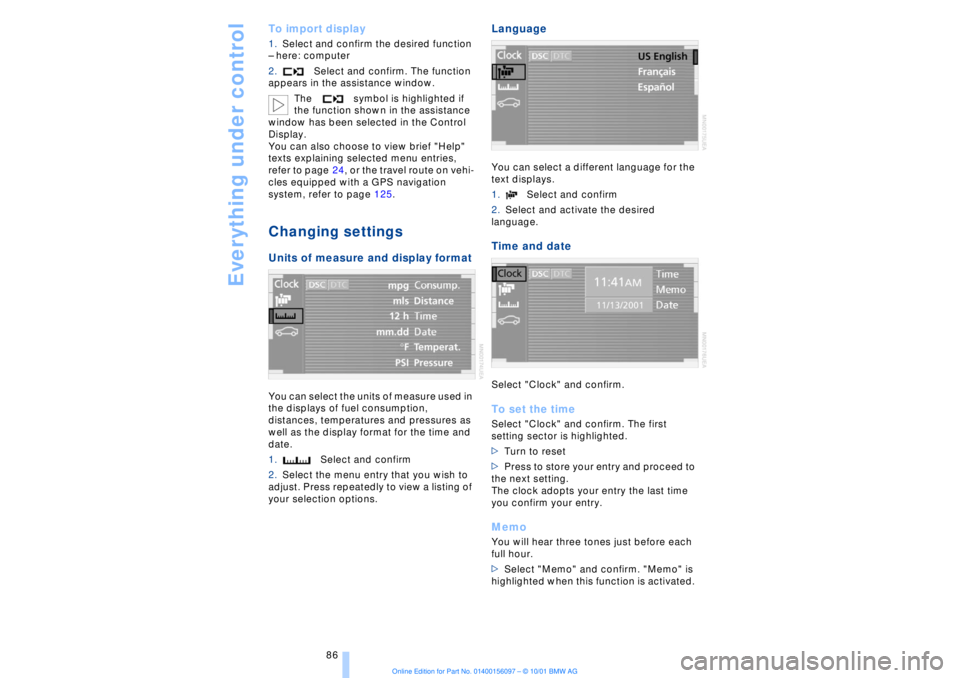
system, refer to page 125. Changing settings Units of measure and display format You can select the units of measure used in
the displays of fuel consumption,
distances, temperatures and pressures as
well as the display format for the time and
date.
1.Select and confirm
2.Select the menu entry that you wish to
adjust. Press repeatedly to view a listing of
your selection options.
Language You can select a different language for the
text displays.
1.Select and confirm
2.Select and activate the desired
language. Time and date Select "Clock" and confirm. To set the timeSelect "Clock" and confirm. The first
setting sector is highlighted.
>Turn to reset
>Press to store your entry and proceed to
the next setting.
The clock adopts your entry the last time
you confirm your entry. MemoYou will hear three tones just before each
full hour.
>Select "Memo" and confirm. "Memo" is
highlighted when this function is activated.