Page 2624 of 4323
A23324
(a)
(b)
(c)
(d)
A23325Water Bypass Hose
A23326
A23327
± ENGINE MECHANICALCYLINDER HEAD
EM±37
2616 Author�: Date�:
2005 SEQUOIA (RM1146U)
13. DISCONNECT HOSES FROM INTAKE MANIFOLD
(a) Disconnect the vacuum hose from the fuel pressure regu-
lator.
(b) Disconnect the PCV hose from the PCV valve on the LH
cylinder head.
(c) Disconnect the EVAP hose (from charcoal canister) from
the VSV for the EVAP.
(d) Disconnect the 2 vacuum hoses from the VSV for the air
injection system.
14. REMOVE INTAKE MANIFOLD ASSEMBLY
(a) Disconnect the 2 water bypass hoses from the throttle
body.
(b) Disconnect the 2 wire clamps from the wire clamp bracket
on the RH delivery pipe.
(c) Remove the 2 bolts holding the engine wire protector from
the intake manifold and cylinder head.
(d) Remove the 2 bolts and ground cables from the RH and
LH cylinder heads.
(e) Remove the bolt and throttle body cover bracket from the
intake manifold.
Page 2625 of 4323
A23328
A23329
A23330
(a)(a)
(b)(c)
(c) (c)
B17510
A23331
EM±38
± ENGINE MECHANICALCYLINDER HEAD
2617 Author�: Date�:
2005 SEQUOIA (RM1146U)
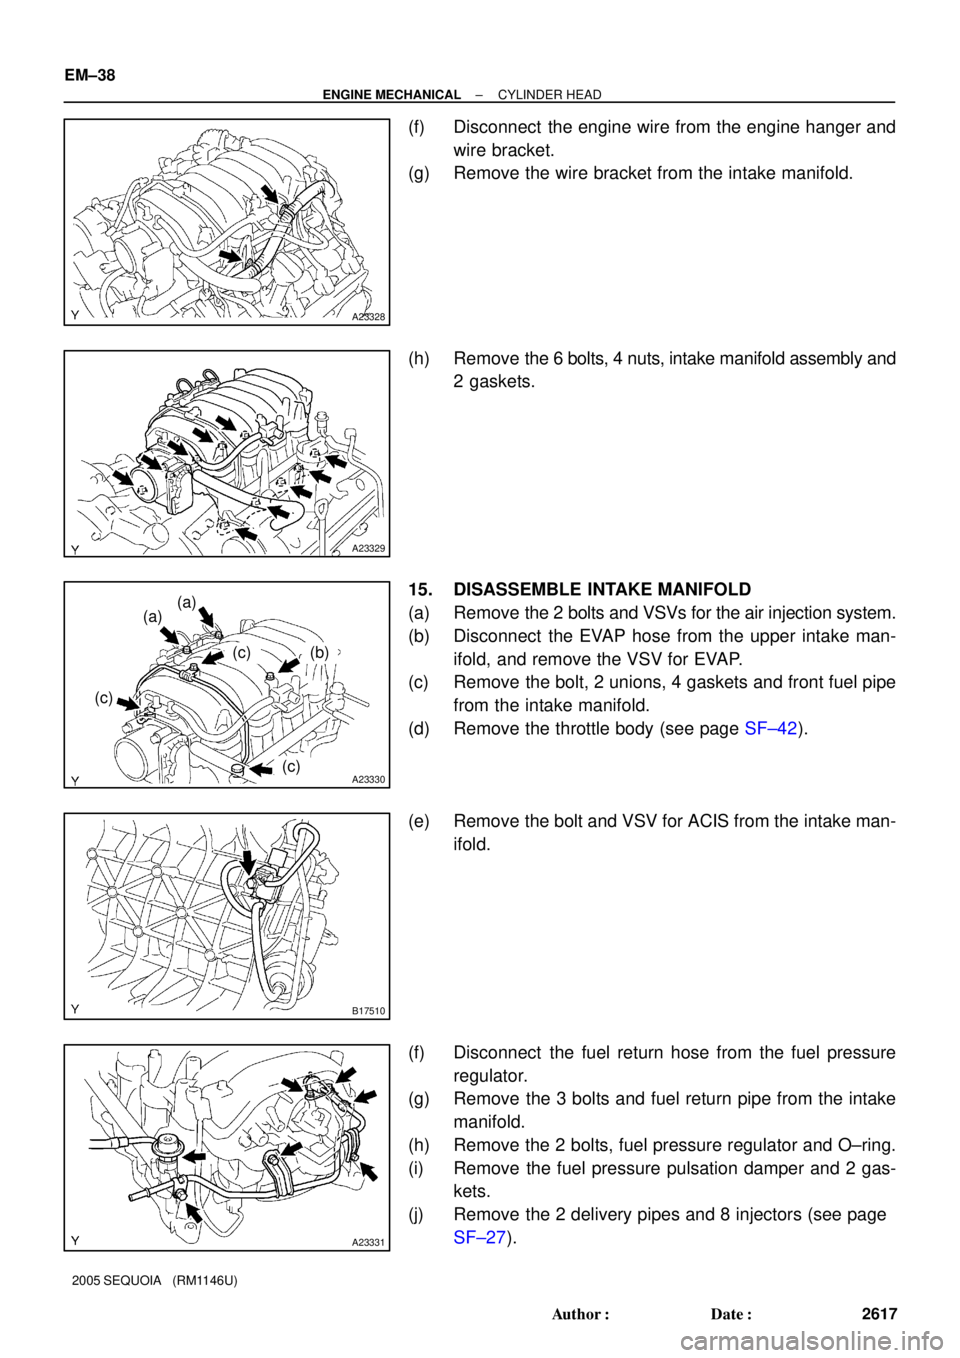
(f) Disconnect the engine wire from the engine hanger and
wire bracket.
(g) Remove the wire bracket from the intake manifold.
(h) Remove the 6 bolts, 4 nuts, intake manifold assembly and
2 gaskets.
15. DISASSEMBLE INTAKE MANIFOLD
(a) Remove the 2 bolts and VSVs for the air injection system.
(b) Disconnect the EVAP hose from the upper intake man-
ifold, and remove the VSV for EVAP.
(c) Remove the bolt, 2 unions, 4 gaskets and front fuel pipe
from the intake manifold.
(d) Remove the throttle body (see page SF±42).
(e) Remove the bolt and VSV for ACIS from the intake man-
ifold.
(f) Disconnect the fuel return hose from the fuel pressure
regulator.
(g) Remove the 3 bolts and fuel return pipe from the intake
manifold.
(h) Remove the 2 bolts, fuel pressure regulator and O±ring.
(i) Remove the fuel pressure pulsation damper and 2 gas-
kets.
(j) Remove the 2 delivery pipes and 8 injectors (see page
SF±27).
Page 2658 of 4323
A04015
Wire
Clamp
Bracket
A23333
Rear Water Bypass Joint
A23332
Front Water Bypass Joint
A23331
± ENGINE MECHANICALCYLINDER HEAD
EM±71
2650 Author�: Date�:
2005 SEQUOIA (RM1146U)
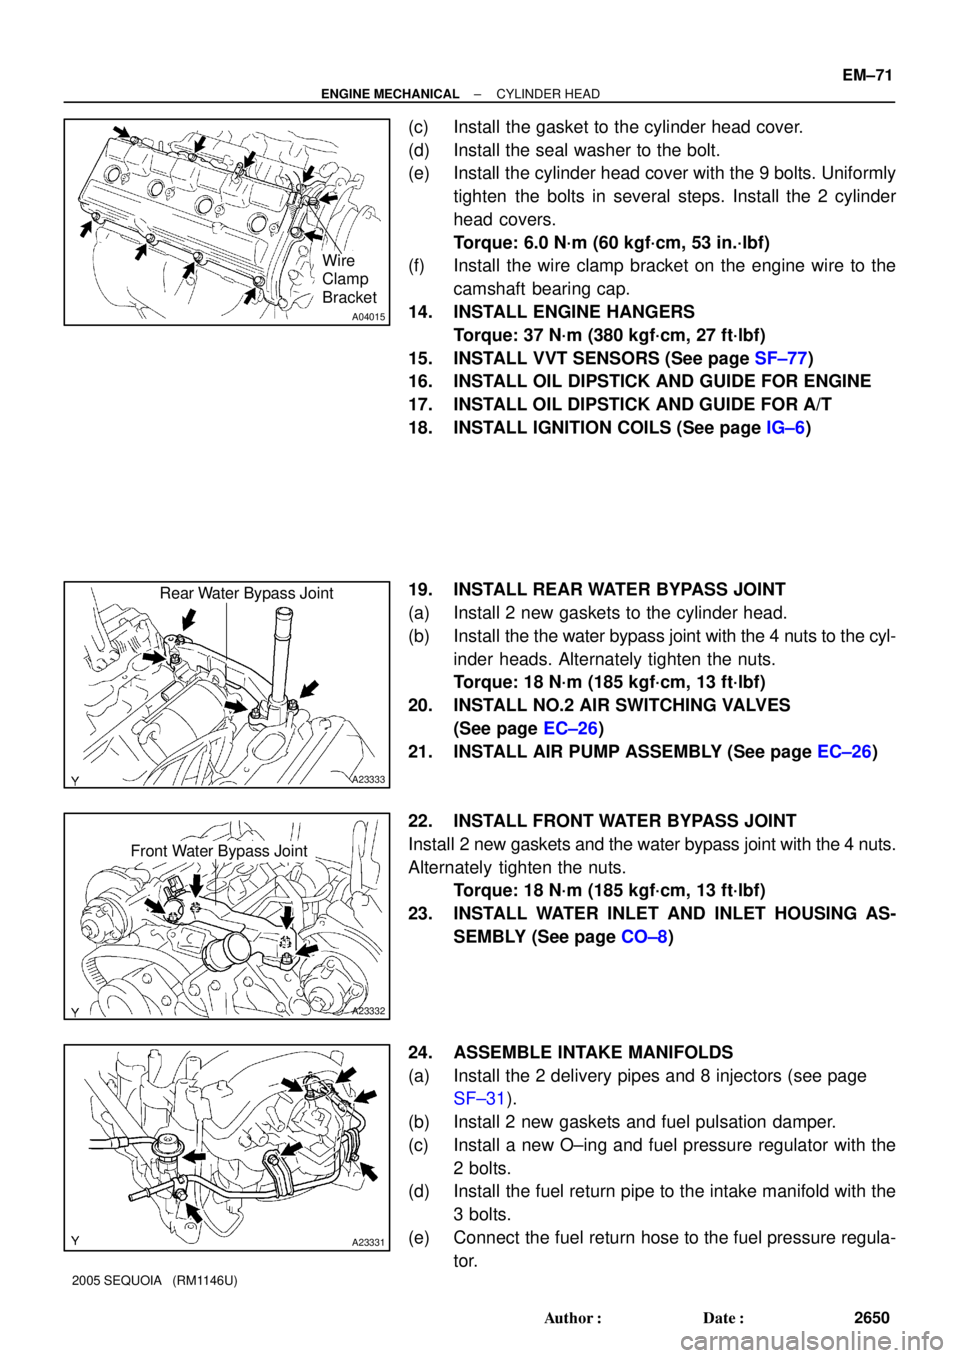
(c) Install the gasket to the cylinder head cover.
(d) Install the seal washer to the bolt.
(e) Install the cylinder head cover with the 9 bolts. Uniformly
tighten the bolts in several steps. Install the 2 cylinder
head covers.
Torque: 6.0 N´m (60 kgf´cm, 53 in.´lbf)
(f) Install the wire clamp bracket on the engine wire to the
camshaft bearing cap.
14. INSTALL ENGINE HANGERS
Torque: 37 N´m (380 kgf´cm, 27 ft´lbf)
15. INSTALL VVT SENSORS (See page SF±77)
16. INSTALL OIL DIPSTICK AND GUIDE FOR ENGINE
17. INSTALL OIL DIPSTICK AND GUIDE FOR A/T
18. INSTALL IGNITION COILS (See page IG±6)
19. INSTALL REAR WATER BYPASS JOINT
(a) Install 2 new gaskets to the cylinder head.
(b) Install the the water bypass joint with the 4 nuts to the cyl-
inder heads. Alternately tighten the nuts.
Torque: 18 N´m (185 kgf´cm, 13 ft´lbf)
20. INSTALL NO.2 AIR SWITCHING VALVES
(See page EC±26)
21. INSTALL AIR PUMP ASSEMBLY (See page EC±26)
22. INSTALL FRONT WATER BYPASS JOINT
Install 2 new gaskets and the water bypass joint with the 4 nuts.
Alternately tighten the nuts.
Torque: 18 N´m (185 kgf´cm, 13 ft´lbf)
23. INSTALL WATER INLET AND INLET HOUSING AS-
SEMBLY (See page CO±8)
24. ASSEMBLE INTAKE MANIFOLDS
(a) Install the 2 delivery pipes and 8 injectors (see page
SF±31).
(b) Install 2 new gaskets and fuel pulsation damper.
(c) Install a new O±ing and fuel pressure regulator with the
2 bolts.
(d) Install the fuel return pipe to the intake manifold with the
3 bolts.
(e) Connect the fuel return hose to the fuel pressure regula-
tor.
Page 2659 of 4323
B17510
A23330
(j)(j)
(i)(h)
(h) (h)
A23365
A23329
EM±72
± ENGINE MECHANICALCYLINDER HEAD
2651 Author�: Date�:
2005 SEQUOIA (RM1146U)
(f) Install the VSV for ACIS with the bolt.
Torque: 7.5 N´m (76 kgf´cm, 66 in.´lbf)
(g) Install the throttle body (See page SF±43).
(h) Install 4 new gaskets and front fuel pipe with the bolt and
2 unions to the intake manifold.
Torque:
39 N´m (400 kgf´cm, 29 ft´lbf) for union bolts
7.5 N´m (80 kgf´cm, 66 in.´lbf) for bolt
(i) Install the VSV for EVAP with the bolt to the intake man-
ifold and connect the EVAP hose.
Torque: 7.5 N´m (76 kgf´cm, 66 in.´lbf)
(j) Install the 2 VSVs for air injection system with the 2 bolts.
Torque: 7.5 N´m (76 kgf´cm, 66 in.´lbf)
25. INSTALL INTAKE MANIFOLD ASSEMBLY
(a) Place 2 new gaskets on the intake manifold.
(b) Place the intake manifold assembly on the cylinder
heads.
(c) Install and uniformly tighten the 6 bolts and 4 nuts in sev-
eral steps.
Torque: 18 N´m (185 kgf´cm, 13 ft´lbf)
Page 2661 of 4323
A23324
(a)
(b)
(c)
(d)
EM±74
± ENGINE MECHANICALCYLINDER HEAD
2653 Author�: Date�:
2005 SEQUOIA (RM1146U)
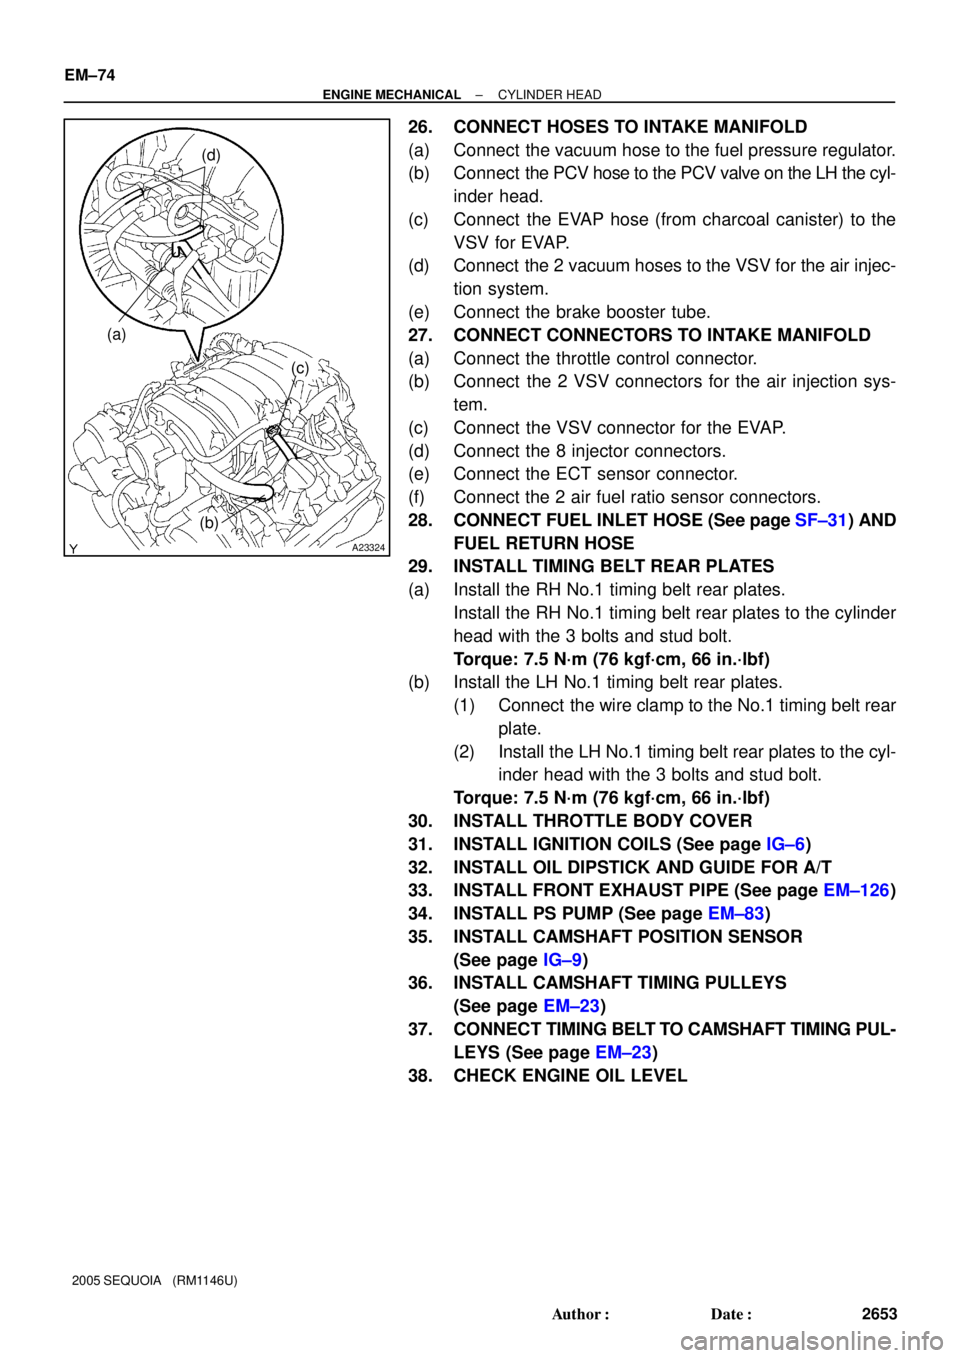
26. CONNECT HOSES TO INTAKE MANIFOLD
(a) Connect the vacuum hose to the fuel pressure regulator.
(b) Connect the PCV hose to the PCV valve on the LH the cyl-
inder head.
(c) Connect the EVAP hose (from charcoal canister) to the
VSV for EVAP.
(d) Connect the 2 vacuum hoses to the VSV for the air injec-
tion system.
(e) Connect the brake booster tube.
27. CONNECT CONNECTORS TO INTAKE MANIFOLD
(a) Connect the throttle control connector.
(b) Connect the 2 VSV connectors for the air injection sys-
tem.
(c) Connect the VSV connector for the EVAP.
(d) Connect the 8 injector connectors.
(e) Connect the ECT sensor connector.
(f) Connect the 2 air fuel ratio sensor connectors.
28. CONNECT FUEL INLET HOSE (See page SF±31) AND
FUEL RETURN HOSE
29. INSTALL TIMING BELT REAR PLATES
(a) Install the RH No.1 timing belt rear plates.
Install the RH No.1 timing belt rear plates to the cylinder
head with the 3 bolts and stud bolt.
Torque: 7.5 N´m (76 kgf´cm, 66 in.´lbf)
(b) Install the LH No.1 timing belt rear plates.
(1) Connect the wire clamp to the No.1 timing belt rear
plate.
(2) Install the LH No.1 timing belt rear plates to the cyl-
inder head with the 3 bolts and stud bolt.
Torque: 7.5 N´m (76 kgf´cm, 66 in.´lbf)
30. INSTALL THROTTLE BODY COVER
31. INSTALL IGNITION COILS (See page IG±6)
32. INSTALL OIL DIPSTICK AND GUIDE FOR A/T
33. INSTALL FRONT EXHAUST PIPE (See page EM±126)
34. INSTALL PS PUMP (See page EM±83)
35. INSTALL CAMSHAFT POSITION SENSOR
(See page IG±9)
36. INSTALL CAMSHAFT TIMING PULLEYS
(See page EM±23)
37. CONNECT TIMING BELT TO CAMSHAFT TIMING PUL-
LEYS (See page EM±23)
38. CHECK ENGINE OIL LEVEL
Page 2663 of 4323
A08928
ECM Connector ECM and Bracket AssemblyHeater to Register Dust
Lower No.2 Finish Panel
Glove Compartment Door
Wire Harness Connector (Cassette Connector)
A23366
Engine Wire Clamp
Engine WireHeater Hose Ground Strap
Fuel Inlet
HoseBattery
Negative
(±) Cable Heater Hose
Fuel Return
Hose
Generator Wire
Battery
Positive (+)
Terminal Clamp
Generator
Connector
EVAP Hose
w/o Hydraulic Brake Booster:
Brake Booster Tube
EM±76
± ENGINE MECHANICALENGINE UNIT (2WD)
2655 Author�: Date�:
2005 SEQUOIA (RM1146U)
Page 2667 of 4323
A09151
A08905
A08907
EM±80
± ENGINE MECHANICALENGINE UNIT (2WD)
2659 Author�: Date�:
2005 SEQUOIA (RM1146U)
(d) Disconnect the hose clamp for the PS air hose.
(e) Disconnect the PS air hose from the upper intake man-
ifold.
(f) Disconnect the 2 heater hoses.
(g) Disconnect the ground strap from the cowl panel.
(h) Disconnect the fuel inlet hose and clamps.
(i) Disconnect the fuel return hose and clamp.
(j) Disconnect the air inlet hose from the charcoal canister.
(k) Disconnect the EVAP hose from the charcoal canister.
(l) w/o Hydraulic brake booster:
Disconnect the brake booster tube.
11. REMOVE FRONT EXHAUST PIPES
(See page EM±126)
12. REMOVE PROPELLER SHAFT (See page PR±3)
13. REMOVE FRONT STABILIZER BAR
(See page SA±91)
14. DISCONNECT POWER STEERING GEAR PIPES
Disconnect the pressure feed tube, turn tube and pressure
tubes from the PS gear assembly.
(See page SR±40, SR±41)
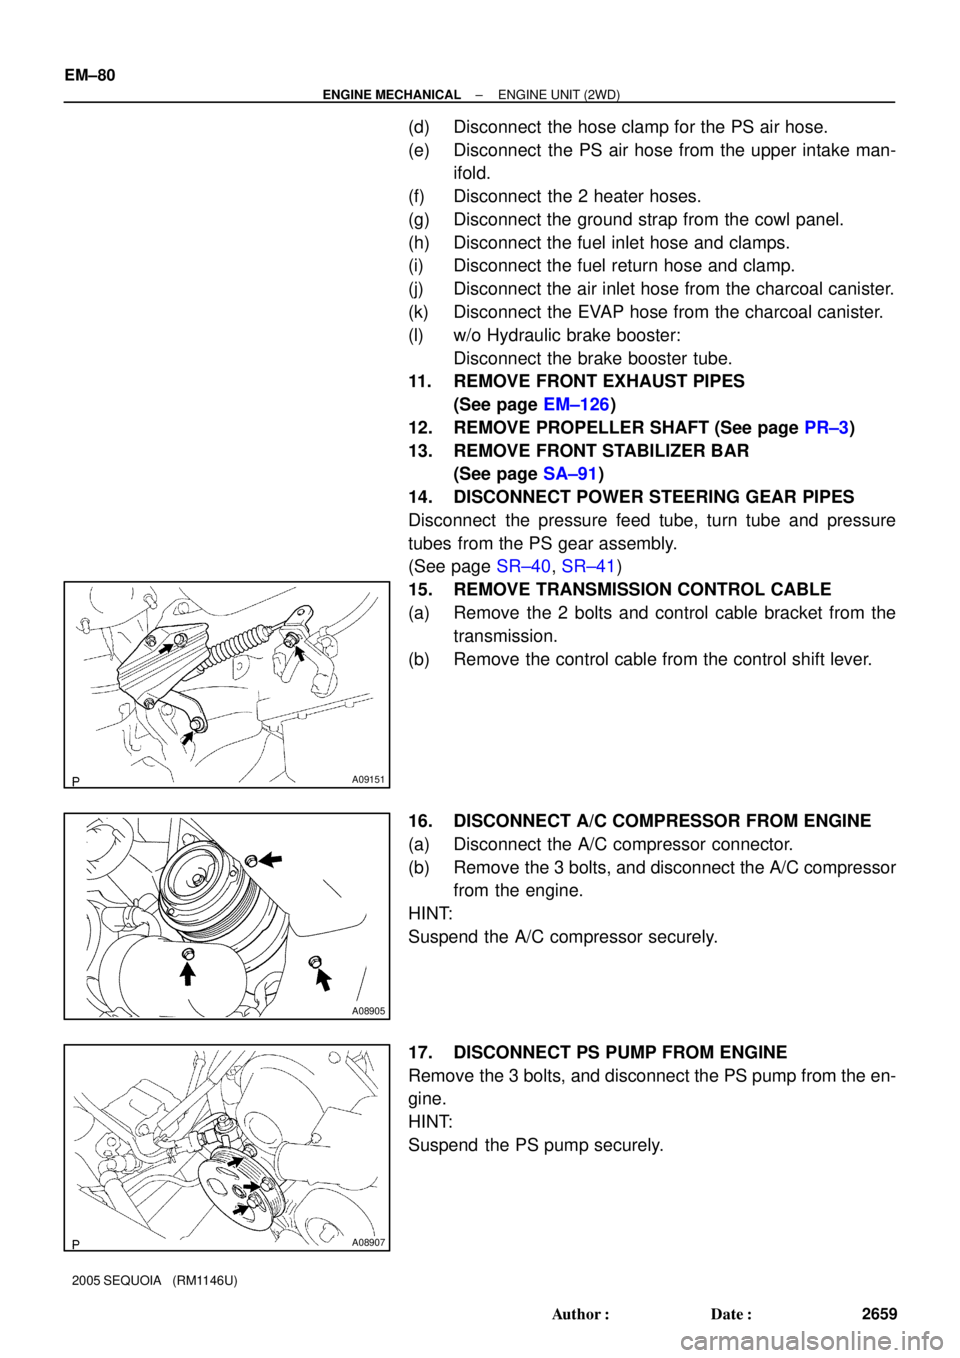
15. REMOVE TRANSMISSION CONTROL CABLE
(a) Remove the 2 bolts and control cable bracket from the
transmission.
(b) Remove the control cable from the control shift lever.
16. DISCONNECT A/C COMPRESSOR FROM ENGINE
(a) Disconnect the A/C compressor connector.
(b) Remove the 3 bolts, and disconnect the A/C compressor
from the engine.
HINT:
Suspend the A/C compressor securely.
17. DISCONNECT PS PUMP FROM ENGINE
Remove the 3 bolts, and disconnect the PS pump from the en-
gine.
HINT:
Suspend the PS pump securely.
Page 2673 of 4323
A08905
A09151
(a) EM±86
± ENGINE MECHANICALENGINE UNIT (2WD)
2665 Author�: Date�:
2005 SEQUOIA (RM1146U)
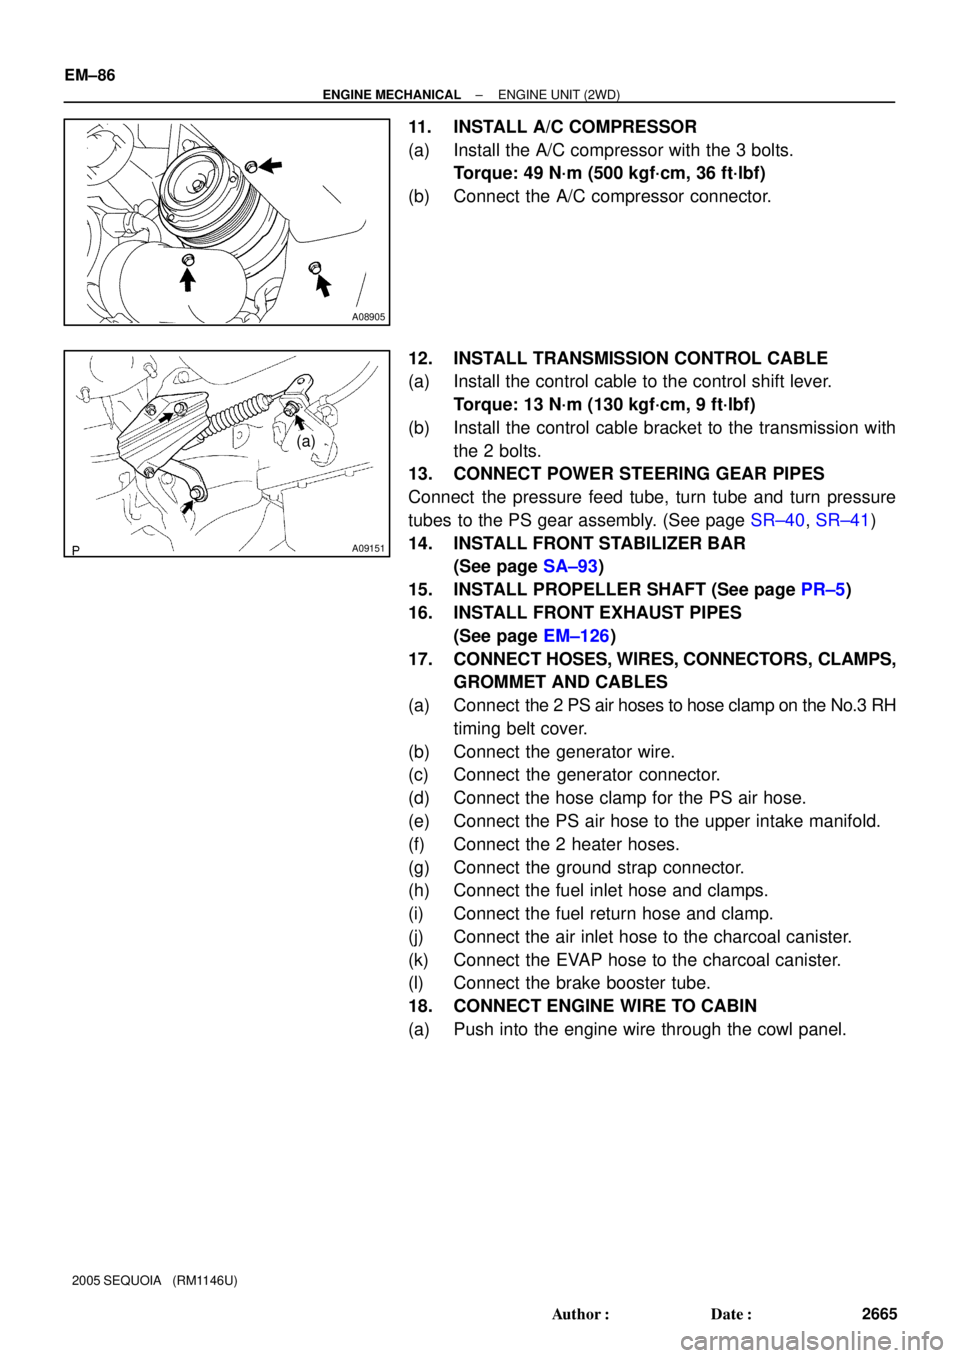
11. INSTALL A/C COMPRESSOR
(a) Install the A/C compressor with the 3 bolts.
Torque: 49 N´m (500 kgf´cm, 36 ft´lbf)
(b) Connect the A/C compressor connector.
12. INSTALL TRANSMISSION CONTROL CABLE
(a) Install the control cable to the control shift lever.
Torque: 13 N´m (130 kgf´cm, 9 ft´lbf)
(b) Install the control cable bracket to the transmission with
the 2 bolts.
13. CONNECT POWER STEERING GEAR PIPES
Connect the pressure feed tube, turn tube and turn pressure
tubes to the PS gear assembly. (See page SR±40, SR±41)
14. INSTALL FRONT STABILIZER BAR
(See page SA±93)
15. INSTALL PROPELLER SHAFT (See page PR±5)
16. INSTALL FRONT EXHAUST PIPES
(See page EM±126)
17. CONNECT HOSES, WIRES, CONNECTORS, CLAMPS,
GROMMET AND CABLES
(a) Connect the 2 PS air hoses to hose clamp on the No.3 RH
timing belt cover.
(b) Connect the generator wire.
(c) Connect the generator connector.
(d) Connect the hose clamp for the PS air hose.
(e) Connect the PS air hose to the upper intake manifold.
(f) Connect the 2 heater hoses.
(g) Connect the ground strap connector.
(h) Connect the fuel inlet hose and clamps.
(i) Connect the fuel return hose and clamp.
(j) Connect the air inlet hose to the charcoal canister.
(k) Connect the EVAP hose to the charcoal canister.
(l) Connect the brake booster tube.
18. CONNECT ENGINE WIRE TO CABIN
(a) Push into the engine wire through the cowl panel.