Page 2435 of 4323

± DIAGNOSTICSNAVIGATION SYSTEM
DI±2233
2427 Author�: Date�:
2005 SEQUOIA (RM1146U)
Abnormal noise occurs
INSPECTION PROCEDURE
1 Check speaker installation
CHECK:
Check if each speaker is securely installed.
OK:
Each speaker is securely installed.
HINT:
The radio is equipped with a noise prevention system that blocks only excessively loud noise. If loud noise
occurs, check that all wiring is proper and that the antenna installation part ground and noise±prevention
equipment are installed.
Conditions under which noise occursNoise type
Noise increases when the accelerator pedal is depressed, but stops when
the engine is stopped.Generator noise
Noise occurs during A/C or heater operation.Blower motor noise
Noise occurs when the vehicle accelerates rapidly on an unpaved road or
after the ignition switch is turned on.Fuel pump noise
Noise occurs when the horn switch is pressed and released or when pressed
and held.Horn noise
Quiet noise is occurs while the engine is running, but stops when the engine
is stopped.Ignition noise
Noise occurs synchronously with the blink of the turn signal.Flasher noise
Noise occurs during window washer operation.Washer noise
Noise occurs while the engine is running, and continues even after the engine
is stopped.Water temperature sensor noise
Noise occurs during wiper operation.Wiper noise
Noise occurs when the brake pedal is depressed.Stop light switch noise
Others.Static electricity stored on the vehicle
HINT:
�Identify the condition under which the noise occurs, and check the noise filter on the relevant part.
�First ensure that the noise is not coming from outside. Failure to do so makes noise source detection
difficult and may lead to a misdiagnosis.
�Noise should be removed in descending order of loudness.
NG Install it properly.
OK
Identification of noise source (See page DI±2174).
DIDCO±01
Page 2499 of 4323

AC2810
DIDKM±01
AC2811
N11084
Wrong Okay
HI LO HILO
± DIAGNOSTICSAIR CONDITIONING SYSTEM
DI±2297
2491 Author�: Date�:
2005 SEQUOIA (RM1146U)
AIR CONDITIONING SYSTEM
PRECAUTION
1. DO NOT HANDLE REFRIGERANT IN AN ENCLOSED
AREA OR NEAR AN OPEN FLAME
2. ALWAYS WEAR EYE PROTECTION
3. BE CAREFUL NOT TO GET LIQUID REFRIGERANT IN
YOUR EYES OR ON YOUR SKIN
If liquid refrigerant gets in your eyes or on your skin:
(a) wash the area with lots of cool water.
CAUTION:
Do not rub your eyes or skin.
(b) apply clean petroleum jelly to the skin.
(c) go immediately to a hospital or see a physician for profes-
sional treatment.
4. NEVER HEAT CONTAINER OR EXPOSE IT TO NAKED
FLAME
5. BE CAREFUL NOT TO DROP CONTAINER OR APPLY
PHYSICAL SHOCKS TO IT
6. DO NOT OPERATE COMPRESSOR WITHOUT
ENOUGH REFRIGERANT IN REFRIGERATION SYS-
TEM
If there is not enough refrigerant in the refrigerant system, oil lu-
brication will be insufficient and compressor burnout may occur.
Necessary care should be taken to avoid this.
7. DO NOT OPEN HIGH PRESSURE MANIFOLD VALVE
WHILE COMPRESSOR IS OPERATE
Open and close only the low pressure valve. If the high pressure
valves are opened, refrigerant flows in the reverse direction
causing the charging cylinder to rupture.
8. BE CAREFUL NOT TO OVERCHARGE SYSTEM WITH
REFRIGERANT
If refrigerant is overcharged, it causes problems such as insuffi-
cient cooling, poor fuel economy, engine overheating etc.
Page 2589 of 4323

EM±2
± ENGINE MECHANICALCO/HC
2581 Author�: Date�:
2005 SEQUOIA (RM1146U)
5. IMMEDIATELY CHECK CO/HC CONCENTRATION AT
IDLE AND/OR 2,500 RPM
HINT:
When performing the 2 mode (2,500 rpm and idle) test, follow
the measurement orders are prescribed by the applicable local
regulations.
If the CO/HC concentration does not comply with regulations,
perform troubleshooting in the order given below.
(a) Check the air±fuel ratio sensors and heated oxygen sen-
sors operation.(See page DI±88 and DI±93)
(b) See the table below for possible causes, and then inspect
and correct the applicable causes if necessary.
COHCProblemsCauses
NormalHighRough idle7. Faulty ignitions:
�Incorrect timing
�Fouled, shorted or improperly gapped plugs
8. Incorrect valve clearance
9. Leaky intake and exhaust valves
10.Leaky cylinders
LowHighRough idle
(fluctuating HC reading)1. Vacuum leaks:
�PCV hoses
�Intake manifold
�Throttle body
�Brake booster line
2. Lean mixture causing misfire
HighHighRough idle
(Black smoke from exhaust)1. Restricted air filter
2. Faulty SFI systems:
�Faulty pressure regulator
�Defective ECT sensor
�Faulty ECM
�Faulty injectors
�Faulty throttle position sensor
�Faulty MAF meter
Page 2590 of 4323

EM0KR±10
A04458
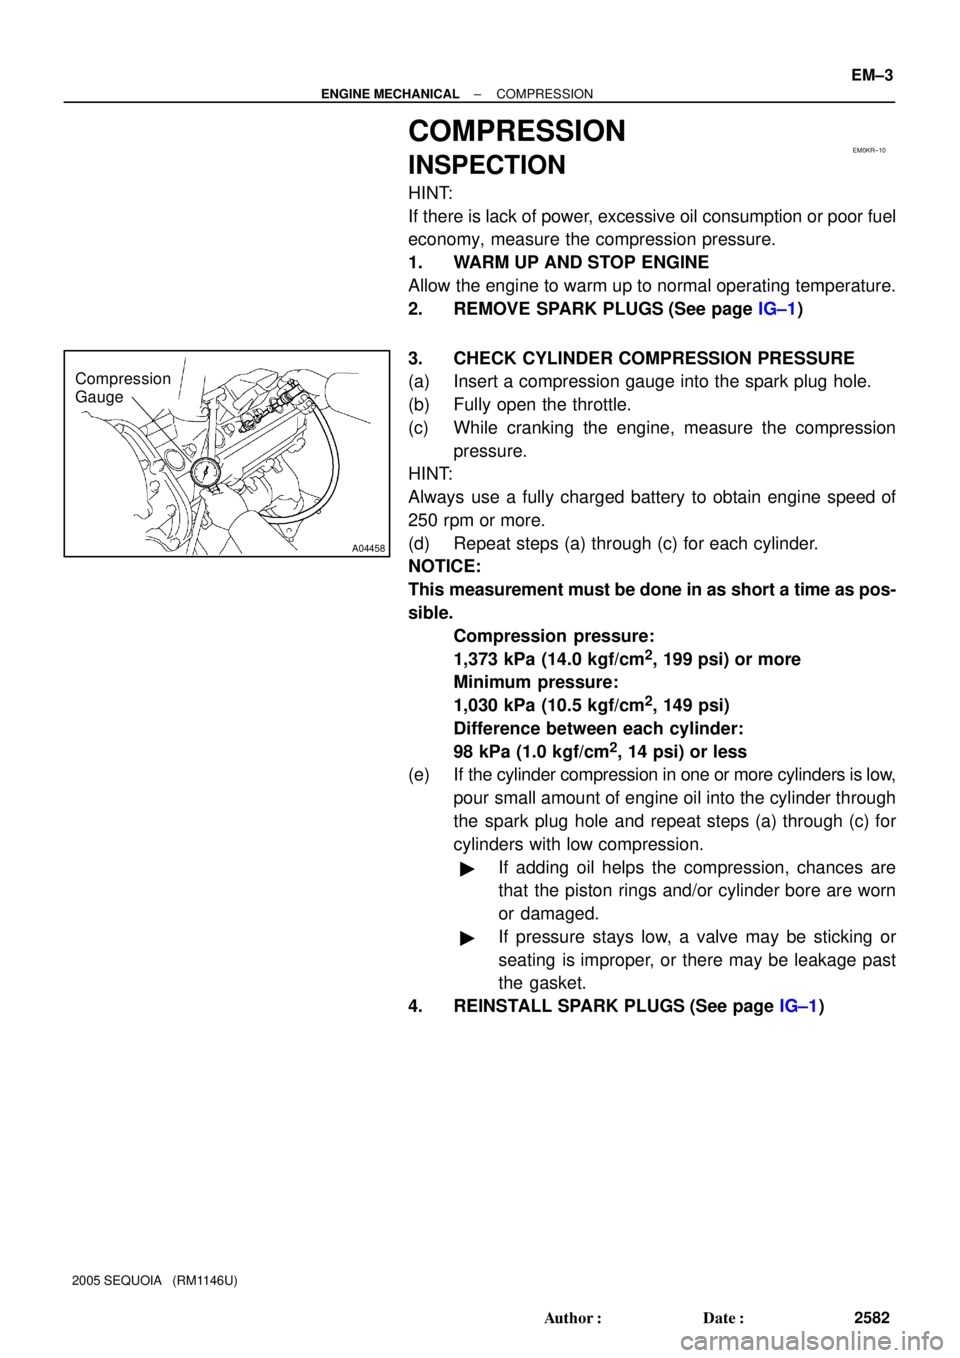
Compression
Gauge
± ENGINE MECHANICALCOMPRESSION
EM±3
2582 Author�: Date�:
2005 SEQUOIA (RM1146U)
COMPRESSION
INSPECTION
HINT:
If there is lack of power, excessive oil consumption or poor fuel
economy, measure the compression pressure.
1. WARM UP AND STOP ENGINE
Allow the engine to warm up to normal operating temperature.
2. REMOVE SPARK PLUGS (See page IG±1)
3. CHECK CYLINDER COMPRESSION PRESSURE
(a) Insert a compression gauge into the spark plug hole.
(b) Fully open the throttle.
(c) While cranking the engine, measure the compression
pressure.
HINT:
Always use a fully charged battery to obtain engine speed of
250 rpm or more.
(d) Repeat steps (a) through (c) for each cylinder.
NOTICE:
This measurement must be done in as short a time as pos-
sible.
Compression pressure:
1,373 kPa (14.0 kgf/cm
2, 199 psi) or more
Minimum pressure:
1,030 kPa (10.5 kgf/cm
2, 149 psi)
Difference between each cylinder:
98 kPa (1.0 kgf/cm
2, 14 psi) or less
(e) If the cylinder compression in one or more cylinders is low,
pour small amount of engine oil into the cylinder through
the spark plug hole and repeat steps (a) through (c) for
cylinders with low compression.
�If adding oil helps the compression, chances are
that the piston rings and/or cylinder bore are worn
or damaged.
�If pressure stays low, a valve may be sticking or
seating is improper, or there may be leakage past
the gasket.
4. REINSTALL SPARK PLUGS (See page IG±1)
Page 2619 of 4323
A23320
Rear Water
Bypass JointEngine Wire Protector
� Gasket
Injection Connector
Ignition Coil Connector
Ignition Coil Throttle Control
Connector
ECT
Sensor Connector
Front Water
Bypass Joint
Water Inlet and Inlet
Housing Assembly
Water Bypass Hose
LH No.1 Timing Belt Rear Plate
� Non±reusable partEngine Wire
� Gasket
� O±Ring
Engine WireHeater Hose
Throttle Body
Cover Bracket
VSV Connector
for EVAP Fuel Return Hose
Engine Wire
EVAP Hose
Heater Hose
Wire BracketFuel Inlet Hose
� Gasket
RH No.1 Timing Belt Rear Plate
� GasketAir Switching Valve No.2
Air Tube No.3
Air Tube No.3
� Gasket
N´m (kgf´cm, ft´lbf) : Specified torque� Gasket
18 (185, 13)
18 (185, 13)
18 (185, 13)
7.5 (76, 66 in.´lbf)
7.5 (76, 66 in.´lbf)
� Gasket
� Gasket
7.5 (76, 66 in.´lbf)
Air Pump Assembly
16 (163, 12)
10 (102, 7)
10 (102, 7)
16 (163, 12)
EM±32
± ENGINE MECHANICALCYLINDER HEAD
2611 Author�: Date�:
2005 SEQUOIA (RM1146U)
Page 2620 of 4323
A23321
Fuel Pressure
Pulsation Damper
* 33 (340, 24)
39 (400, 29)
PCV
18 (184, 13)
LH Delivery Pipe
N´m (kgf´cm, ft´lbf) : Specified torque
� Non±reusable part
* For use with SST� Grommet
Injector � O±Ring
� InsulatorFuel Return Pipe
Front Fuel Pipe � Gasket
� Gasket
Throttle Body Assembly
39 (400, 29)
Fuel Pressure RegulatorVacuum Hose
RH Delivery PipeVSV for EVAP
VSV for Secondary Air Injection System
VSV Wire Connector
for ACIS
VSV for ACIS
7.5 (76, 66 in.´lbf)
Union
39 (400, 29)
Union
� Upper Gasket
7.5 (76, 66 in.´lbf)
7.5 (76, 66 in.´lbf)
21 (214, 15)
21 (214, 15)
Ventilation
Hose
7.5 (76, 66 in.´lbf)
7.5 (76, 66 in.´lbf)
� O±Ring
� Lower Gasket
7.5 (76, 66 in.´lbf)
18 (185, 13)
± ENGINE MECHANICALCYLINDER HEAD
EM±33
2612 Author�: Date�:
2005 SEQUOIA (RM1146U)
Page 2621 of 4323

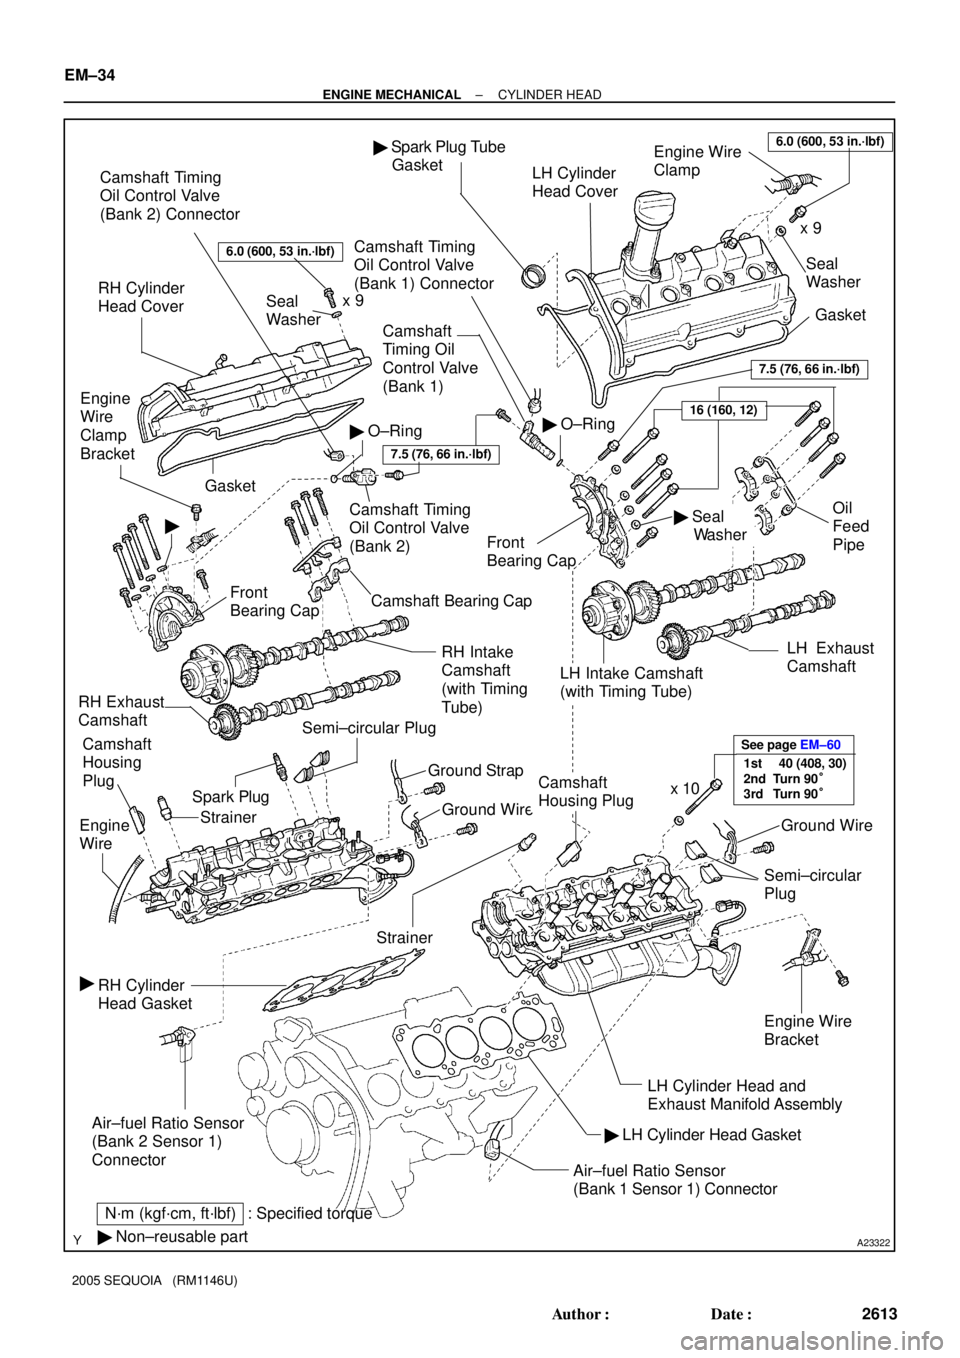
A23322� Non±reusable part
N´m (kgf´cm, ft´lbf) : Specified torque Camshaft Timing
Oil Control Valve
(Bank 2) Connector
RH Cylinder
Head Cover
Engine
Wire
Clamp
Bracket� Spark Plug Tube
Gasket
Seal
Washer LH Cylinder
Head Cover
RH Intake
Camshaft
(with Timing
Tube)
Semi±circular Plug
Ground Strap
Ground WireEngine Wire
Clamp
x 9
Camshaft
Timing Oil
Control Valve
(Bank 1)
Camshaft Timing
Oil Control Valve
(Bank 2)
Front
Bearing Cap
Spark PlugGasket
Oil
Feed
Pipe
� Seal
Washer
Ground Wire
Camshaft Bearing Cap
16 (160, 12)� O±Ring
LH Exhaust
Camshaft
Camshaft
Housing Plug
Semi±circular
Plug
Strainer
� O±Ring
Gasket
�
LH Intake Camshaft
(with Timing Tube)
RH Exhaust
Camshaft
Camshaft
Housing
Plug
Engine Wire
Bracket
� LH Cylinder Head GasketLH Cylinder Head and
Exhaust Manifold Assembly
Air±fuel Ratio Sensor
(Bank 1 Sensor 1) Connector
RH Cylinder
Head Gasket
Engine
Wire
7.5 (76, 66 in.´lbf)
7.5 (76, 66 in.´lbf)
Seal
Washerx 9
x 10
�Camshaft Timing
Oil Control Valve
(Bank 1) Connector
Air±fuel Ratio Sensor
(Bank 2 Sensor 1)
Connector
Strainer
1st 40 (408, 30)
2nd Turn 90°
3rd
Turn 90° See page EM±60
Front
Bearing Cap
6.0 (600, 53 in.´lbf)
6.0 (600, 53 in.´lbf)
EM±34
± ENGINE MECHANICALCYLINDER HEAD
2613 Author�: Date�:
2005 SEQUOIA (RM1146U)
Page 2623 of 4323

EM1X0±01
A02844
EM±36
± ENGINE MECHANICALCYLINDER HEAD
2615 Author�: Date�:
2005 SEQUOIA (RM1146U)
REMOVAL
1. DRAIN ENGINE COOLANT
2. REMOVE THROTTLE BODY COVER
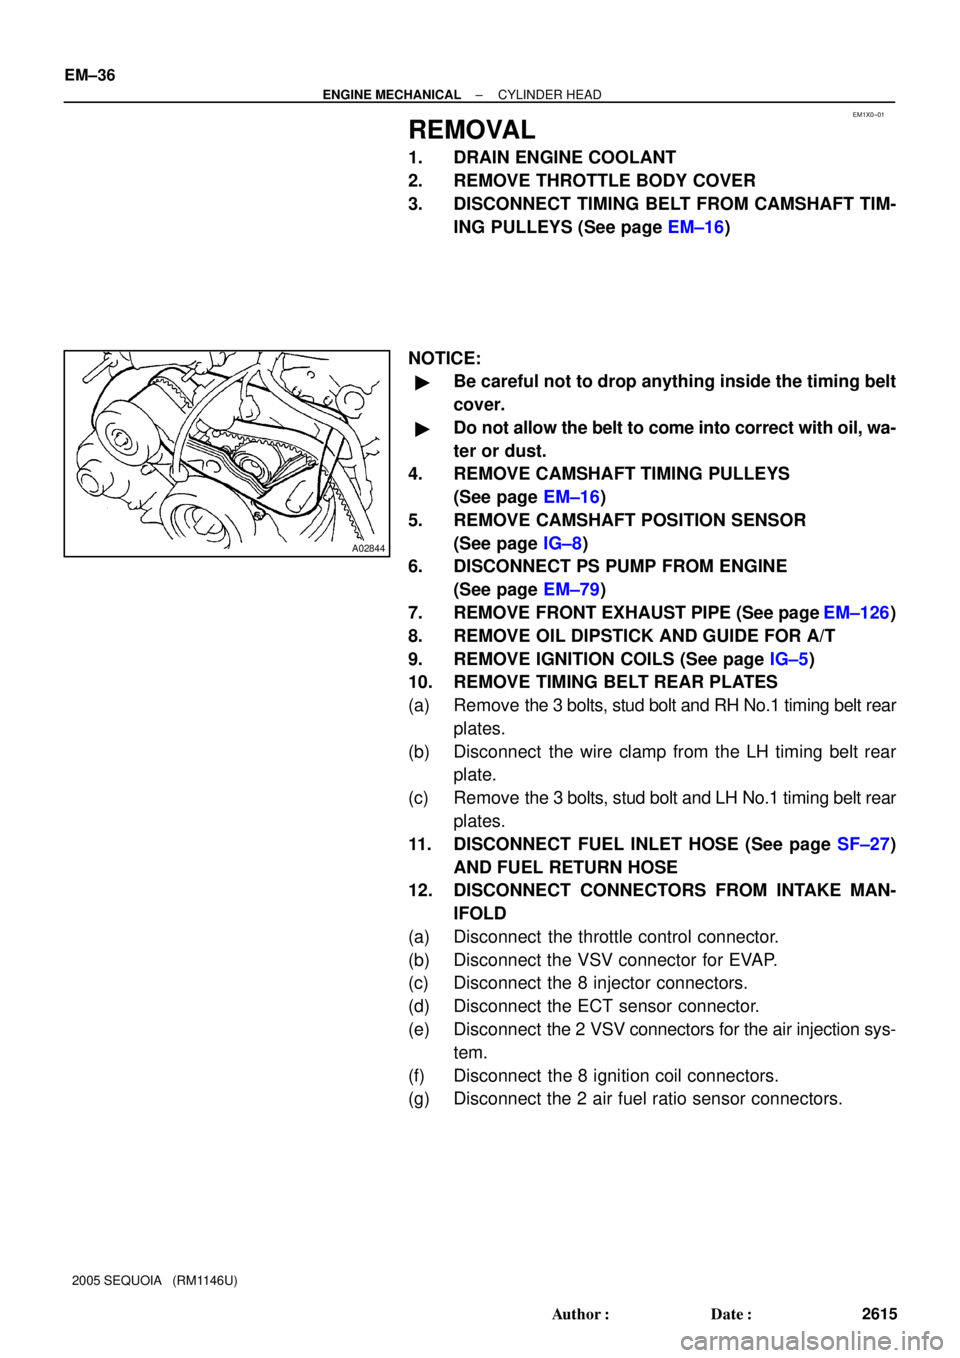
3. DISCONNECT TIMING BELT FROM CAMSHAFT TIM-
ING PULLEYS (See page EM±16)
NOTICE:
�Be careful not to drop anything inside the timing belt
cover.
�Do not allow the belt to come into correct with oil, wa-
ter or dust.
4. REMOVE CAMSHAFT TIMING PULLEYS
(See page EM±16)
5. REMOVE CAMSHAFT POSITION SENSOR
(See page IG±8)
6. DISCONNECT PS PUMP FROM ENGINE
(See page EM±79)
7. REMOVE FRONT EXHAUST PIPE (See page EM±126)
8. REMOVE OIL DIPSTICK AND GUIDE FOR A/T
9. REMOVE IGNITION COILS (See page IG±5)
10. REMOVE TIMING BELT REAR PLATES
(a) Remove the 3 bolts, stud bolt and RH No.1 timing belt rear
plates.
(b) Disconnect the wire clamp from the LH timing belt rear
plate.
(c) Remove the 3 bolts, stud bolt and LH No.1 timing belt rear
plates.
11. DISCONNECT FUEL INLET HOSE (See page SF±27)
AND FUEL RETURN HOSE
12. DISCONNECT CONNECTORS FROM INTAKE MAN-
IFOLD
(a) Disconnect the throttle control connector.
(b) Disconnect the VSV connector for EVAP.
(c) Disconnect the 8 injector connectors.
(d) Disconnect the ECT sensor connector.
(e) Disconnect the 2 VSV connectors for the air injection sys-
tem.
(f) Disconnect the 8 ignition coil connectors.
(g) Disconnect the 2 air fuel ratio sensor connectors.