Page 1798 of 1943
I17796
21
BE1V3±02
I17797
5
I08152
BE±56
± BODY ELECTRICALPOWER WINDOW CONTROL SYSTEM
2001 PRIUS (RM778U)
INSPECTION
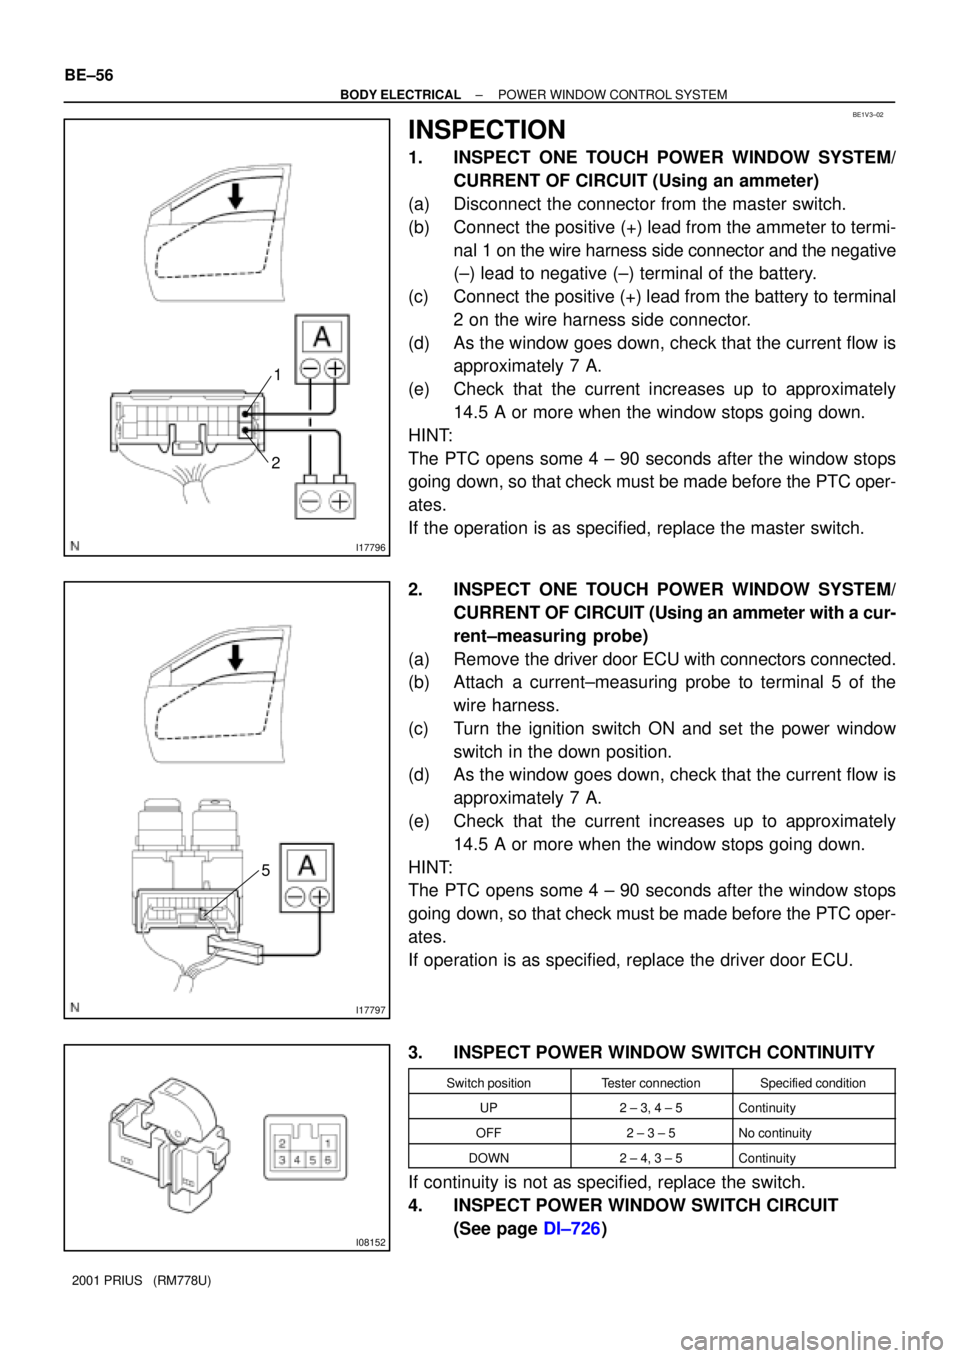
1. INSPECT ONE TOUCH POWER WINDOW SYSTEM/
CURRENT OF CIRCUIT (Using an ammeter)
(a) Disconnect the connector from the master switch.
(b) Connect the positive (+) lead from the ammeter to termi-
nal 1 on the wire harness side connector and the negative
(±) lead to negative (±) terminal of the battery.
(c) Connect the positive (+) lead from the battery to terminal
2 on the wire harness side connector.
(d) As the window goes down, check that the current flow is
approximately 7 A.
(e) Check that the current increases up to approximately
14.5 A or more when the window stops going down.
HINT:
The PTC opens some 4 ± 90 seconds after the window stops
going down, so that check must be made before the PTC oper-
ates.
If the operation is as specified, replace the master switch.
2. INSPECT ONE TOUCH POWER WINDOW SYSTEM/
CURRENT OF CIRCUIT (Using an ammeter with a cur-
rent±measuring probe)
(a) Remove the driver door ECU with connectors connected.
(b) Attach a current±measuring probe to terminal 5 of the
wire harness.
(c) Turn the ignition switch ON and set the power window
switch in the down position.
(d) As the window goes down, check that the current flow is
approximately 7 A.
(e) Check that the current increases up to approximately
14.5 A or more when the window stops going down.
HINT:
The PTC opens some 4 ± 90 seconds after the window stops
going down, so that check must be made before the PTC oper-
ates.
If operation is as specified, replace the driver door ECU.
3. INSPECT POWER WINDOW SWITCH CONTINUITY
Switch positionTester connectionSpecified condition
UP2 ± 3, 4 ± 5Continuity
OFF2 ± 3 ± 5No continuity
DOWN2 ± 4, 3 ± 5Continuity
If continuity is not as specified, replace the switch.
4. INSPECT POWER WINDOW SWITCH CIRCUIT
(See page DI±726)
Page 1799 of 1943
Z05930
1
2
3
5 1
5
2 3
I1535121
I1535221
I15353
2
1
I153542
1
± BODY ELECTRICALPOWER WINDOW CONTROL SYSTEM
BE±57
2001 PRIUS (RM778U)
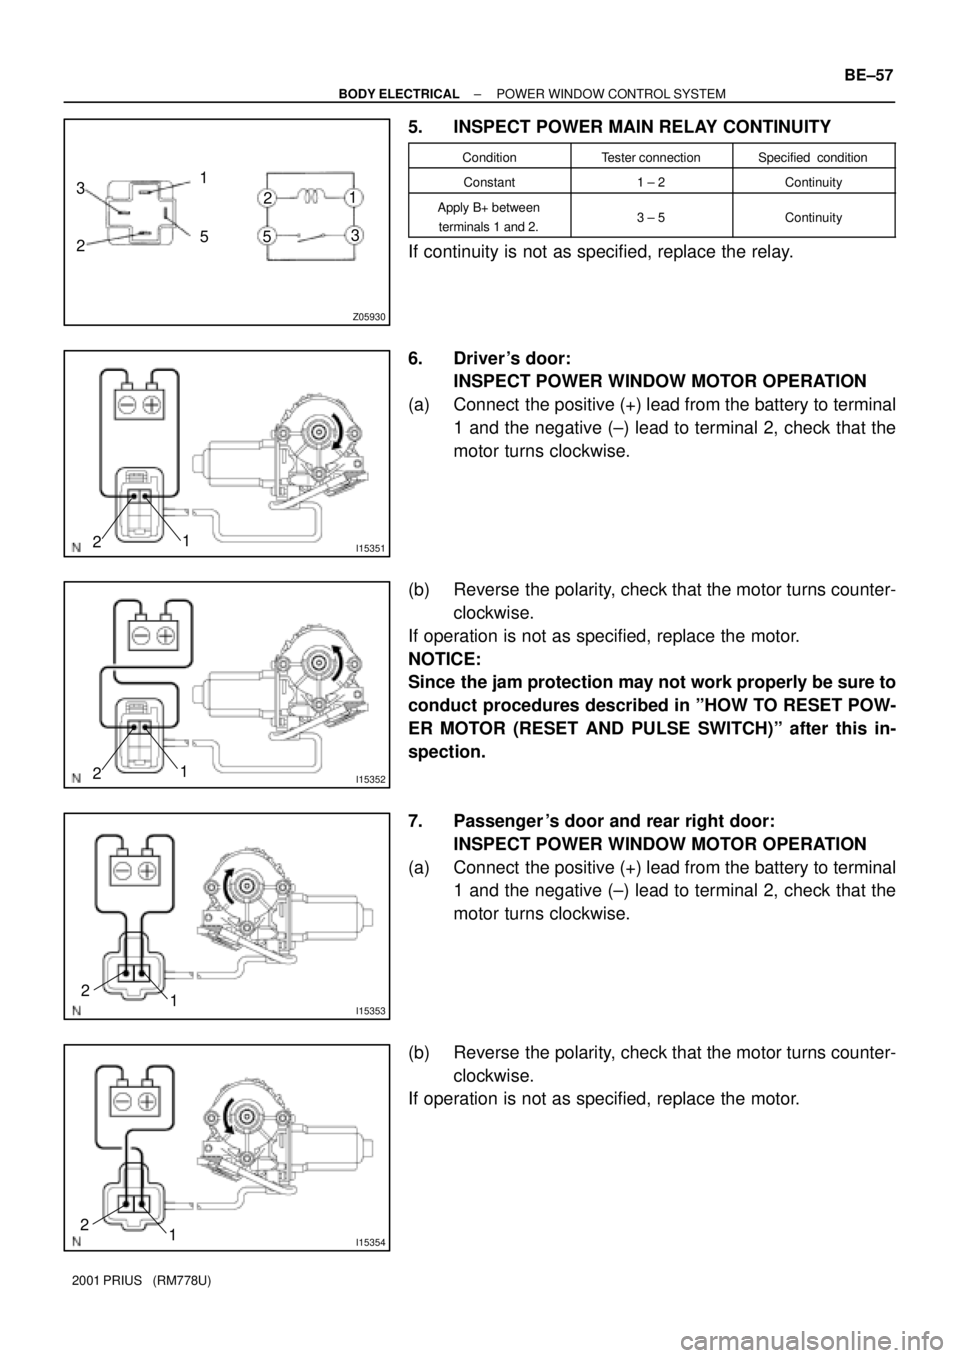
5. INSPECT POWER MAIN RELAY CONTINUITY
ConditionTester connectionSpecified condition
Constant1 ± 2Continuity
Apply B+ between
terminals 1 and 2.3 ± 5Continuity
If continuity is not as specified, replace the relay.
6. Driver 's door:
INSPECT POWER WINDOW MOTOR OPERATION
(a) Connect the positive (+) lead from the battery to terminal
1 and the negative (±) lead to terminal 2, check that the
motor turns clockwise.
(b) Reverse the polarity, check that the motor turns counter-
clockwise.
If operation is not as specified, replace the motor.
NOTICE:
Since the jam protection may not work properly be sure to
conduct procedures described in ºHOW TO RESET POW-
ER MOTOR (RESET AND PULSE SWITCH)º after this in-
spection.
7. Passenger 's door and rear right door:
INSPECT POWER WINDOW MOTOR OPERATION
(a) Connect the positive (+) lead from the battery to terminal
1 and the negative (±) lead to terminal 2, check that the
motor turns clockwise.
(b) Reverse the polarity, check that the motor turns counter-
clockwise.
If operation is not as specified, replace the motor.
Page 1800 of 1943
I15357
2
1
I15358
2
1
I14317
21
I1431821
I14319
21
BE±58
± BODY ELECTRICALPOWER WINDOW CONTROL SYSTEM
2001 PRIUS (RM778U)
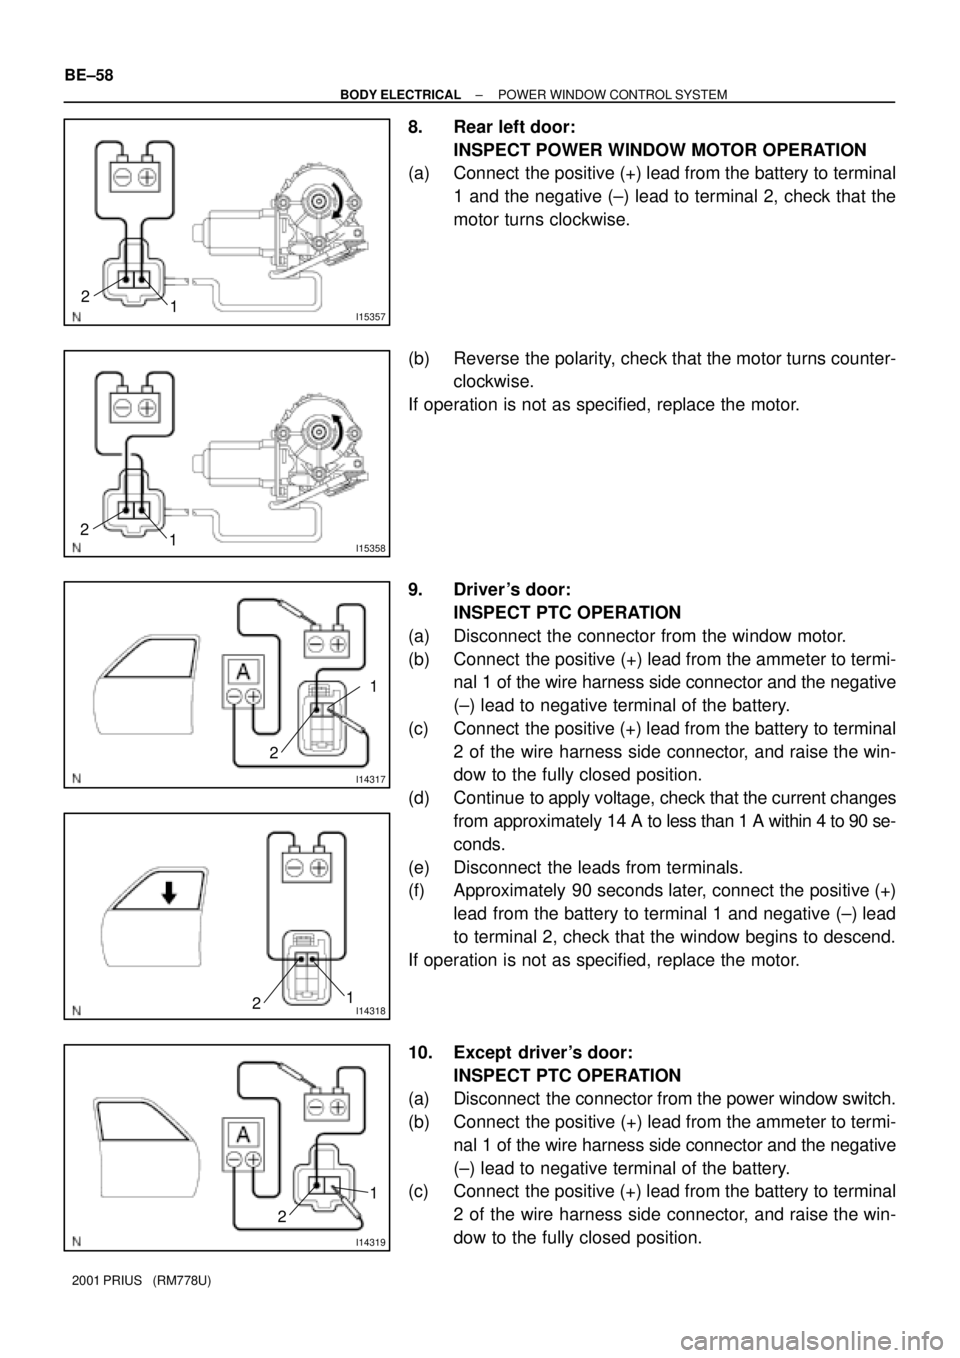
8. Rear left door:
INSPECT POWER WINDOW MOTOR OPERATION
(a) Connect the positive (+) lead from the battery to terminal
1 and the negative (±) lead to terminal 2, check that the
motor turns clockwise.
(b) Reverse the polarity, check that the motor turns counter-
clockwise.
If operation is not as specified, replace the motor.
9. Driver 's door:
INSPECT PTC OPERATION
(a) Disconnect the connector from the window motor.
(b) Connect the positive (+) lead from the ammeter to termi-
nal 1 of the wire harness side connector and the negative
(±) lead to negative terminal of the battery.
(c) Connect the positive (+) lead from the battery to terminal
2 of the wire harness side connector, and raise the win-
dow to the fully closed position.
(d) Continue to apply voltage, check that the current changes
from approximately 14 A to less than 1 A within 4 to 90 se-
conds.
(e) Disconnect the leads from terminals.
(f) Approximately 90 seconds later, connect the positive (+)
lead from the battery to terminal 1 and negative (±) lead
to terminal 2, check that the window begins to descend.
If operation is not as specified, replace the motor.
10. Except driver's door:
INSPECT PTC OPERATION
(a) Disconnect the connector from the power window switch.
(b) Connect the positive (+) lead from the ammeter to termi-
nal 1 of the wire harness side connector and the negative
(±) lead to negative terminal of the battery.
(c) Connect the positive (+) lead from the battery to terminal
2 of the wire harness side connector, and raise the win-
dow to the fully closed position.
Page 1801 of 1943
I14320
21
± BODY ELECTRICALPOWER WINDOW CONTROL SYSTEM
BE±59
2001 PRIUS (RM778U)
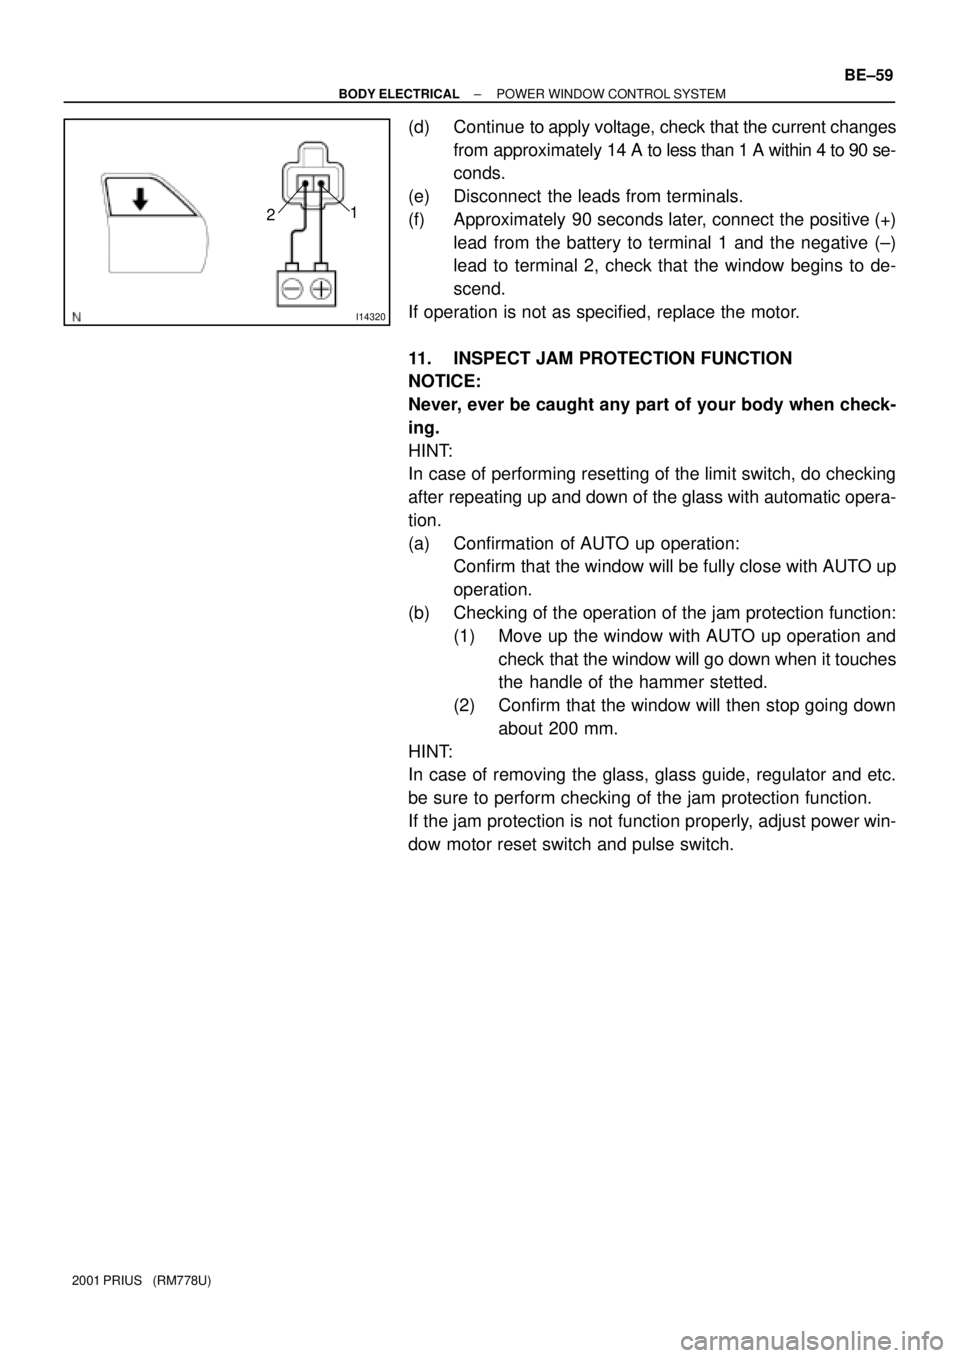
(d) Continue to apply voltage, check that the current changes
from approximately 14 A to less than 1 A within 4 to 90 se-
conds.
(e) Disconnect the leads from terminals.
(f) Approximately 90 seconds later, connect the positive (+)
lead from the battery to terminal 1 and the negative (±)
lead to terminal 2, check that the window begins to de-
scend.
If operation is not as specified, replace the motor.
11. INSPECT JAM PROTECTION FUNCTION
NOTICE:
Never, ever be caught any part of your body when check-
ing.
HINT:
In case of performing resetting of the limit switch, do checking
after repeating up and down of the glass with automatic opera-
tion.
(a) Confirmation of AUTO up operation:
Confirm that the window will be fully close with AUTO up
operation.
(b) Checking of the operation of the jam protection function:
(1) Move up the window with AUTO up operation and
check that the window will go down when it touches
the handle of the hammer stetted.
(2) Confirm that the window will then stop going down
about 200 mm.
HINT:
In case of removing the glass, glass guide, regulator and etc.
be sure to perform checking of the jam protection function.
If the jam protection is not function properly, adjust power win-
dow motor reset switch and pulse switch.
Page 1852 of 1943
BO3QK±01
H13682
H15388
Clip
H15389
: 2 Clips
H153907 Clips
± BODYFRONT DOOR
BO±11
2001 PRIUS (RM778U)
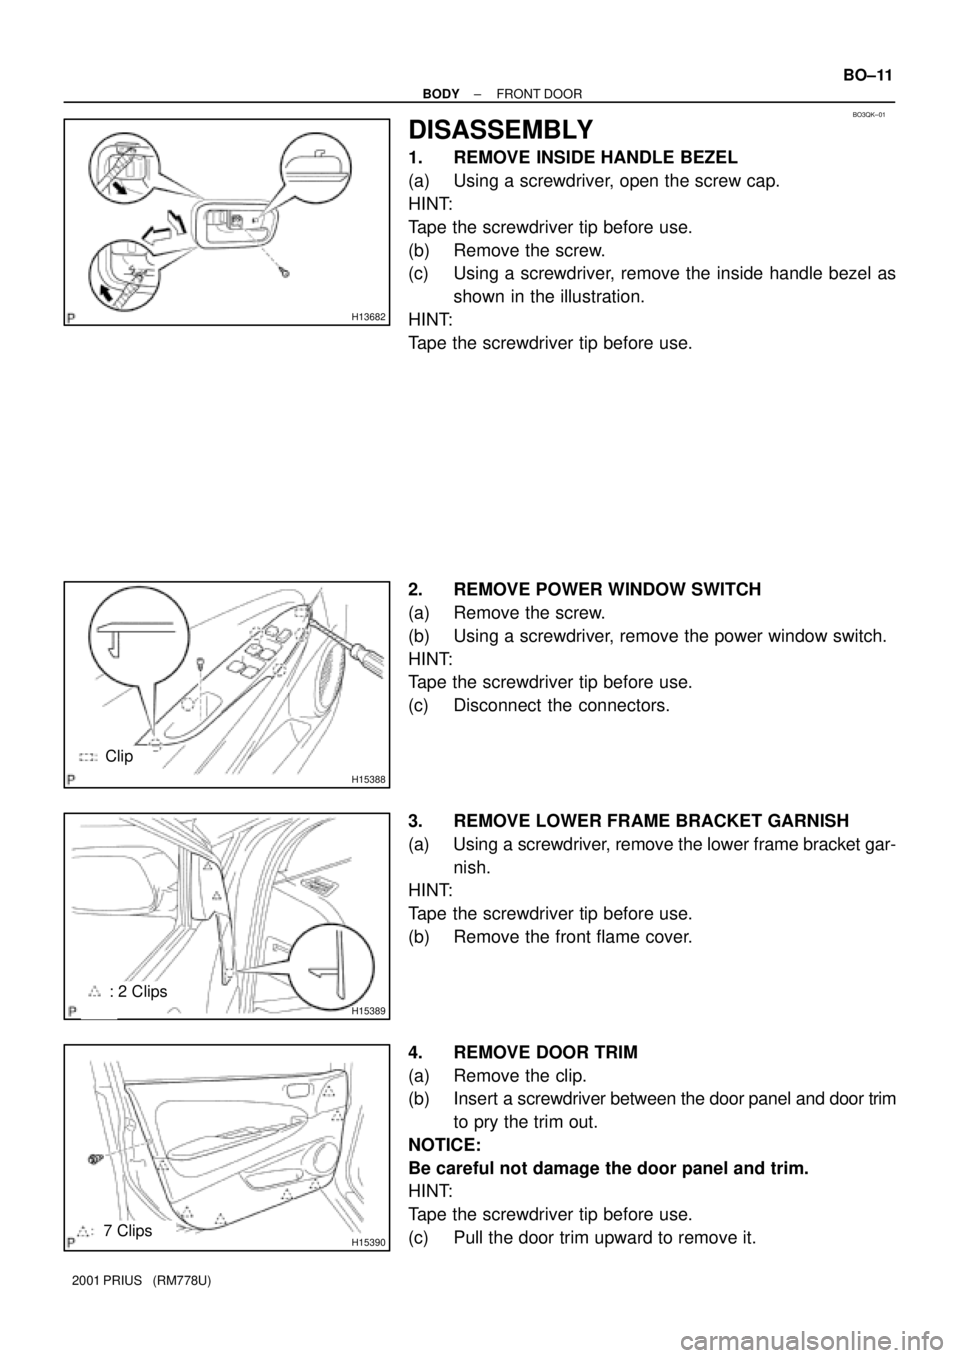
DISASSEMBLY
1. REMOVE INSIDE HANDLE BEZEL
(a) Using a screwdriver, open the screw cap.
HINT:
Tape the screwdriver tip before use.
(b) Remove the screw.
(c) Using a screwdriver, remove the inside handle bezel as
shown in the illustration.
HINT:
Tape the screwdriver tip before use.
2. REMOVE POWER WINDOW SWITCH
(a) Remove the screw.
(b) Using a screwdriver, remove the power window switch.
HINT:
Tape the screwdriver tip before use.
(c) Disconnect the connectors.
3. REMOVE LOWER FRAME BRACKET GARNISH
(a) Using a screwdriver, remove the lower frame bracket gar-
nish.
HINT:
Tape the screwdriver tip before use.
(b) Remove the front flame cover.
4. REMOVE DOOR TRIM
(a) Remove the clip.
(b) Insert a screwdriver between the door panel and door trim
to pry the trim out.
NOTICE:
Be careful not damage the door panel and trim.
HINT:
Tape the screwdriver tip before use.
(c) Pull the door trim upward to remove it.
Page 1855 of 1943
H15435
H15436
BO±14
± BODYFRONT DOOR
2001 PRIUS (RM778U)
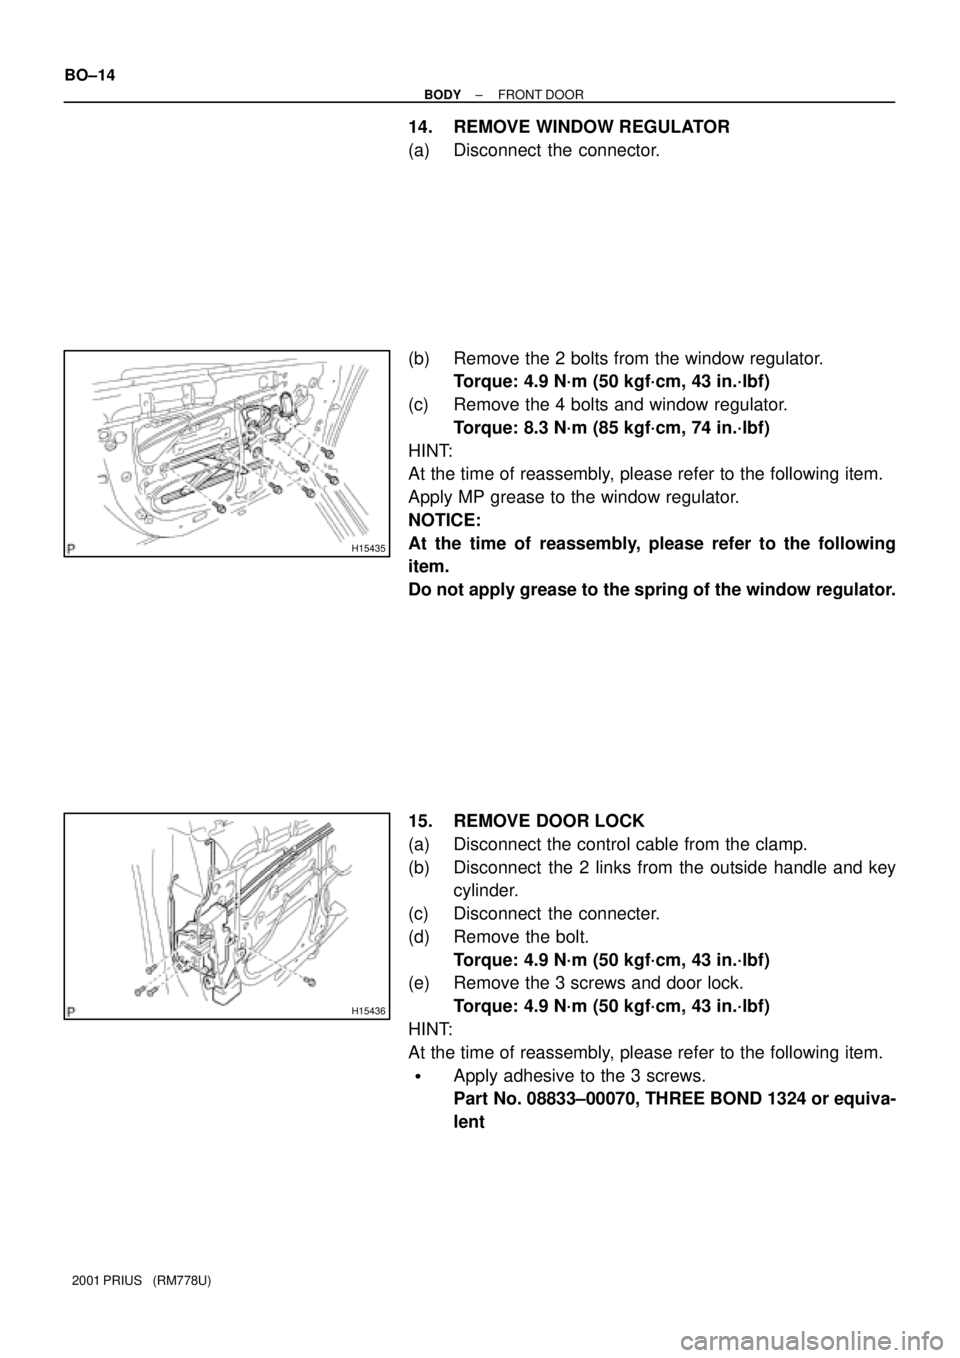
14. REMOVE WINDOW REGULATOR
(a) Disconnect the connector.
(b) Remove the 2 bolts from the window regulator.
Torque: 4.9 N´m (50 kgf´cm, 43 in.´lbf)
(c) Remove the 4 bolts and window regulator.
Torque: 8.3 N´m (85 kgf´cm, 74 in.´lbf)
HINT:
At the time of reassembly, please refer to the following item.
Apply MP grease to the window regulator.
NOTICE:
At the time of reassembly, please refer to the following
item.
Do not apply grease to the spring of the window regulator.
15. REMOVE DOOR LOCK
(a) Disconnect the control cable from the clamp.
(b) Disconnect the 2 links from the outside handle and key
cylinder.
(c) Disconnect the connecter.
(d) Remove the bolt.
Torque: 4.9 N´m (50 kgf´cm, 43 in.´lbf)
(e) Remove the 3 screws and door lock.
Torque: 4.9 N´m (50 kgf´cm, 43 in.´lbf)
HINT:
At the time of reassembly, please refer to the following item.
�Apply adhesive to the 3 screws.
Part No. 08833±00070, THREE BOND 1324 or equiva-
lent
Page 1857 of 1943
BO3QO±01
H13682
H13683
Clip
H136842 Clips
H136857 Clips
± BODYREAR DOOR
BO±19
2001 PRIUS (RM778U)
DISASSEMBLY
1. REMOVE INSIDE HANDLE BEZEL
(a) Using a screwdriver, open the screw cap.
HINT:
Tape the screwdriver tip before use.
(b) Remove the screw.
(c) Using a screwdriver, remove the inside handle bezel as
shown in the illustration.
HINT:
Tape the screwdriver tip before use.
2. REMOVE POWER WINDOW SWITCH
(a) Remove the screw.
(b) Using a screwdriver, remove the power window switch.
HINT:
Tape the screwdriver tip before use.
(c) Disconnect the connector.
3. REMOVE REAR DOOR LOWER BRACKET GARNISH
Using a screwdriver, remove the rear door lower bracket gar-
nish.
HINT:
Tape the screwdriver tip before use.
4. REMOVE DOOR TRIM
(a) Remove the clip.
(b) Insert a screwdriver between the door panel and door trim
to pry the trim out.
NOTICE:
Be careful not to damage the door panel and trim.
HINT:
Tape the screwdriver tip before use.
(c) Pull the trim upward to remove it.
Page 1858 of 1943
H15391
H15429
H15430Protective Tape
H15427
H15428
BO±20
± BODYREAR DOOR
2001 PRIUS (RM778U)
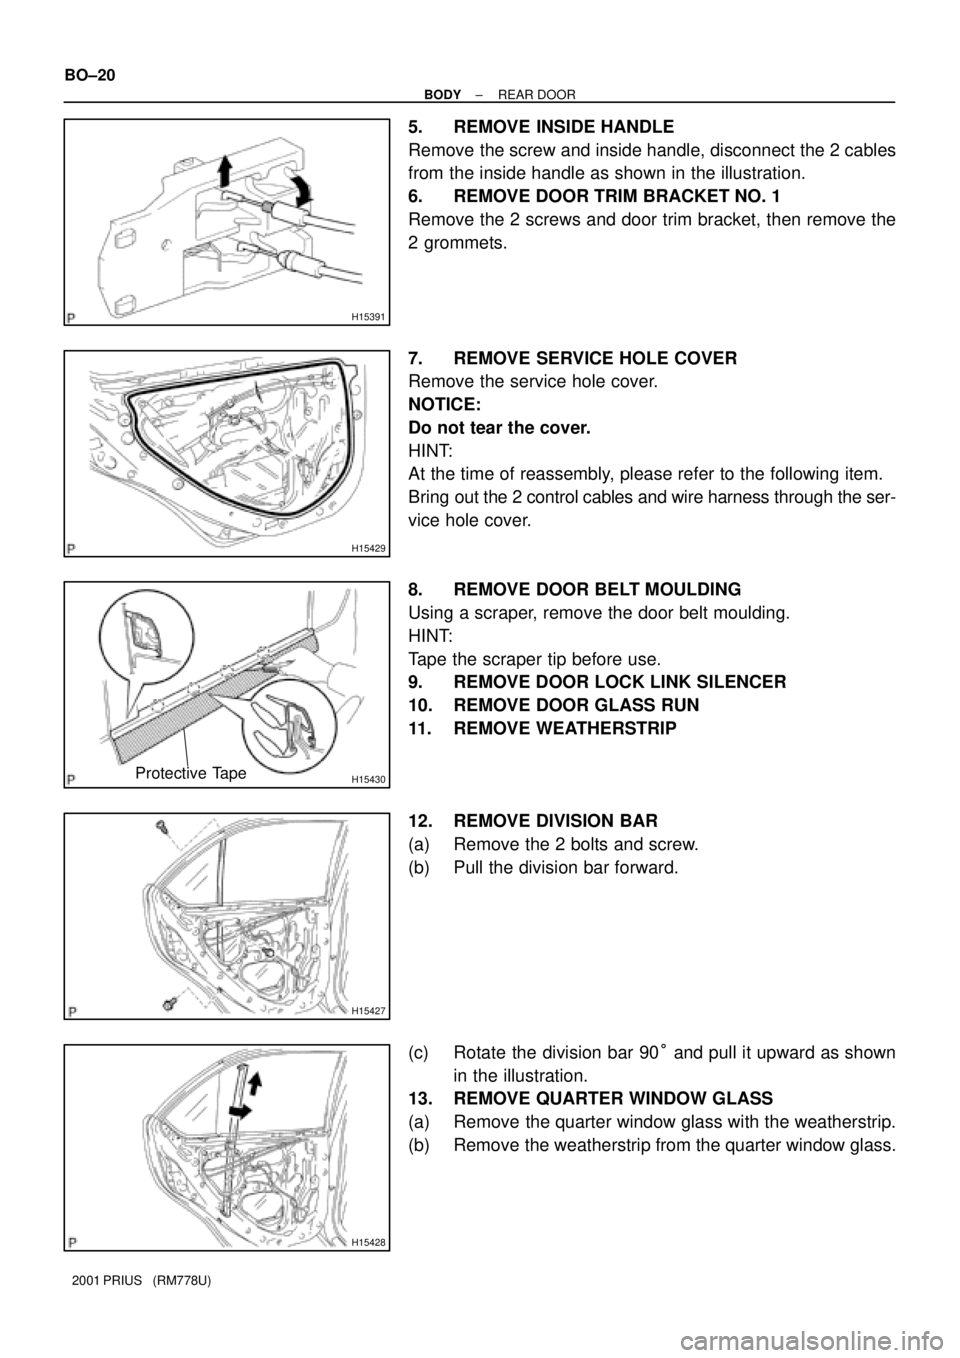
5. REMOVE INSIDE HANDLE
Remove the screw and inside handle, disconnect the 2 cables
from the inside handle as shown in the illustration.
6. REMOVE DOOR TRIM BRACKET NO. 1
Remove the 2 screws and door trim bracket, then remove the
2 grommets.
7. REMOVE SERVICE HOLE COVER
Remove the service hole cover.
NOTICE:
Do not tear the cover.
HINT:
At the time of reassembly, please refer to the following item.
Bring out the 2 control cables and wire harness through the ser-
vice hole cover.
8. REMOVE DOOR BELT MOULDING
Using a scraper, remove the door belt moulding.
HINT:
Tape the scraper tip before use.
9. REMOVE DOOR LOCK LINK SILENCER
10. REMOVE DOOR GLASS RUN
11. REMOVE WEATHERSTRIP
12. REMOVE DIVISION BAR
(a) Remove the 2 bolts and screw.
(b) Pull the division bar forward.
(c) Rotate the division bar 90° and pull it upward as shown
in the illustration.
13. REMOVE QUARTER WINDOW GLASS
(a) Remove the quarter window glass with the weatherstrip.
(b) Remove the weatherstrip from the quarter window glass.