Page 1918 of 1943
AC37J±01
I17980
Instrument Panel
Outer Front Cowl Top Panel
Defroster Duct
Reinforcement
Brace
Brake ECU
ECM & EMPS ECUFoot Air DuctBlower
UnitAir
Inlet
Duct Clamp Liquid Tube Suction Tube Clamp Water Hose
A/C Unit
�O±Ring
�Non±reusable part
± AIR CONDITIONINGAIR CONDITIONING UNIT
AC±23
1911 Author�: Date�:
2001 PRIUS (RM778U)
AIR CONDITIONING UNIT
COMPONENTS
Page 1919 of 1943
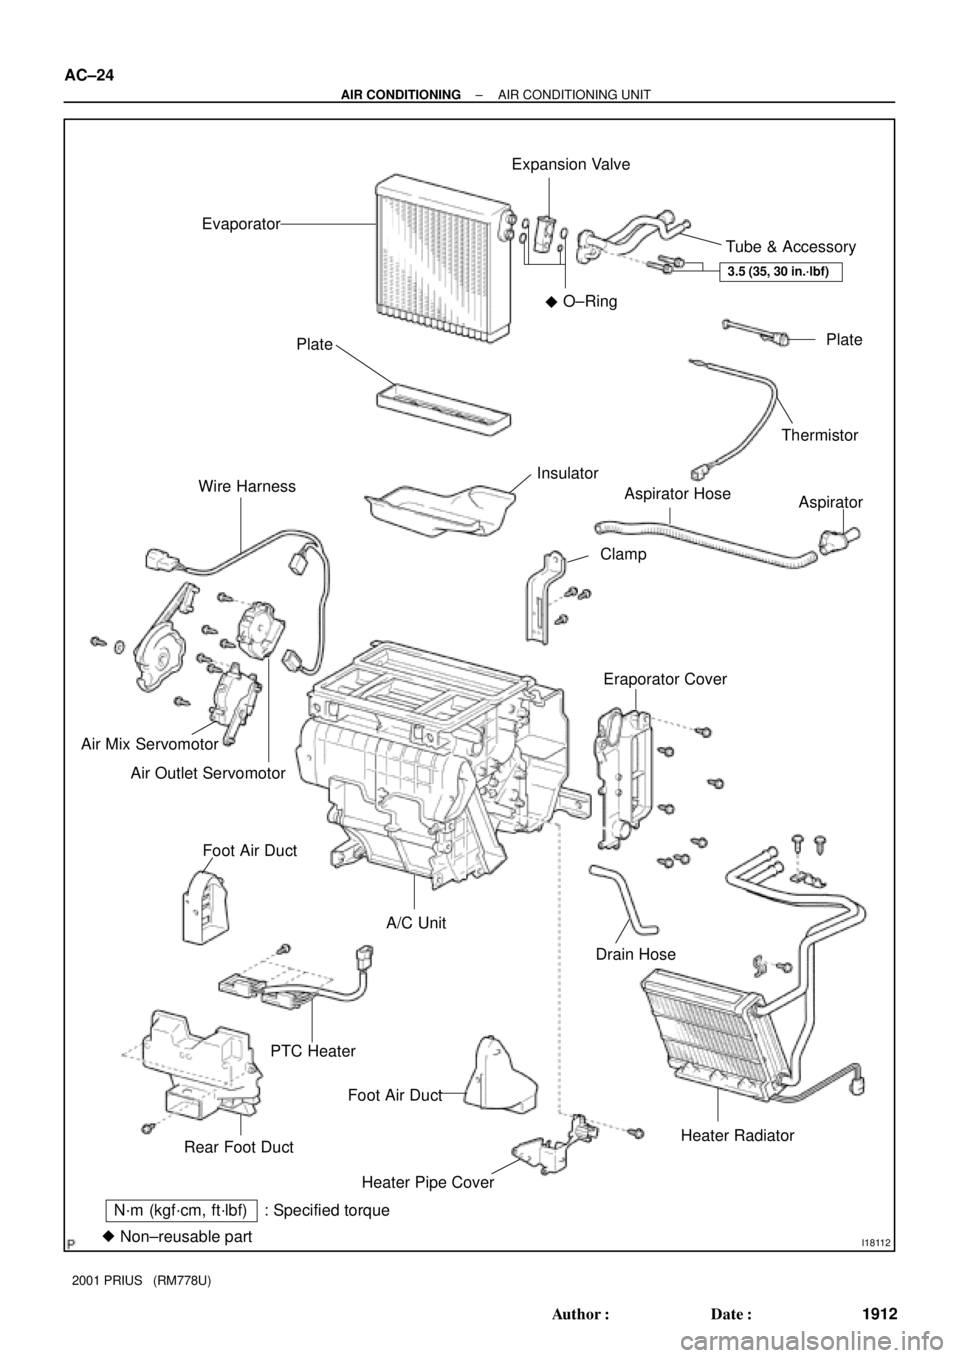
I18112
N´m (kgf´cm, ft´lbf) : Specified torque
�Non±reusable partEvaporatorExpansion Valve
Tube & Accessory
Plate
Thermistor
Aspirator
Eraporator CoverAspirator Hose
Clamp Insulator Plate
Wire Harness
Air Mix Servomotor
Air Outlet Servomotor
Foot Air Duct
PTC HeaterA/C Unit
Foot Air Duct
Heater Pipe CoverDrain Hose
Heater Radiator
Rear Foot DuctO±Ring
3.5 (35, 30 in.´lbf)
�
AC±24
± AIR CONDITIONINGAIR CONDITIONING UNIT
1912 Author�: Date�:
2001 PRIUS (RM778U)
Page 1920 of 1943

REMOVAL
1. REMOVE FRONT WIPER AND OUTER FRONT COWL
TOP PANEL (Se")
AC37K±01
I17981
I03838
SST
I03839
SST
Push
SSTPull
Release
Lever
± AIR CONDITIONINGAIR CONDITIONING UNIT
AC±25
2001 PRIUS (RM778U)
REMOVAL
1. REMOVE FRONT WIPER AND OUTER FRONT COWL
TOP PANEL (See page BO±32)
2. DISCHARGE REFRIGERANT FROM REFRIGERATION
SYSTEM
HINT:
At the time of installation, please refer to the following item.
Evacuate air from refrigeration system.
Charge system with refrigerant and inspect for leakage of refrig-
erant.
Specified amount: 500 ± 50 g (17.64 ± 1.76 oz.)
3. DRAIN ENGINE COOLANT FROM RADIATOR
HINT:
It is not necessary to drain out all coolant.
4. DISCONNECT LIQUID TUBE AND SUCTION HOSE
(a) Using SST, remove the 2 piping clamps.
SST 09870±00015 (Suction tube)
09870±00025 (Liquid tube)
(1) Insert SST to piping clamp.
HINT:
Confirm the direction of the piping clamp claw and SST using
the illustration showing on the caution label.
(2) Push down SST and release the clamp lock.
NOTICE:
Be careful not to deform the tubes, when pushing SST.
(3) Pull SST slightly and push the release lever, then re-
move the piping clamp with SST.
(4) Remove the piping clamp from SST.
(b) Disconnect the both tubes.
Page 1921 of 1943

I06919
Disconnect the tube
using hand
Screw
Driver
Tube
I17982
I18108
View
Upper
Lower RH LH
MarkingHose Clip
A
View
Second RidgeA
Upper
Lower
20°
20°
I17984
I17985
AC±26
± AIR CONDITIONINGAIR CONDITIONING UNIT
2001 PRIUS (RM778U)
NOTICE:
�Do not use tools like screwdriver to remove the tube.
�Cap the open fittings immediately to keep moisture or
dirt out of the system.
HINT:
At the time of reassembly, please refer to the following item.
Lubricate 4 new O±rings with compressor oil and install them
to the valve.
5. DISCONNECT WATER HOSES FROM HEATER RA-
DIATOR PIPES
(a) Using pliers, grip the claw of the hose clip and slide the
hose clip along the hose.
(b) Disconnect the heater hoses.
HINT:
At the time of installation, please refer to the following item.
Push the water hose onto the heater radiator pipe as far as se-
cond ridge on the pipe and install the hose clip.
6. REMOVE INSTRUMENT PANEL AND REINFORCE-
MENT (See page BO±62)
7. REMOVE BLOWER UNIT (See page AC±32)
8. REMOVE A/C UNIT
(a) Remove the 2 screws and defroster duct.
(b) Remove the foot air duct.
(c) Disconnect the connectors.
(d) Remove the 2 nuts and A/C unit.
Page 1922 of 1943
AC35U±01
I11223
SST
I18010
SST
I18012
N20013
R±Shape
RotorSnap Ring
Compressor
I18011
AC±40
± AIR CONDITIONINGCOMPRESSOR AND MAGNETIC CLUTCH
2001 PRIUS (RM778U)
DISASSEMBLY
1. REMOVE PRESSURE PLATE
(a) Using SST and a socket wrench, remove the shaft bolt.
SST 07112±76050
Torque: 13.2 N´m (135 kgf´cm, 9 ft´lbf)
(b) Install SST to the pressure plate.
SST 07112±66040
(c) Using SST and a socket wrench, remove the pressure
plate.
SST 07112±76050, 07112±66040
(d) Remove the shims from the shaft.
2. REMOVE ROTOR
(a) Remove the snap ring.
NOTICE:
At the time of reassembly, please refer to the following
item.
The snap ring should be installed so that its beveled side
faces up.
(b) Using a plastic hammer, tap the rotor off the shaft.
NOTICE:
Be careful not to damage the pulley when tapping on the ro-
tor.
Page 1923 of 1943
I18013
I18014
N20012
R±Shape
Snap Ring
Startor
Compressor
N18359
± AIR CONDITIONINGCOMPRESSOR AND MAGNETIC CLUTCH
AC±41
2001 PRIUS (RM778U)
3. REMOVE STATOR
(a) Disconnect the connector from the stator.
(b) Remove the screw and stator lead wire.
(c) Remove the snap ring.
NOTICE:
At the time of reassembly, please refer to the following
item.
The snap ring should be installed so that its beveled side
faces up.
(d) Remove the stator.
Page 1924 of 1943
AC36Q±01
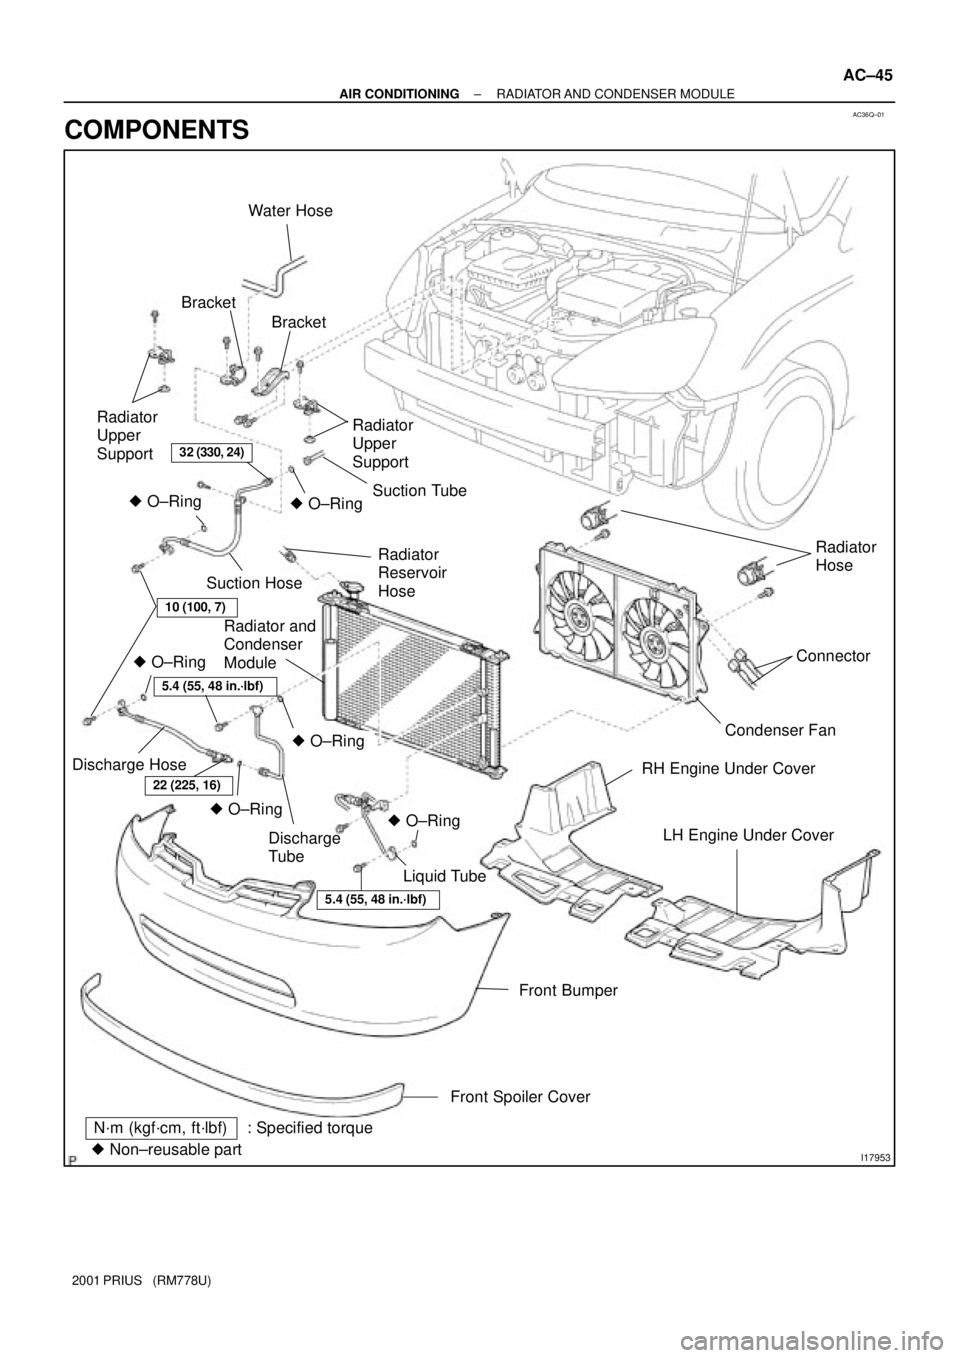
I17953
N´m (kgf´cm, ft´lbf): Specified torque
� Non±reusable partBracket Water Hose
Radiator
Upper
Support
� O±RingRadiator
Reservoir
Hose Suction Hose
Radiator and
Condenser
Module
Discharge Hose
Liquid Tube Discharge
Tube
5.4 (55, 48 in.´lbf)
22 (225, 16)
5.4 (55, 48 in.´lbf)
� O±Ring
10 (100, 7)
� O±Ring
� O±RingSuction Tube
� O±Ring
Bracket
Radiator
Upper
Support
Radiator
Hose
Condenser FanConnector
RH Engine Under Cover
LH Engine Under Cover
Front Bumper� O±Ring
32 (330, 24)
Front Spoiler Cover
± AIR CONDITIONINGRADIATOR AND CONDENSER MODULE
AC±45
2001 PRIUS (RM778U)
COMPONENTS
Page 1925 of 1943
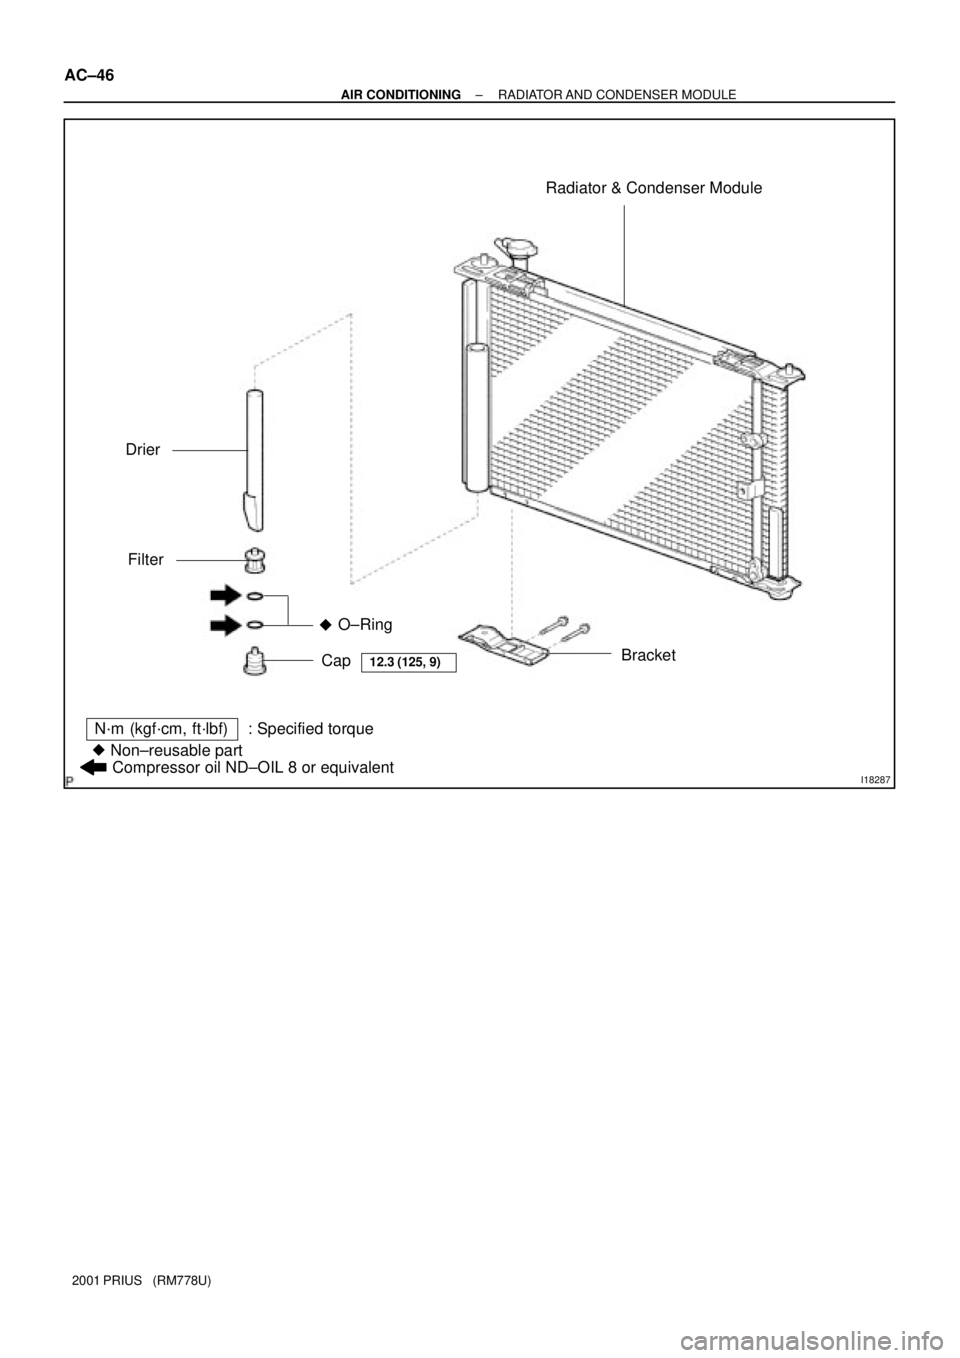
I18287
Radiator & Condenser Module
Bracket Drier
Filter
O±Ring
Cap
12.3 (125, 9)
N´m (kgf´cm, ft´lbf): Specified torque
� Non±reusable part�
Compressor oil ND±OIL 8 or equivalent
AC±46
± AIR CONDITIONINGRADIATOR AND CONDENSER MODULE
2001 PRIUS (RM778U)


DISASSEMBLY
1. REMOVE PRESSURE PL")

3. REMOVE STATOR
(a) Disconnect the connector from the")