Page 1810 of 2493
SST863C
4. Install center bushing and rack oil seal with rack assembly.
SST321B
5. Insert rack oil seal and end cover assembly to rack. Then
tighten end cover assembly.
SST073B
6. Fasten end cover assembly to gear housing by staking.
SST086BA
7. Set rack gear in neutral position.
Rack stroke ªSº:
Refer to SDS, ST-30.
SST880C
8. Install adjustment shims and O-rings to gear sub-assembly.
+Install the same number of adjustment shims as before,
regardless of whether or not gear sub-assembly is replaced.
+Discard old O-rings; replace with new ones.
9. Tighten gear subassembly securing bolts to specified tighten-
ing torque.
POWER STEERING GEAR AND LINKAGE
Assembly (Cont'd)
ST-20
Page 1812 of 2493

SST868C
16. Install boot bands.
+Securely install boot band to boot groove and clinch the root
section of the trapezoidal area.
+Make sure that there is a clearance of 3.5 mm (0.138 in) or less
at the clinched section of the boot band. Refer to the Figure at
left.
SST869C
+After installing gear in vehicle, make sure that the clinched
section of boot band is positioned toward the rear of vehicle (to
prevent interference with adjacent parts).
SST719C
AdjustmentNJST0026Adjust pinion rotating torque as follows:
1. Set rack to the neutral position without fluid in the gear.
2. Coat the adjusting screw with locking sealant and screw it in.
3. Lightly tighten lock nut.
4. Tighten adjusting screw to a torque of 4.9 to 5.9 N´m (50 to 60
kg-cm, 43 to 52 in-lb).
5. Loosen adjusting screw, then retighten it to 0.2 N´m (2 kg-cm,
1.7 in-lb).
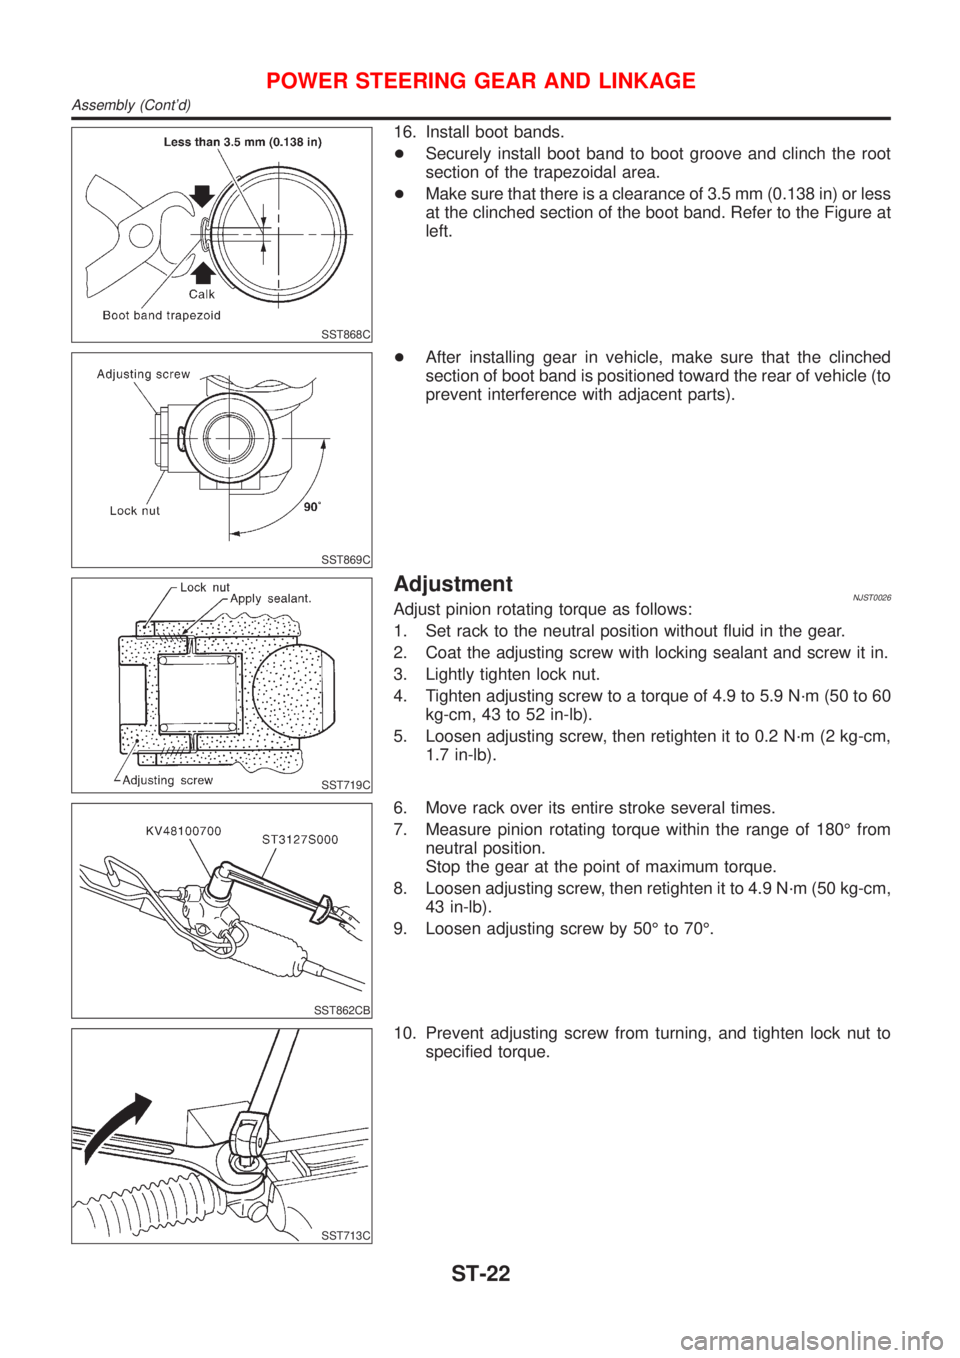
SST862CB
6. Move rack over its entire stroke several times.
7. Measure pinion rotating torque within the range of 180É from
neutral position.
Stop the gear at the point of maximum torque.
8. Loosen adjusting screw, then retighten it to 4.9 N´m (50 kg-cm,
43 in-lb).
9. Loosen adjusting screw by 50É to 70É.
SST713C
10. Prevent adjusting screw from turning, and tighten lock nut to
specified torque.
POWER STEERING GEAR AND LINKAGE
Assembly (Cont'd)
ST-22
Page 1825 of 2493
Front Seat Belt
REMOVAL AND INSTALLATION/4-DOOR SEDAN=NJRS00031. Slide the seat all the way forward and tilt the seatback toward the front.
2. Remove adjuster cover.
3. Remove floor anchor bolt.
4. Remove shoulder anchor bolt.
5. Remove front and rear kicking plate, then remove center pillar upper and lower garnish. Refer to BT-31,
ªSIDE AND FLOOR TRIMº for details.
6. Remove second sash guide
7. Disconnect seat belt pre-tensioner connector.
8. Remove the screw securing seat belt pre-tensioner retractor, then remove seat belt and seat belt pre-ten-
sioner retractor.
9. Remove bolts securing seat belt adjuster, then remove seat belt adjuster.
SRS812
SEAT BELTS
Front Seat Belt
RS-5
Page 1827 of 2493
REMOVAL AND INSTALLATION/5-DOOR HATCHBACK=NJRS00561. Slide the seat all the way forward and tilt the seatback toward the front.
2. Remove adjuster cover.
3. Remove floor anchor bolt.
4. Remove shoulder anchor bolt.
5. Remove front and rear kicking plate, then remove center pillar upper and lower garnish. Refer to BT-36,
ªSIDE AND FLOOR TRIMº for details.
6. Remove second sash guide
7. Disconnect seat belt pre-tensioner connector.
8. Remove the screw securing seat belt pre-tensioner retractor, then remove seat belt and seat belt pre-ten-
sioner retractor.
9. Remove bolts securing seat belt adjuster, then remove seat belt adjuster.
SRS854
SEAT BELTS
Front Seat Belt (Cont'd)
RS-7
Page 1829 of 2493
REMOVAL AND INSTALLATION/3-DOOR HATCHBACK=NJRS00571. Slide the seat all the way forward and tilt the seatback toward the front.
2. Remove adjuster cover.
3. Remove floor anchor bolt.
4. Remove shoulder anchor bolt.
5. Remove rear side finisher and rear pillar garnish. Refer to BT-34, ªSIDE AND FLOOR TRIMº for details.
6. Disconnect seat belt pre-tensioner connector.
7. Remove the screw securing seat belt pre-tensioner retractor, then remove seat belt and seat belt pre-ten-
sioner retractor.
8. Remove bolts securing seat belt adjuster, then remove seat belt adjuster.
SRS856
SEAT BELTS
Front Seat Belt (Cont'd)
RS-9
Page 1831 of 2493
Rear Seat Belt
REMOVAL AND INSTALLATION/4-DOOR SEDAN WITH 2-POINT TYPE REAR CENTER SEAT
BELT
=NJRS00421. Remove rear seat. Refer to BT-59, ªREAR SEATº for details.
2. Remove outer and floor anchor bolt.
3. Remove rear side garnish. Refer to BT-31, ªSIDE AND FLOOR TRIMº for details.
4. Remove rear parcel shelf finisher. Refer to BT-31, ªSIDE AND FLOOR TRIMº for details.
5. Remove bolts securing rear seat belt retractor, then remove seat belt and seat belt retractor.
SRS814
SEAT BELTS
Rear Seat Belt
RS-11
Page 1833 of 2493
REMOVAL AND INSTALLATION/4-DOOR SEDAN WITH 3-POINT TYPE REAR CENTER SEAT
BELT
=NJRS00631. Remove rear seat. Refer to BT-59, ªREAR SEATº for details.
2. Remove outer and floor anchor bolt.
3. Remove rear side garnish. Refer to BT-31, ªSIDE AND FLOOR TRIMº for details.
4. Remove rear parcel shelf finisher. Refer to BT-31, ªSIDE AND FLOOR TRIMº for details.
5. Remove bolts securing rear seat belt retractor, then remove seat belt and seat belt retractor.
SRS889
SEAT BELTS
Rear Seat Belt (Cont'd)
RS-13
Page 1835 of 2493
REMOVAL AND INSTALLATION/HATCHBACK WITH 3-POINT TYPE REAR CENTER SEAT=NJRS00581. Remove rear seat. Refer to BT-59, ªREAR SEATº for details.
2. Remove outer and floor anchor bolt.
3. Remove rear parcel shelf finisher. Refer to BT-31, ªSIDE AND FLOOR TRIMº for details.
4. Remove rear side garnish. Refer to BT-31, ªSIDE AND FLOOR TRIMº for details.
5. Remove bolts securing rear seat belt retractor, then remove seat belt and seat belt retractor.
6. Remove cover garnish at headlining. Refer to BT-31, ªSIDE AND FLOOR TRIMº for details. Then remove
seat belt retractor.
SRS858
SEAT BELTS
Rear Seat Belt (Cont'd)
RS-15