2001 NISSAN ALMERA N16 Rad fan
[x] Cancel search: Rad fanPage 129 of 2493

SEM174D
9. Remove the following parts:
+RH and LH front tires
+Splash covers
+RH and LH brake caliper assemblies
Refer to BR-27, ªFRONT DISC BRAKEº.
Brake hose does not need to be disconnected from brake
caliper assembly. Never depress brake pedal.
+RH & LH drive shaft. Refer to AX-10, ªDrive Shaftº.
When removing drive shaft, be careful not to damage tran-
saxle side grease seal.
SEM109G
+Disconnect control rod and support rod from transaxle. (M/T
models.)
Refer to MT-29, ªTRANSAXLE GEAR CONTROLº.
+Disconnect control cable from transaxle. (A/T models.)
Refer to AT-346, ªRemovalº.
SEM108G
+Center member
+Front exhaust tube
+Stabilizer bar
+Cooling fan
+Radiator
+Disconnect wires, harness, pipes, hoses and so on.
10. Lift up engine slightly and disconnect or remove all engine
mountings.
When lifting engine, be sure to clear surrounding parts. Use
special care near brake tubes and brake master cylinder.
11. Remove engine with transaxle as shown.
SEM420D
INSTALLATIONNJEM0022S02+Install in reverse order of removal.
ENGINE ASSEMBLYQG
Removal and Installation (Cont'd)
EM-51
Page 187 of 2493

Removal and InstallationNJEM0101
JEM264G
PREPARATIVE WORKNJEM0101S01Remove the following parts.
+Under cover
+Engine coolant (drain)
Refer to LC-43, ªChanging Engine Coolantº.
+Radiator upper hose
+Cooling fan
Refer to LC-42, ªRadiatorº.
+Radiator mount bracket
+Water inlet pipe
+Exhaust front tube (disconnect)
Refer to FE-27, ªRemoval and Installationº, ªEXHAUST SYS-
TEMº.
CATALYSTNJEM0101S02RemovalNJEM0101S0201+Remove the catalyst, refer to above illustration.
CAUTION:
Do not disassemble.
InstallationNJEM0101S0202Install two locking pins into both sides of the catalytic converter. Be
careful not to confuse locking pins with insulator mounting bolts.
Catalytic converter locking pin:
Flange bolt (black)
Insulator mounting bolt:
Washer bolt (silver or yellow)
CATALYSTYD
Removal and Installation
EM-109
Page 215 of 2493

crankshaft position sensor (TDC sensor) from the assem-
bly.
+Always pay extra attention not to damage edge of crank-
shaft position sensor (TDC sensor) or ring gear teeth.
REMOVALNJEM0069S011. Remove engine undercover, and hood for hoisting.
2. Drain coolant from both cylinder block and radiator. Refer to
LC-43, ªChanging Engine Coolantº.
3. Remove the following parts:
+Battery
+RH and LH front wheels
+RH and LH splash covers (combined with undercover)
+Auxiliary belts
+Alternator
+Alternator brackets
+Radiator and cooling fan
+Engine cover
+Air ducts and air cleaner case
LH side of engine room:
4. Disconnect all harnesses and grounds that are connected to
components on vehicle.
5. Disconnect vacuum hose on vacuum pump side.
6. Disconnect fuel feed and fuel return hoses on engine side.
+Immediately put blind plugs into the openings to prevent
fuel from flowing out.
7. Disconnect heater hose. Plug opening of hose to prevent cool-
ant from flowing out.
RH side of engine room:
8. Remove air conditioner compressor from brackets and move
it toward vehicle side. Secure compressor on vehicle side with
rope.
Vehicle underside:
9. Remove exhaust front tube.
10. Disconnect two hoses from power steering pump and plug to
stop fluid.
11. Remove M/T control rod and support rod.
12. Remove ABS wheel sensor, and temporarily hang brake cali-
per with rope on vehicle side.
13. Remove RH and LH drive shafts.
YEM024
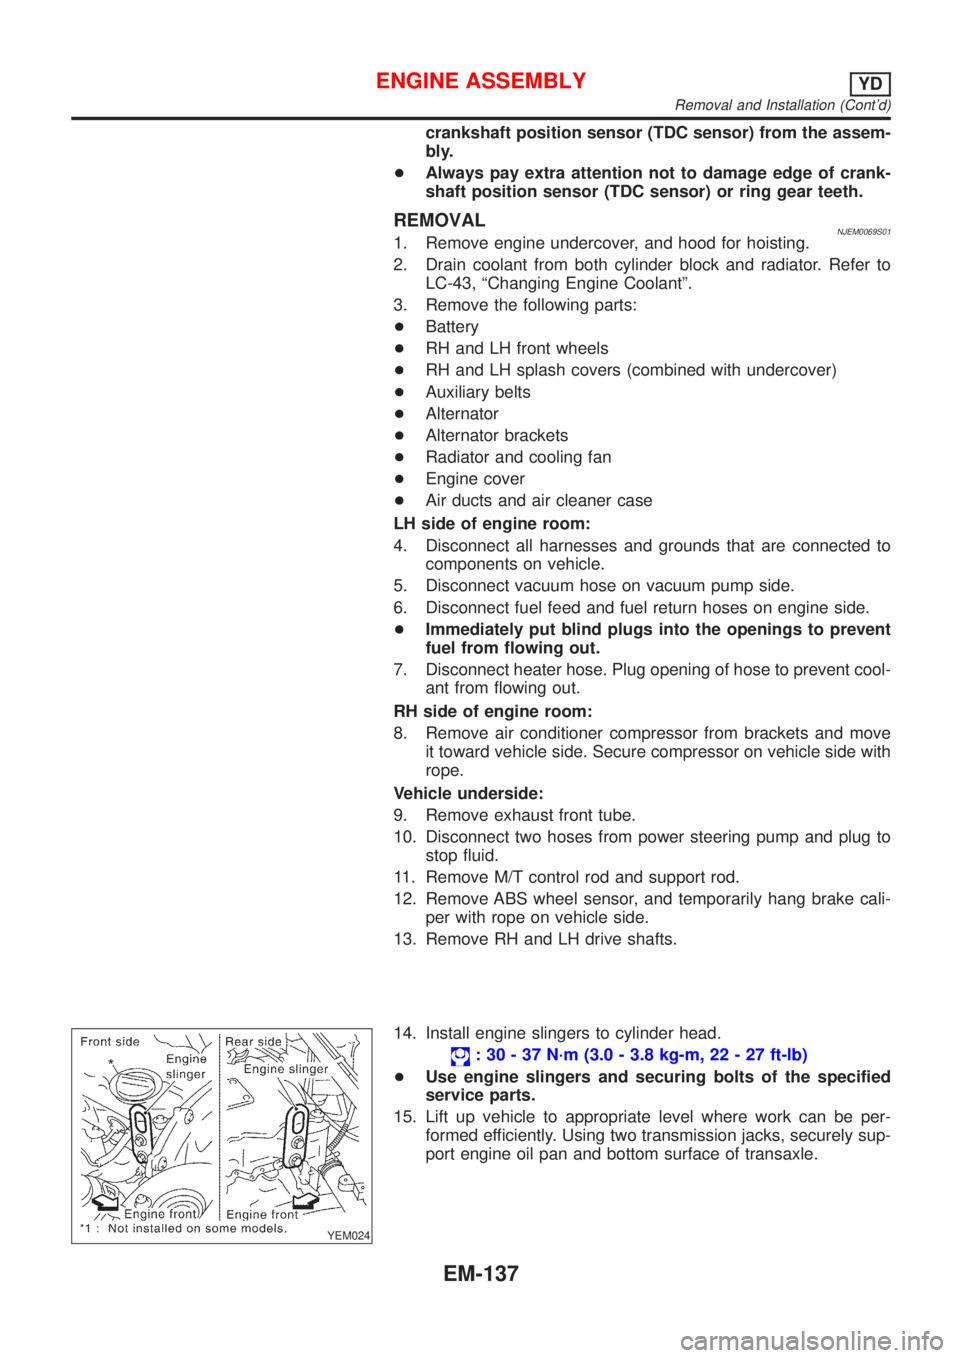
14. Install engine slingers to cylinder head.
: 30 - 37 N´m (3.0 - 3.8 kg-m, 22 - 27 ft-lb)
+Use engine slingers and securing bolts of the specified
service parts.
15. Lift up vehicle to appropriate level where work can be per-
formed efficiently. Using two transmission jacks, securely sup-
port engine oil pan and bottom surface of transaxle.
ENGINE ASSEMBLYYD
Removal and Installation (Cont'd)
EM-137
Page 249 of 2493

ENGINE LUBRICATION &
COOLING SYSTEMS
SECTION
LC
CONTENTS
QG
ENGINE LUBRICATION SYSTEM..................................3
Precautions ..................................................................3
LIQUID GASKET APPLICATION PROCEDURE............3
Preparation ..................................................................3
SPECIAL SERVICE TOOLS........................................3
Lubrication Circuit ........................................................4
Oil Pressure Check......................................................5
Oil Pump ......................................................................5
REMOVAL AND INSTALLATION.................................5
DISASSEMBLY AND ASSEMBLY................................6
INSPECTION.............................................................7
REGULATOR VALVE INSPECTION............................7
Changing Engine Oil....................................................8
Changing Oil Filter .......................................................9
Service Data and Specifications (SDS).....................10
OIL PRESSURE CHECK..........................................10
OIL PUMP INSPECTION..........................................10
REGULATOR VALVE INSPECTION..........................10
OIL CAPACITY........................................................10
ENGINE COOLING SYSTEM........................................ 11
Precautions ................................................................ 11
LIQUID GASKET APPLICATION PROCEDURE.......... 11
Preparation ................................................................ 11
SPECIAL SERVICE TOOLS...................................... 11
Cooling Circuit ...........................................................12
System Check............................................................12
CHECKING COOLING SYSTEM HOSES...................12
CHECKING RADIATOR............................................13
CHECKING RADIATOR CAP....................................13
CHECKING COOLING SYSTEM FOR LEAKS............13
Water Pump ...............................................................14
REMOVAL AND INSTALLATION...............................14
INSPECTION...........................................................14
Thermostat .................................................................15
REMOVAL AND INSTALLATION...............................15
INSPECTION...........................................................16
Radiator .....................................................................16
COMPONENTS.......................................................16
Cooling Fan ...............................................................17
COMPONENTS.......................................................17
CONTROL SYSTEM................................................17
Changing Engine Coolant..........................................17
- DRAINING ENGINE COOLANT -............................17
- REFILLING ENGINE COOLANT -...........................18
- FLUSHING COOLING SYSTEM -............................19
Radiator (Aluminum type) ..........................................20
PREPARATION.......................................................20
DISASSEMBLY........................................................20
ASSEMBLY.............................................................21
INSPECTION...........................................................22
Overheating Cause Analysis .....................................23
Service Data and Specifications (SDS).....................24
THERMOSTAT........................................................24
RADIATOR..............................................................24
COOLANT CAPACITY..............................................24
YD
ENGINE LUBRICATION SYSTEM................................25
Precautions ................................................................25
LIQUID GASKET APPLICATION PROCEDURE..........25
Preparation ................................................................25
SPECIAL SERVICE TOOLS......................................25
Lubrication Circuit ......................................................26
Oil Pressure Check....................................................27
Oil Pump ....................................................................27
REMOVAL AND INSTALLATION...............................27
DISASSEMBLY AND ASSEMBLY..............................28
OIL PUMP INSPECTION..........................................28
REGULATOR VALVE INSPECTION..........................29
Changing Engine Oil..................................................30
Oil Filter Bracket ........................................................31
REMOVAL AND INSTALLATION...............................31
Changing Oil Filter .....................................................31
REMOVAL...............................................................32
INSTALLATION........................................................32
Oil Cooler ...................................................................33
REMOVAL AND INSTALLATION...............................33
Service Data and Specifications (SDS).....................34
OIL PRESSURE CHECK..........................................34
Page 250 of 2493

REGULATOR VALVE INSPECTION..........................34
OIL PUMP INSPECTION..........................................34
ENGINE OIL CAPACITY...........................................34
ENGINE COOLING SYSTEM........................................35
Precautions ................................................................35
LIQUID GASKET APPLICATION PROCEDURE..........35
Preparation ................................................................35
SPECIAL SERVICE TOOLS......................................35
Cooling Circuit ...........................................................36
System Check............................................................37
CHECKING COOLING SYSTEM HOSES...................37
CHECKING RADIATOR............................................37
CHECKING RADIATOR CAP....................................37
CHECKING COOLING SYSTEM FOR LEAKS............38
Water Pump ...............................................................38
REMOVAL AND INSTALLATION...............................38
REMOVAL...............................................................39
INSPECTION...........................................................39
INSTALLATION........................................................39
Thermostat .................................................................40
REMOVAL AND INSTALLATION...............................40
INSPECTION...........................................................41
Radiator .....................................................................41
COMPONENTS.......................................................41
REMOVAL AND INSTALLATION...............................42
Cooling Fan ...............................................................42
COMPONENTS.......................................................42
CONTROL SYSTEM................................................42
Changing Engine Coolant..........................................43
- DRAINING ENGINE COOLANT -............................43
- REFILLING ENGINE COOLANT -...........................43
- FLUSHING COOLING SYSTEM -............................45
Radiator (Aluminum type) ..........................................46
Overheating Cause Analysis .....................................46
Service Data and Specifications (SDS).....................47
THERMOSTAT........................................................47
RADIATOR..............................................................47
ENGINE COOLANT CAPACITY................................47
CONTENTS(Cont'd)
LC-2
Page 261 of 2493

CHECKING RADIATORNJLC0017S04Check radiator for mud or clogging. If necessary, clean radiator as
follows.
+Be careful not to bend or damage the radiator fins.
+When radiator is cleaned without removal, remove all sur-
rounding parts such as cooling fan, rediator shroud and horns.
Then tape the harness and connectors to prevent water from
entering.
1. Apply water by hose to the back side of the radiator core ver-
tically download.
2. Apply water again to all radiator core surfaces once per
minute.
3. Stop washing if any stains no longer flow out from the radia-
tor.
4. Blow air into the back side of radiator core vertically download.
+Use compressesd air lower than 490 kPa (4.9 bar, 5 kg/cm
2,
71 psi) and keep distance more than 30 cm (11.8 in).
5. Blow air again into all the radiator core surfaces once per
minute until no water sprays out.
SLC613-A
CHECKING RADIATOR CAPNJLC0017S03To check radiator cap, apply pressure to cap with a tester.
Radiator cap relief pressure:
Standard
78-98kPa
(0.78 - 0.98 bar, 0.8 - 1.0 kg/cm
2, 11 - 14 psi)
Limit
59-98kPa
(0.59 - 0.98 bar, 0.6 - 1.0 kg/cm
2,9-14psi)
SMA967B
Pull the negative pressure valve to open it.
Check that it closes completely when released.
SLC756AA
CHECKING COOLING SYSTEM FOR LEAKSNJLC0017S02To check for leakage, apply pressure to the cooling system with a
tester.
Testing pressure:
157 kPa (1.57 bar, 1.6 kg/cm
2, 23 psi)
CAUTION:
Higher pressure than specified may cause radiator damage.
ENGINE COOLING SYSTEMQG
System Check (Cont'd)
LC-13
Page 264 of 2493

SLC343
INSPECTIONNJLC00221. Check for valve seating condition at normal room temperature.
It should seat tightly.
2. Check valve opening temperature and valve lift.
Valve opening temperature ÉC (ÉF) 82 (180)
Valve lift mm/ÉC (in/ÉF) More than 8/95 (0.31/203)
3. Then check if valve closes at 5ÉC (9ÉF) below valve opening
temperature.
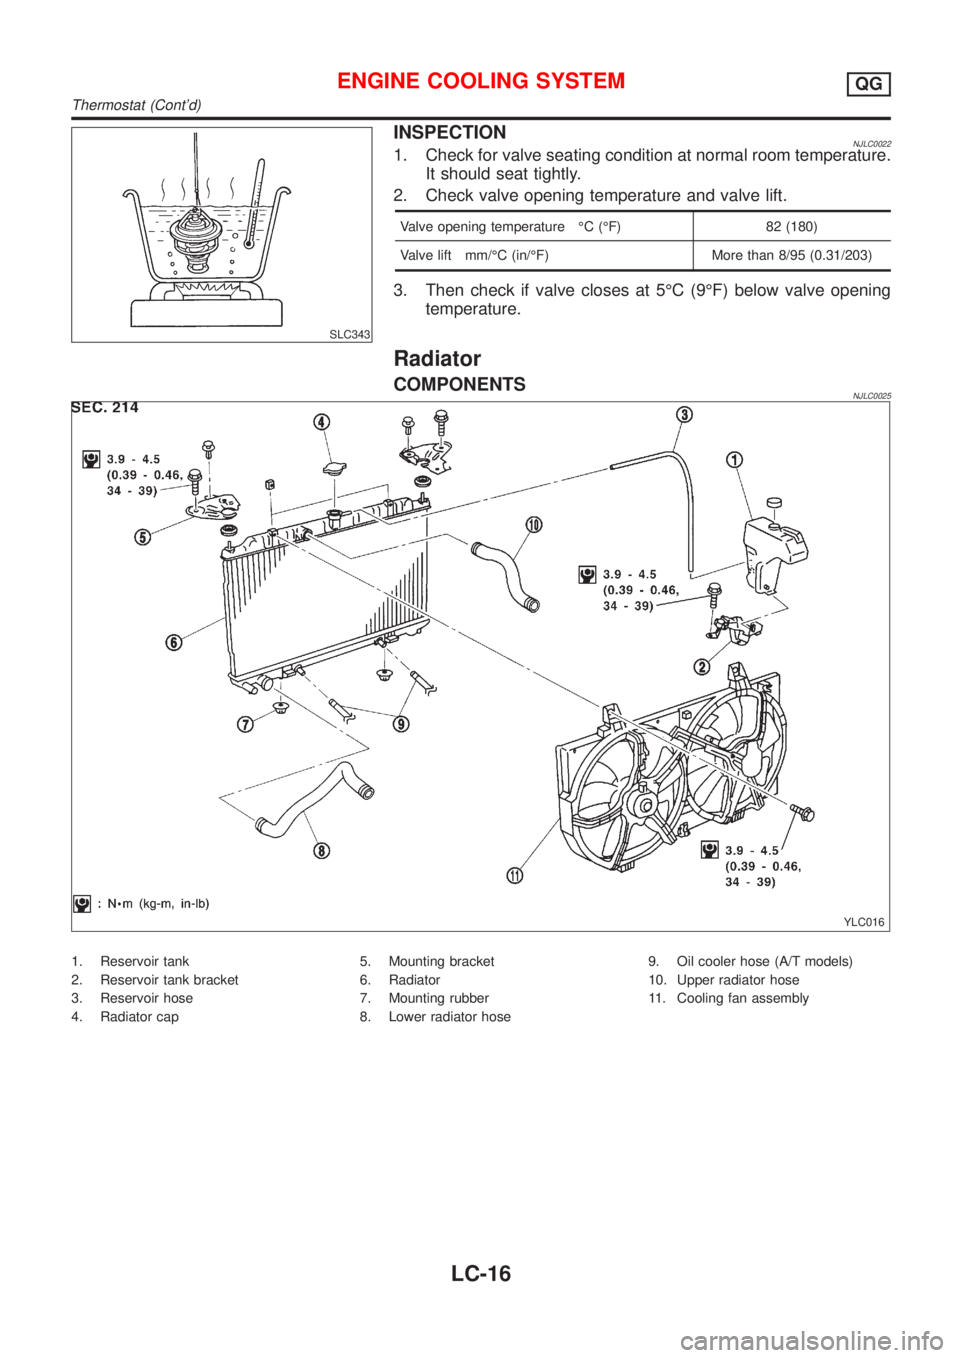
Radiator
COMPONENTSNJLC0025
YLC016
1. Reservoir tank
2. Reservoir tank bracket
3. Reservoir hose
4. Radiator cap5. Mounting bracket
6. Radiator
7. Mounting rubber
8. Lower radiator hose9. Oil cooler hose (A/T models)
10. Upper radiator hose
11. Cooling fan assembly
ENGINE COOLING SYSTEMQG
Thermostat (Cont'd)
LC-16
Page 267 of 2493

SMA182B
SMA412B
Refer to MA-20, ªRECOMMENDED FLUIDS AND LUBRI-
CANTSº.
Coolant capacity (With reservoir tank):
Unit:!(Imp qt)
M/T 6.7 (5-7/8)
A/TFor Sedan 6.6 (5-7/8)
For Hatchback 6.7 (5-7/8)
Reservoir tank capacity:
0.7!(5/8 Imp qt)
+Pour coolant through coolant filler neck slowly to allow air
in system to escape.
3. Fill radiator and reservoir tank to specified level.
4. Warm up engine to normal operating temperature without
radiator cap installed.
+If coolant overflows radiator filler hole, install filler cap.
5. Run engine at 2,500 rpm for 10 seconds and return to idle
speed with radiator cap installed.
+Repeat two or three times.
Watch coolant temperature gauge so as not to overheat the
engine.
6. Stop engine and cool it down.
+Cool down using a fan to reduce the time.
+If necessary, refill radiator up to filler neck with coolant.
7. Refill reservoir tank to MAX level line with coolant.
8. Repeat steps 4 through 7 two or more times with radiator cap
installed until coolant level no longer drops.
9. Check cooling system for leaks with engine running.
10. Warm up engine, and check for sound of coolant flow while
running engine from idle up to 3,000 rpm with heater tempera-
ture controller set at several positions between COOL and
HOT.
+Sound may be noticeable at heater water cock.
11. If sound is heard, bleed air from cooling system by repeating
steps 4 through 7 until coolant level no longer drops
+Clean excess coolant from engine.
Ð FLUSHING COOLING SYSTEM ÐNJLC0037S031. Open air relief plug.
2. Fill radiator with water until water spills from the air relief hole,
then close air relief plug. Fill radiator and reservoir tank with
water and reinstall radiator cap.
3. Run engine and warm it up to normal operating temperature.
4. Rev engine two or three times under no-load.
5. Stop engine and wait until it cools down.
6. Drain water.
7. Repeat steps 1 through 6 until clear water begins to drain from
radiator.
ENGINE COOLING SYSTEMQG
Changing Engine Coolant (Cont'd)
LC-19