2001 DODGE RAM heater
[x] Cancel search: heaterPage 1559 of 2889
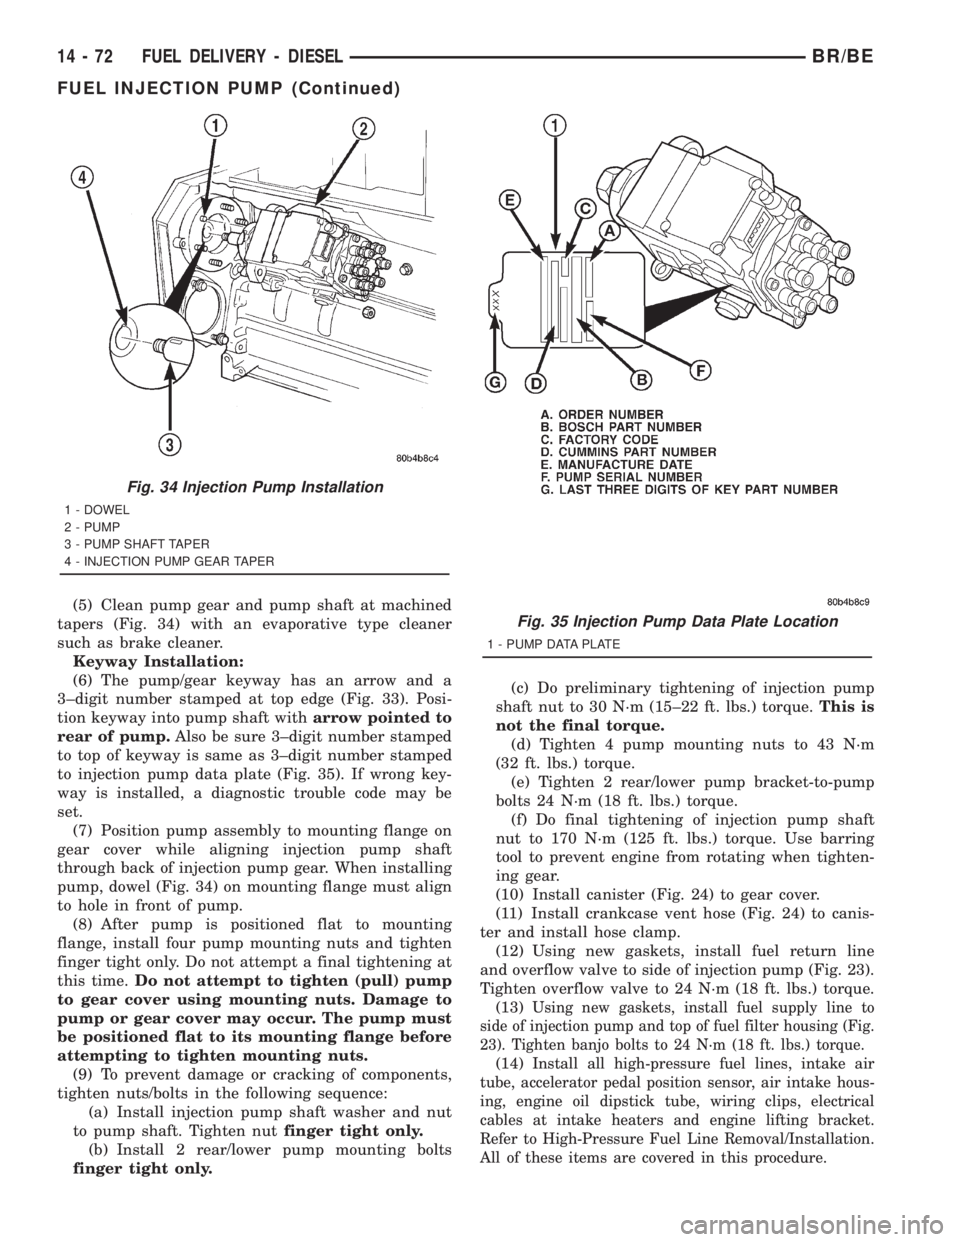
(5) Clean pump gear and pump shaft at machined
tapers (Fig. 34) with an evaporative type cleaner
such as brake cleaner.
Keyway Installation:
(6) The pump/gear keyway has an arrow and a
3±digit number stamped at top edge (Fig. 33). Posi-
tion keyway into pump shaft witharrow pointed to
rear of pump.Also be sure 3±digit number stamped
to top of keyway is same as 3±digit number stamped
to injection pump data plate (Fig. 35). If wrong key-
way is installed, a diagnostic trouble code may be
set.
(7) Position pump assembly to mounting flange on
gear cover while aligning injection pump shaft
through back of injection pump gear. When installing
pump, dowel (Fig. 34) on mounting flange must align
to hole in front of pump.
(8) After pump is positioned flat to mounting
flange, install four pump mounting nuts and tighten
finger tight only. Do not attempt a final tightening at
this time.Do not attempt to tighten (pull) pump
to gear cover using mounting nuts. Damage to
pump or gear cover may occur. The pump must
be positioned flat to its mounting flange before
attempting to tighten mounting nuts.
(9) To prevent damage or cracking of components,
tighten nuts/bolts in the following sequence:
(a) Install injection pump shaft washer and nut
to pump shaft. Tighten nutfinger tight only.
(b) Install 2 rear/lower pump mounting bolts
finger tight only.(c) Do preliminary tightening of injection pump
shaft nut to 30 N´m (15±22 ft. lbs.) torque.This is
not the final torque.
(d) Tighten 4 pump mounting nuts to 43 N´m
(32 ft. lbs.) torque.
(e) Tighten 2 rear/lower pump bracket-to-pump
bolts 24 N´m (18 ft. lbs.) torque.
(f) Do final tightening of injection pump shaft
nut to 170 N´m (125 ft. lbs.) torque. Use barring
tool to prevent engine from rotating when tighten-
ing gear.
(10) Install canister (Fig. 24) to gear cover.
(11) Install crankcase vent hose (Fig. 24) to canis-
ter and install hose clamp.
(12) Using new gaskets, install fuel return line
and overflow valve to side of injection pump (Fig. 23).
Tighten overflow valve to 24 N´m (18 ft. lbs.) torque.
(13)
Using new gaskets, install fuel supply line to
side of injection pump and top of fuel filter housing (Fig.
23). Tighten banjo bolts to 24 N´m (18 ft. lbs.) torque.
(14)Install all high-pressure fuel lines, intake air
tube, accelerator pedal position sensor, air intake hous-
ing, engine oil dipstick tube, wiring clips, electrical
cables at intake heaters and engine lifting bracket.
Refer to High-Pressure Fuel Line Removal/Installation.
All of these items are covered in this procedure.
Fig. 34 Injection Pump Installation
1 - DOWEL
2 - PUMP
3 - PUMP SHAFT TAPER
4 - INJECTION PUMP GEAR TAPER
Fig. 35 Injection Pump Data Plate Location
1 - PUMP DATA PLATE
14 - 72 FUEL DELIVERY - DIESELBR/BE
FUEL INJECTION PUMP (Continued)
Page 1563 of 2889
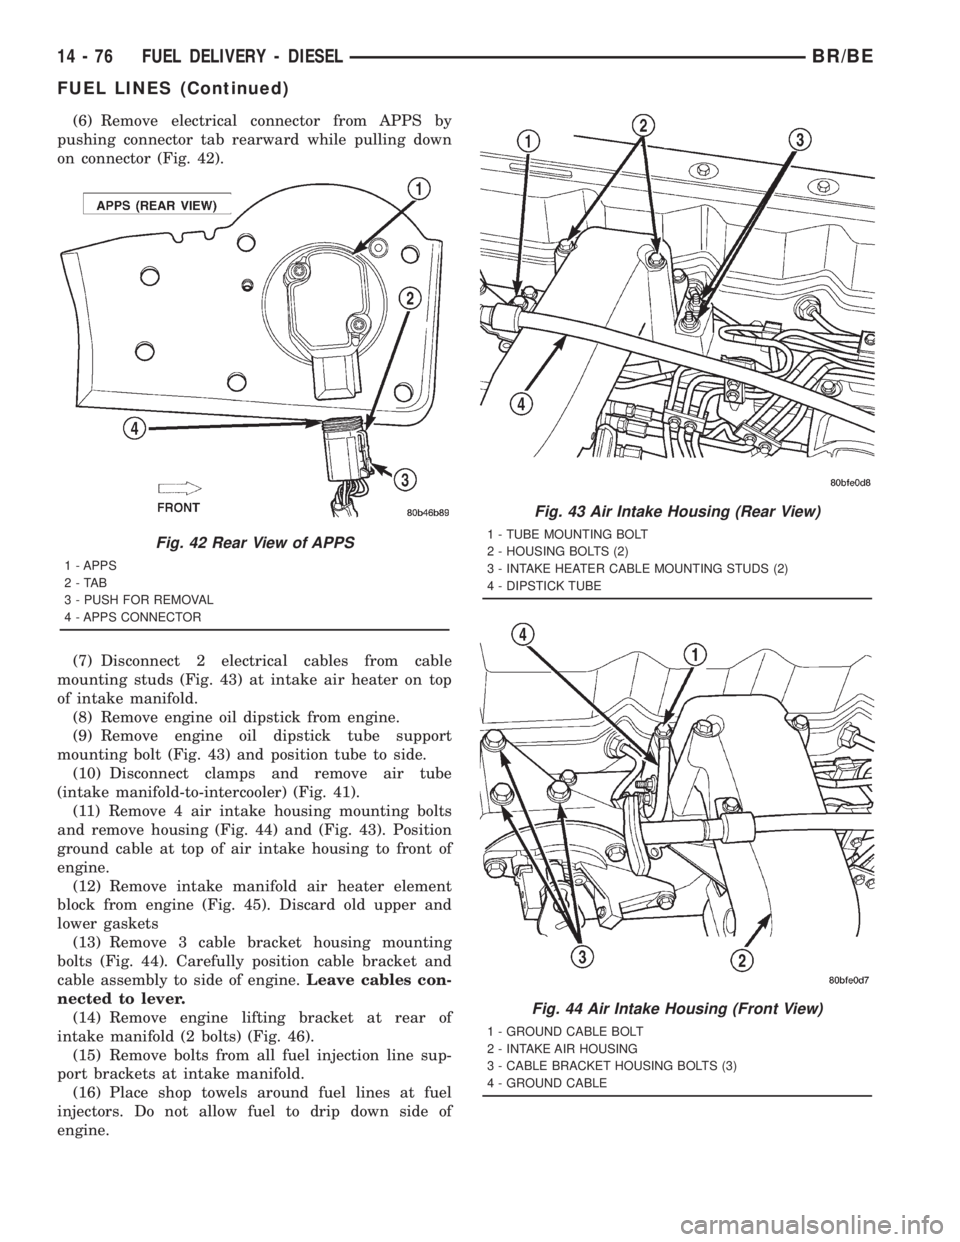
(6) Remove electrical connector from APPS by
pushing connector tab rearward while pulling down
on connector (Fig. 42).
(7) Disconnect 2 electrical cables from cable
mounting studs (Fig. 43) at intake air heater on top
of intake manifold.
(8) Remove engine oil dipstick from engine.
(9) Remove engine oil dipstick tube support
mounting bolt (Fig. 43) and position tube to side.
(10) Disconnect clamps and remove air tube
(intake manifold-to-intercooler) (Fig. 41).
(11) Remove 4 air intake housing mounting bolts
and remove housing (Fig. 44) and (Fig. 43). Position
ground cable at top of air intake housing to front of
engine.
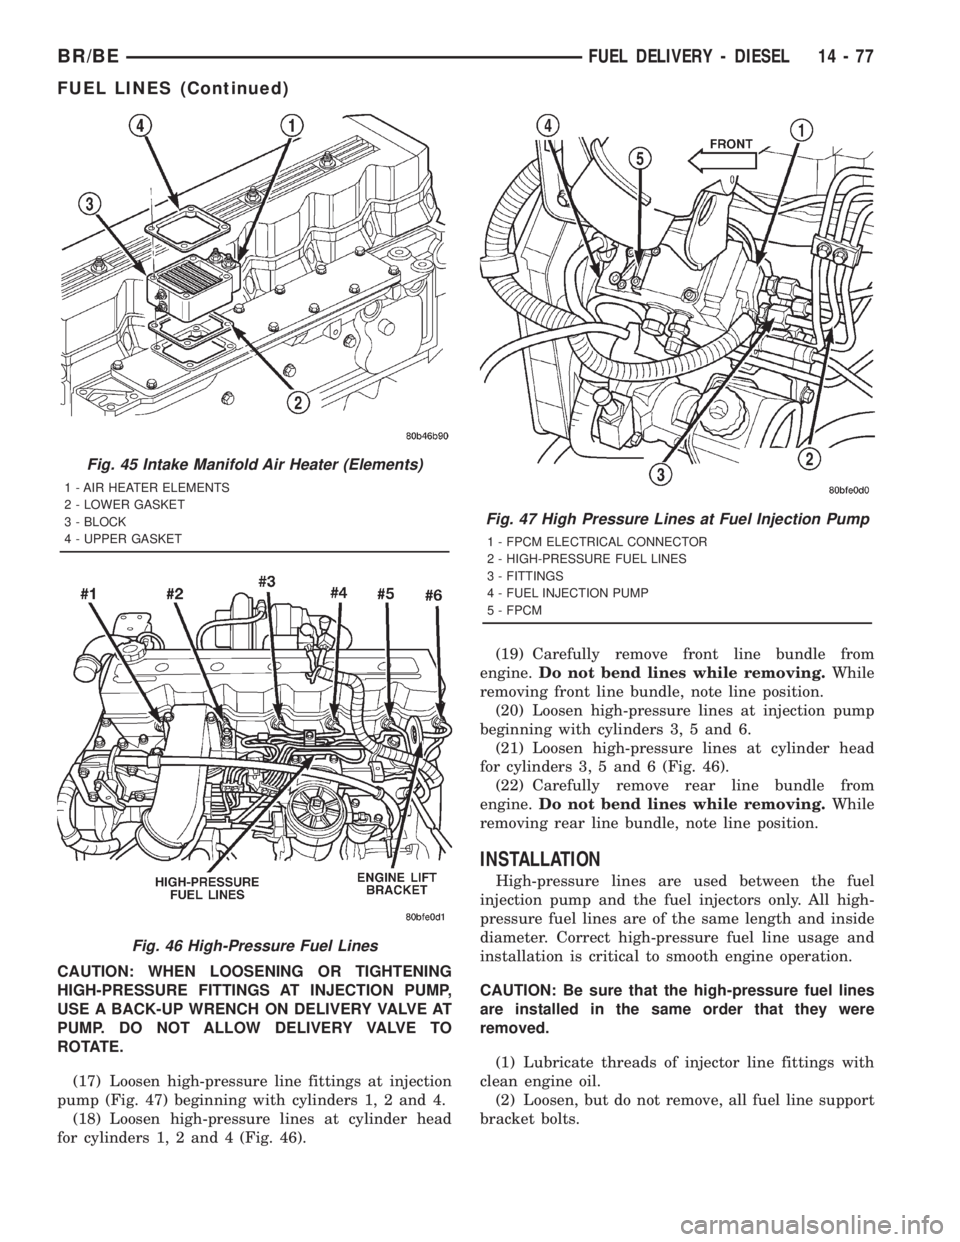
(12) Remove intake manifold air heater element
block from engine (Fig. 45). Discard old upper and
lower gaskets
(13) Remove 3 cable bracket housing mounting
bolts (Fig. 44). Carefully position cable bracket and
cable assembly to side of engine.Leave cables con-
nected to lever.
(14) Remove engine lifting bracket at rear of
intake manifold (2 bolts) (Fig. 46).
(15) Remove bolts from all fuel injection line sup-
port brackets at intake manifold.
(16) Place shop towels around fuel lines at fuel
injectors. Do not allow fuel to drip down side of
engine.
Fig. 42 Rear View of APPS
1 - APPS
2-TAB
3 - PUSH FOR REMOVAL
4 - APPS CONNECTOR
Fig. 43 Air Intake Housing (Rear View)
1 - TUBE MOUNTING BOLT
2 - HOUSING BOLTS (2)
3 - INTAKE HEATER CABLE MOUNTING STUDS (2)
4 - DIPSTICK TUBE
Fig. 44 Air Intake Housing (Front View)
1 - GROUND CABLE BOLT
2 - INTAKE AIR HOUSING
3 - CABLE BRACKET HOUSING BOLTS (3)
4 - GROUND CABLE
14 - 76 FUEL DELIVERY - DIESELBR/BE
FUEL LINES (Continued)
Page 1564 of 2889
CAUTION: WHEN LOOSENING OR TIGHTENING
HIGH-PRESSURE FITTINGS AT INJECTION PUMP,
USE A BACK-UP WRENCH ON DELIVERY VALVE AT
PUMP. DO NOT ALLOW DELIVERY VALVE TO
ROTATE.
(17) Loosen high-pressure line fittings at injection
pump (Fig. 47) beginning with cylinders 1, 2 and 4.
(18) Loosen high-pressure lines at cylinder head
for cylinders 1, 2 and 4 (Fig. 46).(19) Carefully remove front line bundle from
engine.Do not bend lines while removing.While
removing front line bundle, note line position.
(20) Loosen high-pressure lines at injection pump
beginning with cylinders 3, 5 and 6.
(21) Loosen high-pressure lines at cylinder head
for cylinders 3, 5 and 6 (Fig. 46).
(22) Carefully remove rear line bundle from
engine.Do not bend lines while removing.While
removing rear line bundle, note line position.
INSTALLATION
High-pressure lines are used between the fuel
injection pump and the fuel injectors only. All high-
pressure fuel lines are of the same length and inside
diameter. Correct high-pressure fuel line usage and
installation is critical to smooth engine operation.
CAUTION: Be sure that the high-pressure fuel lines
are installed in the same order that they were
removed.
(1) Lubricate threads of injector line fittings with
clean engine oil.
(2) Loosen, but do not remove, all fuel line support
bracket bolts.
Fig. 45 Intake Manifold Air Heater (Elements)
1 - AIR HEATER ELEMENTS
2 - LOWER GASKET
3 - BLOCK
4 - UPPER GASKET
Fig. 46 High-Pressure Fuel Lines
Fig. 47 High Pressure Lines at Fuel Injection Pump
1 - FPCM ELECTRICAL CONNECTOR
2 - HIGH-PRESSURE FUEL LINES
3 - FITTINGS
4 - FUEL INJECTION PUMP
5 - FPCM
BR/BEFUEL DELIVERY - DIESEL 14 - 77
FUEL LINES (Continued)
Page 1565 of 2889
(3) Installrearinjection line bundle beginning
with cylinder head (fuel injector) connections, fol-
lowed by injection pump connections. Tighten all fit-
tings finger tight.
(4) Tighten fittings at fuel injector ends for cylin-
ders number 6 and 5 to 38 N´m (28 ft. lbs.) torque.
Do not tighten number 3 line at this time. It
will be tightened during bleeding procedure.
(5) Tighten 3 fittings at fuel injection pump ends
to 24 N´m (18 ft. lbs.) torque.
(6) Installfrontinjection line bundle beginning
with cylinder head (fuel injector) connections, fol-
lowed by injection pump connections. Tighten all fit-
tings finger tight.
(7) Tighten fitting at fuel injector end for cylinder
number 2 to 38 N´m (28 ft. lbs.) torque.Do not
tighten lines number 1 or 4 at this time. They
will be tightened during bleeding procedure.
(8) Tighten remaining 3 fittings at fuel injection
pump ends to 24 N´m (18 ft. lbs.) torque.
(9) Install fuel line support bracket bolts to intake
manifold and tighten to 24 N´m (18 ft. lbs.) torque.
CAUTION: Be sure fuel lines are not contacting
each other or any other component. Noise will
result.
(10) Install engine lifting bracket at rear of intake
manifold. Tighten 2 bolts to 77 N´m (57 ft. lbs.)
torque.
(11) Install cable bracket housing/cable assembly
and tighten 3 mounting bolts to 24 N´m (18 ft. lbs.)
torque.
(12) Clean any old gasket material below and
above intake manifold air heater element block. Also
clean mating areas at intake manifold and air intake
housing.
(13) Using new gaskets, position intake manifold
air heater element block to engine.
(14) Install air intake housing and position ground
cable. Install 4 mounting bolts and tighten to 24 N´m
(18 ft. lbs.) torque.
(15) Install air tube (intake manifold-to-charge air
cooler) (Fig. 41). Tighten clamps to 8 N´m (72 in. lbs.)
torque.
(16) Install engine oil dipstick tube support mount-
ing bolt and tighten to 24 N´m (18 ft. lbs.) torque.
(17) Install engine oil dipstick to engine.
(18) Connect 2 electrical cables to cable mounting
studs.
(19) Connect electrical connector to bottom of
APPS by pushing connector upward until it snaps
into position.
(20) Connect wiring harness (clip) at bottom of
Accelerator Pedal Position Sensor (APPS) mounting
bracket (Fig. 40).(21) Connect front wiring clip (Fig. 41) to cable
bracket housing.
(22) Install cable cover (Fig. 39).
(23) Connect both negative battery cables to both
batteries.
(24) Bleed air from fuel system. Do this at fuel
injector ends of lines. Use cylinders numbers 1, 3 and
4 for bleeding . (Refer to 14 - FUEL SYSTEM/FUEL
DELIVERY - STANDARD PROCEDURE). After
bleeding, tighten fittings to 38 N´m (28 ft. lbs.)
torque.
(25) Check lines/fittings for leaks.
FUEL TANK
DESCRIPTION - DIESEL FUEL TANK
The fuel tank is similar to the tank used with gas-
oline powered models. The tank is equipped with a
separate fuel return line and a different fuel tank
module for diesel powered models. A fuel tank
mounted, electric fuel pump is not used with diesel
powered models. Refer to Fuel Tank Module for addi-
tional information.
For removal and installation procedures, refer to
Fuel Tank - Gasoline Engines.
FUEL TANK MODULE
DESCRIPTION
An electric fuel pump isnot usedin the fuel tank
module for diesel powered engines. Fuel is supplied
by the engine mounted fuel transfer pump and the
fuel injection pump.
The fuel tank module is installed in the top of the
fuel tank (Fig. 48). The fuel tank module (Fig. 48)
contains the following components:
²Fuel reservoir
²A separate in-tank fuel filter
²Rollover valve
²Fuel gauge sending unit (fuel level sensor)
²Fuel supply line connection
²Fuel return line connection
²Auxiliary non-pressurized fuel supply fitting
OPERATION
Refer to Fuel Gauge Sending Unit.
REMOVAL
(1) Drain and remove fuel tank. Refer to Fuel
Tank Removal/Installation.
(2) Thoroughly clean area around tank module at
top of tank.
14 - 78 FUEL DELIVERY - DIESELBR/BE
FUEL LINES (Continued)
Page 1572 of 2889
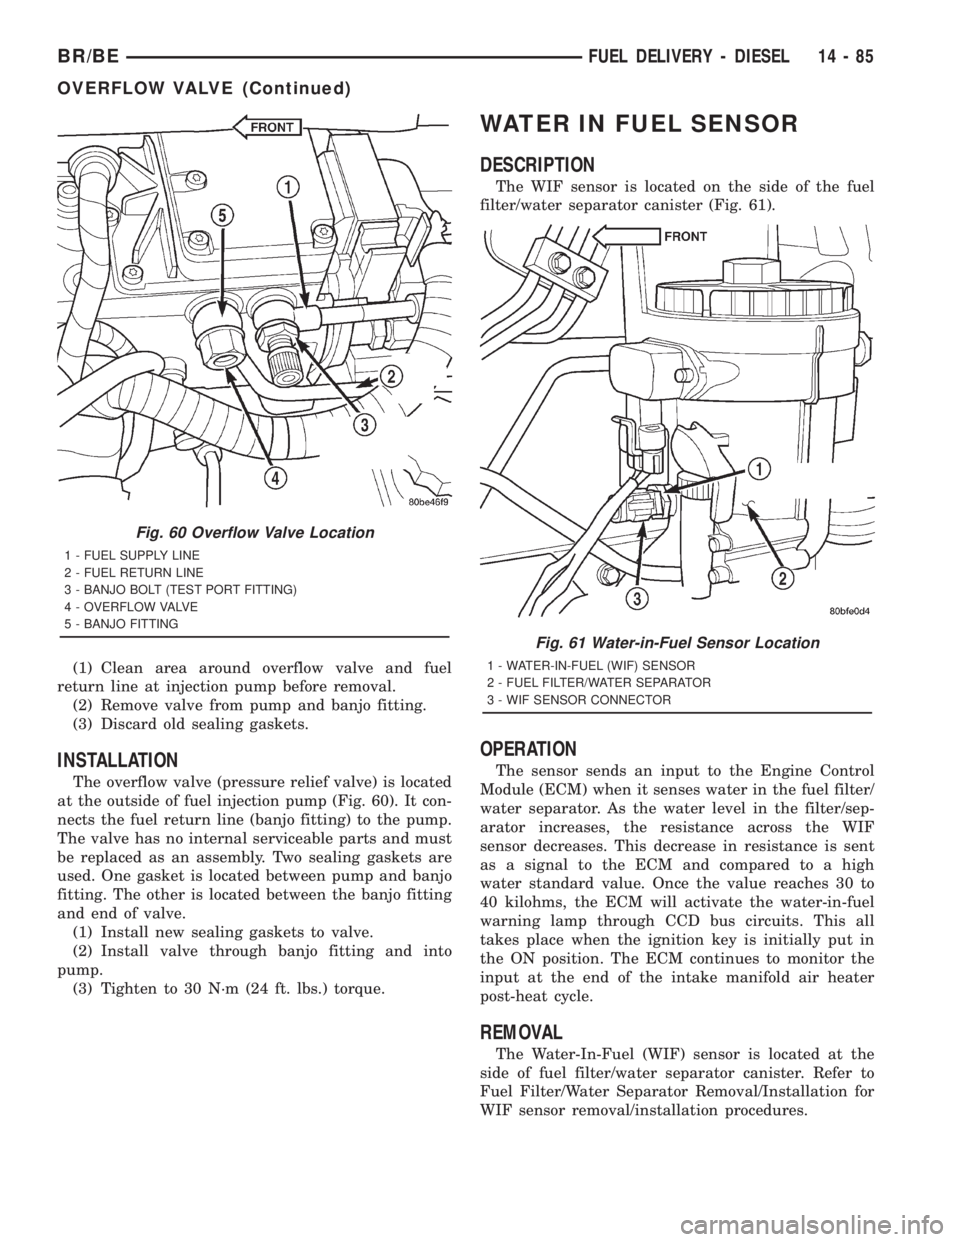
(1) Clean area around overflow valve and fuel
return line at injection pump before removal.
(2) Remove valve from pump and banjo fitting.
(3) Discard old sealing gaskets.
INSTALLATION
The overflow valve (pressure relief valve) is located
at the outside of fuel injection pump (Fig. 60). It con-
nects the fuel return line (banjo fitting) to the pump.
The valve has no internal serviceable parts and must
be replaced as an assembly. Two sealing gaskets are
used. One gasket is located between pump and banjo
fitting. The other is located between the banjo fitting
and end of valve.
(1) Install new sealing gaskets to valve.
(2) Install valve through banjo fitting and into
pump.
(3) Tighten to 30 N´m (24 ft. lbs.) torque.
WATER IN FUEL SENSOR
DESCRIPTION
The WIF sensor is located on the side of the fuel
filter/water separator canister (Fig. 61).
OPERATION
The sensor sends an input to the Engine Control
Module (ECM) when it senses water in the fuel filter/
water separator. As the water level in the filter/sep-
arator increases, the resistance across the WIF
sensor decreases. This decrease in resistance is sent
as a signal to the ECM and compared to a high
water standard value. Once the value reaches 30 to
40 kilohms, the ECM will activate the water-in-fuel
warning lamp through CCD bus circuits. This all
takes place when the ignition key is initially put in
the ON position. The ECM continues to monitor the
input at the end of the intake manifold air heater
post-heat cycle.
REMOVAL
The Water-In-Fuel (WIF) sensor is located at the
side of fuel filter/water separator canister. Refer to
Fuel Filter/Water Separator Removal/Installation for
WIF sensor removal/installation procedures.
Fig. 60 Overflow Valve Location
1 - FUEL SUPPLY LINE
2 - FUEL RETURN LINE
3 - BANJO BOLT (TEST PORT FITTING)
4 - OVERFLOW VALVE
5 - BANJO FITTING
Fig. 61 Water-in-Fuel Sensor Location
1 - WATER-IN-FUEL (WIF) SENSOR
2 - FUEL FILTER/WATER SEPARATOR
3 - WIF SENSOR CONNECTOR
BR/BEFUEL DELIVERY - DIESEL 14 - 85
OVERFLOW VALVE (Continued)
Page 1574 of 2889
FUEL INJECTION - DIESEL
TABLE OF CONTENTS
page page
FUEL INJECTION - DIESEL
DESCRIPTION...........................87
DIAGNOSIS AND TESTING.................89
BOOST PRESSURE.....................89
SPECIFICATIONS........................90
ACCELERATOR PEDAL POSITION SENSOR
DESCRIPTION...........................91
OPERATION.............................91
REMOVAL..............................91
INSTALLATION...........................93
FUEL INJECTOR
DESCRIPTION...........................93
OPERATION.............................94
DIAGNOSIS AND TESTING.................95
FUEL INJECTOR TEST...................95
REMOVAL..............................96
INSTALLATION...........................98
FUEL INJECTION PUMP RELAY
DESCRIPTION...........................99
OPERATION.............................99
FUEL TEMPERATURE SENSOR
DESCRIPTION...........................99
OPERATION............................100
INTAKE AIR HEATER
DESCRIPTION..........................100OPERATION............................100
REMOVAL.............................100
INSTALLATION..........................101
INTAKE AIR HEATER RELAY
DESCRIPTION..........................101
OPERATION............................102
REMOVAL.............................102
INSTALLATION..........................102
INTAKE AIR TEMPERATURE SENSOR
DESCRIPTION..........................102
OPERATION............................102
REMOVAL.............................103
INSTALLATION..........................103
MAP SENSOR
DESCRIPTION..........................103
OPERATION............................103
REMOVAL.............................104
INSTALLATION..........................104
PTO SWITCH
DESCRIPTION..........................104
THROTTLE CONTROL CABLE
REMOVAL.............................104
INSTALLATION..........................105
FUEL INJECTION - DIESEL
DESCRIPTION - DIESEL FUEL INJECTION
SYSTEM
The Engine Control Module (ECM) and Fuel Injec-
tion Pump Control Module (FPCM) are used prima-
rily for fuel system control. The ECM is a separate
replaceable component, while the FPCM is internal
to the fuel injection pump and is a non-serviceable
part. The ECM and FPCM are interconnected (wired
together) for fuel injection control.The Powertrain Control Module (PCM) is used to
regulate or control the A/C, charging and speed con-
trol systems. It is also used to partially control cer-
tain electronic automatic transmission components.
The PCM also has control over certain instrument
panel components.
Refer to either Powertrain Control Module (PCM)
or Engine Control Module (ECM) for additional infor-
mation. Refer to (Fig. 1) for a partial list of fuel sys-
tem components.
BR/BEFUEL INJECTION - DIESEL 14 - 87
Page 1575 of 2889
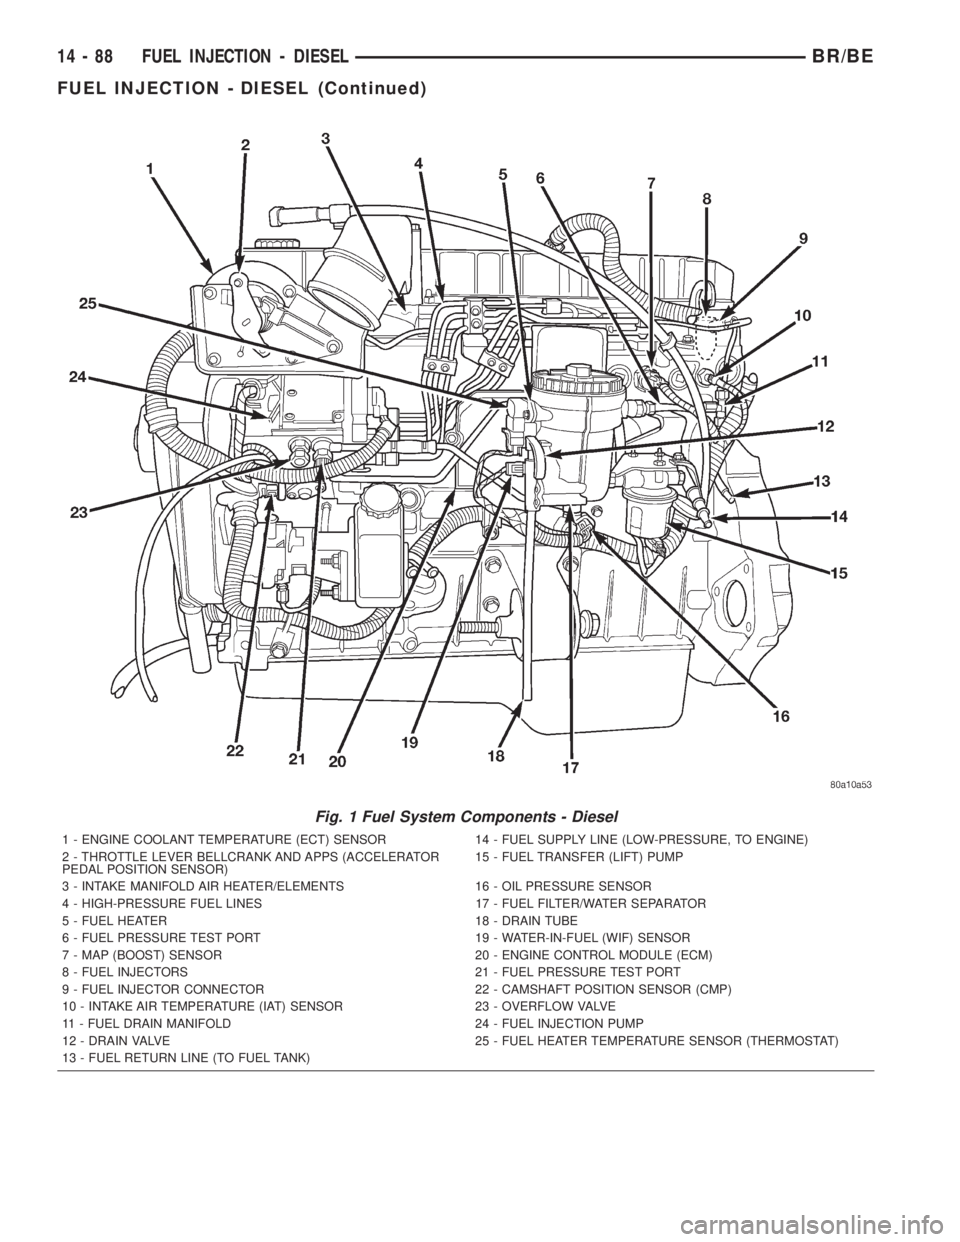
Fig. 1 Fuel System Components - Diesel
1 - ENGINE COOLANT TEMPERATURE (ECT) SENSOR 14 - FUEL SUPPLY LINE (LOW-PRESSURE, TO ENGINE)
2 - THROTTLE LEVER BELLCRANK AND APPS (ACCELERATOR
PEDAL POSITION SENSOR)15 - FUEL TRANSFER (LIFT) PUMP
3 - INTAKE MANIFOLD AIR HEATER/ELEMENTS 16 - OIL PRESSURE SENSOR
4 - HIGH-PRESSURE FUEL LINES 17 - FUEL FILTER/WATER SEPARATOR
5 - FUEL HEATER 18 - DRAIN TUBE
6 - FUEL PRESSURE TEST PORT 19 - WATER-IN-FUEL (WIF) SENSOR
7 - MAP (BOOST) SENSOR 20 - ENGINE CONTROL MODULE (ECM)
8 - FUEL INJECTORS 21 - FUEL PRESSURE TEST PORT
9 - FUEL INJECTOR CONNECTOR 22 - CAMSHAFT POSITION SENSOR (CMP)
10 - INTAKE AIR TEMPERATURE (IAT) SENSOR 23 - OVERFLOW VALVE
11 - FUEL DRAIN MANIFOLD 24 - FUEL INJECTION PUMP
12 - DRAIN VALVE 25 - FUEL HEATER TEMPERATURE SENSOR (THERMOSTAT)
13 - FUEL RETURN LINE (TO FUEL TANK)
14 - 88 FUEL INJECTION - DIESELBR/BE
FUEL INJECTION - DIESEL (Continued)
Page 1577 of 2889
SPECIFICATIONS
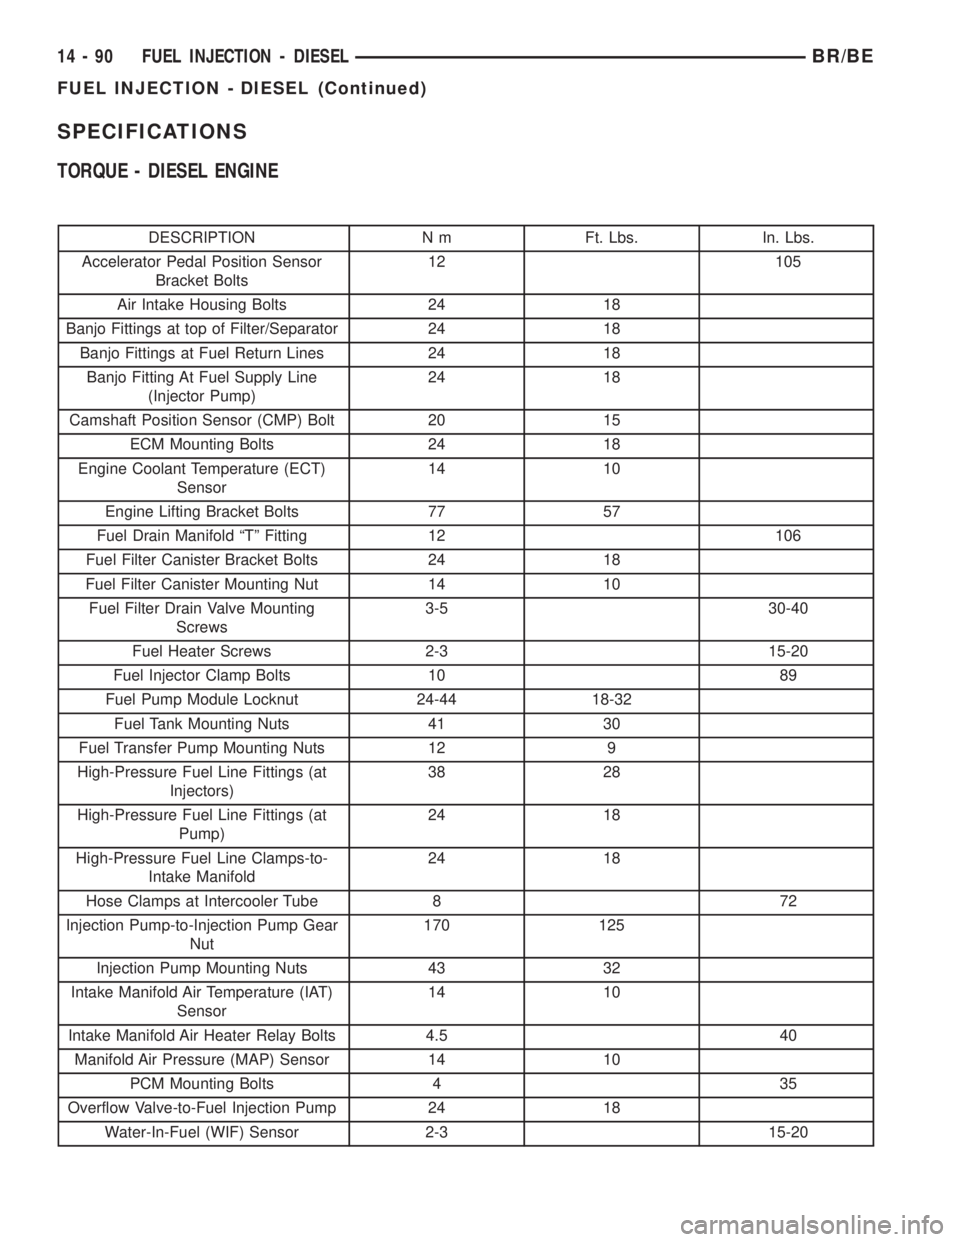
TORQUE - DIESEL ENGINE
DESCRIPTION N m Ft. Lbs. In. Lbs.
Accelerator Pedal Position Sensor
Bracket Bolts12 105
Air Intake Housing Bolts 24 18
Banjo Fittings at top of Filter/Separator 24 18
Banjo Fittings at Fuel Return Lines 24 18
Banjo Fitting At Fuel Supply Line
(Injector Pump)24 18
Camshaft Position Sensor (CMP) Bolt 20 15
ECM Mounting Bolts 24 18
Engine Coolant Temperature (ECT)
Sensor14 10
Engine Lifting Bracket Bolts 77 57
Fuel Drain Manifold ªTº Fitting 12 106
Fuel Filter Canister Bracket Bolts 24 18
Fuel Filter Canister Mounting Nut 14 10
Fuel Filter Drain Valve Mounting
Screws3-5 30-40
Fuel Heater Screws 2-3 15-20
Fuel Injector Clamp Bolts 10 89
Fuel Pump Module Locknut 24-44 18-32
Fuel Tank Mounting Nuts 41 30
Fuel Transfer Pump Mounting Nuts 12 9
High-Pressure Fuel Line Fittings (at
Injectors)38 28
High-Pressure Fuel Line Fittings (at
Pump)24 18
High-Pressure Fuel Line Clamps-to-
Intake Manifold24 18
Hose Clamps at Intercooler Tube 8 72
Injection Pump-to-Injection Pump Gear
Nut170 125
Injection Pump Mounting Nuts 43 32
Intake Manifold Air Temperature (IAT)
Sensor14 10
Intake Manifold Air Heater Relay Bolts 4.5 40
Manifold Air Pressure (MAP) Sensor 14 10
PCM Mounting Bolts 4 35
Overflow Valve-to-Fuel Injection Pump 24 18
Water-In-Fuel (WIF) Sensor 2-3 15-20
14 - 90 FUEL INJECTION - DIESELBR/BE
FUEL INJECTION - DIESEL (Continued)