2001 CHRYSLER VOYAGER warning light
[x] Cancel search: warning lightPage 3990 of 4284
TEST ACTION APPLICABILITY
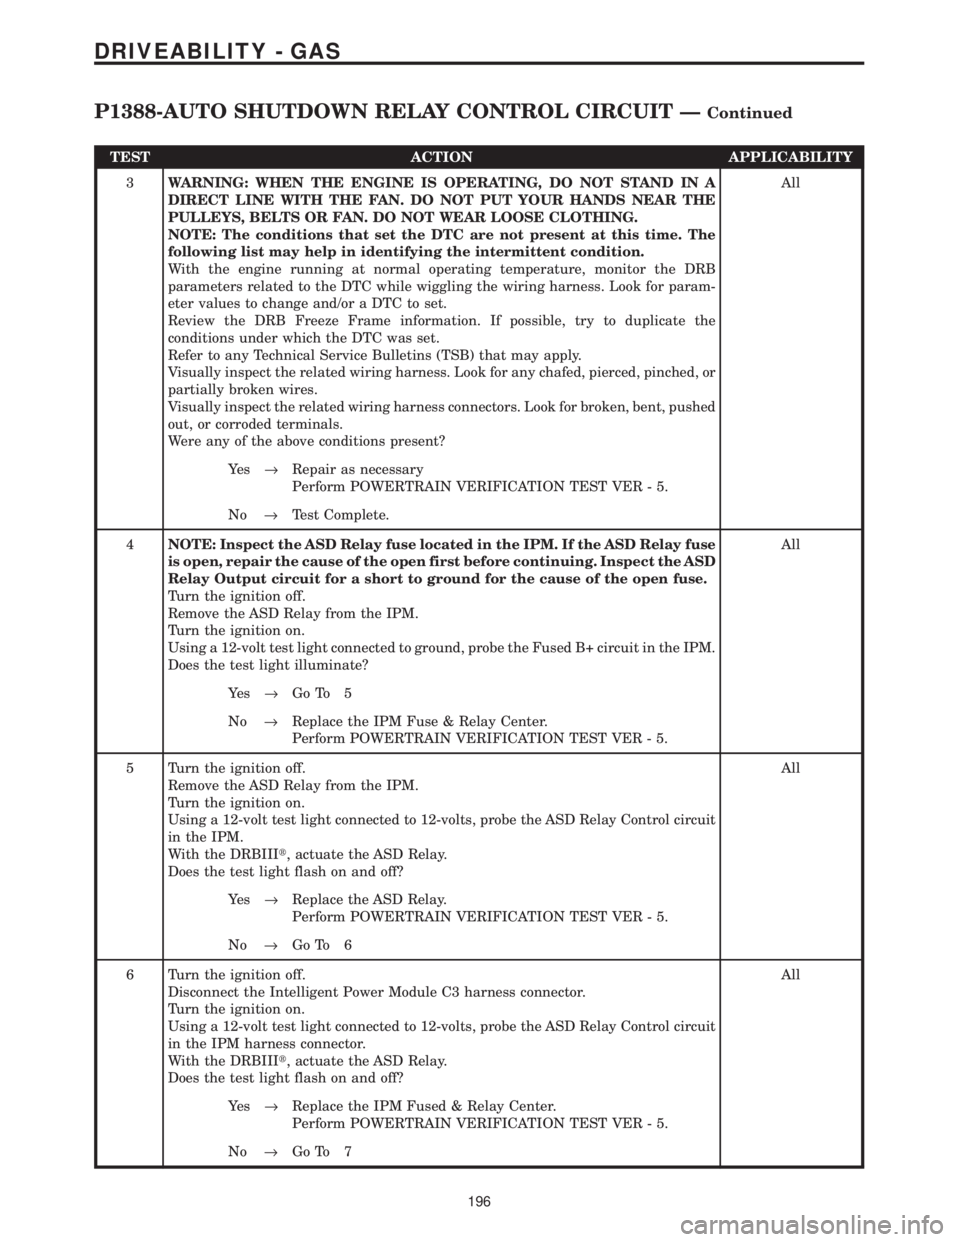
3WARNING: WHEN THE ENGINE IS OPERATING, DO NOT STAND IN A
DIRECT LINE WITH THE FAN. DO NOT PUT YOUR HANDS NEAR THE
PULLEYS, BELTS OR FAN. DO NOT WEAR LOOSE CLOTHING.
NOTE: The conditions that set the DTC are not present at this time. The
following list may help in identifying the intermittent condition.
With the engine running at normal operating temperature, monitor the DRB
parameters related to the DTC while wiggling the wiring harness. Look for param-
eter values to change and/or a DTC to set.
Review the DRB Freeze Frame information. If possible, try to duplicate the
conditions under which the DTC was set.
Refer to any Technical Service Bulletins (TSB) that may apply.
Visually inspect the related wiring harness. Look for any chafed, pierced, pinched, or
partially broken wires.
Visually inspect the related wiring harness connectors. Look for broken, bent, pushed
out, or corroded terminals.
Were any of the above conditions present?All
Ye s®Repair as necessary
Perform POWERTRAIN VERIFICATION TEST VER - 5.
No®Test Complete.
4NOTE: Inspect the ASD Relay fuse located in the IPM. If the ASD Relay fuse
is open, repair the cause of the open first before continuing. Inspect the ASD
Relay Output circuit for a short to ground for the cause of the open fuse.
Turn the ignition off.
Remove the ASD Relay from the IPM.
Turn the ignition on.
Using a 12-volt test light connected to ground, probe the Fused B+ circuit in the IPM.
Does the test light illuminate?All
Ye s®Go To 5
No®Replace the IPM Fuse & Relay Center.
Perform POWERTRAIN VERIFICATION TEST VER - 5.
5 Turn the ignition off.
Remove the ASD Relay from the IPM.
Turn the ignition on.
Using a 12-volt test light connected to 12-volts, probe the ASD Relay Control circuit
in the IPM.
With the DRBIIIt, actuate the ASD Relay.
Does the test light flash on and off?All
Ye s®Replace the ASD Relay.
Perform POWERTRAIN VERIFICATION TEST VER - 5.
No®Go To 6
6 Turn the ignition off.
Disconnect the Intelligent Power Module C3 harness connector.
Turn the ignition on.
Using a 12-volt test light connected to 12-volts, probe the ASD Relay Control circuit
in the IPM harness connector.
With the DRBIIIt, actuate the ASD Relay.
Does the test light flash on and off?All
Ye s®Replace the IPM Fused & Relay Center.
Perform POWERTRAIN VERIFICATION TEST VER - 5.
No®Go To 7
196
DRIVEABILITY - GAS
P1388-AUTO SHUTDOWN RELAY CONTROL CIRCUIT ÐContinued
Page 4002 of 4284
TEST ACTION APPLICABILITY
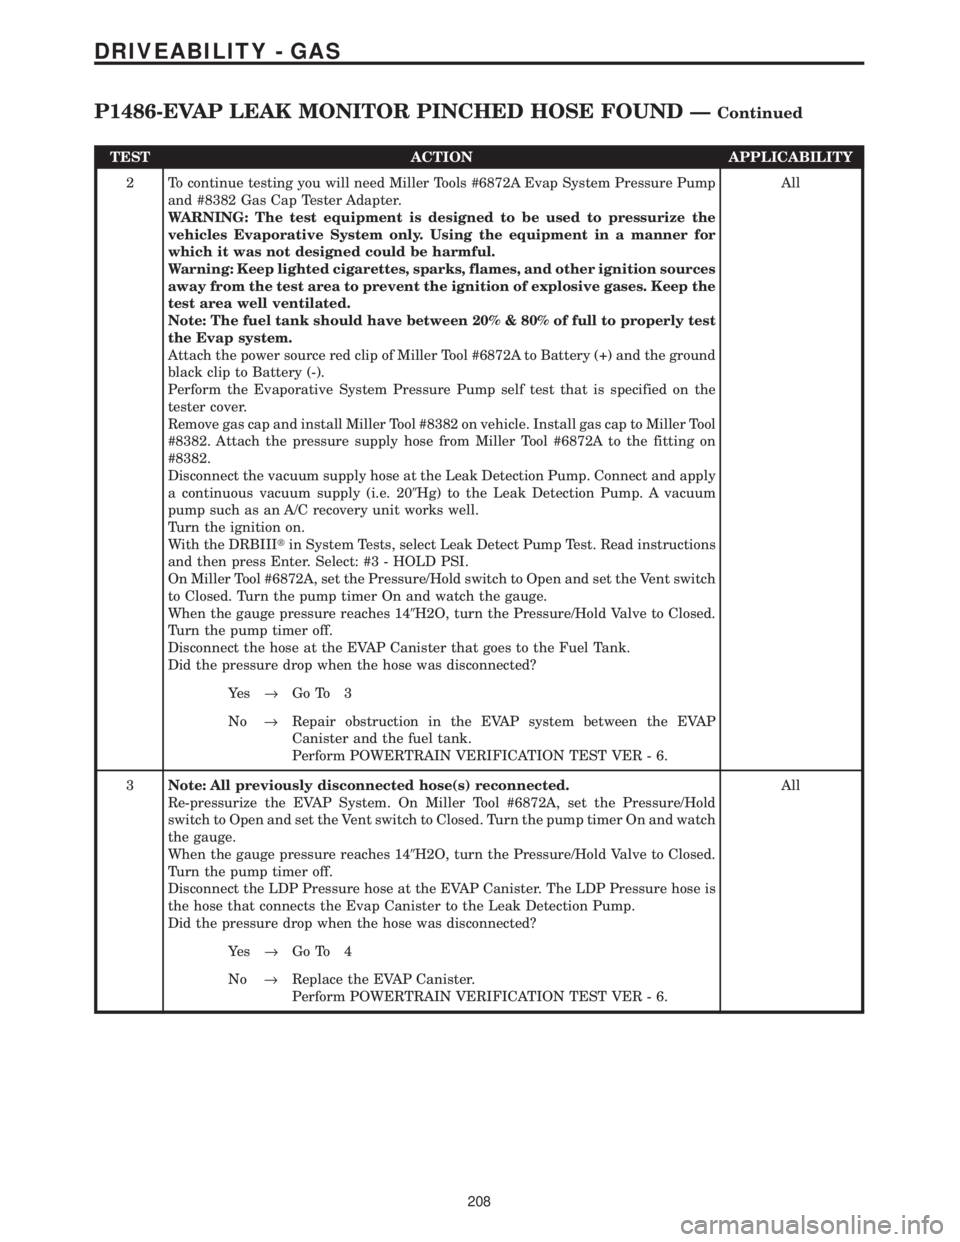
2 To continue testing you will need Miller Tools #6872A Evap System Pressure Pump
and #8382 Gas Cap Tester Adapter.
WARNING: The test equipment is designed to be used to pressurize the
vehicles Evaporative System only. Using the equipment in a manner for
which it was not designed could be harmful.
Warning: Keep lighted cigarettes, sparks, flames, and other ignition sources
away from the test area to prevent the ignition of explosive gases. Keep the
test area well ventilated.
Note: The fuel tank should have between 20% & 80% of full to properly test
the Evap system.
Attach the power source red clip of Miller Tool #6872A to Battery (+) and the ground
black clip to Battery (-).
Perform the Evaporative System Pressure Pump self test that is specified on the
tester cover.
Remove gas cap and install Miller Tool #8382 on vehicle. Install gas cap to Miller Tool
#8382. Attach the pressure supply hose from Miller Tool #6872A to the fitting on
#8382.
Disconnect the vacuum supply hose at the Leak Detection Pump. Connect and apply
a continuous vacuum supply (i.e. 209Hg) to the Leak Detection Pump. A vacuum
pump such as an A/C recovery unit works well.
Turn the ignition on.
With the DRBIIItin System Tests, select Leak Detect Pump Test. Read instructions
and then press Enter. Select: #3 - HOLD PSI.
On Miller Tool #6872A, set the Pressure/Hold switch to Open and set the Vent switch
to Closed. Turn the pump timer On and watch the gauge.
When the gauge pressure reaches 149H2O, turn the Pressure/Hold Valve to Closed.
Turn the pump timer off.
Disconnect the hose at the EVAP Canister that goes to the Fuel Tank.
Did the pressure drop when the hose was disconnected?All
Ye s®Go To 3
No®Repair obstruction in the EVAP system between the EVAP
Canister and the fuel tank.
Perform POWERTRAIN VERIFICATION TEST VER - 6.
3Note: All previously disconnected hose(s) reconnected.
Re-pressurize the EVAP System. On Miller Tool #6872A, set the Pressure/Hold
switch to Open and set the Vent switch to Closed. Turn the pump timer On and watch
the gauge.
When the gauge pressure reaches 149H2O, turn the Pressure/Hold Valve to Closed.
Turn the pump timer off.
Disconnect the LDP Pressure hose at the EVAP Canister. The LDP Pressure hose is
the hose that connects the Evap Canister to the Leak Detection Pump.
Did the pressure drop when the hose was disconnected?All
Ye s®Go To 4
No®Replace the EVAP Canister.
Perform POWERTRAIN VERIFICATION TEST VER - 6.
208
DRIVEABILITY - GAS
P1486-EVAP LEAK MONITOR PINCHED HOSE FOUND ÐContinued
Page 4005 of 4284
TEST ACTION APPLICABILITY
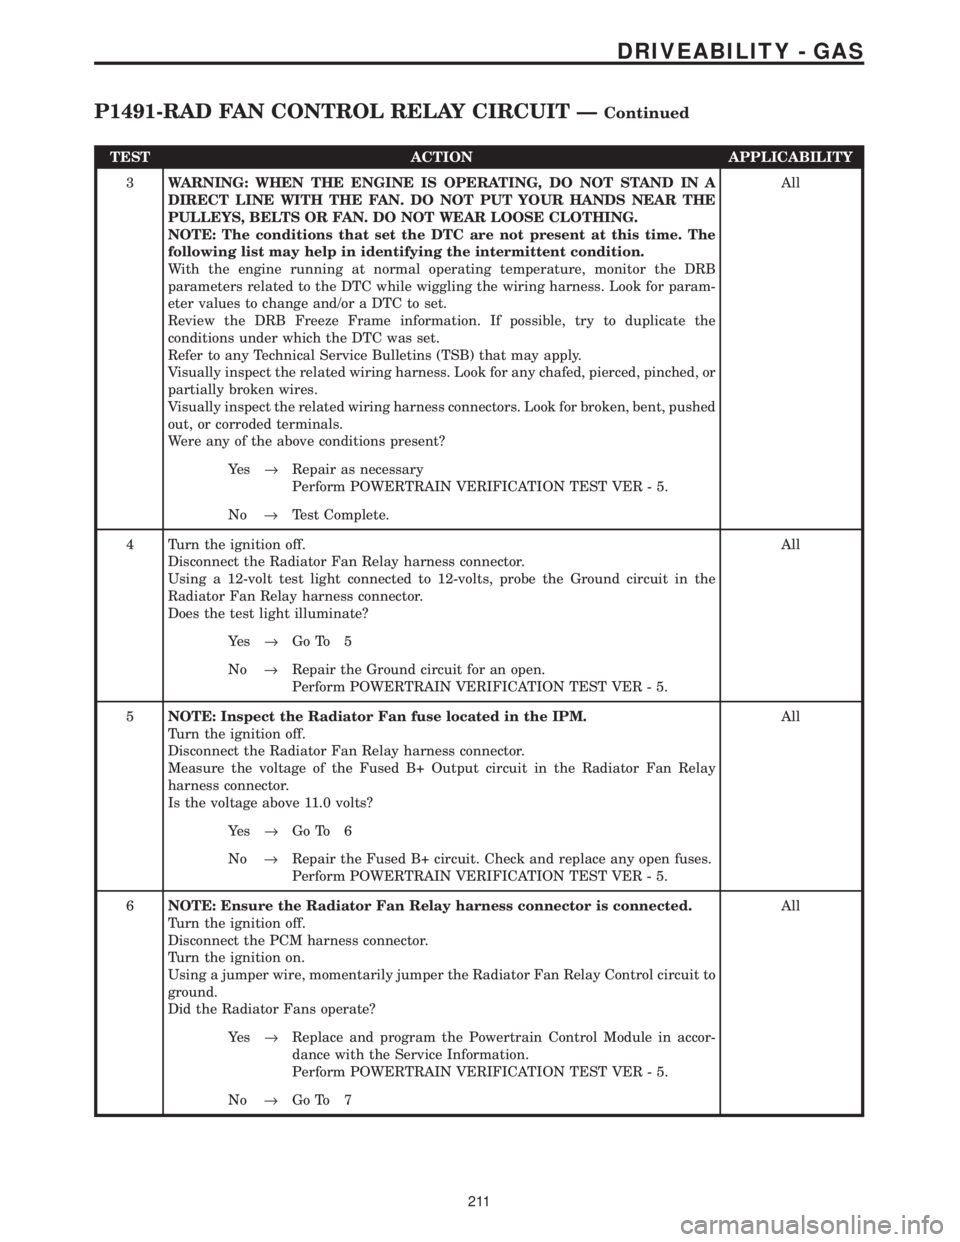
3WARNING: WHEN THE ENGINE IS OPERATING, DO NOT STAND IN A
DIRECT LINE WITH THE FAN. DO NOT PUT YOUR HANDS NEAR THE
PULLEYS, BELTS OR FAN. DO NOT WEAR LOOSE CLOTHING.
NOTE: The conditions that set the DTC are not present at this time. The
following list may help in identifying the intermittent condition.
With the engine running at normal operating temperature, monitor the DRB
parameters related to the DTC while wiggling the wiring harness. Look for param-
eter values to change and/or a DTC to set.
Review the DRB Freeze Frame information. If possible, try to duplicate the
conditions under which the DTC was set.
Refer to any Technical Service Bulletins (TSB) that may apply.
Visually inspect the related wiring harness. Look for any chafed, pierced, pinched, or
partially broken wires.
Visually inspect the related wiring harness connectors. Look for broken, bent, pushed
out, or corroded terminals.
Were any of the above conditions present?All
Ye s®Repair as necessary
Perform POWERTRAIN VERIFICATION TEST VER - 5.
No®Test Complete.
4 Turn the ignition off.
Disconnect the Radiator Fan Relay harness connector.
Using a 12-volt test light connected to 12-volts, probe the Ground circuit in the
Radiator Fan Relay harness connector.
Does the test light illuminate?All
Ye s®Go To 5
No®Repair the Ground circuit for an open.
Perform POWERTRAIN VERIFICATION TEST VER - 5.
5NOTE: Inspect the Radiator Fan fuse located in the IPM.
Turn the ignition off.
Disconnect the Radiator Fan Relay harness connector.
Measure the voltage of the Fused B+ Output circuit in the Radiator Fan Relay
harness connector.
Is the voltage above 11.0 volts?All
Ye s®Go To 6
No®Repair the Fused B+ circuit. Check and replace any open fuses.
Perform POWERTRAIN VERIFICATION TEST VER - 5.
6NOTE: Ensure the Radiator Fan Relay harness connector is connected.
Turn the ignition off.
Disconnect the PCM harness connector.
Turn the ignition on.
Using a jumper wire, momentarily jumper the Radiator Fan Relay Control circuit to
ground.
Did the Radiator Fans operate?All
Ye s®Replace and program the Powertrain Control Module in accor-
dance with the Service Information.
Perform POWERTRAIN VERIFICATION TEST VER - 5.
No®Go To 7
211
DRIVEABILITY - GAS
P1491-RAD FAN CONTROL RELAY CIRCUIT ÐContinued
Page 4023 of 4284
TEST ACTION APPLICABILITY
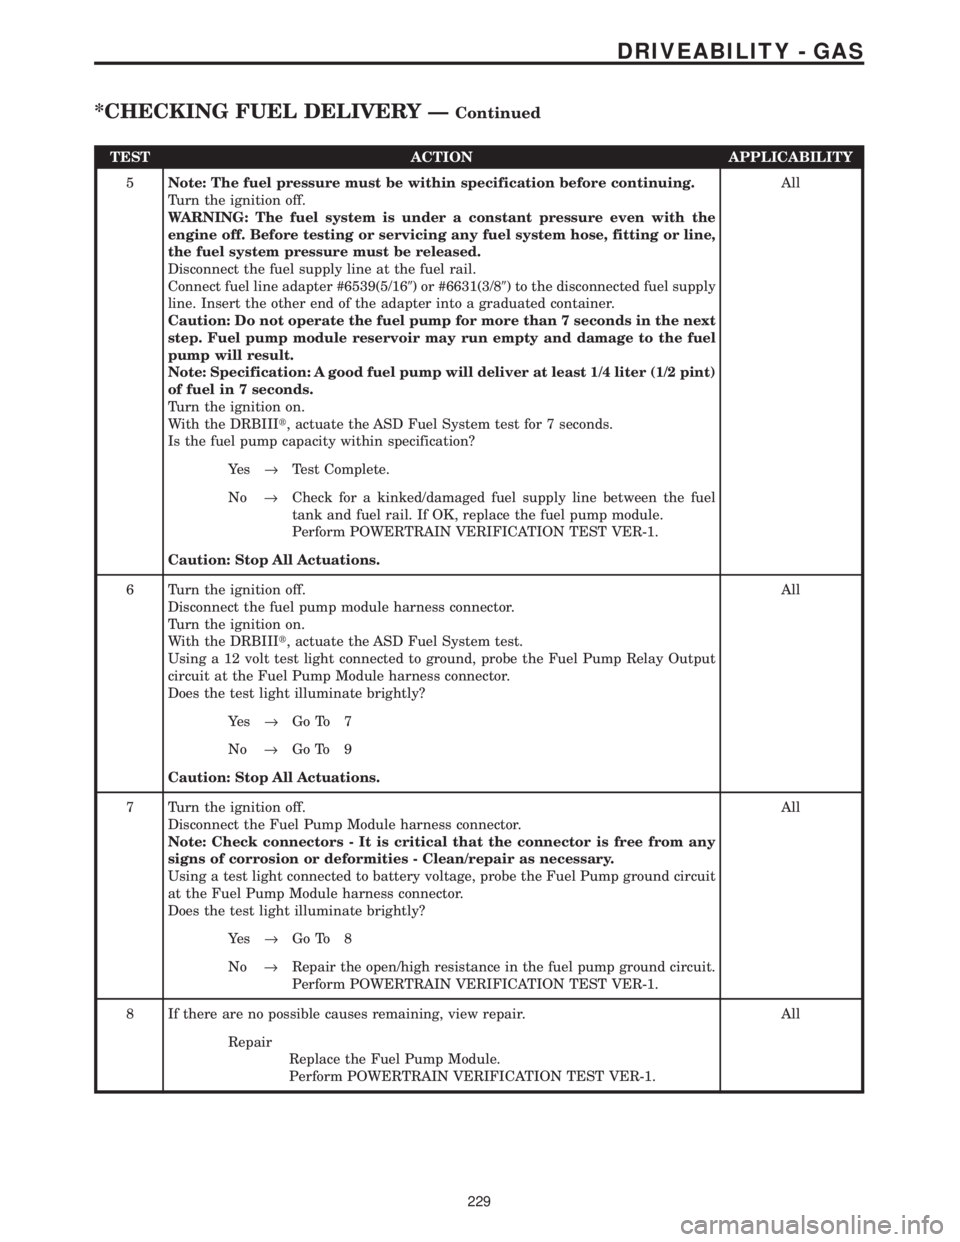
5Note: The fuel pressure must be within specification before continuing.
Turn the ignition off.
WARNING: The fuel system is under a constant pressure even with the
engine off. Before testing or servicing any fuel system hose, fitting or line,
the fuel system pressure must be released.
Disconnect the fuel supply line at the fuel rail.
Connect fuel line adapter #6539(5/169) or #6631(3/89) to the disconnected fuel supply
line. Insert the other end of the adapter into a graduated container.
Caution: Do not operate the fuel pump for more than 7 seconds in the next
step. Fuel pump module reservoir may run empty and damage to the fuel
pump will result.
Note: Specification: A good fuel pump will deliver at least 1/4 liter (1/2 pint)
of fuel in 7 seconds.
Turn the ignition on.
With the DRBIIIt, actuate the ASD Fuel System test for 7 seconds.
Is the fuel pump capacity within specification?All
Ye s®Test Complete.
No®Check for a kinked/damaged fuel supply line between the fuel
tank and fuel rail. If OK, replace the fuel pump module.
Perform POWERTRAIN VERIFICATION TEST VER-1.
Caution: Stop All Actuations.
6 Turn the ignition off.
Disconnect the fuel pump module harness connector.
Turn the ignition on.
With the DRBIIIt, actuate the ASD Fuel System test.
Using a 12 volt test light connected to ground, probe the Fuel Pump Relay Output
circuit at the Fuel Pump Module harness connector.
Does the test light illuminate brightly?All
Ye s®Go To 7
No®Go To 9
Caution: Stop All Actuations.
7 Turn the ignition off.
Disconnect the Fuel Pump Module harness connector.
Note: Check connectors - It is critical that the connector is free from any
signs of corrosion or deformities - Clean/repair as necessary.
Using a test light connected to battery voltage, probe the Fuel Pump ground circuit
at the Fuel Pump Module harness connector.
Does the test light illuminate brightly?All
Ye s®Go To 8
No®Repair the open/high resistance in the fuel pump ground circuit.
Perform POWERTRAIN VERIFICATION TEST VER-1.
8 If there are no possible causes remaining, view repair. All
Repair
Replace the Fuel Pump Module.
Perform POWERTRAIN VERIFICATION TEST VER-1.
229
DRIVEABILITY - GAS
*CHECKING FUEL DELIVERY ÐContinued
Page 4034 of 4284

TEST ACTION APPLICABILITY
3WARNING: KEEP CLEAR OF THE ENGINE'S MOVING PARTS.
NOTE: The conditions that set the DTC are not present at this time. The
following list may help in identifying the intermittent condition.
With the engine running at normal operating temperature, monitor the DRB
parameters related to the DTC while wiggling the wiring harness. Look for param-
eter values to change and/or a DTC to set.
Review the DRB Freeze Frame information. If possible, try to duplicate the
conditions under which the DTC was set.
Refer to any Technical Service Bulletins (TSB) that may apply.
Visually inspect the related wiring harness. Look for any chafed, pierced, pinched, or
partially broken wires.
Visually inspect the related wiring harness connectors. Look for broken, bent, pushed
out, or corroded terminals.
Were any of the above conditions present?All
Ye s®Repair as necessary
Perform POWERTRAIN VERIFICATION TEST VER - 5.
No®Test Complete.
4 Turn the ignition off.
Remove the A/C Clutch Relay from the IPM.
Turn the ignition on.
Using a 12-volt test light connected to ground, probe the Fused Ignition Switch
circuit in the IPM.
Does the test light illuminate?All
Ye s®Go To 5
No®Go To 10
5 Turn the ignition off.
Remove the A/C Clutch Relay from the IPM.
Turn the ignition on.
Using a 12-volt test light connected to 12-volts, probe the A/C Clutch Relay circuit in
the IPM.
With the DRBIIIt, actuate the A/C Clutch Relay.
Does the test light flash on and off?All
Ye s®Replace the A/C Clutch Relay.
Perform POWERTRAIN VERIFICATION TEST VER - 5.
No®Go To 6
6 Turn the ignition off.
Disconnect the Intelligent Power Module C3 harness connector.
Turn the ignition on.
Using a 12-volt test light connected to 12-volts, probe the A/C Clutch Relay Control
circuit in the IPM harness connector.
With the DRBIIIt, actuate the A/C Clutch Relay.
Does the test light flash on and off?All
Ye s®Replace the IPM Fused & Relay Center.
Perform POWERTRAIN VERIFICATION TEST VER - 5.
No®Go To 7
240
HEATING & A/C
P0645-A/C CLUTCH RELAY CKT ÐContinued
Page 4046 of 4284
TEST ACTION APPLICABILITY
15 Turn the ignition off.
Disconnect the S/C Servo harness connector.
Using a 12-volt test light connected to 12-volts, probe the ground circuit in the S/C
Servo harness connector.
Does the test light illuminate brightly?All
Ye s®Go To 16
No®Repair the ground circuit for an open.
Perform POWERTRAIN VERIFICATION TEST VER - 4.
16WARNING: WHEN THE ENGINE IS OPERATING, DO NOT STAND IN A
DIRECT LINE WITH THE FAN. DO NOT PUT YOUR HANDS NEAR THE
PULLEYS, BELTS OR FAN. DO NOT WEAR LOOSE CLOTHING.
NOTE: The conditions that set the DTC are not present at this time. The
following list may help in identifying the intermittent condition.
With the engine running at normal operating temperature, monitor the DRB
parameters related to the DTC while wiggling the wiring harness. Look for param-
eter values to change and/or a DTC to set.
Review the DRB Freeze Frame information. If possible, try to duplicate the
conditions under which the DTC was set.
Refer to any Technical Service Bulletins (TSB) that may apply.
Visually inspect the related wiring harness. Look for any chafed, pierced, pinched, or
partially broken wires.
Visually inspect the related wiring harness connectors. Look for broken, bent, pushed
out, or corroded terminals.
Were any of the above conditions present?All
Ye s®Repair as necessary
Perform POWERTRAIN VERIFICATION TEST VER - 4.
No®Test Complete.
252
SPEED CONTROL
P1595-SPEED CONTROL SOLENOID CIRCUITS ÐContinued
Page 4053 of 4284

TEST ACTION APPLICABILITY
4 Turn ignition off.
Remove the Starter Relay from PDC.
WARNING: The Parking Brake must be on and the Transmission must be in
park for a vehicle equipped with an automatic transmission.
Warning: The engine may be cranked in the next step. Keep away from
moving engine parts.
Briefly connect a jumper wire between Starter Relay B+ circuit and the Starter Relay
Output Circuits.
Did the Starter Motor crank the engine?All
Ye s®Go To 5
No®Go To 8
5 Turn the ignition off.
Remove the Starter Relay from the PDC.
Turn the ignition on.
Using a 12-volt test light, probe the Ignition Switch Output circuit in the Starter
Relay connector.
While observing 12-volt test light, hold ignition key in the start position.
Does the test light illuminate brightly?All
Ye s®Go To 6
No®Repair the Ignition Switch Output circuit for an open or high
resistance.
Perform POWERTRAIN VERIFICATION TEST VER-1.
6 Turn the ignition off.
Remove the Starter Relay from the PDC.
Disconnect the PCM harness connector.
Measure the Starter Relay Control circuit between the Relay terminal and the PCM
harness connector.
Is the resistance below 5.0 ohms?All
Ye s®Go To 7
No®Repair the Starter Relay Control circuit for an open.
Perform POWERTRAIN VERIFICATION TEST VER-1.
7 Turn the ignition off.
Install a substitute a Relay in the of the Starter Motor Relay.
Attempt to start the vehicle.
Does the engine crank over?All
Ye s®Replace the Starter Motor Relay.
Perform POWERTRAIN VERIFICATION TEST VER-1.
No®Replace and program the Powertrain Control Module in accor-
dance with the Service Information.
Perform POWERTRAIN VERIFICATION TEST VER-1.
259
STARTING
*NO CRANK CONDITION ÐContinued
Page 4122 of 4284
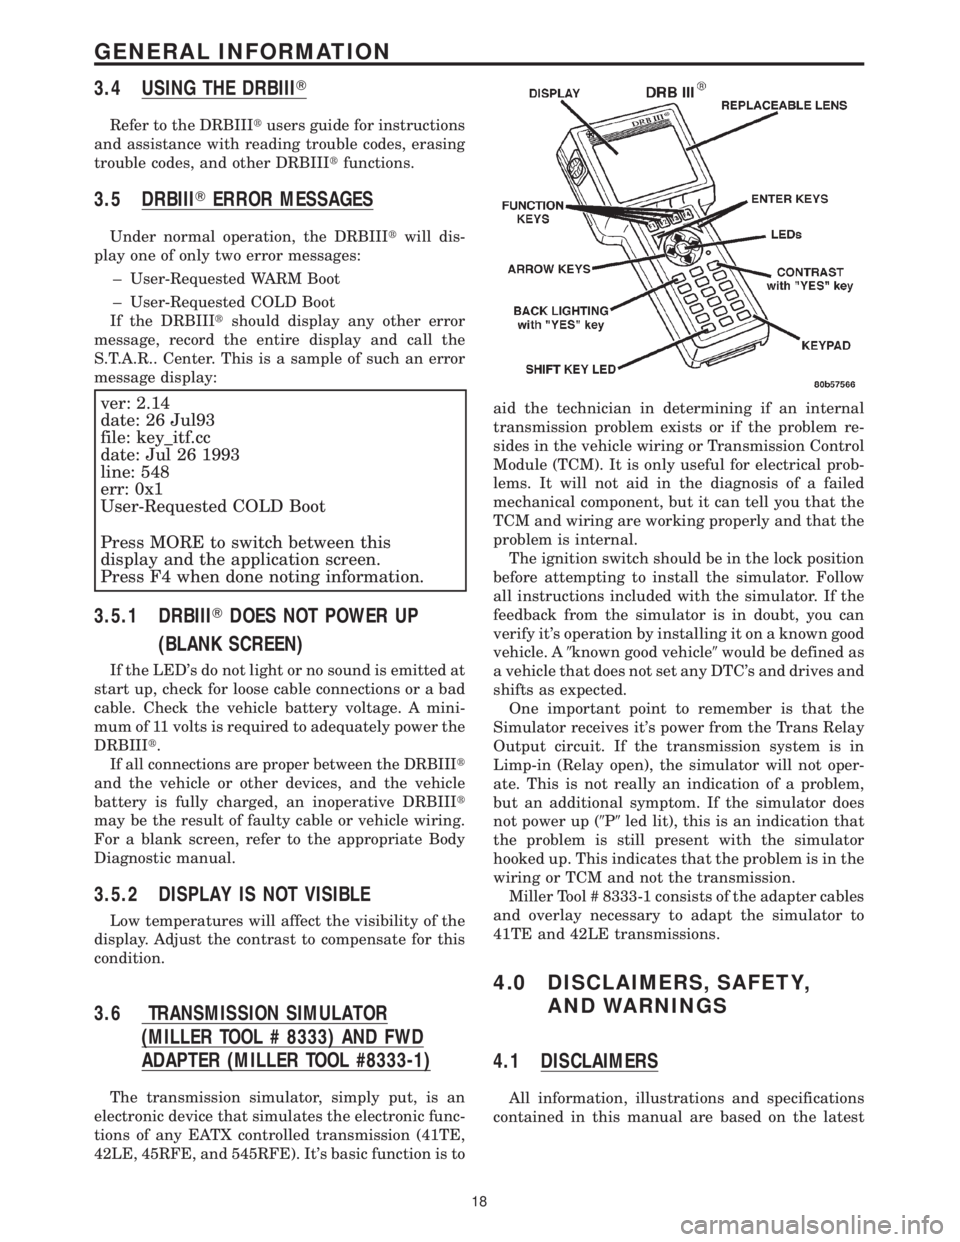
3.4 USING THE DRBIIIT
Refer to the DRBIIItusers guide for instructions
and assistance with reading trouble codes, erasing
trouble codes, and other DRBIIItfunctions.
3.5 DRBIIITERROR MESSAGES
Under normal operation, the DRBIIItwill dis-
play one of only two error messages:
± User-Requested WARM Boot
± User-Requested COLD Boot
If the DRBIIItshould display any other error
message, record the entire display and call the
S.T.A.R.. Center. This is a sample of such an error
message display:
ver: 2.14
date: 26 Jul93
file: key_itf.cc
date: Jul 26 1993
line: 548
err: 0x1
User-Requested COLD Boot
Press MORE to switch between this
display and the application screen.
Press F4 when done noting information.
3.5.1 DRBIIITDOES NOT POWER UP
(BLANK SCREEN)
If the LED's do not light or no sound is emitted at
start up, check for loose cable connections or a bad
cable. Check the vehicle battery voltage. A mini-
mum of 11 volts is required to adequately power the
DRBIIIt.
If all connections are proper between the DRBIIIt
and the vehicle or other devices, and the vehicle
battery is fully charged, an inoperative DRBIIIt
may be the result of faulty cable or vehicle wiring.
For a blank screen, refer to the appropriate Body
Diagnostic manual.
3.5.2 DISPLAY IS NOT VISIBLE
Low temperatures will affect the visibility of the
display. Adjust the contrast to compensate for this
condition.
3.6 TRANSMISSION SIMULATOR
(MILLER TOOL # 8333) AND FWD
ADAPTER (MILLER TOOL #8333-1)
The transmission simulator, simply put, is an
electronic device that simulates the electronic func-
tions of any EATX controlled transmission (41TE,
42LE, 45RFE, and 545RFE). It's basic function is toaid the technician in determining if an internal
transmission problem exists or if the problem re-
sides in the vehicle wiring or Transmission Control
Module (TCM). It is only useful for electrical prob-
lems. It will not aid in the diagnosis of a failed
mechanical component, but it can tell you that the
TCM and wiring are working properly and that the
problem is internal.
The ignition switch should be in the lock position
before attempting to install the simulator. Follow
all instructions included with the simulator. If the
feedback from the simulator is in doubt, you can
verify it's operation by installing it on a known good
vehicle. A9known good vehicle9would be defined as
a vehicle that does not set any DTC's and drives and
shifts as expected.
One important point to remember is that the
Simulator receives it's power from the Trans Relay
Output circuit. If the transmission system is in
Limp-in (Relay open), the simulator will not oper-
ate. This is not really an indication of a problem,
but an additional symptom. If the simulator does
not power up (9P9led lit), this is an indication that
the problem is still present with the simulator
hooked up. This indicates that the problem is in the
wiring or TCM and not the transmission.
Miller Tool # 8333-1 consists of the adapter cables
and overlay necessary to adapt the simulator to
41TE and 42LE transmissions.
4.0 DISCLAIMERS, SAFETY,
AND WARNINGS
4.1 DISCLAIMERS
All information, illustrations and specifications
contained in this manual are based on the latest
18
GENERAL INFORMATION