2001 CHRYSLER VOYAGER display
[x] Cancel search: displayPage 441 of 4284

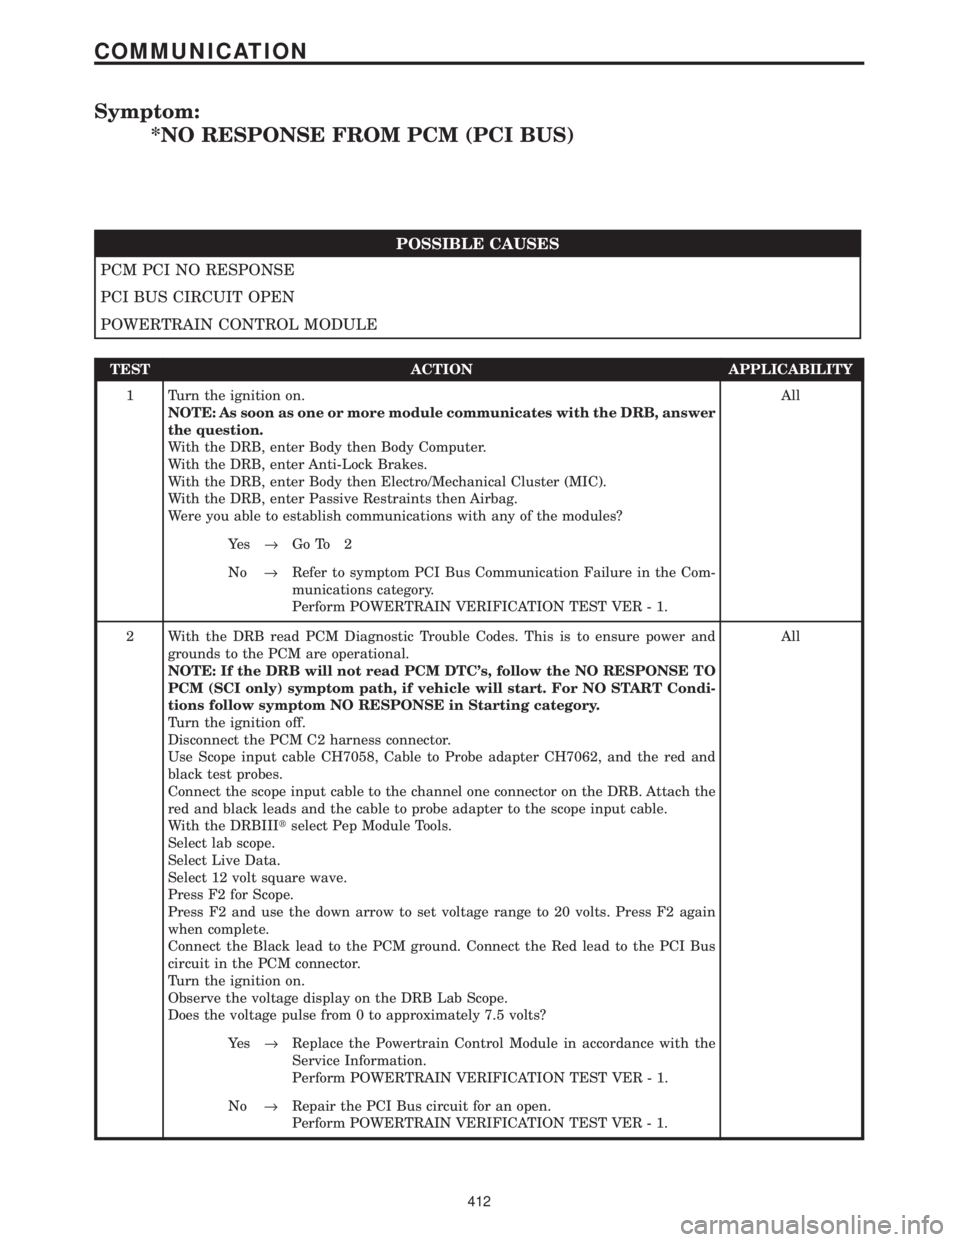
Symptom:
*NO RESPONSE FROM PCM (PCI BUS)
POSSIBLE CAUSES
PCM PCI NO RESPONSE
PCI BUS CIRCUIT OPEN
POWERTRAIN CONTROL MODULE
TEST ACTION APPLICABILITY
1 Turn the ignition on.
NOTE: As soon as one or more module communicates with the DRB, answer
the question.
With the DRB, enter Body then Body Computer.
With the DRB, enter Anti-Lock Brakes.
With the DRB, enter Body then Electro/Mechanical Cluster (MIC).
With the DRB, enter Passive Restraints then Airbag.
Were you able to establish communications with any of the modules?All
Ye s®Go To 2
No®Refer to symptom PCI Bus Communication Failure in the Com-
munications category.
Perform POWERTRAIN VERIFICATION TEST VER - 1.
2 With the DRB read PCM Diagnostic Trouble Codes. This is to ensure power and
grounds to the PCM are operational.
NOTE: If the DRB will not read PCM DTC's, follow the NO RESPONSE TO
PCM (SCI only) symptom path, if vehicle will start. For NO START Condi-
tions follow symptom NO RESPONSE in Starting category.
Turn the ignition off.
Disconnect the PCM C2 harness connector.
Use Scope input cable CH7058, Cable to Probe adapter CH7062, and the red and
black test probes.
Connect the scope input cable to the channel one connector on the DRB. Attach the
red and black leads and the cable to probe adapter to the scope input cable.
With the DRBIIItselect Pep Module Tools.
Select lab scope.
Select Live Data.
Select 12 volt square wave.
Press F2 for Scope.
Press F2 and use the down arrow to set voltage range to 20 volts. Press F2 again
when complete.
Connect the Black lead to the PCM ground. Connect the Red lead to the PCI Bus
circuit in the PCM connector.
Turn the ignition on.
Observe the voltage display on the DRB Lab Scope.
Does the voltage pulse from 0 to approximately 7.5 volts?All
Ye s®Replace the Powertrain Control Module in accordance with the
Service Information.
Perform POWERTRAIN VERIFICATION TEST VER - 1.
No®Repair the PCI Bus circuit for an open.
Perform POWERTRAIN VERIFICATION TEST VER - 1.
412
COMMUNICATION
Page 446 of 4284

TEST ACTION APPLICABILITY
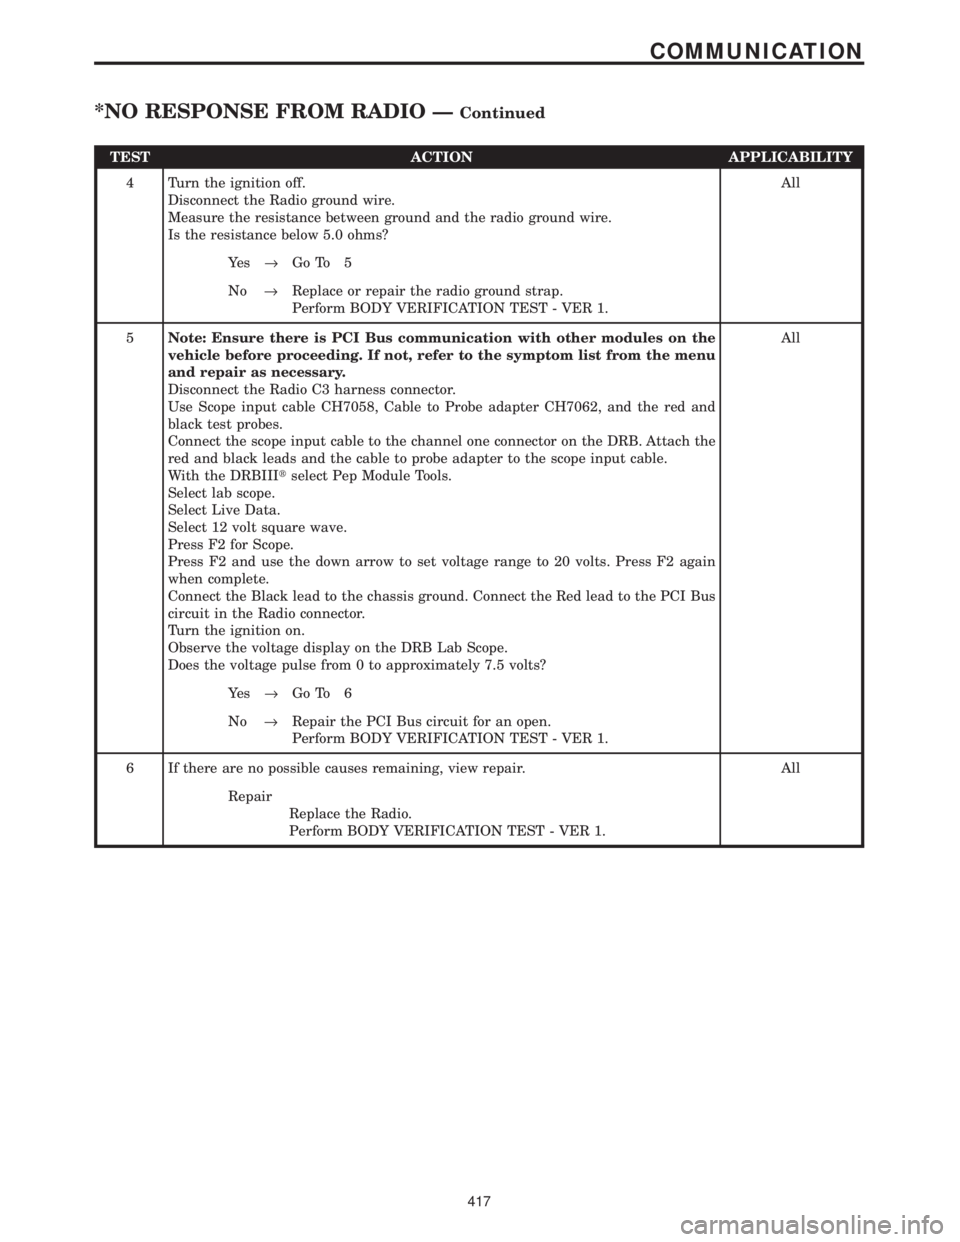
4 Turn the ignition off.
Disconnect the Radio ground wire.
Measure the resistance between ground and the radio ground wire.
Is the resistance below 5.0 ohms?All
Ye s®Go To 5
No®Replace or repair the radio ground strap.
Perform BODY VERIFICATION TEST - VER 1.
5Note: Ensure there is PCI Bus communication with other modules on the
vehicle before proceeding. If not, refer to the symptom list from the menu
and repair as necessary.
Disconnect the Radio C3 harness connector.
Use Scope input cable CH7058, Cable to Probe adapter CH7062, and the red and
black test probes.
Connect the scope input cable to the channel one connector on the DRB. Attach the
red and black leads and the cable to probe adapter to the scope input cable.
With the DRBIIItselect Pep Module Tools.
Select lab scope.
Select Live Data.
Select 12 volt square wave.
Press F2 for Scope.
Press F2 and use the down arrow to set voltage range to 20 volts. Press F2 again
when complete.
Connect the Black lead to the chassis ground. Connect the Red lead to the PCI Bus
circuit in the Radio connector.
Turn the ignition on.
Observe the voltage display on the DRB Lab Scope.
Does the voltage pulse from 0 to approximately 7.5 volts?All
Ye s®Go To 6
No®Repair the PCI Bus circuit for an open.
Perform BODY VERIFICATION TEST - VER 1.
6 If there are no possible causes remaining, view repair. All
Repair
Replace the Radio.
Perform BODY VERIFICATION TEST - VER 1.
417
COMMUNICATION
*NO RESPONSE FROM RADIO ÐContinued
Page 448 of 4284

TEST ACTION APPLICABILITY
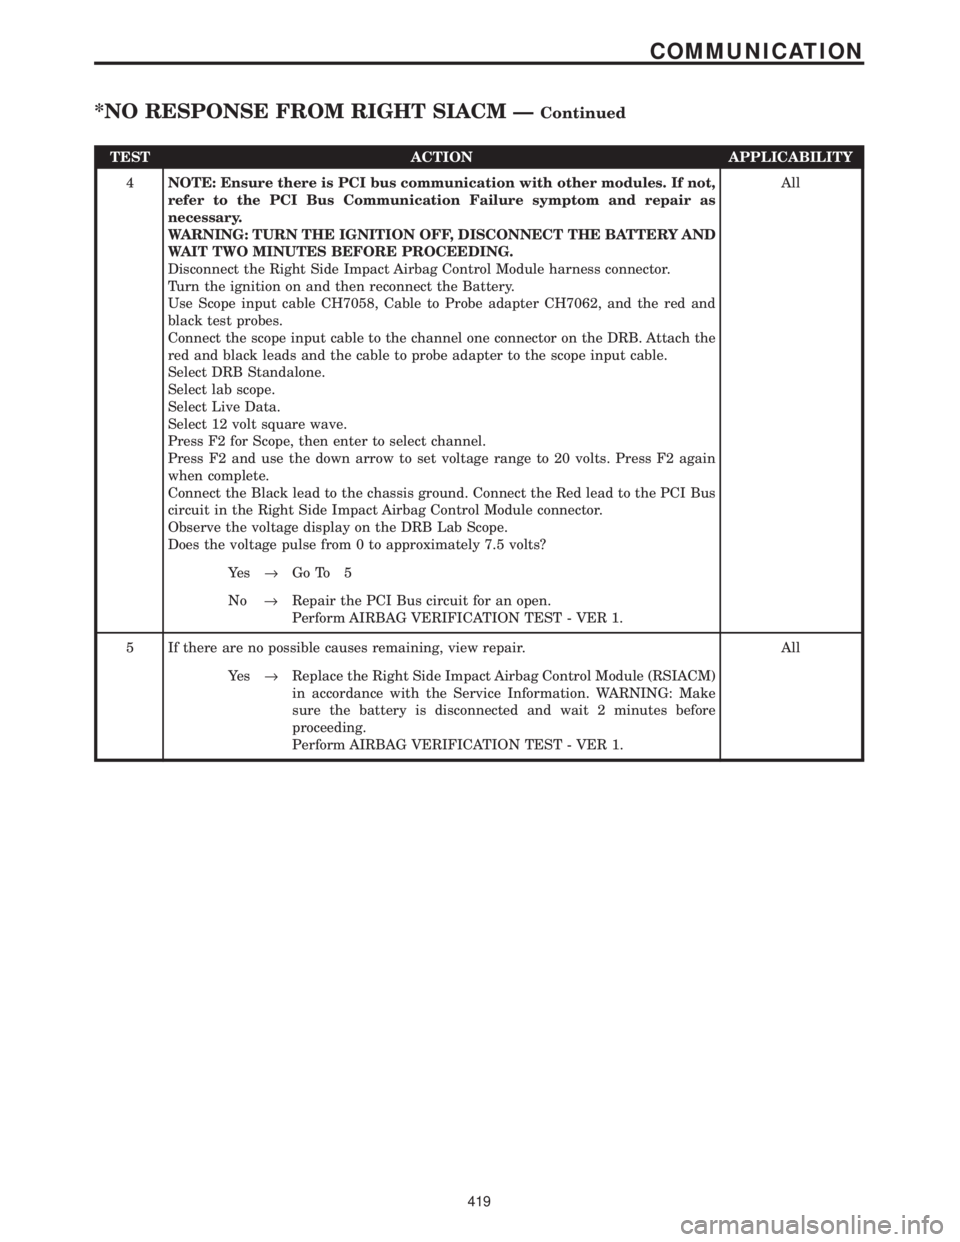
4NOTE: Ensure there is PCI bus communication with other modules. If not,
refer to the PCI Bus Communication Failure symptom and repair as
necessary.
WARNING: TURN THE IGNITION OFF, DISCONNECT THE BATTERY AND
WAIT TWO MINUTES BEFORE PROCEEDING.
Disconnect the Right Side Impact Airbag Control Module harness connector.
Turn the ignition on and then reconnect the Battery.
Use Scope input cable CH7058, Cable to Probe adapter CH7062, and the red and
black test probes.
Connect the scope input cable to the channel one connector on the DRB. Attach the
red and black leads and the cable to probe adapter to the scope input cable.
Select DRB Standalone.
Select lab scope.
Select Live Data.
Select 12 volt square wave.
Press F2 for Scope, then enter to select channel.
Press F2 and use the down arrow to set voltage range to 20 volts. Press F2 again
when complete.
Connect the Black lead to the chassis ground. Connect the Red lead to the PCI Bus
circuit in the Right Side Impact Airbag Control Module connector.
Observe the voltage display on the DRB Lab Scope.
Does the voltage pulse from 0 to approximately 7.5 volts?All
Ye s®Go To 5
No®Repair the PCI Bus circuit for an open.
Perform AIRBAG VERIFICATION TEST - VER 1.
5 If there are no possible causes remaining, view repair. All
Ye s®Replace the Right Side Impact Airbag Control Module (RSIACM)
in accordance with the Service Information. WARNING: Make
sure the battery is disconnected and wait 2 minutes before
proceeding.
Perform AIRBAG VERIFICATION TEST - VER 1.
419
COMMUNICATION
*NO RESPONSE FROM RIGHT SIACM ÐContinued
Page 451 of 4284

TEST ACTION APPLICABILITY
6Note: Ensure there is PCI Bus communication with other modules on the
vehicle before proceeding. If not, refer to the symptom list from the menu
and repair as necessary.
Disconnect the TCM harness connector.
Use Scope input cable CH7058, Cable to Probe adapter CH7062, and the red and
black test probes.
Connect the scope input cable to the channel one connector on the DRB. Attach the
red and black leads and the cable to probe adapter to the scope input cable.
With the DRBIIItselect Pep Module Tools.
Select lab scope.
Select Live Data.
Select 12 volt square wave.
Press F2 for Scope.
Press F2 and use the down arrow to set voltage range to 20 volts. Press F2 again
when complete.
Connect the Black lead to the chassis ground. Connect the Red lead to the PCI Bus
circuit in the TCM connector.
Turn the ignition on.
Observe the voltage display on the DRB Lab Scope.
Does the voltage pulse from 0 to approximately 7.5 volts?All
Ye s®Go To 7
No®Repair the PCI Bus circuit for an open.
Perform 41TE TRANSMISSION VERIFICATION TEST - VER 1.
7 If there are no possible causes remaining, view repair. All
Repair
Replace the Transmission Control Module in accordance with the
Service Information.
Perform 41TE TRANSMISSION VERIFICATION TEST - VER 1.
422
COMMUNICATION
*NO RESPONSE FROM TRANSMISSION CONTROL MODULE ÐContinued
Page 453 of 4284

TEST ACTION APPLICABILITY
3Note: Determine which modules this vehicle is equipped with before begin-
ning.
Connect the Diagnostic Junction Port Tester #8339 to the DRB and to the Diagnostic
Junction Port.
Using the DRB, along with the Diagnostic Junction Port Tester #8339, select
Junction Port Tool then PCI Bus Control Mode and follow the instructions on the
DRB.
Note: Perform this function on each pin that is equipped with a PCI Bus
circuit.
Did the DRB display No Modules Responding from any of the pins that were
scanned?All
Ye s®Go To 4
No®Check the PCI Bus circuit between the DLC and the Diagnostic
Junction Port connector for a short to voltage or to ground, repair
as necessary.
Perform BODY VERIFICATION TEST - VER 1.
4 Disconnect the Diagnostic Junction Port Tester cable from the DRB. Keep the tester
connected to the Diagnostic Junction Port.
Turn the ignition on.
Measure the voltage of the PCI Bus circuit on the Diagnostic Junction Port Tester
that the DRB displayed No Modules Responding.
Is the voltage steadily above 7.0 volts?All
Ye s®Go To 5
No®Go To 6
5 Measure the voltage of the PCI Bus circuit on the Diagnostic Junction Port tester
that previously measured above 7.0 volts.
Note: Turn the ignition off before disconnecting any module harness
connector then turn the ignition on.
Disconnect the module harness connector(s). Note: If the problem occurred on pins 1,
3, 9 or 12 of the Diagnostic Junction Port tester, observe the voltmeter while
disconnecting each module connector one at a time.
Is the voltage steadily above 7.0 volts with the module(s) disconnected?All
Ye s®Repair the PCI Bus circuit that measured over 7.0 volts for a
short to voltage.
Perform BODY VERIFICATION TEST - VER 1.
No®Replace the module that when disconnected the short to voltage
was eliminated.
Perform BODY VERIFICATION TEST - VER 1.
6 Disconnect the Diagnostic Junction Port Tester cable from the DRB. Keep the tester
connected to the Diagnostic Junction Port.
Turn the ignition off.
Disconnect the negative battery cable.
Measure the resistance between ground and the PCI Bus circuit on the Diagnostic
Junction Port Tester that the DRB displayed No Modules Responding.
Is the resistance below 100.0 ohms?All
Ye s®Go To 7
No®Go To 8
424
COMMUNICATION
*PCI BUS COMMUNICATION FAILURE ÐContinued
Page 455 of 4284

Symptom:
*HOOD AJAR CIRCUIT OPEN
POSSIBLE CAUSES
HOOD AJAR SWITCH GROUND CIRCUIT OPEN
INTERMITTENT CONDITION
HOOD AJAR SWITCH
HOOD AJAR SWITCH SENSE CIRCUIT OPEN
BODY CONTROL MODULE INTERNAL MALFUNCTION
TEST ACTION APPLICABILITY
1 Open the Hood.
With the DRBIIItin Inputs/Outputs, read the HOOD AJAR SW state.
Does the DRBIIItdisplay CLOSED?All
Ye s®The condition that caused this symptom is currently not present.
Inspect the related wiring harness for a possible intermittent
condition. Look for any chafed, pierced, pinched or partially
broken wires.
Perform BODY VERIFICATION TEST - VER 1.
No®Go To 2
2 Disconnect the Hood Ajar switch connector.
Using a 12-volt Test Light connected to 12-volts, test the Ground circuit for
continuity.
Does the light illuminate?All
Ye s®Go To 3
No®Repair the Ground circuit for an open.
Perform BODY VERIFICATION TEST - VER 1.
3 Disconnect the Hood Ajar Switch connector.
With the DRBIIItin Inputs/Outputs, read the HOOD AJAR SW state.
Connect a jumper wire between Sense circuit and the Ground circuit.
Does the DRBIIItdisplay HOOD AJAR SW: CLOSED?All
Ye s®Replace the Hood Ajar Switch.
Perform BODY VERIFICATION TEST - VER 1.
No®Go To 4
4 Disconnect the Body Control Module C3 harness connector.
Disconnect the Hood Ajar Switch harness connector.
Measure the resistance of the Sense circuit.
Is the resistance below 5.0 ohms?All
Ye s®Replace the Body Control Module.
Perform BODY VERIFICATION TEST - VER 1.
No®Repair the Hood Ajar Switch Sense circuit for an open.
Perform BODY VERIFICATION TEST - VER 1.
426
DOOR AJAR
Page 457 of 4284

Symptom:
*LEFT FRONT DOOR AJAR SWITCH SENSE CIRCUIT OPEN
POSSIBLE CAUSES
INTERMITTENT CONDITION
LEFT FRONT DOOR AJAR SWITCH GROUND CIRCUIT OPEN
LEFT FRONT DOOR LOCK MOTOR/AJAR SWITCH
LEFT FRONT DOOR AJAR SWITCH SENSE CIRCUIT OPEN
BODY CONTROL MODULE INTERNAL MALFUNCTION
TEST ACTION APPLICABILITY
1 Open the driver door.
With the DRBIIItin Inputs/Outputs, read the DR DOOR AJAR SW state.
Does the DRBIIItdisplay CLOSED?All
Ye s®The condition that caused this symptom is currently not present.
Inspect the related wiring harness for a possible intermittent
condition. Look for any chafed, pierced, pinched or partially
broken wires.
Perform BODY VERIFICATION TEST - VER 1.
No®Go To 2
2 Disconnect the Left Front Door Lock Motor/Ajar switch connector.
Using a 12-volt Test Light connected to 12-volts, test the Ground circuit for
continuity.
Does the light illuminate?All
Ye s®Go To 3
No®Repair the Ground circuit for an open.
Perform BODY VERIFICATION TEST - VER 1.
3 Disconnect the Left Front Door Lock Motor/Ajar Switch connector.
With the DRBIIItin Inputs/Outputs, read the DR DOOR AJAR SW state.
Connect a jumper wire between Sense circuit and the Ground circuit.
Does the DRBIIItdisplay DR DOOR AJAR SW: CLOSED?All
Ye s®Replace the Left Front Door Lock Motor/Ajar Switch.
Perform BODY VERIFICATION TEST - VER 1.
No®Go To 4
4 Disconnect the Body Control Module C3 harness connector.
Disconnect the Left Front Door Lock Motor/Ajar Switch harness connector.
Measure the resistance of the Sense circuit.
Is the resistance below 5.0 ohms?All
Ye s®Replace the Body Control Module.
Perform BODY VERIFICATION TEST - VER 1.
No®Repair the Left Front Door Ajar Switch Sense circuit for an open.
Perform BODY VERIFICATION TEST - VER 1.
428
DOOR AJAR
Page 462 of 4284

Symptom:
*LIFTGATE AJAR CIRCUIT OPEN
POSSIBLE CAUSES
INTERMITTENT CONDITION
LIFTGATE AJAR SWITCH GROUND CIRCUIT OPEN
LIFTGATE AJAR SWITCH
LIFTGATE AJAR SWITCH SENSE CIRCUIT OPEN
BODY CONTROL MODULE INTERNAL MALFUNCTION
TEST ACTION APPLICABILITY
1 Open the Liftgate.
With the DRBIIItin Inputs/Outputs, read the LIFTGATE AJAR SW state.
Does the DRBIIItdisplay CLOSED?All
Ye s®The condition that caused this symptom is currently not present.
Inspect the related wiring harness for a possible intermittent
condition. Look for any chafed, pierced, pinched or partially
broken wires.
Perform BODY VERIFICATION TEST - VER 1.
No®Go To 2
2 Disconnect the Liftgate Ajar switch connector.
Using a 12-volt Test Light connected to 12-volts, test the Ground circuit for
continuity.
Does the light illuminate?All
Ye s®Go To 3
No®Repair the Ground circuit for an open.
Perform BODY VERIFICATION TEST - VER 1.
3 Disconnect the Liftgate Ajar Switch connector.
With the DRBIIItin Inputs/Outputs, read the LIFTGATE AJAR SW state.
Connect a jumper wire between Sense circuit and the Ground circuit.
Does the DRBIIItdisplay LIFTGATE AJAR SW: CLOSED?All
Ye s®Replace the Liftgate Ajar Switch.
Perform BODY VERIFICATION TEST - VER 1.
No®Go To 4
4 Disconnect the Body Control Module C3 harness connector.
Disconnect the Liftgate Ajar Switch harness connector.
Measure the resistance of the Sense circuit.
Is the resistance below 5.0 ohms?All
Ye s®Replace the Body Control Module.
Perform BODY VERIFICATION TEST - VER 1.
No®Repair the Liftgate Ajar Switch Sense circuit for an open.
Perform BODY VERIFICATION TEST - VER 1.
433
DOOR AJAR