2000 NISSAN PATROL belt
[x] Cancel search: beltPage 1013 of 1033
![NISSAN PATROL 2000 Electronic Repair Manual 6. Touch ªSELF-DIAG [PAST]º.
7. If diagnostic codes are displayed on ªSELF-DIAG [PAST]º,
go to step 10.
If no malfunction is detected on ªSELF-DIAG [PAST]º, touch
ªBACKº and go back to ªSELEC NISSAN PATROL 2000 Electronic Repair Manual 6. Touch ªSELF-DIAG [PAST]º.
7. If diagnostic codes are displayed on ªSELF-DIAG [PAST]º,
go to step 10.
If no malfunction is detected on ªSELF-DIAG [PAST]º, touch
ªBACKº and go back to ªSELEC](/manual-img/5/57367/w960_57367-1012.png)
6. Touch ªSELF-DIAG [PAST]º.
7. If diagnostic codes are displayed on ªSELF-DIAG [PAST]º,
go to step 10.
If no malfunction is detected on ªSELF-DIAG [PAST]º, touch
ªBACKº and go back to ªSELECT DIAG MODEº.
NOTE:
Past malfunction for seat belt pre-tensioner system will not
be displayed on ªSELF-DIAG [PAST]º.
8. Touch ªTROUBLE DIAG RECORDº.
NOTE:
With ªTROUBLE DIAG RECORDº, diagnosis results previ-
ously erased by a reset operation can be displayed.
9. Diagnostic code is displayed on ªTROUBLE DIAG
RECORDº.
SRS697
SRS700
SRS702
SRS697
SRS704
TROUBLE DIAGNOSES Ð Supplemental Restraint System (SRS)
Self-diagnosis (Cont'd)
RS-1041
Page 1024 of 1033

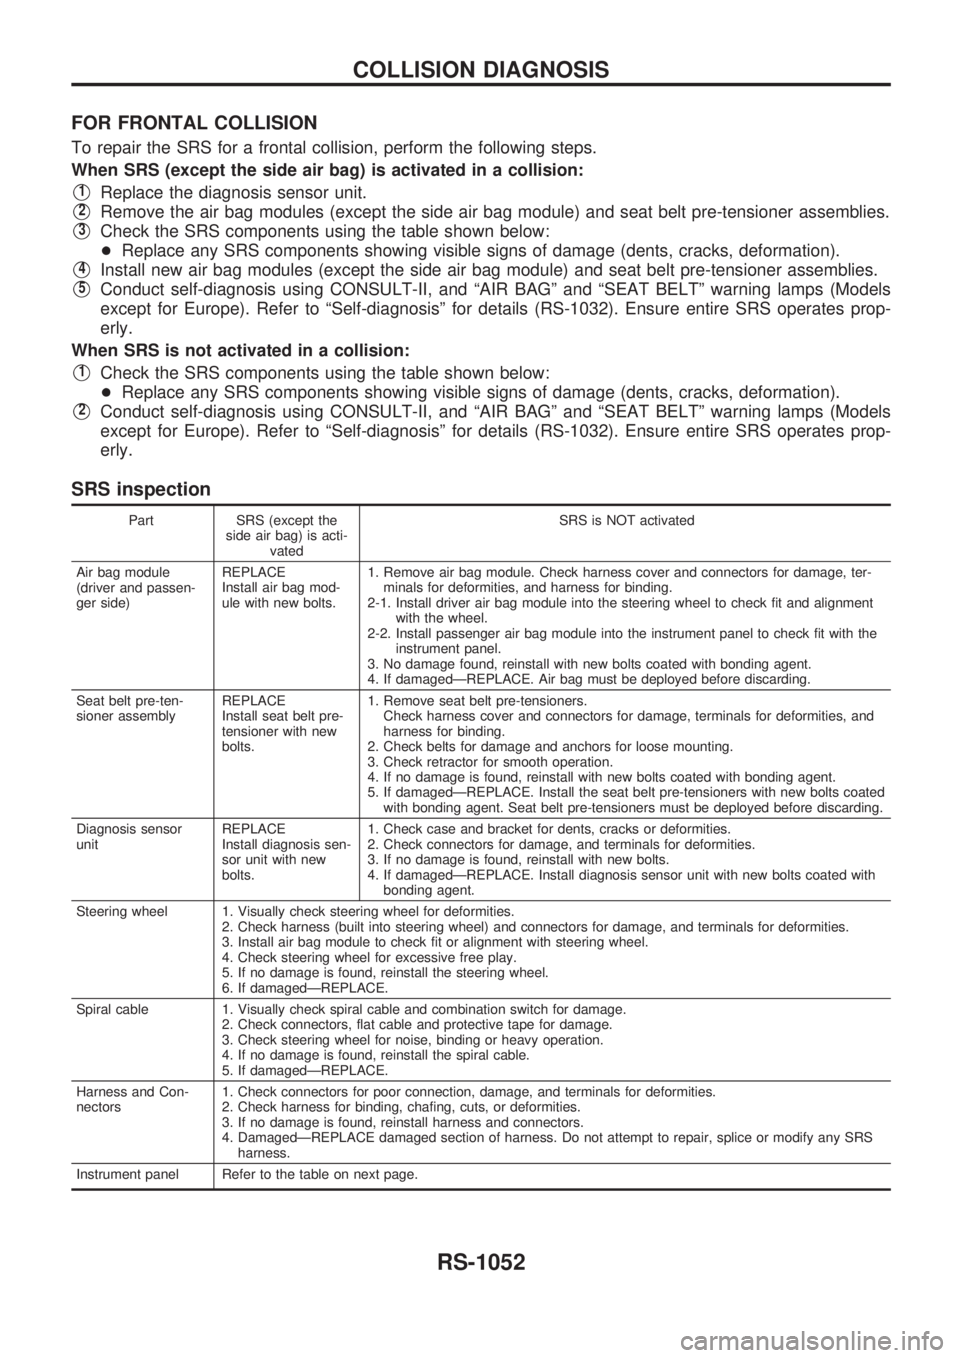
FOR FRONTAL COLLISION
To repair the SRS for a frontal collision, perform the following steps.
When SRS (except the side air bag) is activated in a collision:
V1Replace the diagnosis sensor unit.
V2Remove the air bag modules (except the side air bag module) and seat belt pre-tensioner assemblies.
V3Check the SRS components using the table shown below:
+Replace any SRS components showing visible signs of damage (dents, cracks, deformation).
V4Install new air bag modules (except the side air bag module) and seat belt pre-tensioner assemblies.
V5Conduct self-diagnosis using CONSULT-II, and ªAIR BAGº and ªSEAT BELTº warning lamps (Models
except for Europe). Refer to ªSelf-diagnosisº for details (RS-1032). Ensure entire SRS operates prop-
erly.
When SRS is not activated in a collision:
V1Check the SRS components using the table shown below:
+Replace any SRS components showing visible signs of damage (dents, cracks, deformation).
V2Conduct self-diagnosis using CONSULT-II, and ªAIR BAGº and ªSEAT BELTº warning lamps (Models
except for Europe). Refer to ªSelf-diagnosisº for details (RS-1032). Ensure entire SRS operates prop-
erly.
SRS inspection
Part SRS (except the
side air bag) is acti-
vatedSRS is NOT activated
Air bag module
(driver and passen-
ger side)REPLACE
Install air bag mod-
ule with new bolts.1. Remove air bag module. Check harness cover and connectors for damage, ter-
minals for deformities, and harness for binding.
2-1. Install driver air bag module into the steering wheel to check fit and alignment
with the wheel.
2-2. Install passenger air bag module into the instrument panel to check fit with the
instrument panel.
3. No damage found, reinstall with new bolts coated with bonding agent.
4. If damagedÐREPLACE. Air bag must be deployed before discarding.
Seat belt pre-ten-
sioner assemblyREPLACE
Install seat belt pre-
tensioner with new
bolts.1. Remove seat belt pre-tensioners.
Check harness cover and connectors for damage, terminals for deformities, and
harness for binding.
2. Check belts for damage and anchors for loose mounting.
3. Check retractor for smooth operation.
4. If no damage is found, reinstall with new bolts coated with bonding agent.
5. If damagedÐREPLACE. Install the seat belt pre-tensioners with new bolts coated
with bonding agent. Seat belt pre-tensioners must be deployed before discarding.
Diagnosis sensor
unitREPLACE
Install diagnosis sen-
sor unit with new
bolts.1. Check case and bracket for dents, cracks or deformities.
2. Check connectors for damage, and terminals for deformities.
3. If no damage is found, reinstall with new bolts.
4. If damagedÐREPLACE. Install diagnosis sensor unit with new bolts coated with
bonding agent.
Steering wheel 1. Visually check steering wheel for deformities.
2. Check harness (built into steering wheel) and connectors for damage, and terminals for deformities.
3. Install air bag module to check fit or alignment with steering wheel.
4. Check steering wheel for excessive free play.
5. If no damage is found, reinstall the steering wheel.
6. If damagedÐREPLACE.
Spiral cable 1. Visually check spiral cable and combination switch for damage.
2. Check connectors, flat cable and protective tape for damage.
3. Check steering wheel for noise, binding or heavy operation.
4. If no damage is found, reinstall the spiral cable.
5. If damagedÐREPLACE.
Harness and Con-
nectors1. Check connectors for poor connection, damage, and terminals for deformities.
2. Check harness for binding, chafing, cuts, or deformities.
3. If no damage is found, reinstall harness and connectors.
4. DamagedÐREPLACE damaged section of harness. Do not attempt to repair, splice or modify any SRS
harness.
Instrument panel Refer to the table on next page.
COLLISION DIAGNOSIS
RS-1052
Page 1026 of 1033

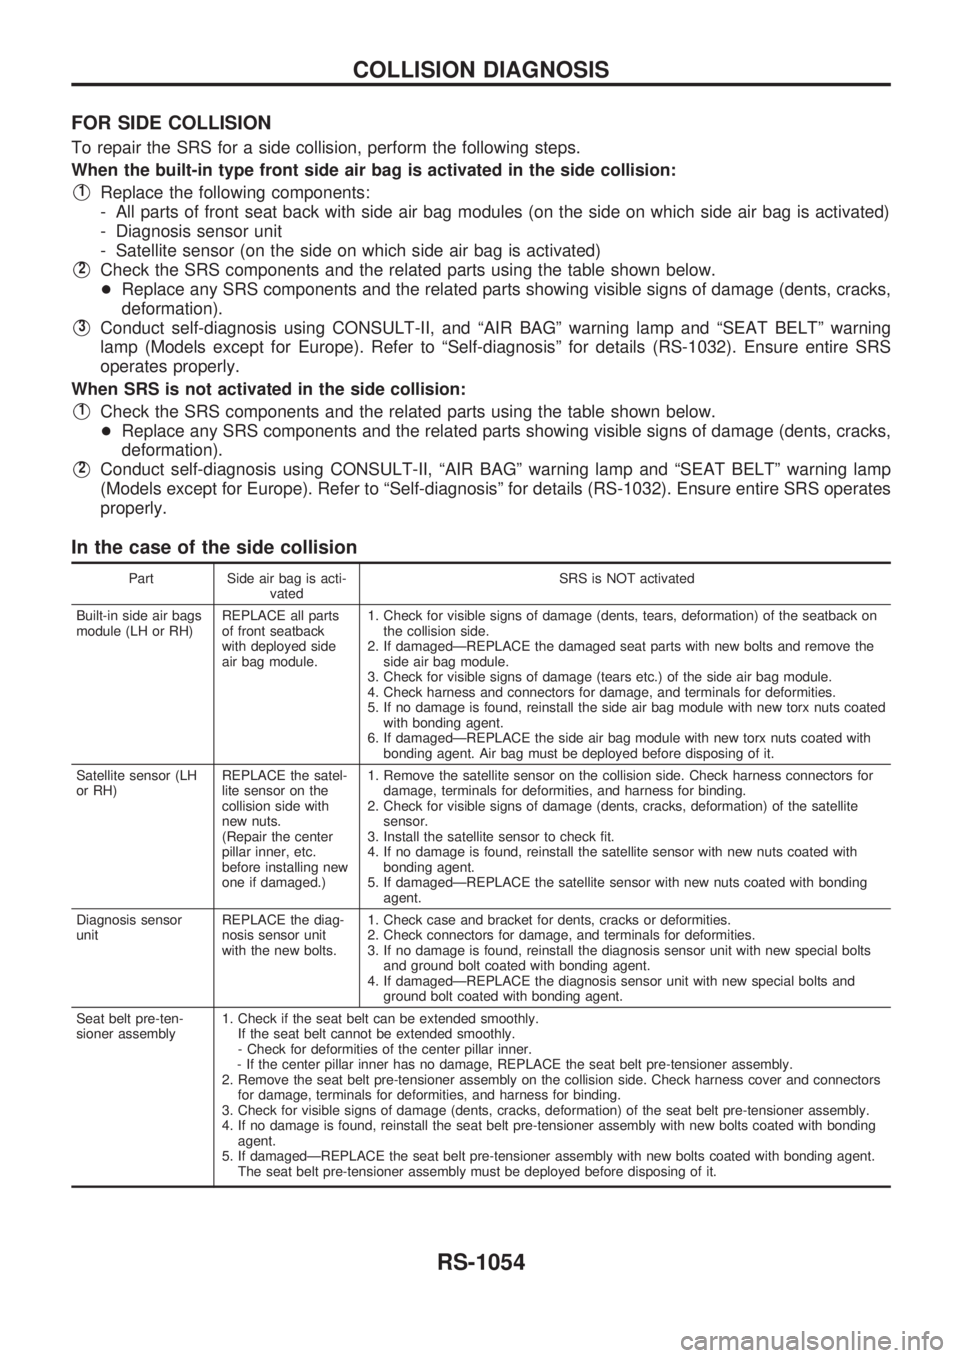
FOR SIDE COLLISION
To repair the SRS for a side collision, perform the following steps.
When the built-in type front side air bag is activated in the side collision:
V1Replace the following components:
- All parts of front seat back with side air bag modules (on the side on which side air bag is activated)
- Diagnosis sensor unit
- Satellite sensor (on the side on which side air bag is activated)
V2Check the SRS components and the related parts using the table shown below.
+Replace any SRS components and the related parts showing visible signs of damage (dents, cracks,
deformation).
V3Conduct self-diagnosis using CONSULT-II, and ªAIR BAGº warning lamp and ªSEAT BELTº warning
lamp (Models except for Europe). Refer to ªSelf-diagnosisº for details (RS-1032). Ensure entire SRS
operates properly.
When SRS is not activated in the side collision:
V1Check the SRS components and the related parts using the table shown below.
+Replace any SRS components and the related parts showing visible signs of damage (dents, cracks,
deformation).
V2Conduct self-diagnosis using CONSULT-II, ªAIR BAGº warning lamp and ªSEAT BELTº warning lamp
(Models except for Europe). Refer to ªSelf-diagnosisº for details (RS-1032). Ensure entire SRS operates
properly.
In the case of the side collision
Part Side air bag is acti-
vatedSRS is NOT activated
Built-in side air bags
module (LH or RH)REPLACE all parts
of front seatback
with deployed side
air bag module.1. Check for visible signs of damage (dents, tears, deformation) of the seatback on
the collision side.
2. If damagedÐREPLACE the damaged seat parts with new bolts and remove the
side air bag module.
3. Check for visible signs of damage (tears etc.) of the side air bag module.
4. Check harness and connectors for damage, and terminals for deformities.
5. If no damage is found, reinstall the side air bag module with new torx nuts coated
with bonding agent.
6. If damagedÐREPLACE the side air bag module with new torx nuts coated with
bonding agent. Air bag must be deployed before disposing of it.
Satellite sensor (LH
or RH)REPLACE the satel-
lite sensor on the
collision side with
new nuts.
(Repair the center
pillar inner, etc.
before installing new
one if damaged.)1. Remove the satellite sensor on the collision side. Check harness connectors for
damage, terminals for deformities, and harness for binding.
2. Check for visible signs of damage (dents, cracks, deformation) of the satellite
sensor.
3. Install the satellite sensor to check fit.
4. If no damage is found, reinstall the satellite sensor with new nuts coated with
bonding agent.
5. If damagedÐREPLACE the satellite sensor with new nuts coated with bonding
agent.
Diagnosis sensor
unitREPLACE the diag-
nosis sensor unit
with the new bolts.1. Check case and bracket for dents, cracks or deformities.
2. Check connectors for damage, and terminals for deformities.
3. If no damage is found, reinstall the diagnosis sensor unit with new special bolts
and ground bolt coated with bonding agent.
4. If damagedÐREPLACE the diagnosis sensor unit with new special bolts and
ground bolt coated with bonding agent.
Seat belt pre-ten-
sioner assembly1. Check if the seat belt can be extended smoothly.
If the seat belt cannot be extended smoothly.
- Check for deformities of the center pillar inner.
- If the center pillar inner has no damage, REPLACE the seat belt pre-tensioner assembly.
2. Remove the seat belt pre-tensioner assembly on the collision side. Check harness cover and connectors
for damage, terminals for deformities, and harness for binding.
3. Check for visible signs of damage (dents, cracks, deformation) of the seat belt pre-tensioner assembly.
4. If no damage is found, reinstall the seat belt pre-tensioner assembly with new bolts coated with bonding
agent.
5. If damagedÐREPLACE the seat belt pre-tensioner assembly with new bolts coated with bonding agent.
The seat belt pre-tensioner assembly must be deployed before disposing of it.
COLLISION DIAGNOSIS
RS-1054