2000 MITSUBISHI MONTERO fuel
[x] Cancel search: fuelPage 248 of 1839
GDI -Troubleshooting
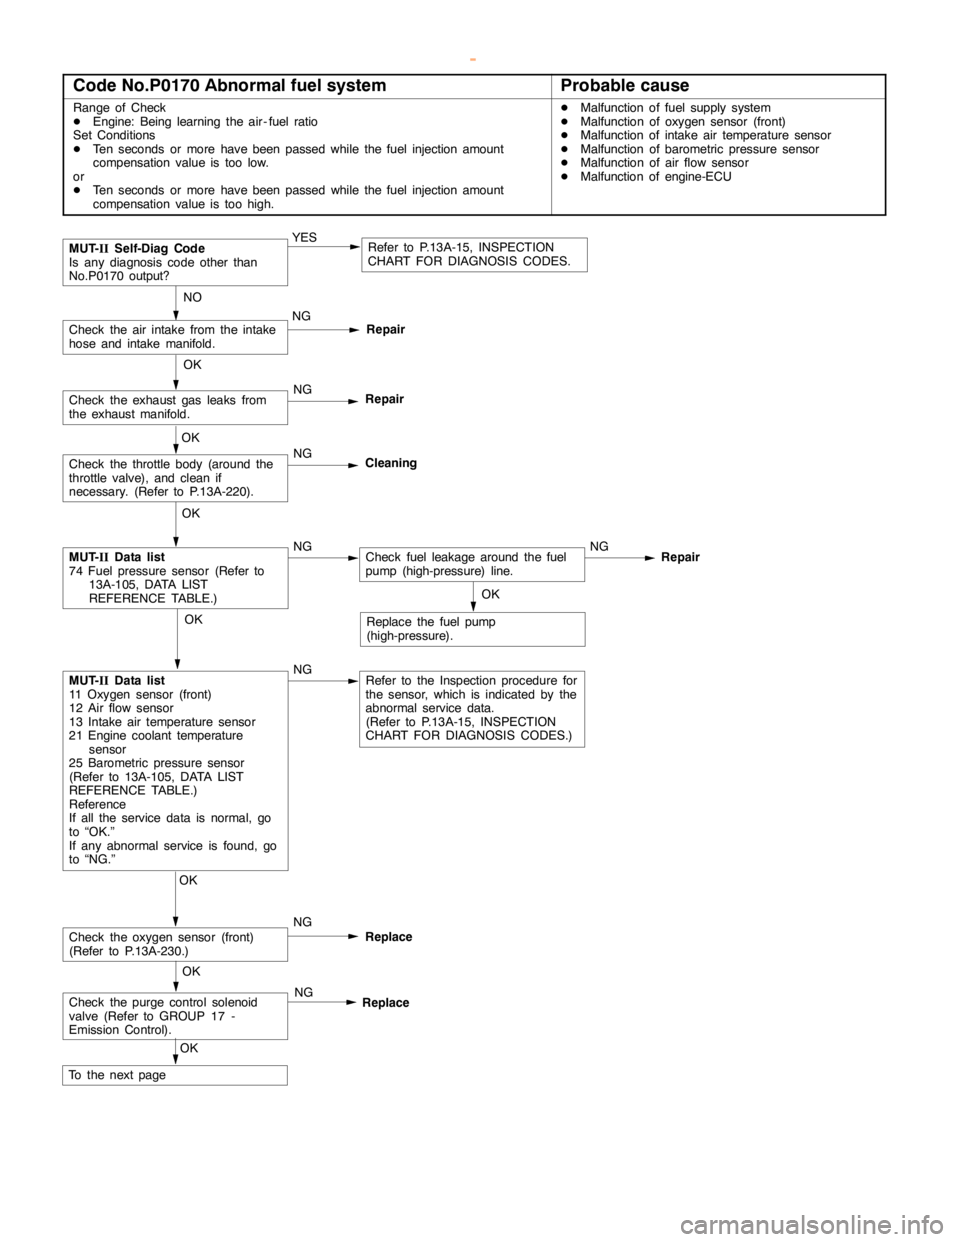
Code No.P0170 Abnormal fuel systemProbable cause
Range of Check
DEngine: Being learning the air - fuel ratio
Set Conditions
DTen seconds or more havebeenpassed while the fuel injection amount
compensation value is too low.
or
DTen seconds or more havebeenpassed while the fuel injection amount
compensation value is too high.DMalfunction of fuel supply system
DMalfunction of oxygen sensor (front)
DMalfunction of intake air temperature sensor
DMalfunction of barometric pressure sensor
DMalfunction of air flow sensor
DMalfunction of engine-ECU
Repair
OK
MUT-
IIData list
74 Fuel pressure sensor (Refer to
13A-105, DATA LIST
REFERENCE TABLE.)NGCheck fuel leakage around the fuel
pump (high-pressure) line.NG
NO
Check the air intake from the intake
hose and intake manifold.NG
Repair
OK
Check the oxygen sensor (front)
(Refer to P.13A-230.)NG
Replace
MUT-
IISelf-Diag Code
Is any diagnosis code other than
No.P0170 output?YESRefer to P.13A-15, INSPECTION
CHART FOR DIAGNOSIS CODES.
OK
Check the exhaust gas leaks from
the exhaust manifold.NG
Repair
OK
Check the throttle body (around the
throttle valve), and clean if
necessary. (Refer to P.13A-220).NG
Cleaning
OK
MUT-
IIData list
11 Oxygen sensor (front)
12 Air flow sensor
13 Intake air temperature sensor
21 Engine coolant temperature
sensor
25 Barometric pressure sensor
(Refer to 13A-105, DATA LIST
REFERENCE TABLE.)
Reference
If all the service data is normal, go
to “OK.”
If any abnormal service is found, go
to “NG.”NGRefer to the Inspection procedure for
the sensor, which is indicated by the
abnormal service data.
(Refer to P.13A-15, INSPECTION
CHART FOR DIAGNOSIS CODES.)OK
Replace the fuel pump
(high-pressure).
Check the purge control solenoid
valve (Refer to GROUP 17 -
Emission Control).NG
Replace
OK
To the nextpageOK
www.WorkshopManuals.co.uk
Purchased from www.WorkshopManuals.co.uk
Page 249 of 1839
GDI -Troubleshooting
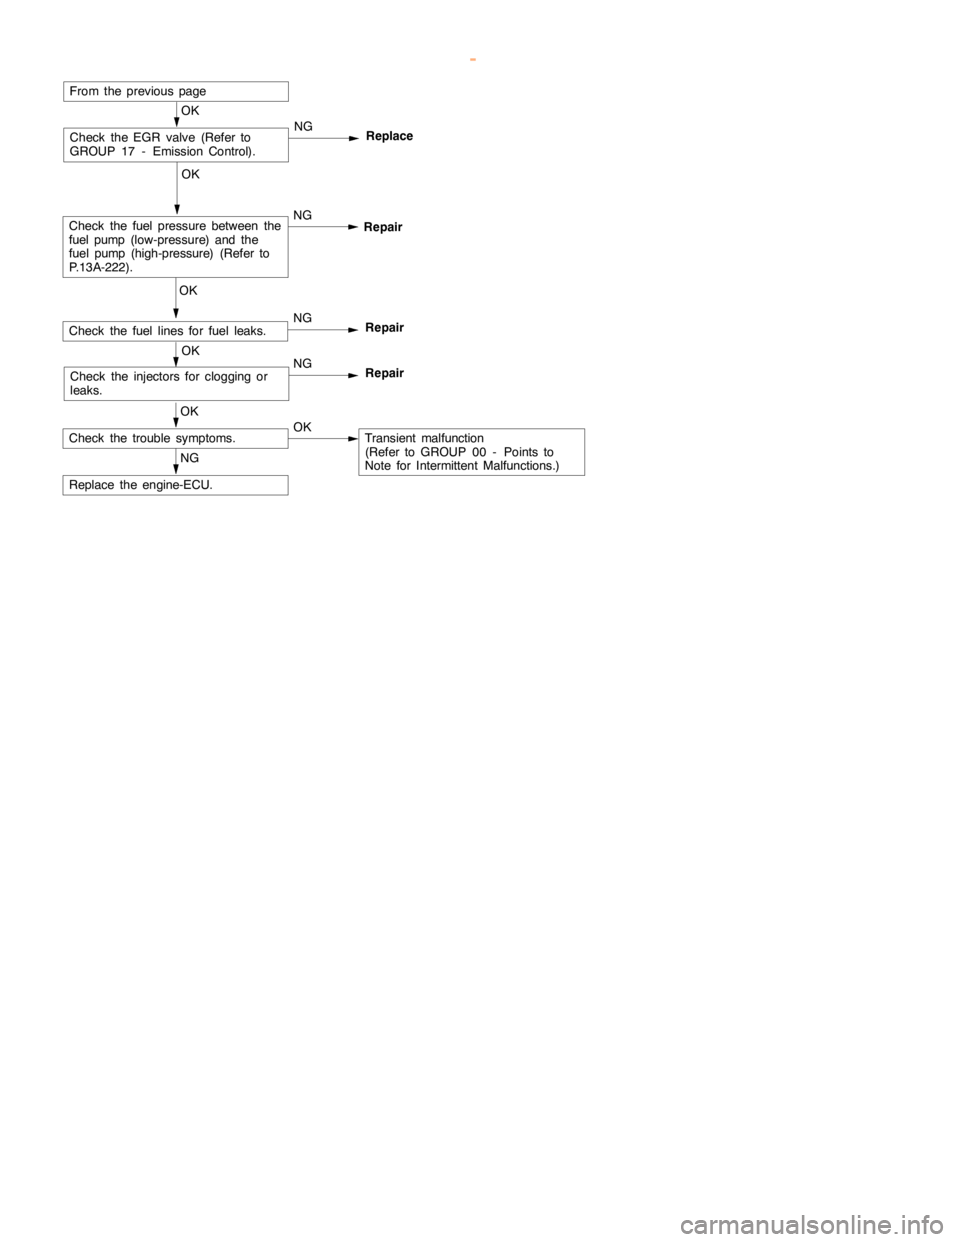
OK
Check the injectors for clogging or
leaks.NG
Repair
OK
Check the fuel lines for fuel leaks.NG
Repair
OK
Check the fuel pressure between the
fuel pump(low-pressure) and the
fuel pump (high-pressure)(Refer to
P.13A-222).NG
From the previouspage
OK
Check the trouble symptoms.OKTransient malfunction
(Refer to GROUP 00 - Points to
Note for Intermittent Malfunctions.)
NG
Replace the engine-ECU.
OK
Check the EGR valve (Refer to
GROUP 17 - Emission Control).NG
Replace
Repair
www.WorkshopManuals.co.uk
Purchased from www.WorkshopManuals.co.uk
Page 250 of 1839
GDI -Troubleshooting
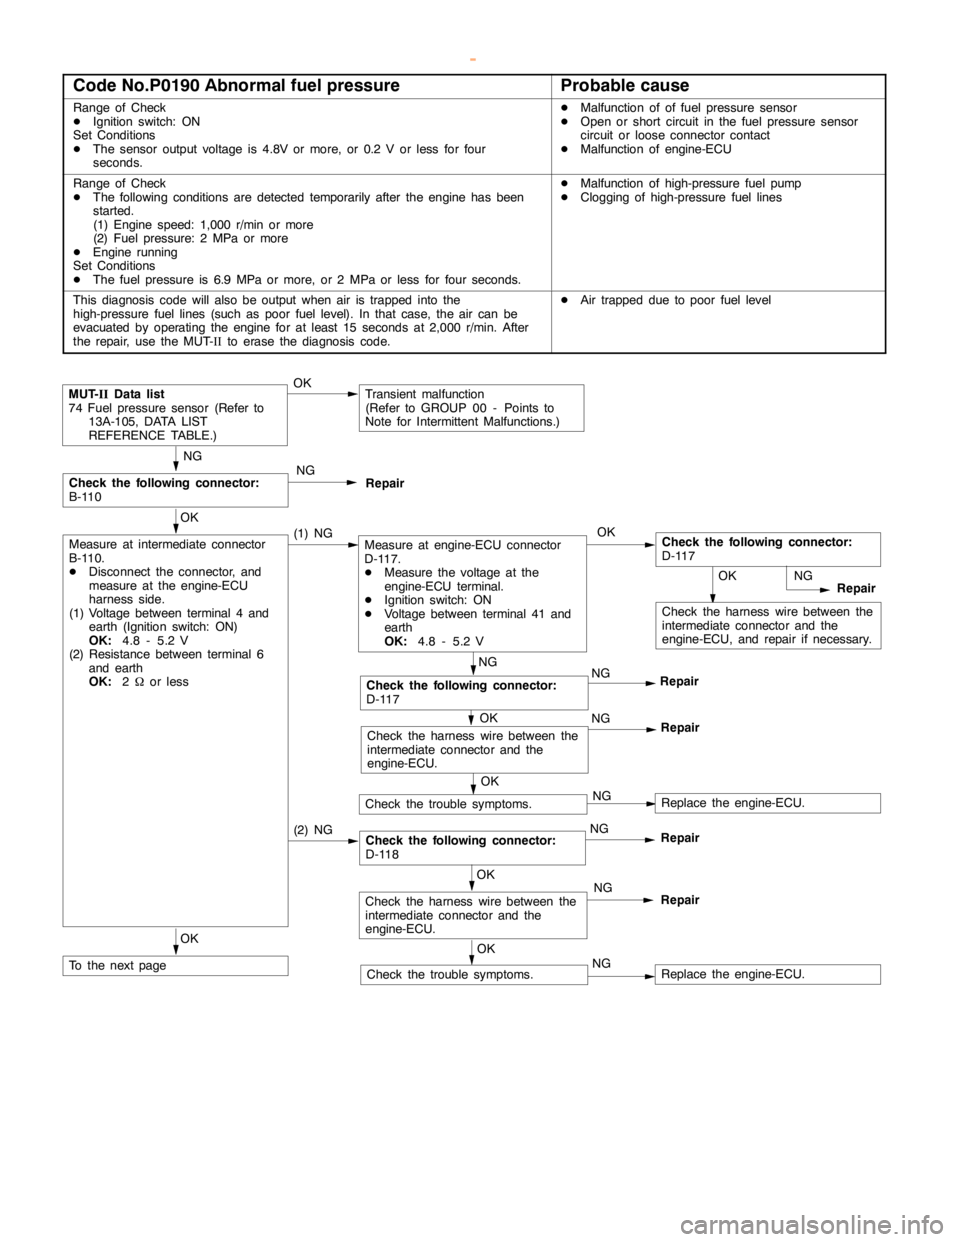
Code No.P0190 Abnormal fuel pressureProbable cause
Range of Check
DIgnition switch: ON
Set Conditions
DThe sensor output voltage is 4.8V or more, or 0.2 V or less for four
seconds.DMalfunction of of fuel pressure sensor
DOpen or short circuit in the fuel pressure sensor
circuit or loose connector contact
DMalfunction of engine-ECU
Range of Check
DThe following conditions are detected temporarily after the engine has been
started.
(1) Engine speed: 1,000 r/min or more
(2) Fuel pressure: 2 MPa or more
DEngine running
Set Conditions
DThe fuel pressure is 6.9 MPa or more, or 2 MPa or less for four seconds.DMalfunction of high-pressure fuel pump
DClogging of high-pressure fuel lines
This diagnosis code will also be output when air is trapped into the
high-pressure fuel lines (such as poor fuel level). In that case, the air can be
evacuated by operating the engine for atleast 15 seconds at 2,000 r/min. After
the repair, use the MUT-IIto erase the diagnosis code.DAir trapped due to poor fuel level
(2) NGCheck the following connector:
D-118NG
Repair
OK
Check the harness wire between the
intermediate connector and the
engine-ECU, and repair if necessary.
MUT-
IIData list
74 Fuel pressure sensor (Refer to
13A-105, DATA LIST
REFERENCE TABLE.)OKTransient malfunction
(Refer to GROUP 00 - Points to
Note for Intermittent Malfunctions.)
NG
Check the following connector:
B-110NG
Repair
OK
Measure at intermediate connector
B-110.
DDisconnect the connector, and
measure at the engine-ECU
harness side.
(1) Voltage between terminal 4 and
earth (Ignition switch: ON)
OK:
4.8 - 5.2 V
(2) Resistance between terminal 6
and earth
OK:
2Wor less(1) NGMeasure at engine-ECU connector
D-117.
DMeasure the voltage at the
engine-ECU terminal.
DIgnition switch: ON
DVoltage between terminal 41 and
earth
OK:
4.8 - 5.2 VOKCheck the following connector:
D-117
NG
Repair
NG
Check the following connector:
D-117NG
Repair
OK
Check the harness wire between the
intermediate connector and the
engine-ECU.NG
Repair
OK
Check the trouble symptoms.NGReplace the engine-ECU.
OK
Check the trouble symptoms.NGReplace the engine-ECU.
OK
To the nextpage
OK
Check the harness wire between the
intermediate connector and the
engine-ECU.NG
Repair
www.WorkshopManuals.co.uk
Purchased from www.WorkshopManuals.co.uk
Page 251 of 1839
GDI -Troubleshooting
NG
(2) NGCheck the following connector:
B - 111NG
Repair
OK
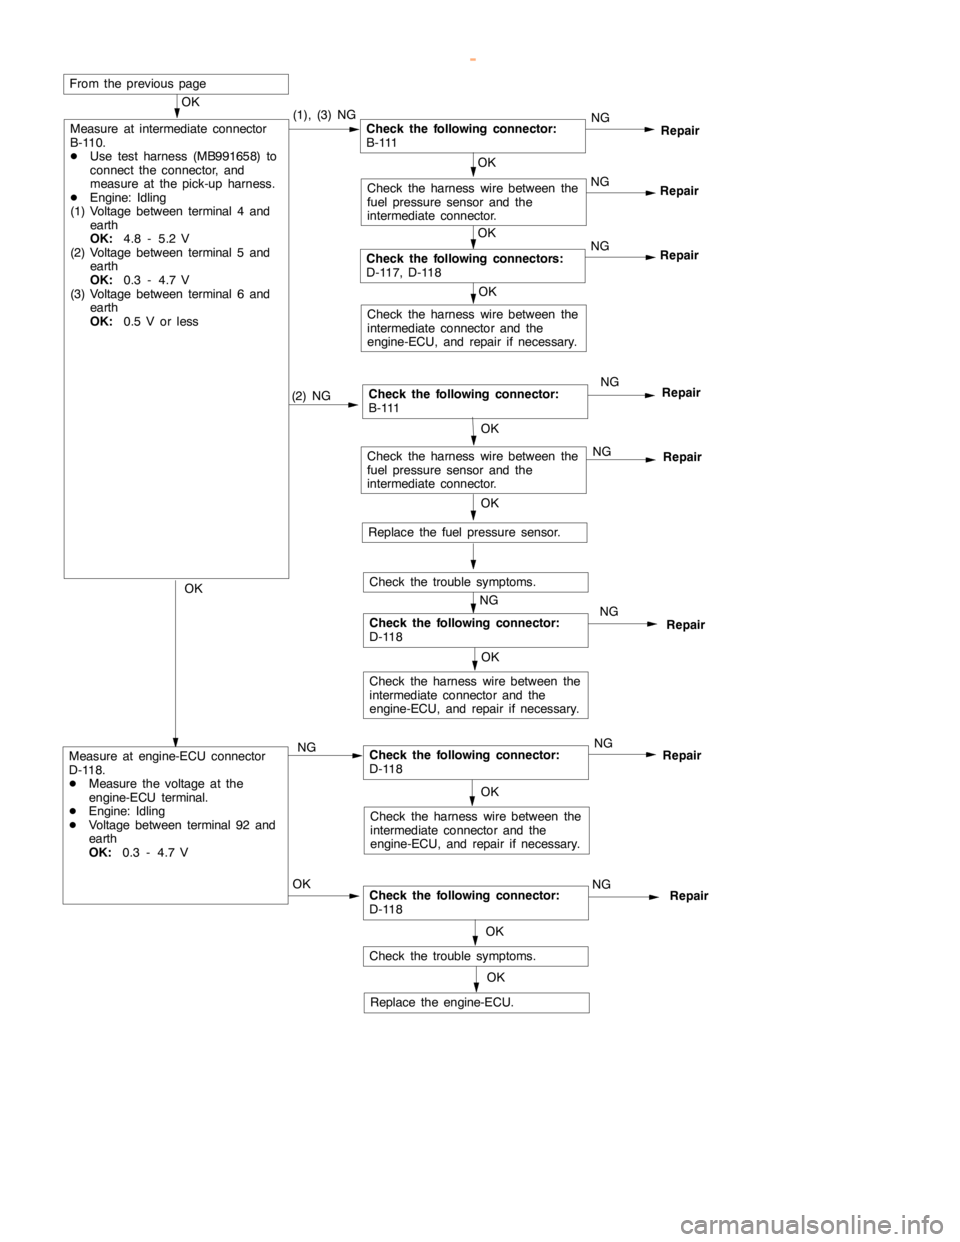
Measure at intermediate connector
B-110.
DUse test harness (MB991658) to
connect the connector, and
measure at the pick-up harness.
DEngine: Idling
(1) Voltage between terminal 4 and
earth
OK:
4.8 - 5.2 V
(2) Voltage between terminal 5 and
earth
OK:
0.3 - 4.7 V
(3) Voltage between terminal 6 and
earth
OK:
0.5 V or less(1), (3) NGCheck the following connector:
B - 111
OK
Check the following connectors:
D-117, D-118NG
Repair
OK
Check the harness wire between the
fuel pressure sensor and the
intermediate connector.NG
Repair
From the previouspage
OK
Check the harness wire between the
intermediate connector and the
engine-ECU, and repair if necessary.
OK
Check the harness wire between the
fuel pressure sensor and the
intermediate connector.NG
Repair
OK
Replace the fuel pressure sensor.
Check the trouble symptoms.
Check the following connector:
D-118NG
Repair
NG
Check the harness wire between the
intermediate connector and the
engine-ECU, and repair if necessary.
OK
Measure at engine-ECU connector
D-118.
DMeasure the voltage at the
engine-ECU terminal.
DEngine: Idling
DVoltage between terminal 92 and
earth
OK:
0.3 - 4.7 VNGCheck the following connector:
D-118NG
Repair
OK
Check the harness wire between the
intermediate connector and the
engine-ECU, and repair if necessary.
OKCheck the following connector:
D-118NG
Repair
OK
Check the trouble symptoms.
OK
Replace the engine-ECU.OKRepair
www.WorkshopManuals.co.uk
Purchased from www.WorkshopManuals.co.uk
Page 252 of 1839
GDI -Troubleshooting
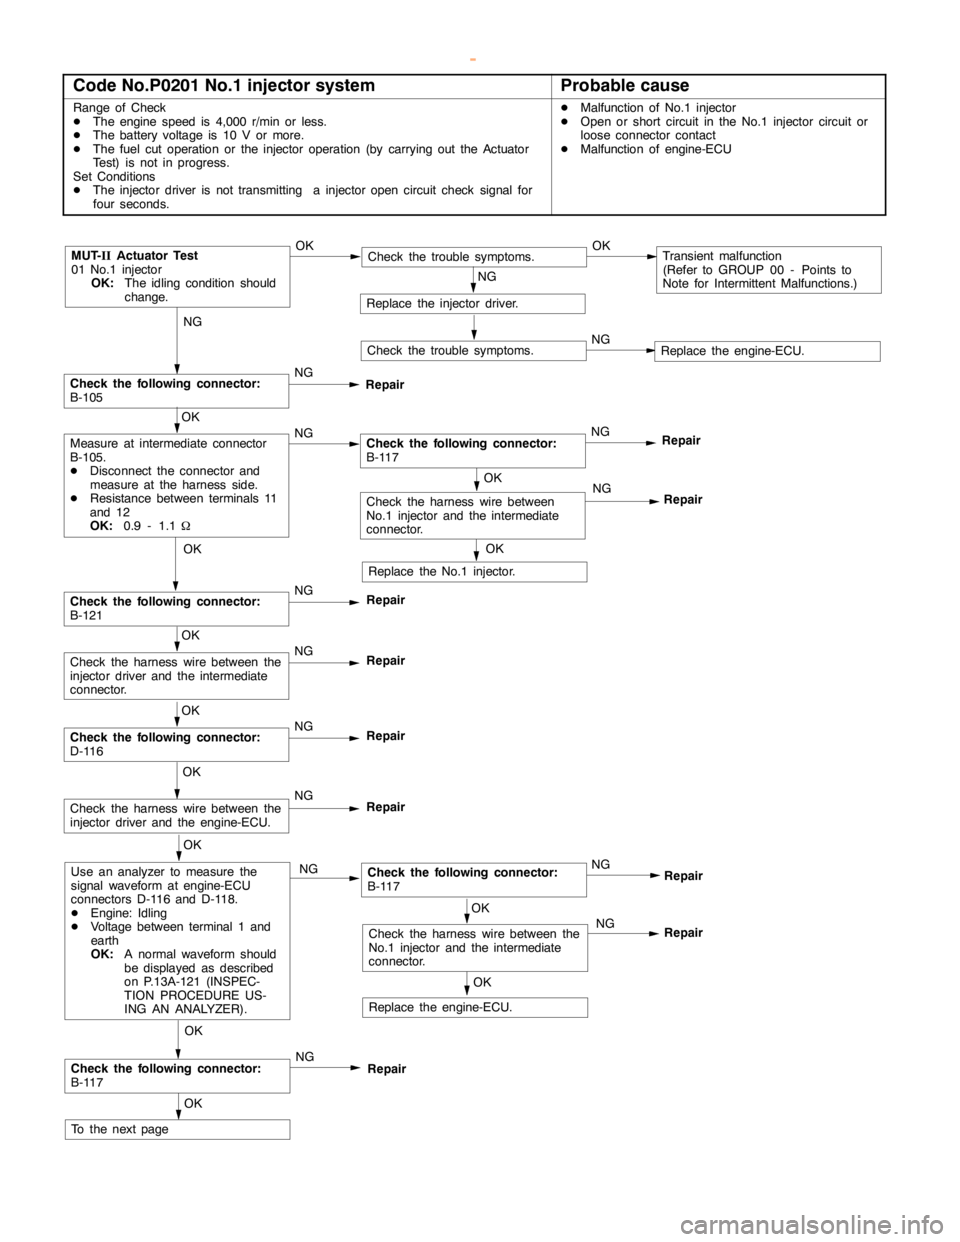
Code No.P0201 No.1 injector systemProbable cause
Range of Check
DThe enginespeed is 4,000 r/min or less.
DThe battery voltage is 10 V or more.
DThe fuel cut operation or the injector operation (by carrying out the Actuator
Test) is not in progress.
Set Conditions
DThe injector driver is not transmitting a injectoropencircuit check signal for
four seconds.DMalfunction of No.1 injector
DOpen or short circuit in the No.1 injector circuit or
loose connector contact
DMalfunction of engine-ECU
NG
Check the following connector:
B-105NG
Repair
OK
NG
Repair
MUT-
IIActuator Test
01 No.1 injector
OK:
The idling condition should
change.OKCheck the trouble symptoms.OKTransient malfunction
(Refer to GROUP 00 - Points to
Note for Intermittent Malfunctions.)
NG
Replace the injector driver.
Check the trouble symptoms.NGReplace the engine-ECU.
OK
Measure at intermediate connector
B-105.
DDisconnect the connector and
measure at the harness side.
DResistance between terminals 11
and 12
OK:
0.9 - 1.1WNGCheck the following connector:
B-117NG
Repair
OK
Replace the No.1 injector.
OK
Check the following connector:
B-121NG
Repair
OK
Check the harness wire between the
injector driver and the intermediate
connector.NG
Repair
OK
Check the following connector:
D-116NG
Repair
OK
Check the harness wire between the
injector driver and the engine-ECU.NG
Repair
OK
Use an analyzer to measure the
signal waveform at engine-ECU
connectors D-116 and D-118.
DEngine: Idling
DVoltage between terminal 1 and
earth
OK:
A normal waveform should
be displayed as described
on P.13A-121 (INSPEC-
TION PROCEDURE US-
ING AN ANALYZER).NGCheck the following connector:
B-117
OK
Check the following connector:
B-117NG
Repair
OK
To the nextpageNG
OK
OK
Check the harness wire between the
No.1 injector and the intermediate
connector.NG
Replace the engine-ECU.
Repair
Repair
Check the harness wire between
No.1 injector and the intermediate
connector.
www.WorkshopManuals.co.uk
Purchased from www.WorkshopManuals.co.uk
Page 254 of 1839
GDI -Troubleshooting
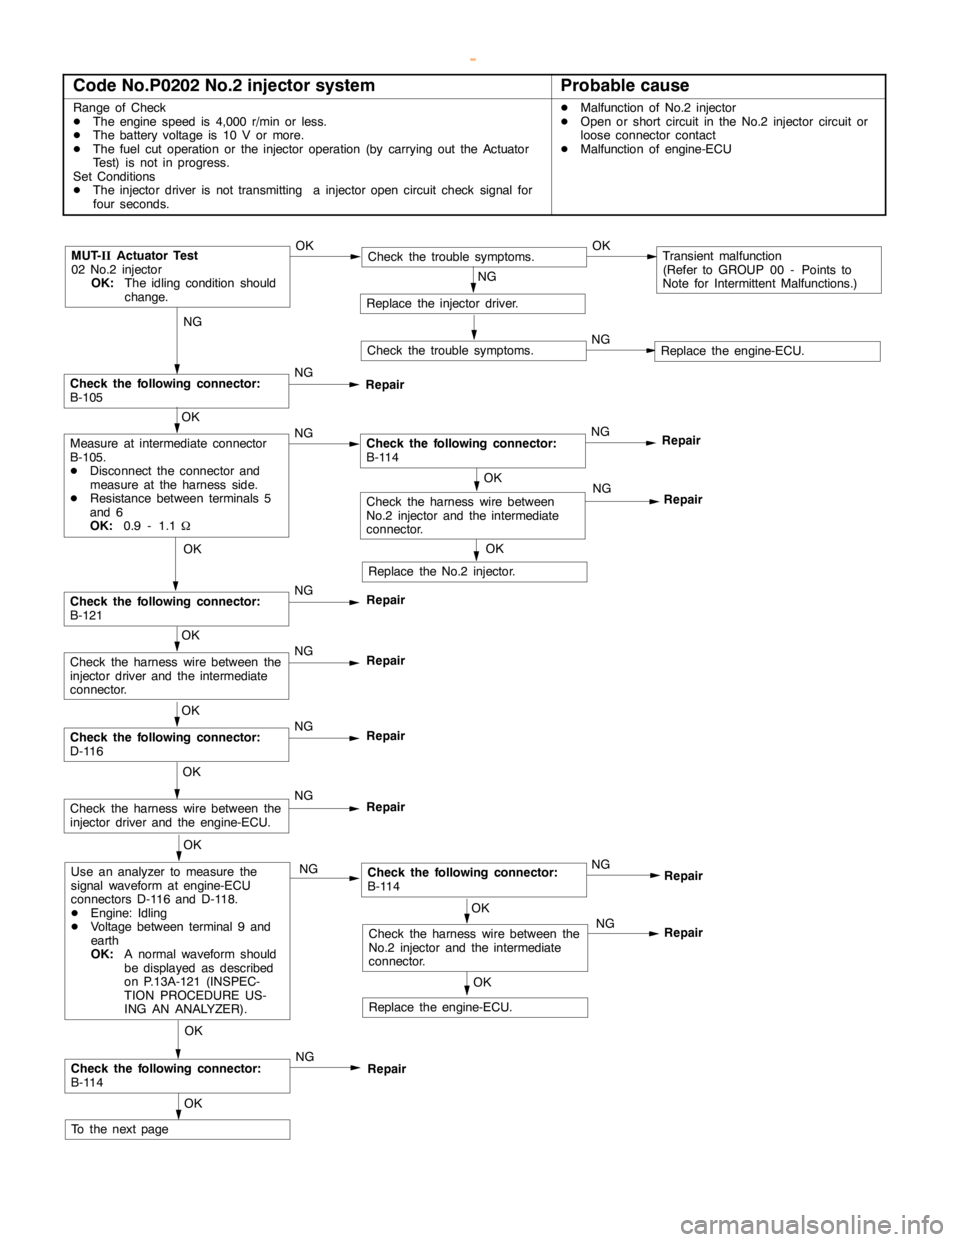
Code No.P0202 No.2 injector systemProbable cause
Range of Check
DThe enginespeed is 4,000 r/min or less.
DThe battery voltage is 10 V or more.
DThe fuel cut operation or the injector operation (by carrying out the Actuator
Test) is not in progress.
Set Conditions
DThe injector driver is not transmitting a injectoropencircuit check signal for
four seconds.DMalfunction of No.2 injector
DOpen or short circuit in the No.2 injector circuit or
loose connector contact
DMalfunction of engine-ECU
NG
Check the following connector:
B-105NG
Repair
OK
NG
Repair
MUT-
IIActuator Test
02 No.2 injector
OK:
The idling condition should
change.OKCheck the trouble symptoms.OKTransient malfunction
(Refer to GROUP 00 - Points to
Note for Intermittent Malfunctions.)
NG
Replace the injector driver.
Check the trouble symptoms.NGReplace the engine-ECU.
OK
Measure at intermediate connector
B-105.
DDisconnect the connector and
measure at the harness side.
DResistance between terminals 5
and 6
OK:
0.9 - 1.1WNGCheck the following connector:
B-114NG
Repair
OK
Replace the No.2 injector.
OK
Check the following connector:
B-121NG
Repair
OK
Check the harness wire between the
injector driver and the intermediate
connector.NG
Repair
OK
Check the following connector:
D-116NG
Repair
OK
Check the harness wire between the
injector driver and the engine-ECU.NG
Repair
OK
Use an analyzer to measure the
signal waveform at engine-ECU
connectors D-116 and D-118.
DEngine: Idling
DVoltage between terminal 9 and
earth
OK:
A normal waveform should
be displayed as described
on P.13A-121 (INSPEC-
TION PROCEDURE US-
ING AN ANALYZER).NGCheck the following connector:
B-114
OK
Check the following connector:
B-114NG
Repair
OK
To the nextpageNG
OK
OK
Check the harness wire between the
No.2 injector and the intermediate
connector.NG
Replace the engine-ECU.
Repair
Repair
Check the harness wire between
No.2 injector and the intermediate
connector.
www.WorkshopManuals.co.uk
Purchased from www.WorkshopManuals.co.uk
Page 256 of 1839
GDI -Troubleshooting
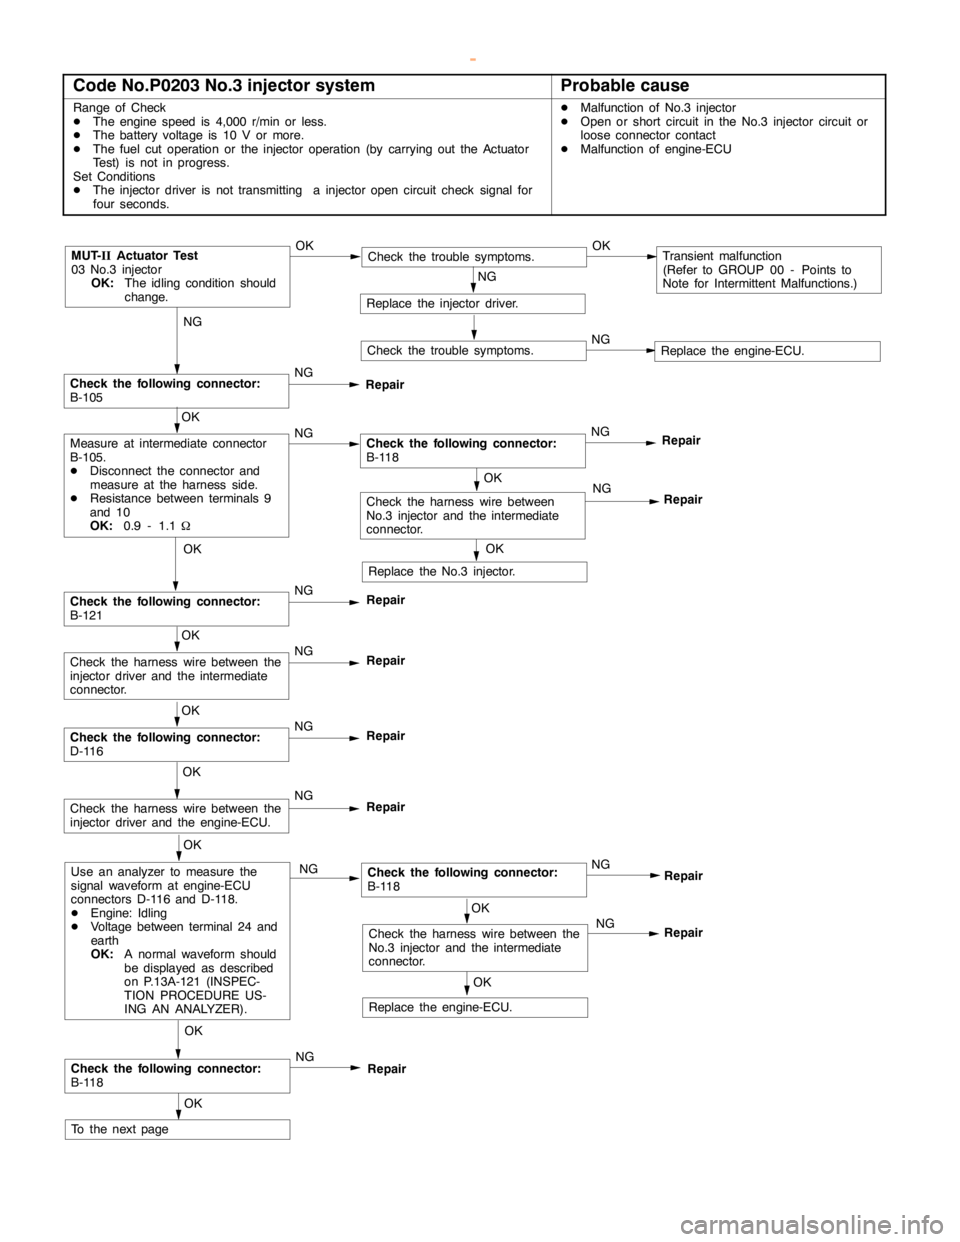
Code No.P0203 No.3 injector systemProbable cause
Range of Check
DThe enginespeed is 4,000 r/min or less.
DThe battery voltage is 10 V or more.
DThe fuel cut operation or the injector operation (by carrying out the Actuator
Test) is not in progress.
Set Conditions
DThe injector driver is not transmitting a injectoropencircuit check signal for
four seconds.DMalfunction of No.3 injector
DOpen or short circuit in the No.3 injector circuit or
loose connector contact
DMalfunction of engine-ECU
NG
Check the following connector:
B-105NG
Repair
OK
NG
Repair
MUT-
IIActuator Test
03 No.3 injector
OK:
The idling condition should
change.OKCheck the trouble symptoms.OKTransient malfunction
(Refer to GROUP 00 - Points to
Note for Intermittent Malfunctions.)
NG
Replace the injector driver.
Check the trouble symptoms.NGReplace the engine-ECU.
OK
Measure at intermediate connector
B-105.
DDisconnect the connector and
measure at the harness side.
DResistance between terminals 9
and 10
OK:
0.9 - 1.1WNGCheck the following connector:
B-118NG
Repair
OK
Replace the No.3 injector.
OK
Check the following connector:
B-121NG
Repair
OK
Check the harness wire between the
injector driver and the intermediate
connector.NG
Repair
OK
Check the following connector:
D-116NG
Repair
OK
Check the harness wire between the
injector driver and the engine-ECU.NG
Repair
OK
Use an analyzer to measure the
signal waveform at engine-ECU
connectors D-116 and D-118.
DEngine: Idling
DVoltage between terminal 24 and
earth
OK:
A normal waveform should
be displayed as described
on P.13A-121 (INSPEC-
TION PROCEDURE US-
ING AN ANALYZER).NGCheck the following connector:
B-118
OK
Check the following connector:
B-118NG
Repair
OK
To the nextpageNG
OK
OK
Check the harness wire between the
No.3 injector and the intermediate
connector.NG
Replace the engine-ECU.
Repair
Repair
Check the harness wire between
No.3 injector and the intermediate
connector.
www.WorkshopManuals.co.uk
Purchased from www.WorkshopManuals.co.uk
Page 258 of 1839
GDI -Troubleshooting
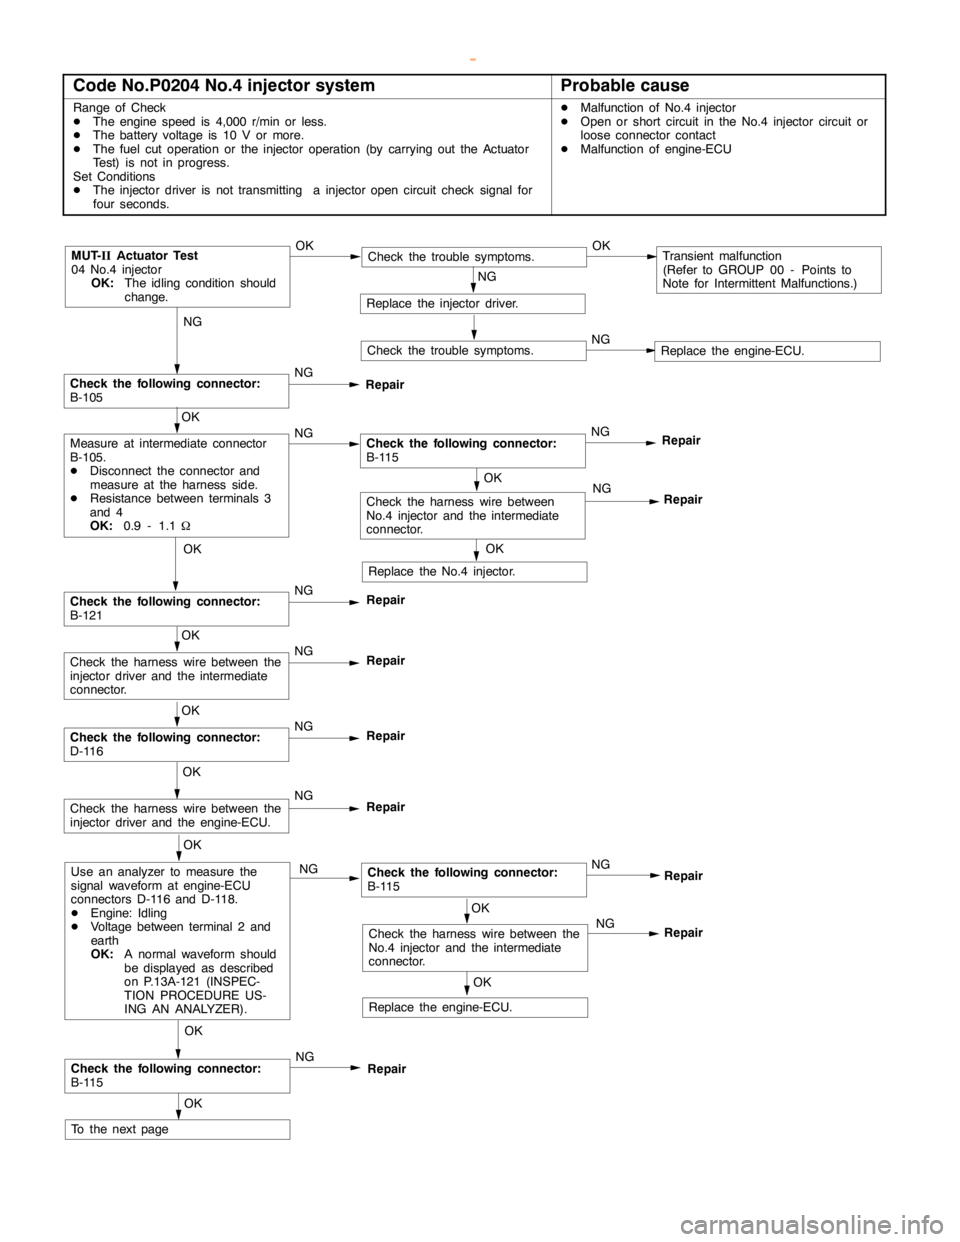
Code No.P0204 No.4 injector systemProbable cause
Range of Check
DThe enginespeed is 4,000 r/min or less.
DThe battery voltage is 10 V or more.
DThe fuel cut operation or the injector operation (by carrying out the Actuator
Test) is not in progress.
Set Conditions
DThe injector driver is not transmitting a injectoropencircuit check signal for
four seconds.DMalfunction of No.4 injector
DOpen or short circuit in the No.4 injector circuit or
loose connector contact
DMalfunction of engine-ECU
NG
Check the following connector:
B-105NG
Repair
OK
NG
Repair
MUT-
IIActuator Test
04 No.4 injector
OK:
The idling condition should
change.OKCheck the trouble symptoms.OKTransient malfunction
(Refer to GROUP 00 - Points to
Note for Intermittent Malfunctions.)
NG
Replace the injector driver.
Check the trouble symptoms.NGReplace the engine-ECU.
OK
Measure at intermediate connector
B-105.
DDisconnect the connector and
measure at the harness side.
DResistance between terminals 3
and 4
OK:
0.9 - 1.1WNGCheck the following connector:
B-115NG
Repair
OK
Replace the No.4 injector.
OK
Check the following connector:
B-121NG
Repair
OK
Check the harness wire between the
injector driver and the intermediate
connector.NG
Repair
OK
Check the following connector:
D-116NG
Repair
OK
Check the harness wire between the
injector driver and the engine-ECU.NG
Repair
OK
Use an analyzer to measure the
signal waveform at engine-ECU
connectors D-116 and D-118.
DEngine: Idling
DVoltage between terminal 2 and
earth
OK:
A normal waveform should
be displayed as described
on P.13A-121 (INSPEC-
TION PROCEDURE US-
ING AN ANALYZER).NGCheck the following connector:
B-115
OK
Check the following connector:
B-115NG
Repair
OK
To the nextpageNG
OK
OK
Check the harness wire between the
No.4 injector and the intermediate
connector.NG
Replace the engine-ECU.
Repair
Repair
Check the harness wire between
No.4 injector and the intermediate
connector.
www.WorkshopManuals.co.uk
Purchased from www.WorkshopManuals.co.uk