Page 166 of 2267
Components
1. Boot
2. Piston
3. Piston cap
4. Spring
5. Wheel cylinder6. Shoe hold-down pin
7. Plug
8. Brake drum
9. Shoe hold-down spring
10. Adjuster11. Retainer ring
12. Return spring (Upper)
13. Return spring (Lower)
14. Spring
15. Toggle lever
Removal
WARNING:
Clean brake lining with a vacuum dust collector to minimize
the hazard of airborne materials.
CAUTION:
Make sure parking brake lever is completely released.
SBR616E
REAR DRUM BRAKE
BR-44
Page 167 of 2267
1. Release parking brake lever fully, then remove drum.
If drum is hard to remove, the following procedures
should be carried out.
a. Remove plug. To make shoe clearance, push shoe hold-
down spring to free toggle lever.
b. Install two bolts as shown. Tighten the two bolts gradu-
ally.
2. After removing retainer, remove spring by rotating shoes.
lBe careful not to damage wheel cylinder piston boots.
lBe careful not to damage parking brake cable when
separating it.
3. Remove adjuster.
4. Disconnect parking brake cable from toggle lever.
5. Remove retainer ring with a suitable tool. Then separate
toggle lever and brake shoe.
Inspection Ð Wheel Cylinder
lCheck wheel cylinder for leakage.
lCheck for wear, damage and loose conditions. Replace if any
such condition exists.
SBR617E
SBR020A
SBR214B
SBR329C
SBR330C
REAR DRUM BRAKE
Removal (Cont'd)
BR-45
Page 168 of 2267

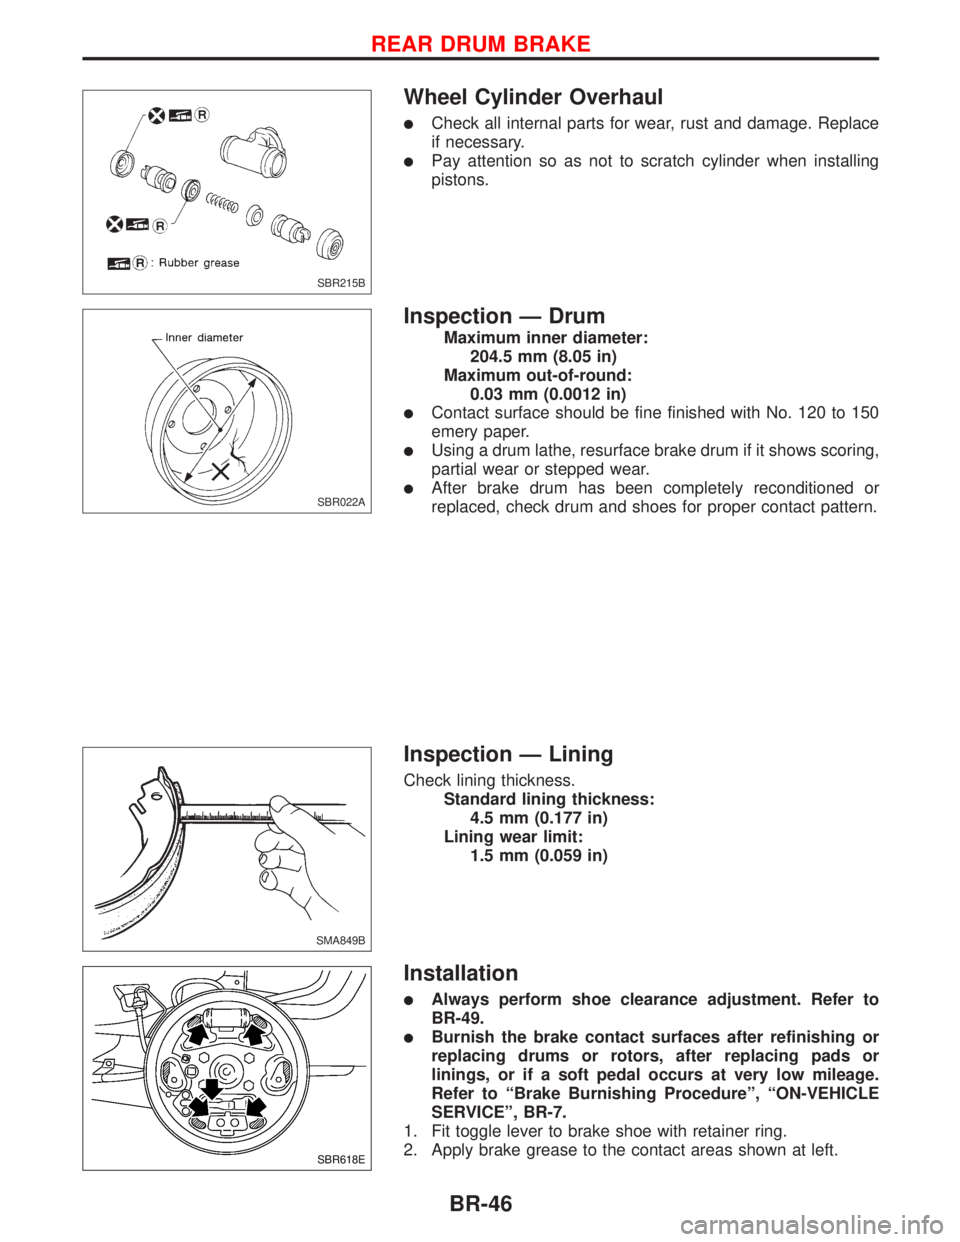
Wheel Cylinder Overhaul
lCheck all internal parts for wear, rust and damage. Replace
if necessary.
lPay attention so as not to scratch cylinder when installing
pistons.
Inspection Ð Drum
Maximum inner diameter:
204.5 mm (8.05 in)
Maximum out-of-round:
0.03 mm (0.0012 in)
lContact surface should be fine finished with No. 120 to 150
emery paper.
lUsing a drum lathe, resurface brake drum if it shows scoring,
partial wear or stepped wear.
lAfter brake drum has been completely reconditioned or
replaced, check drum and shoes for proper contact pattern.
Inspection Ð Lining
Check lining thickness.
Standard lining thickness:
4.5 mm (0.177 in)
Lining wear limit:
1.5 mm (0.059 in)
Installation
lAlways perform shoe clearance adjustment. Refer to
BR-49.
lBurnish the brake contact surfaces after refinishing or
replacing drums or rotors, after replacing pads or
linings, or if a soft pedal occurs at very low mileage.
Refer to ªBrake Burnishing Procedureº, ªON-VEHICLE
SERVICEº, BR-7.
1. Fit toggle lever to brake shoe with retainer ring.
2. Apply brake grease to the contact areas shown at left.
SBR215B
SBR022A
SMA849B
SBR618E
REAR DRUM BRAKE
BR-46
Page 169 of 2267
3. Shorten adjuster by rotating it.
lTo tighten loosened brake shoes, first, insert a screw driver
in the direction shown in the left. Then, move the adjuster in
the direction shown by the arrow while disengaging the tooth
contact. Never tap the area E.
4. Connect parking brake cable to toggle lever.
5. Install all parts.
Be careful not to damage wheel cylinder piston boots.
6. Check all parts are installed properly.
Pay attention to direction of adjuster assembly.
7. Install brake drum.
8. When installing new wheel cylinder or overhauling wheel
cylinder, bleed air. Refer to ªBleeding Brake Systemº, BR-8.
9. Adjust parking brake. Refer to BR-49.
SBR619E
REAR DRUM BRAKE
Installation (Cont'd)
BR-47
Page 172 of 2267

Purpose
The Anti-Lock Brake System (ABS) consists of electronic and hydraulic components. It allows for control of
braking force so that locking of the wheels can be avoided.
The ABS:
1) Provides improved steering control during braking (by preventing front wheel lock).
2) Provides improved vehicle stability and skid prevention during braking (by avoiding rear wheel lock).
Operation
lWhen the vehicle speed is less than 10 km/h (6 mph) this system does not work.
lThe Anti-Lock Brake System (ABS) has self-test capabilities. The system turns on the ABS warning light
for 1 second after turning the ignition switch to the ªONº position. The system performs another test the
first time the vehicle reaches 6 km/h (4 mph). A mechanical noise may be heard as the ABS performs
a self-test. This is a normal part of the self-test feature. If a malfunction is found during this check, the
ABS warning light will come on.
lDuring ABS operation, a mechanical noise may be heard. This is a normal operating condition.
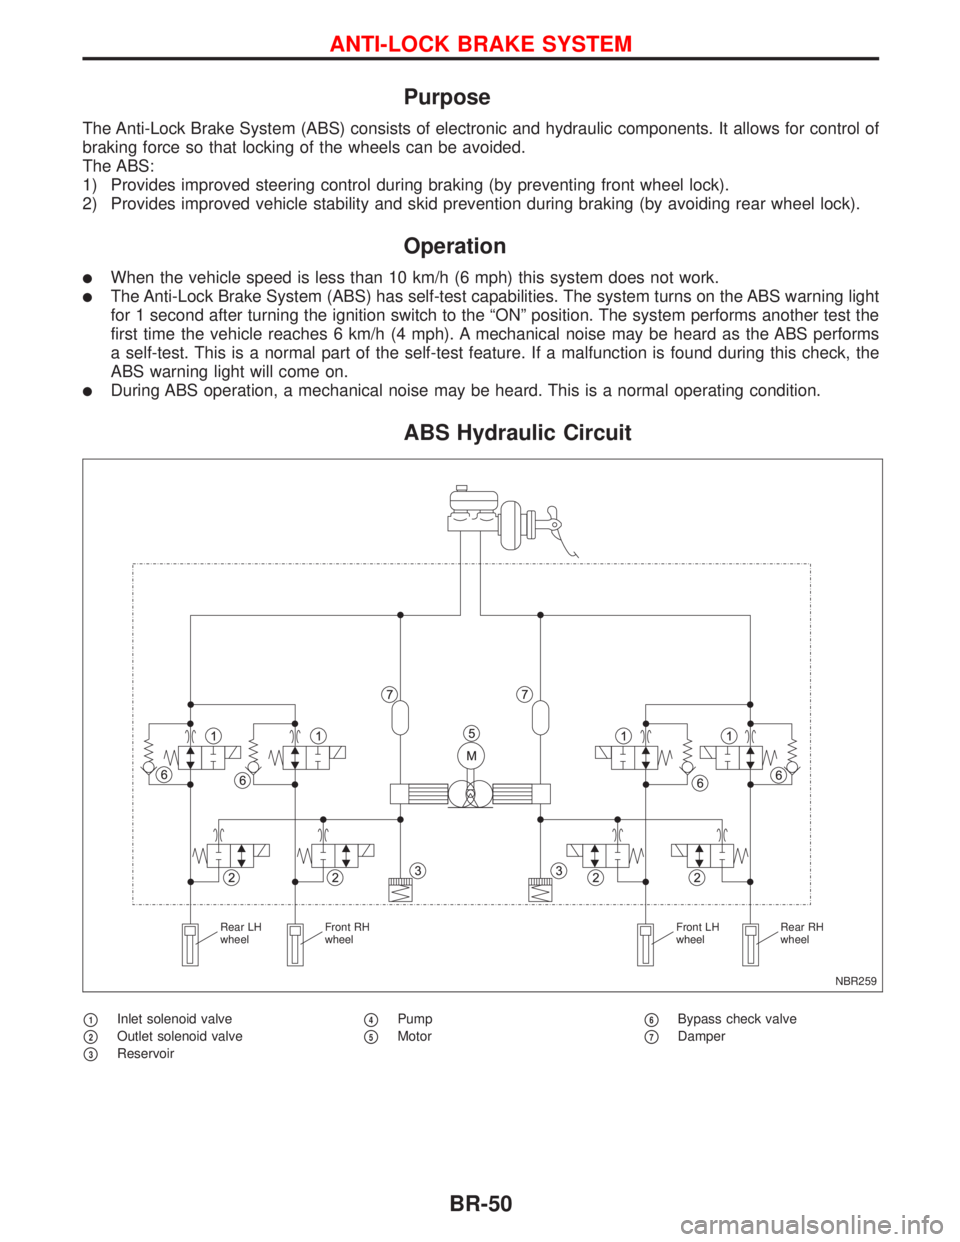
ABS Hydraulic Circuit
p1Inlet solenoid valve
p2Outlet solenoid valve
p3Reservoir
p4Pump
p5Motorp6Bypass check valve
p7Damper
NBR259 Rear LH
wheelFront RH
wheelFront LH
wheelRear RH
wheel
ANTI-LOCK BRAKE SYSTEM
BR-50
Page 173 of 2267

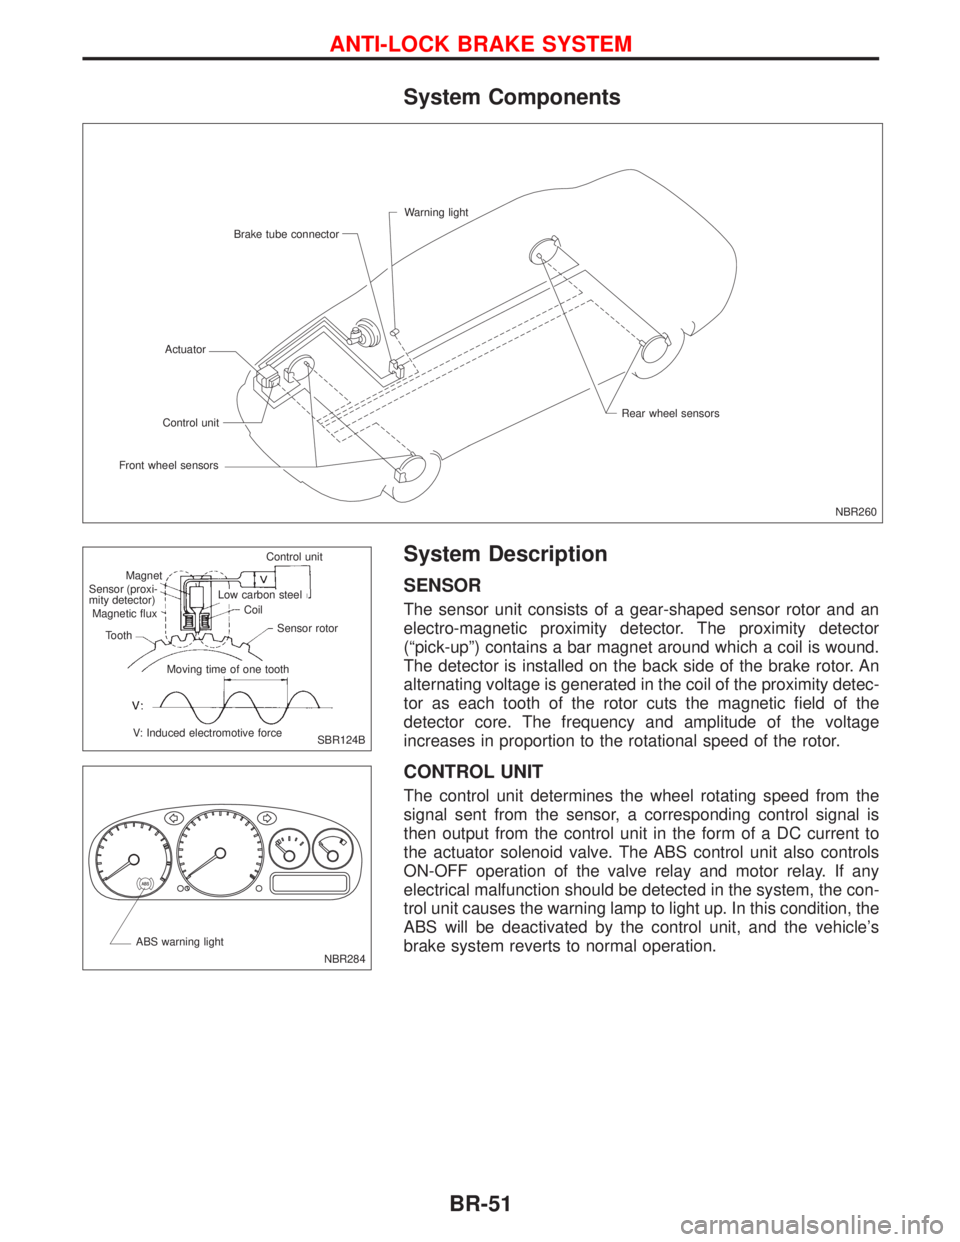
System Components
System Description
SENSOR
The sensor unit consists of a gear-shaped sensor rotor and an
electro-magnetic proximity detector. The proximity detector
(ªpick-upº) contains a bar magnet around which a coil is wound.
The detector is installed on the back side of the brake rotor. An
alternating voltage is generated in the coil of the proximity detec-
tor as each tooth of the rotor cuts the magnetic field of the
detector core. The frequency and amplitude of the voltage
increases in proportion to the rotational speed of the rotor.
CONTROL UNIT
The control unit determines the wheel rotating speed from the
signal sent from the sensor, a corresponding control signal is
then output from the control unit in the form of a DC current to
the actuator solenoid valve. The ABS control unit also controls
ON-OFF operation of the valve relay and motor relay. If any
electrical malfunction should be detected in the system, the con-
trol unit causes the warning lamp to light up. In this condition, the
ABS will be deactivated by the control unit, and the vehicle's
brake system reverts to normal operation.
NBR260 Warning light
Brake tube connector
Actuator
Front wheel sensorsControl unitRear wheel sensors
SBR124B Control unit
Magnet
.Sensor (proxi-
mity detector)
Magnetic flux
Tooth
V: Induced electromotive forceMoving time of one toothSensor rotor Coil Low carbon steel
NBR284 ABS warning light
ANTI-LOCK BRAKE SYSTEM
BR-51
Page 174 of 2267

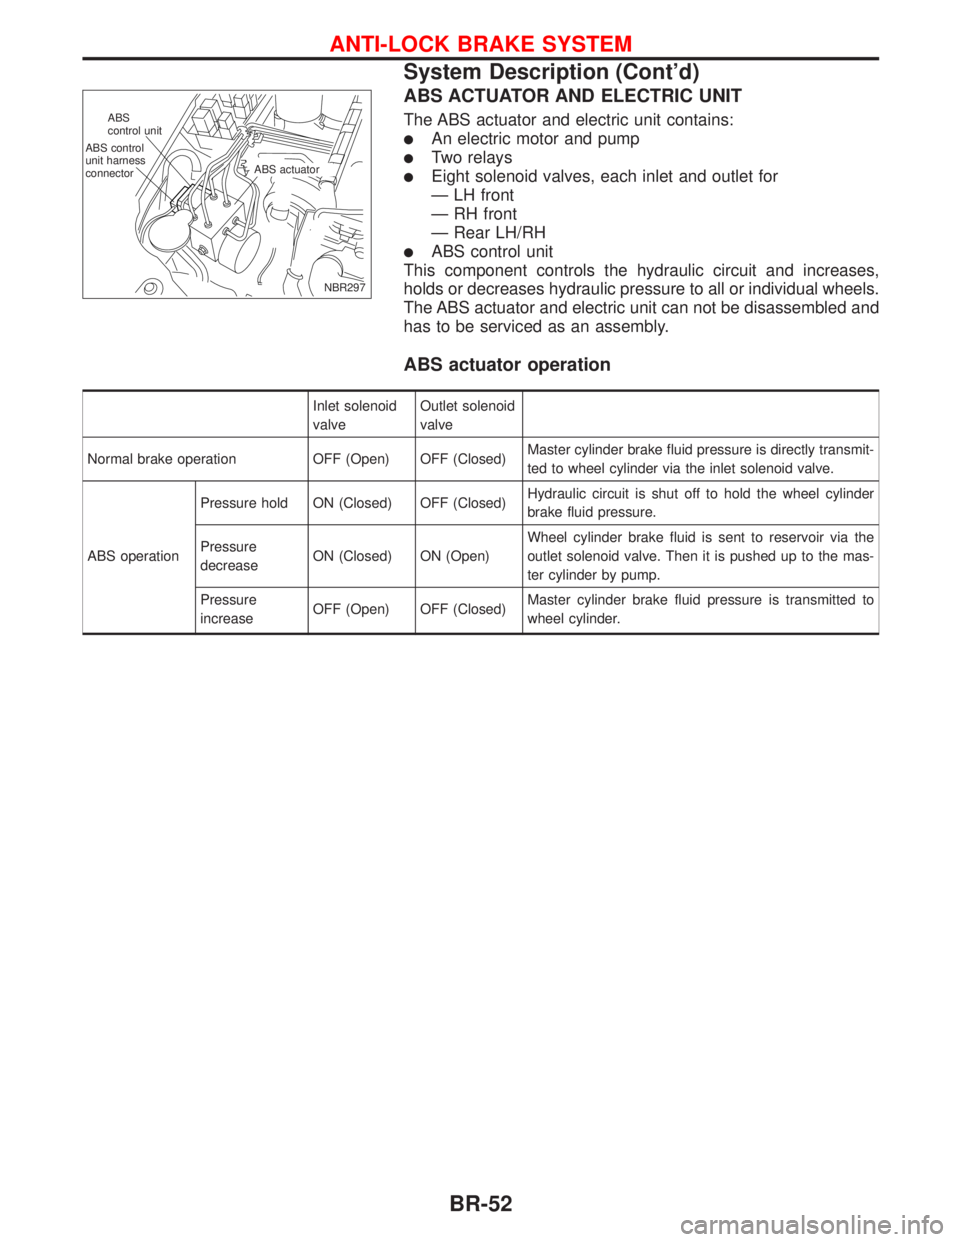
ABS ACTUATOR AND ELECTRIC UNIT
The ABS actuator and electric unit contains:
lAn electric motor and pump
lTwo relays
lEight solenoid valves, each inlet and outlet for
Ð LH front
Ð RH front
Ð Rear LH/RH
lABS control unit
This component controls the hydraulic circuit and increases,
holds or decreases hydraulic pressure to all or individual wheels.
The ABS actuator and electric unit can not be disassembled and
has to be serviced as an assembly.
ABS actuator operation
Inlet solenoid
valveOutlet solenoid
valve
Normal brake operation OFF (Open) OFF (Closed)Master cylinder brake fluid pressure is directly transmit-
ted to wheel cylinder via the inlet solenoid valve.
ABS operationPressure hold ON (Closed) OFF (Closed)Hydraulic circuit is shut off to hold the wheel cylinder
brake fluid pressure.
Pressure
decreaseON (Closed) ON (Open)Wheel cylinder brake fluid is sent to reservoir via the
outlet solenoid valve. Then it is pushed up to the mas-
ter cylinder by pump.
Pressure
increaseOFF (Open) OFF (Closed)Master cylinder brake fluid pressure is transmitted to
wheel cylinder.
NBR297 ABS control
unit harness
connectorABS
control unit
.ABS actuator
ANTI-LOCK BRAKE SYSTEM
System Description (Cont'd)
BR-52
Page 175 of 2267
Removal and Installation
CAUTION:
Be careful not to damage sensor edge and sensor rotor
teeth.
When removing the front or rear wheel hub assembly, dis-
connect the ABS wheel sensor from the assembly and move
it away. Failure to do so may result in damage to the sensor
or wiring making it inoperative.
FRONT WHEEL SENSOR
REAR WHEEL SENSOR
NBR176
18 - 24 (1.8 - 2.4, 13 - 18)
: N´m (kg-m, ft-lb)
NBR296
: N´m (kg-m, ft-lb)
25-33
(2.6 - 3.4, 18 - 24)
ANTI-LOCK BRAKE SYSTEM
BR-53