Page 1218 of 2267

Trouble Diagnoses
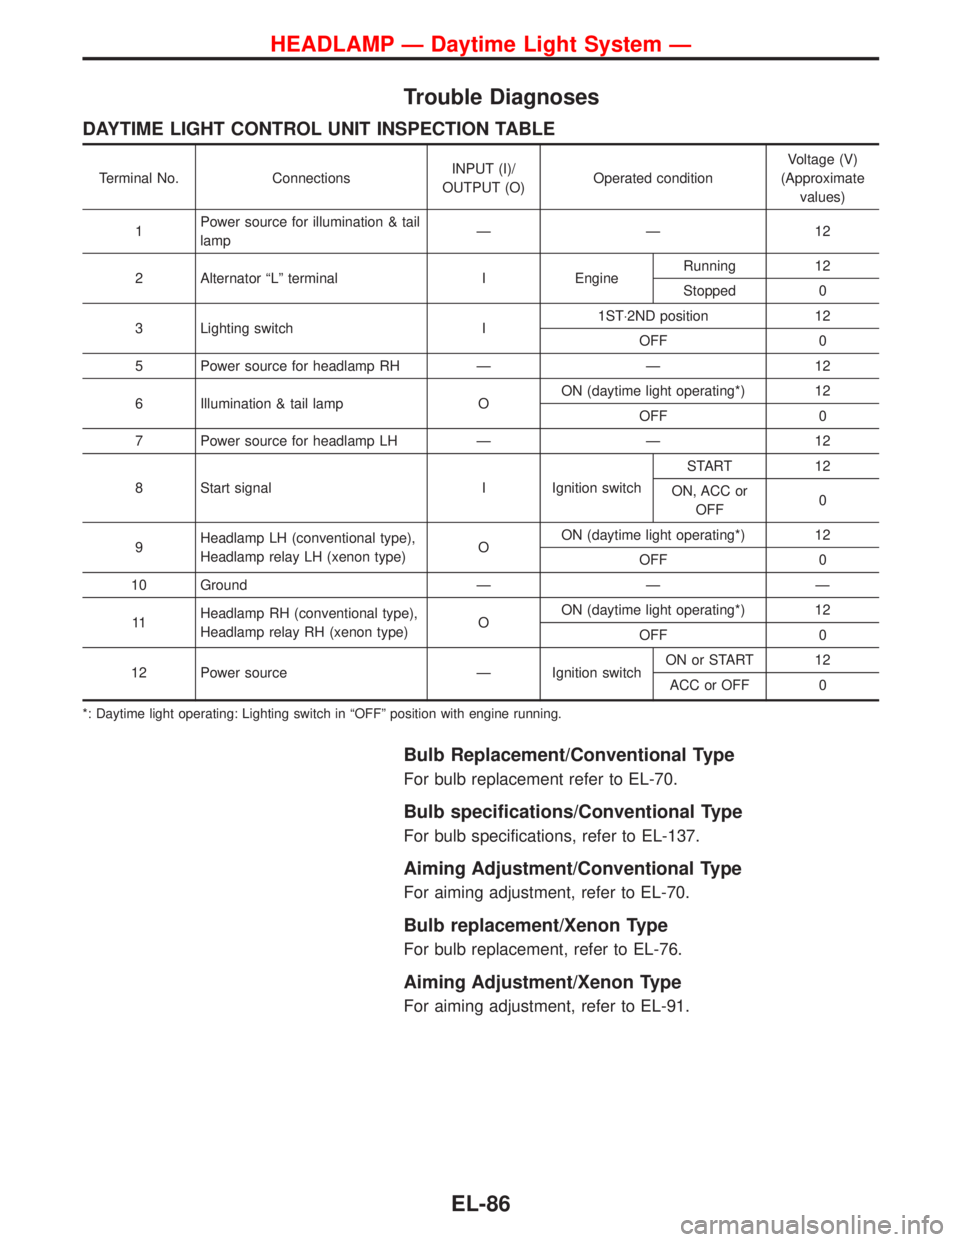
DAYTIME LIGHT CONTROL UNIT INSPECTION TABLE
Terminal No. ConnectionsINPUT (I)/
OUTPUT (O)Operated conditionVoltage (V)
(Approximate
values)
1Power source for illumination & tail
lamp——12
2 Alternator“L”terminal I EngineRunning 12
Stopped 0
3 Lighting switch I1ST⋅2ND position 12
OFF 0
5 Power source for headlamp RH——12
6 Illumination & tail lamp OON (daytime light operating*) 12
OFF 0
7 Power source for headlamp LH——12
8 Start signal I Ignition switchSTART 12
ON, ACC or
OFF0
9Headlamp LH (conventional type),
Headlamp relay LH (xenon type)OON (daytime light operating*) 12
OFF 0
10 Ground———
11Headlamp RH (conventional type),
Headlamp relay RH (xenon type)OON (daytime light operating*) 12
OFF 0
12 Power source—Ignition switchON or START 12
ACC or OFF 0
*: Daytime light operating: Lighting switch in“OFF”position with engine running.
Bulb Replacement/Conventional Type
For bulb replacement refer to EL-70.
Bulb specifications/Conventional Type
For bulb specifications, refer to EL-137.
Aiming Adjustment/Conventional Type
For aiming adjustment, refer to EL-70.
Bulb replacement/Xenon Type
For bulb replacement, refer to EL-76.
Aiming Adjustment/Xenon Type
For aiming adjustment, refer to EL-91.
HEADLAMP—Daytime Light System—
EL-86
Page 1219 of 2267
Wiring Diagram—H/AIM—
MODELS BEFORE VIN - P11U0548750
YEL141C
BATTERY
Refer to EL-POWER.: With daytime light system
: Without daytime light system
Next page
COMBINATION SWITCH
(LIGHTING SWITCH)FUSE BLOCK
(J/B)
DAYTIME LIGHT CON-
TROL UNIT
REFER TO THE FOLLOWING
FUSE BLOCK - Junction Box (J/B)
FUSE BLOCK - Junction Box (J/B) OFF
1ST2ND
Next page
HEADLAMP—Headlamp Aiming Control (Manual)—
EL-87
Page 1223 of 2267

System Description
The auto level control unit is designed to adjust the beam angle of the headlamp in response to the load-
ing conditions of the vehicle. It is not designed to compensate for the dynamic handling of the vehicle.
The vehicle’s front and rear height is measured by sensors attached to the front stabilizer bar and the rear
suspension lateral link arm. The sensors provide a signal to the auto level control unit, which calculates the
correct headlamp aiming position and sends a signal to the aiming motors.
Initialisation
After the replacement or adjustment of any suspension sensor, the system must be self calibrated. This is
achieved as follows.
The vehicle must be empty, since any load will result in an invalid calibration. From outside of the vehicle
turn ignition on and then within 7 seconds the light switch must be turned from off to side lights on position,
5 times, finishing with the lamps in the on position.
The headlamps will then move to the highest, then the lowest then the normal position to indicate that the
calibration is successful, as can be seen by the moving beam pattern.
After successful calibration the headlamps must then be aimed in the conventional manner. Refer to EL-70.
HEADLAMP—Headlamp Aiming Control (Auto)—
EL-91
Page 1228 of 2267
Lighting condition of the bulb System condition Reference item
NEL531 IGN ON
ON
OFF1 sec.
No malfunction is detected.
No further action is neces-
sary.
—
NEL532 IGN ON
ON
OFF1 sec.2 sec. 2 sec.
0.5 sec.
Front sensor or front sensor
circuit is malfunctioning.
(When rear sensor OK)Go to DIAGNOSTIC
PROCEDURE 1
(EL-97).
NEL533 IGN ON
ON
OFF1 sec.2 sec. 2 sec.
0.5 sec. 0.5 sec.
Rear sensor or rear sensor
circuit is malfunctioning.
(Whatever the state of front
sensor)Go to DIAGNOSTIC
PROCEDURE 2
(EL-97).
NEL534 IGN ON
ON
OFF1 sec.2 sec. 2 sec.
0.5 sec. 0.5 sec.
Sensor supply is malfunction-
ing.Go to DIAGNOSTIC
PROCEDURE 1 and
2 (EL-97).
NEL535 IGN ON
ON
OFF1 sec.2 sec. 2 sec.
0.5 sec. 0.5 sec.
Aiming motor or aiming motor
circuit is malfunctioning.Go to DIAGNOSTIC
PROCEDURE 3
(EL-98).
NEL536 IGN ON
ON
OFF
Auto level control unit is mal-
functioning.Replace auto level
control unit.
HEADLAMP—Headlamp Aiming Control (Auto)—
Trouble Diagnosis (Cont’d)
EL-96
Page 1230 of 2267
DIAGNOSTIC PROCEDURE 3
(Aiming motor check)
CHECK POWER SUPPLY
1) Turn lighting switch to 2nd position.
2) Check voltage between aiming
motor terminal
�3and ground.
Battery voltage should exist.
OK
�NG
Check harness between
combination switch and
aiming motor.
CHECK GROUND CIRCUIT
1) Turn lighting switch to OFF position.
2) Check continuity between aiming
motor terminal
�1and ground.
Continuity should exist.
OK
�NG
Check harness between
aiming motor and
ground.
1) Disconnect control unit and aiming
motor connector.
2) Check harness continuity between
control unit terminal
�4and aiming
motor terminal
�2.
Continuity should exist.
OK
�NG
Check harness between
control unit and aiming
motor.
Replace aiming motor.
YEL618B
Headlamp
aiming motor
Lighting switch
“2nd”
NEL540
Headlamp aiming
motor
LH:E4RH:E33
NEL541
Auto leveling control
unitB123Headlamp aiming
motor
LH:E4RH:E33
�
�
�
HEADLAMP—Headlamp Aiming Control (Auto)—
Trouble Diagnosis (Cont’d)
EL-98
Page 1243 of 2267

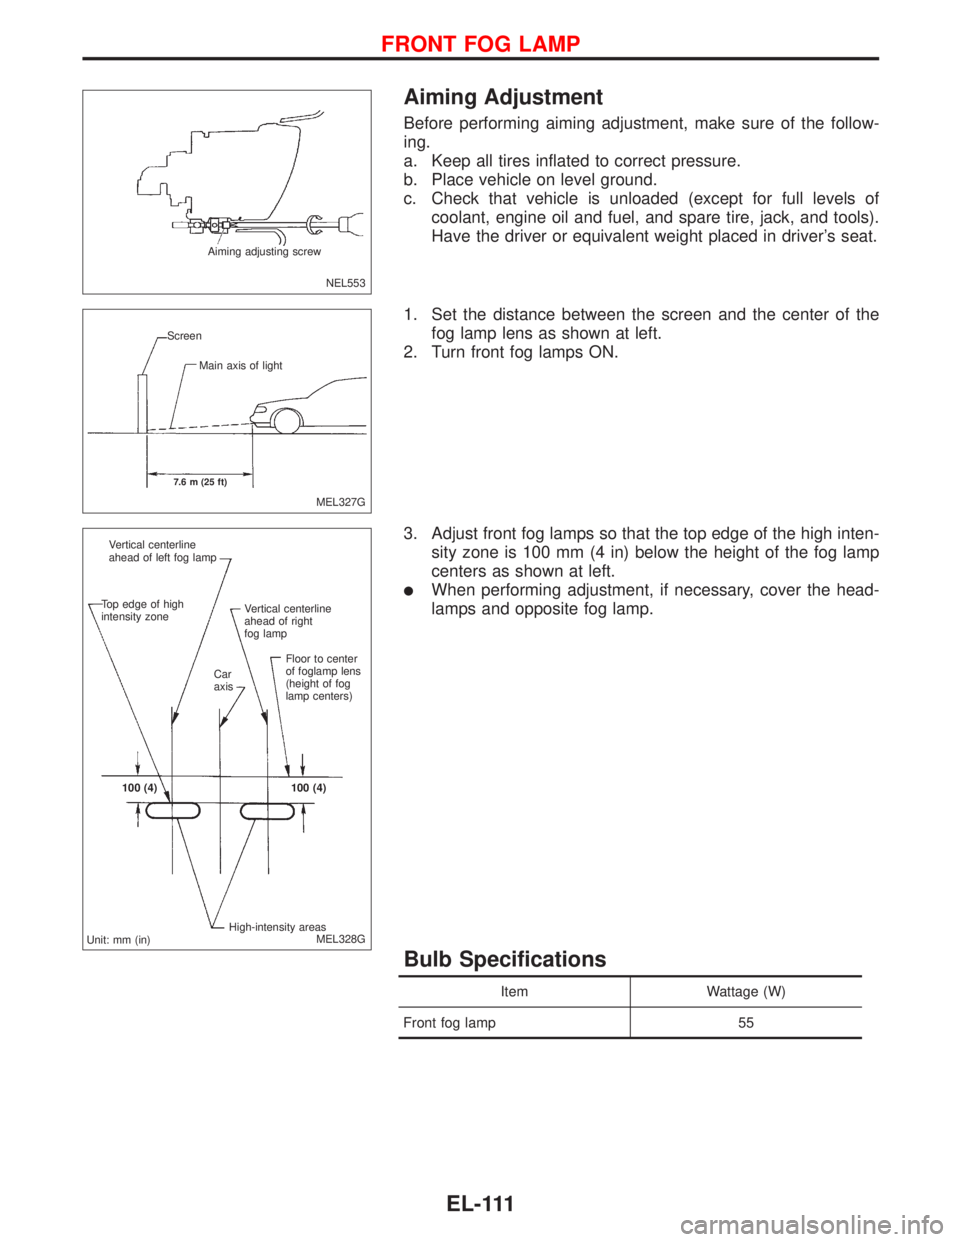
Aiming Adjustment
Before performing aiming adjustment, make sure of the follow-
ing.
a. Keep all tires inflated to correct pressure.
b. Place vehicle on level ground.
c. Check that vehicle is unloaded (except for full levels of
coolant, engine oil and fuel, and spare tire, jack, and tools).
Have the driver or equivalent weight placed in driver’s seat.
1. Set the distance between the screen and the center of the
fog lamp lens as shown at left.
2. Turn front fog lamps ON.
3. Adjust front fog lamps so that the top edge of the high inten-
sity zone is 100 mm (4 in) below the height of the fog lamp
centers as shown at left.
�When performing adjustment, if necessary, cover the head-
lamps and opposite fog lamp.
Bulb Specifications
Item Wattage (W)
Front fog lamp 55
NEL553 Aiming adjusting screw
MEL327G
7.6 m (25 ft)
Screen
Main axis of light
MEL328G Vertical centerline
ahead of left fog lamp
Car
axis Top edge of high
intensity zoneVertical centerline
ahead of right
fog lamp
Floor to center
of foglamp lens
(height of fog
lamp centers)
.100 (4).100 (4)
High-intensity areas
Unit: mm (in)
FRONT FOG LAMP
EL-111
Page 1257 of 2267
Wiring Diagram—ILL—
MODELS BEFORE VIN - P11U0548750
YEL157C
BATTERY
Refer to EL-POWER. IGNITION SWITCH
ON or START
FUSE
BLOCK
(J/B)
OFF1ST2ND
COMBINATION
SWITCH
(LIGHTING SWITCH)
COMBINATION
METER
(ILLUMINATION)
DAYTIME LIGHT
CONTROL
UNIT
: With daytime light system
: Without daytime light system
REFER TO THE FOLLOWING
FUSE BLOCK - Junction Box (J/B)
FUSE BLOCK - Junction Box (J/B) Next
page
HEAD LAMP
WASHER
SWITCH
(ILLUMINATION)
ILLUMINATION
EL-125
Page 1312 of 2267
System Description
The warning chime is combined with the time control unit.
The light warning chime will not sound, when ignition switch in the ON or START position. (When power
supply exists at time control unit terminal
�1.)
LIGHT WARNING CHIME
With ignition switch in the OFF position, driver’s door open, and lighting switch in 1ST or 2ND position,
warning chime will sound. A battery positive voltage is supplied
�from lighting switch terminal�12or daytime light control unit terminal�6
�to time control unit terminal�10.
Ground is supplied
�through driver side door switch
�to time control unit terminal�6.
WARNING CHIME
EL-180