1999 DODGE NEON fuse
[x] Cancel search: fusePage 296 of 1200
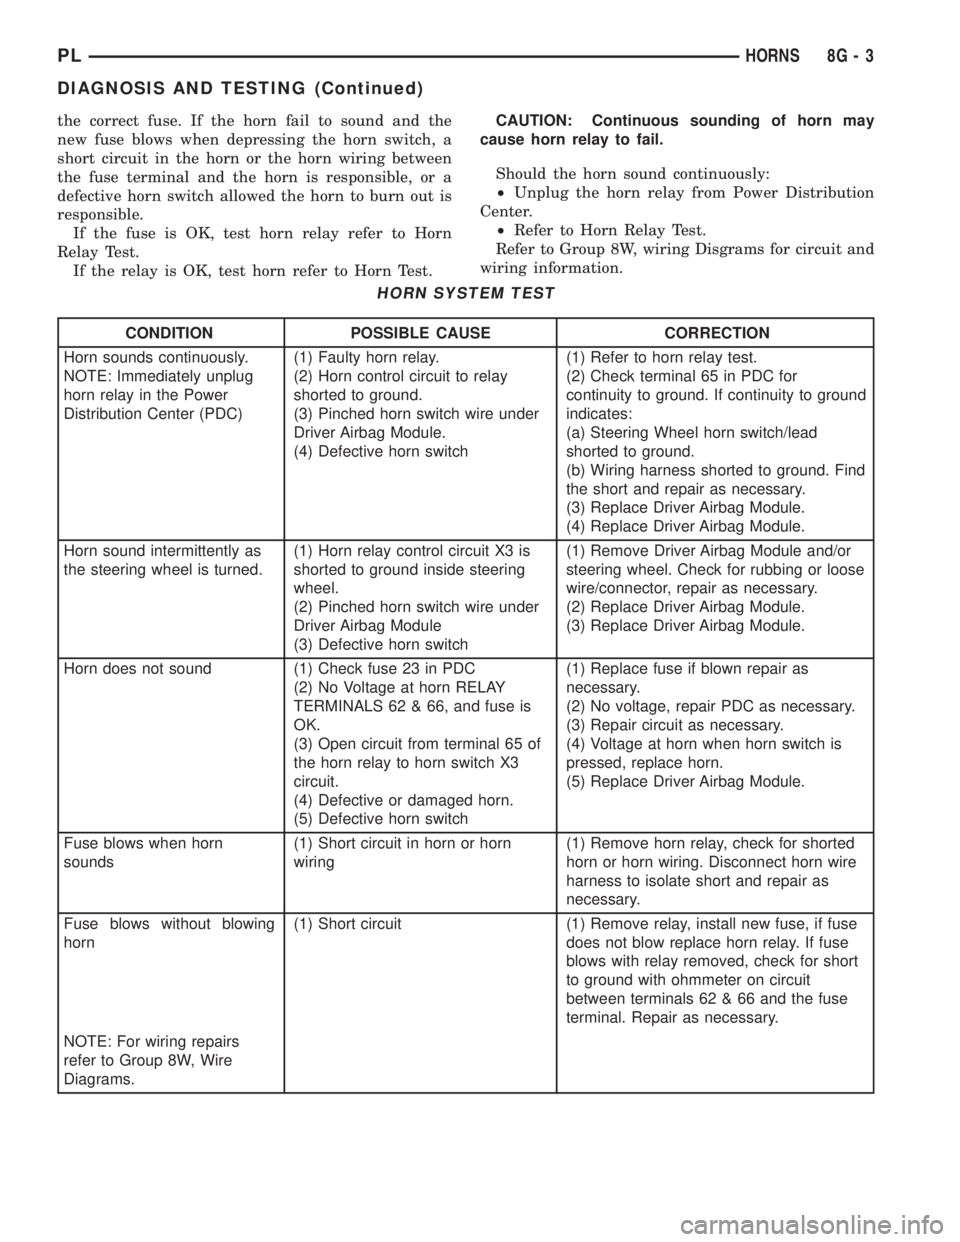
the correct fuse. If the horn fail to sound and the
new fuse blows when depressing the horn switch, a
short circuit in the horn or the horn wiring between
the fuse terminal and the horn is responsible, or a
defective horn switch allowed the horn to burn out is
responsible.
If the fuse is OK, test horn relay refer to Horn
Relay Test.
If the relay is OK, test horn refer to Horn Test.CAUTION: Continuous sounding of horn may
cause horn relay to fail.
Should the horn sound continuously:
²Unplug the horn relay from Power Distribution
Center.
²Refer to Horn Relay Test.
Refer to Group 8W, wiring Disgrams for circuit and
wiring information.
HORN SYSTEM TEST
CONDITION POSSIBLE CAUSE CORRECTION
Horn sounds continuously.
NOTE: Immediately unplug
horn relay in the Power
Distribution Center (PDC)(1) Faulty horn relay.
(2) Horn control circuit to relay
shorted to ground.
(3) Pinched horn switch wire under
Driver Airbag Module.
(4) Defective horn switch(1) Refer to horn relay test.
(2) Check terminal 65 in PDC for
continuity to ground. If continuity to ground
indicates:
(a) Steering Wheel horn switch/lead
shorted to ground.
(b) Wiring harness shorted to ground. Find
the short and repair as necessary.
(3) Replace Driver Airbag Module.
(4) Replace Driver Airbag Module.
Horn sound intermittently as
the steering wheel is turned.(1) Horn relay control circuit X3 is
shorted to ground inside steering
wheel.
(2) Pinched horn switch wire under
Driver Airbag Module
(3) Defective horn switch(1) Remove Driver Airbag Module and/or
steering wheel. Check for rubbing or loose
wire/connector, repair as necessary.
(2) Replace Driver Airbag Module.
(3) Replace Driver Airbag Module.
Horn does not sound (1) Check fuse 23 in PDC
(2) No Voltage at horn RELAY
TERMINALS 62 & 66, and fuse is
OK.
(3) Open circuit from terminal 65 of
the horn relay to horn switch X3
circuit.
(4) Defective or damaged horn.
(5) Defective horn switch(1) Replace fuse if blown repair as
necessary.
(2) No voltage, repair PDC as necessary.
(3) Repair circuit as necessary.
(4) Voltage at horn when horn switch is
pressed, replace horn.
(5) Replace Driver Airbag Module.
Fuse blows when horn
sounds(1) Short circuit in horn or horn
wiring(1) Remove horn relay, check for shorted
horn or horn wiring. Disconnect horn wire
harness to isolate short and repair as
necessary.
Fuse blows without blowing
horn(1) Short circuit (1) Remove relay, install new fuse, if fuse
does not blow replace horn relay. If fuse
blows with relay removed, check for short
to ground with ohmmeter on circuit
between terminals 62 & 66 and the fuse
terminal. Repair as necessary.
NOTE: For wiring repairs
refer to Group 8W, Wire
Diagrams.
PLHORNS 8G - 3
DIAGNOSIS AND TESTING (Continued)
Page 310 of 1200
TURN SIGNAL AND FLASHERS
CONTENTS
page page
GENERAL INFORMATION
INTRODUCTION......................... 1
DESCRIPTION AND OPERATION
COMBINATION FLASHER.................. 1
HAZARD WARNING SYSTEM............... 1DIAGNOSIS AND TESTING
MULTI-FUNCTION SWITCH................ 2
MULTI-FUNCTION SWITCH TEST............ 2
REMOVAL AND INSTALLATION
MULTI-FUNCTION SWITCH................ 4
GENERAL INFORMATION
INTRODUCTION
WARNING: ON VEHICLES EQUIPPED WITH AIR-
BAG, SEE GROUP 8M, RESTRAINT SYSTEMS FOR
AIRBAG REMOVAL PROCEDURES.
The turn signals are part of the multi-function
switch. Which contains:
²Electrical circuitry for turn signals
²Hazard warning switch
²Headlamp beam select switch
²Headlamp optical horn
The integrated switch assembly is mounted to the
left hand side of the steering column. When the
driver wishes to signal his intentions to change direc-
tion of travel, he moves the lever upward to cause
the right signals to flash and downward to cause the
left signals to flash. After completion of a turn the
system is deactivated automatically. As the steering
wheel returns to the straight ahead position, a can-
celing cam molded to the clockspring mechanism
comes in contact with the cancel actuator on the turn
signal multi-function switch assembly. The cam lobe,
pushing on the cancel actuator, returns the switch to
the off position.
If only momentary signaling such as indication of a
lane change is desired, the switch is actuated to a
left or right intermediate detent position. In this
position the signal lamps flash as described above,
but the switch returns to the OFF position as soon as
the lever is released.
When the system is activated, one of two indicator
lamps mounted in the instrument cluster flashes in
unison with the turn signal lamps, indicating to the
driver that the system is operating.
DESCRIPTION AND OPERATION
HAZARD WARNING SYSTEM
The hazard warning system is actuated by a slide
button located on the top of the steering column
between the steering wheel and the instrument
panel. The hazard switch is identified with a double
triangle on front of the button.
COMBINATION FLASHER
The turn signal flasher and the hazard warning
flasher are combined into one unit called a combina-
tion flasher (combo-flasher). The combo- flasher con-
trols the flashing of the hazard warning system and
the turn signal system. An inoperative bulb or incom-
plete turn signal circuit will cause the flasher rate to
double.
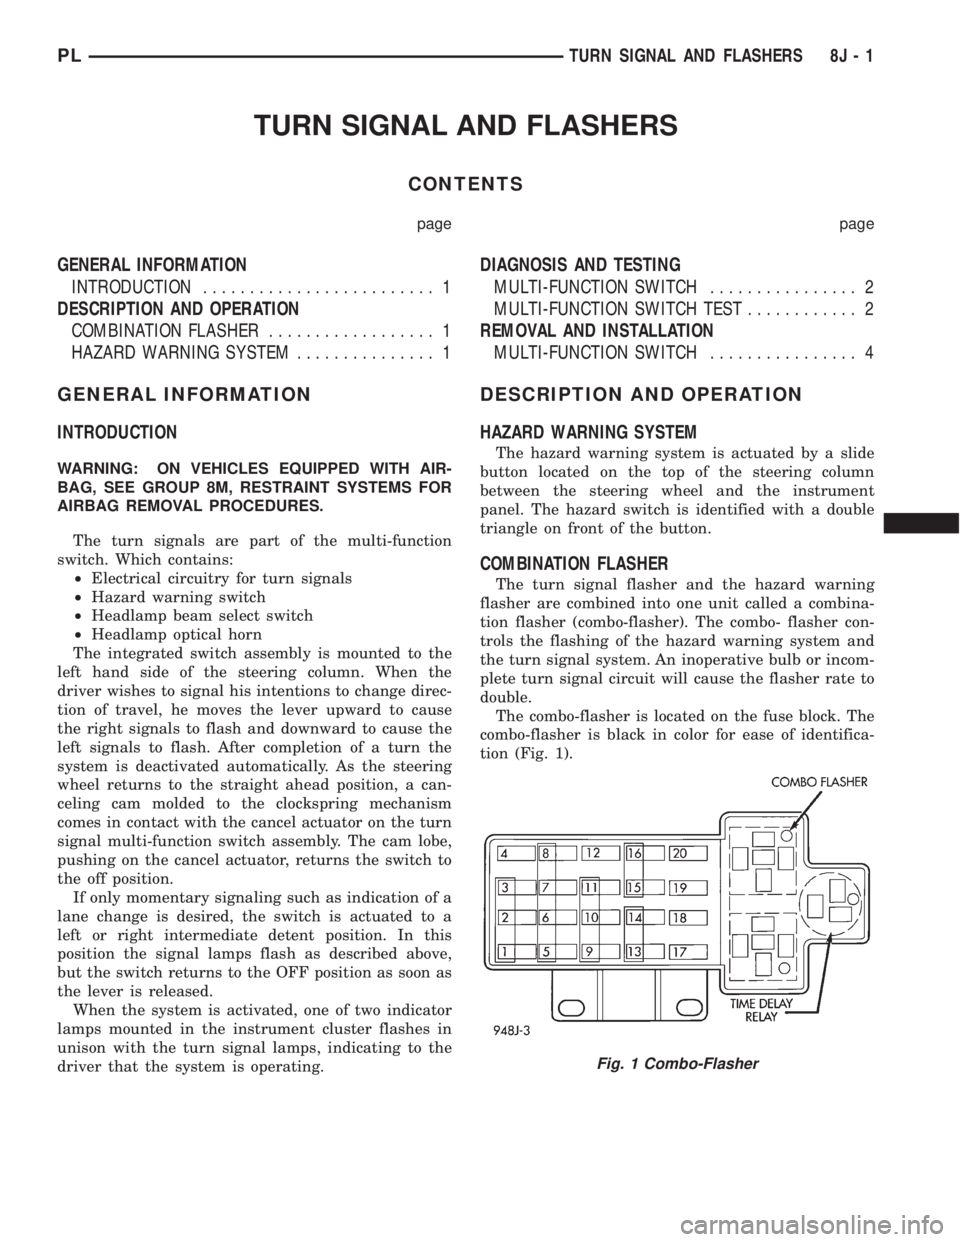
The combo-flasher is located on the fuse block. The
combo-flasher is black in color for ease of identifica-
tion (Fig. 1).
Fig. 1 Combo-Flasher
PLTURN SIGNAL AND FLASHERS 8J - 1
Page 311 of 1200
DIAGNOSIS AND TESTING
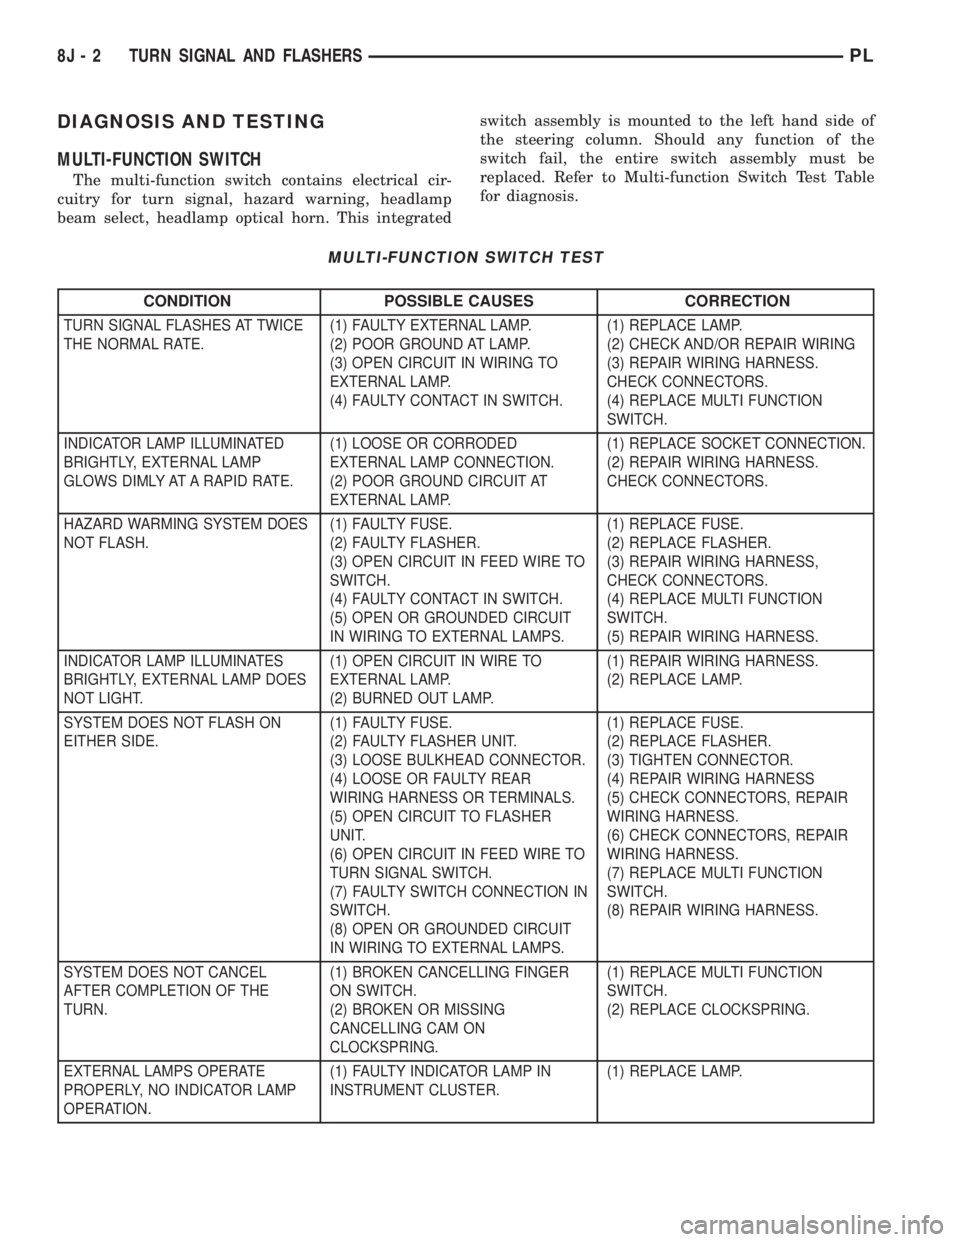
MULTI-FUNCTION SWITCH
The multi-function switch contains electrical cir-
cuitry for turn signal, hazard warning, headlamp
beam select, headlamp optical horn. This integratedswitch assembly is mounted to the left hand side of
the steering column. Should any function of the
switch fail, the entire switch assembly must be
replaced. Refer to Multi-function Switch Test Table
for diagnosis.
MULTI-FUNCTION SWITCH TEST
CONDITION POSSIBLE CAUSES CORRECTION
TURN SIGNAL FLASHES AT TWICE
THE NORMAL RATE.(1) FAULTY EXTERNAL LAMP.
(2) POOR GROUND AT LAMP.
(3) OPEN CIRCUIT IN WIRING TO
EXTERNAL LAMP.
(4) FAULTY CONTACT IN SWITCH.(1) REPLACE LAMP.
(2) CHECK AND/OR REPAIR WIRING
(3) REPAIR WIRING HARNESS.
CHECK CONNECTORS.
(4) REPLACE MULTI FUNCTION
SWITCH.
INDICATOR LAMP ILLUMINATED
BRIGHTLY, EXTERNAL LAMP
GLOWS DIMLY AT A RAPID RATE.(1) LOOSE OR CORRODED
EXTERNAL LAMP CONNECTION.
(2) POOR GROUND CIRCUIT AT
EXTERNAL LAMP.(1) REPLACE SOCKET CONNECTION.
(2) REPAIR WIRING HARNESS.
CHECK CONNECTORS.
HAZARD WARMING SYSTEM DOES
NOT FLASH.(1) FAULTY FUSE.
(2) FAULTY FLASHER.
(3) OPEN CIRCUIT IN FEED WIRE TO
SWITCH.
(4) FAULTY CONTACT IN SWITCH.
(5) OPEN OR GROUNDED CIRCUIT
IN WIRING TO EXTERNAL LAMPS.(1) REPLACE FUSE.
(2) REPLACE FLASHER.
(3) REPAIR WIRING HARNESS,
CHECK CONNECTORS.
(4) REPLACE MULTI FUNCTION
SWITCH.
(5) REPAIR WIRING HARNESS.
INDICATOR LAMP ILLUMINATES
BRIGHTLY, EXTERNAL LAMP DOES
NOT LIGHT.(1) OPEN CIRCUIT IN WIRE TO
EXTERNAL LAMP.
(2) BURNED OUT LAMP.(1) REPAIR WIRING HARNESS.
(2) REPLACE LAMP.
SYSTEM DOES NOT FLASH ON
EITHER SIDE.(1) FAULTY FUSE.
(2) FAULTY FLASHER UNIT.
(3) LOOSE BULKHEAD CONNECTOR.
(4) LOOSE OR FAULTY REAR
WIRING HARNESS OR TERMINALS.
(5) OPEN CIRCUIT TO FLASHER
UNIT.
(6) OPEN CIRCUIT IN FEED WIRE TO
TURN SIGNAL SWITCH.
(7) FAULTY SWITCH CONNECTION IN
SWITCH.
(8) OPEN OR GROUNDED CIRCUIT
IN WIRING TO EXTERNAL LAMPS.(1) REPLACE FUSE.
(2) REPLACE FLASHER.
(3) TIGHTEN CONNECTOR.
(4) REPAIR WIRING HARNESS
(5) CHECK CONNECTORS, REPAIR
WIRING HARNESS.
(6) CHECK CONNECTORS, REPAIR
WIRING HARNESS.
(7) REPLACE MULTI FUNCTION
SWITCH.
(8) REPAIR WIRING HARNESS.
SYSTEM DOES NOT CANCEL
AFTER COMPLETION OF THE
TURN.(1) BROKEN CANCELLING FINGER
ON SWITCH.
(2) BROKEN OR MISSING
CANCELLING CAM ON
CLOCKSPRING.(1) REPLACE MULTI FUNCTION
SWITCH.
(2) REPLACE CLOCKSPRING.
EXTERNAL LAMPS OPERATE
PROPERLY, NO INDICATOR LAMP
OPERATION.(1) FAULTY INDICATOR LAMP IN
INSTRUMENT CLUSTER.(1) REPLACE LAMP.
8J - 2 TURN SIGNAL AND FLASHERSPL
Page 314 of 1200
WINDSHIELD WIPERS AND WASHERS
CONTENTS
page page
WINDSHIELD WASHER SYSTEM............. 8WINDSHIELD WIPERS..................... 1
WINDSHIELD WIPERS
INDEX
page page
GENERAL INFORMATION
INTRODUCTION......................... 1
DESCRIPTION AND OPERATION
WIPER BLADES.......................... 1
DIAGNOSIS AND TESTING
WINDSHIELD WIPER CONDITION............ 2
WIPER MOTOR.......................... 3
WIPER SWITCH.......................... 5
REMOVAL AND INSTALLATION
WIPER ARM............................. 5WIPER BLADE ELEMENT.................. 5
WIPER BLADE........................... 5
WIPER LINKAGE......................... 6
WIPER MODULE......................... 6
WIPER MOTOR.......................... 6
WIPER SWITCH.......................... 6
CLEANING AND INSPECTION
WIPER BLADES.......................... 6
ADJUSTMENTS
WIPER ARM ADJUSTMENT................. 7
GENERAL INFORMATION
INTRODUCTION
WARNING: VEHICLES ARE EQUIPPED WITH AN
AIRBAG, REFER TO GROUP 8M, RESTRAINT SYS-
TEMS FOR STEERING WHEEL OR COLUMN SER-
VICE PROCEDURES.
The windshield wipers will only operate with the
ignition switch in the ACCESSORY or IGNITION
RUN position. The wiper circuit is protect against
over loads by a fuse in the fuse block and a circuit
breaker within the wiper motor. This protects the cir-
cuitry of the wiper system and the vehicle.
The wiper motor has permanent magnet fields.
The intermittent wiper system, in addition to low
and high speed, has a delay mode and a pulse wipe
mode. The delay mode has a range of 1 to 15 seconds.
Pulse wipe is accomplished by momentarily moving
the stalk lever into the WASH position while the
wiper switch is in either OFF or DELAY position.
The wiper blades then sweep once or twice and
return to the previous wiper switch mode, OFF or
DELAY.The intermittent wiper function is integral to the
wiper switch. All electronics and relay are inside the
switch assembly.
The wiper system completes the wipe cycle when
the switch is turned OFF. The blades park in the
lowest portion of the wipe pattern.
DESCRIPTION AND OPERATION
WIPER BLADES
Wiper blades, exposed to the weather for a long
period of time, tend to lose their wiping effectiveness.
Periodic cleaning of the wiper blade is suggested to
remove the accumulation of salt and road film. The
wiper blades, arms, and windshield should be
cleaned with a sponge or cloth and a mild detergent
or nonabrasive cleaner. If the blades continue to
streak or smear, they should be replaced. The right
and left wipers are different blade lengths. The
driver side length is 525 mm and the passenger side
length is 450 mm. The blades should not be inter-
changed.
PLWINDSHIELD WIPERS AND WASHERS 8K - 1
Page 315 of 1200
DIAGNOSIS AND TESTING
WINDSHIELD WIPER CONDITION
WARNING: ON VEHICLES EQUIPPED WITH AIR-
BAGS, SEE GROUP 8M, RESTRAINT SYSTEMS FOR
STEERING WHEEL OR COLUMN REMOVAL PROCE-
DURES.
The following is a list of general wiper motor sys-
tem problems, the tests that are to be performed to
locate the faulty part, and the corrective action to be
taken.
Whatever the problem, disconnect motor wire har-
ness and clean the terminals, then connect motor
wire harness and test.
MOTOR WILL NOT OPERATE IN SOME OR ALL
SWITCH POSITIONS
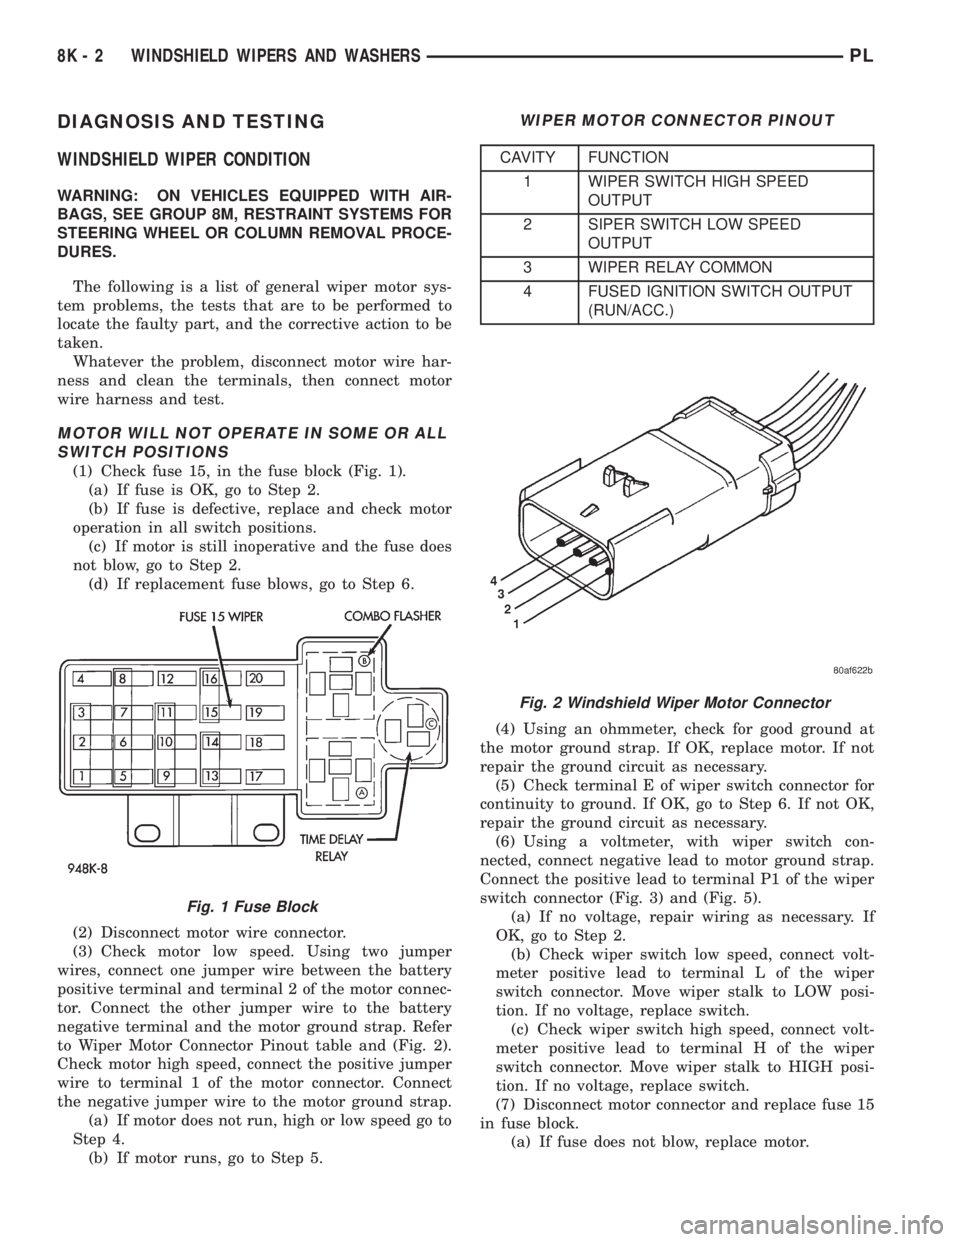
(1) Check fuse 15, in the fuse block (Fig. 1).
(a) If fuse is OK, go to Step 2.
(b) If fuse is defective, replace and check motor
operation in all switch positions.
(c) If motor is still inoperative and the fuse does
not blow, go to Step 2.
(d) If replacement fuse blows, go to Step 6.
(2) Disconnect motor wire connector.
(3) Check motor low speed. Using two jumper
wires, connect one jumper wire between the battery
positive terminal and terminal 2 of the motor connec-
tor. Connect the other jumper wire to the battery
negative terminal and the motor ground strap. Refer
to Wiper Motor Connector Pinout table and (Fig. 2).
Check motor high speed, connect the positive jumper
wire to terminal 1 of the motor connector. Connect
the negative jumper wire to the motor ground strap.
(a) If motor does not run, high or low speed go to
Step 4.
(b) If motor runs, go to Step 5.(4) Using an ohmmeter, check for good ground at
the motor ground strap. If OK, replace motor. If not
repair the ground circuit as necessary.
(5) Check terminal E of wiper switch connector for
continuity to ground. If OK, go to Step 6. If not OK,
repair the ground circuit as necessary.
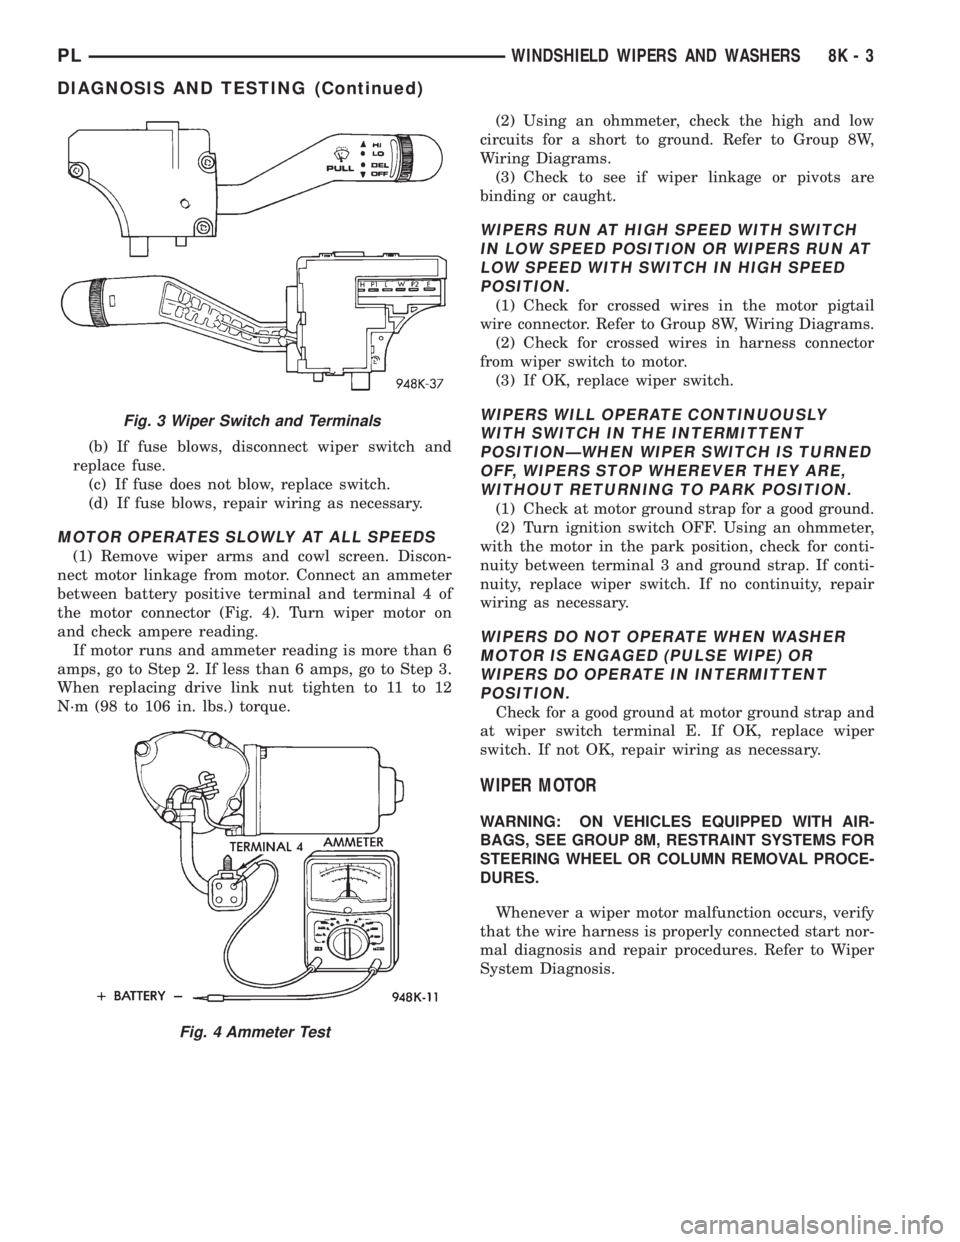
(6) Using a voltmeter, with wiper switch con-
nected, connect negative lead to motor ground strap.
Connect the positive lead to terminal P1 of the wiper
switch connector (Fig. 3) and (Fig. 5).
(a) If no voltage, repair wiring as necessary. If
OK, go to Step 2.
(b) Check wiper switch low speed, connect volt-
meter positive lead to terminal L of the wiper
switch connector. Move wiper stalk to LOW posi-
tion. If no voltage, replace switch.
(c) Check wiper switch high speed, connect volt-
meter positive lead to terminal H of the wiper
switch connector. Move wiper stalk to HIGH posi-
tion. If no voltage, replace switch.
(7) Disconnect motor connector and replace fuse 15
in fuse block.
(a) If fuse does not blow, replace motor.
Fig. 1 Fuse Block
WIPER MOTOR CONNECTOR PINOUT
CAVITY FUNCTION
1 WIPER SWITCH HIGH SPEED
OUTPUT
2 SIPER SWITCH LOW SPEED
OUTPUT
3 WIPER RELAY COMMON
4 FUSED IGNITION SWITCH OUTPUT
(RUN/ACC.)
Fig. 2 Windshield Wiper Motor Connector
8K - 2 WINDSHIELD WIPERS AND WASHERSPL
Page 316 of 1200
(b) If fuse blows, disconnect wiper switch and
replace fuse.
(c) If fuse does not blow, replace switch.
(d) If fuse blows, repair wiring as necessary.
MOTOR OPERATES SLOWLY AT ALL SPEEDS
(1) Remove wiper arms and cowl screen. Discon-
nect motor linkage from motor. Connect an ammeter
between battery positive terminal and terminal 4 of
the motor connector (Fig. 4). Turn wiper motor on
and check ampere reading.
If motor runs and ammeter reading is more than 6
amps, go to Step 2. If less than 6 amps, go to Step 3.
When replacing drive link nut tighten to 11 to 12
N´m (98 to 106 in. lbs.) torque.(2) Using an ohmmeter, check the high and low
circuits for a short to ground. Refer to Group 8W,
Wiring Diagrams.
(3) Check to see if wiper linkage or pivots are
binding or caught.
WIPERS RUN AT HIGH SPEED WITH SWITCH
IN LOW SPEED POSITION OR WIPERS RUN AT
LOW SPEED WITH SWITCH IN HIGH SPEED
POSITION.
(1) Check for crossed wires in the motor pigtail
wire connector. Refer to Group 8W, Wiring Diagrams.
(2) Check for crossed wires in harness connector
from wiper switch to motor.
(3) If OK, replace wiper switch.
WIPERS WILL OPERATE CONTINUOUSLY
WITH SWITCH IN THE INTERMITTENT
POSITIONÐWHEN WIPER SWITCH IS TURNED
OFF, WIPERS STOP WHEREVER THEY ARE,
WITHOUT RETURNING TO PARK POSITION.
(1) Check at motor ground strap for a good ground.
(2) Turn ignition switch OFF. Using an ohmmeter,
with the motor in the park position, check for conti-
nuity between terminal 3 and ground strap. If conti-
nuity, replace wiper switch. If no continuity, repair
wiring as necessary.
WIPERS DO NOT OPERATE WHEN WASHER
MOTOR IS ENGAGED (PULSE WIPE) OR
WIPERS DO OPERATE IN INTERMITTENT
POSITION.
Check for a good ground at motor ground strap and
at wiper switch terminal E. If OK, replace wiper
switch. If not OK, repair wiring as necessary.
WIPER MOTOR
WARNING: ON VEHICLES EQUIPPED WITH AIR-
BAGS, SEE GROUP 8M, RESTRAINT SYSTEMS FOR
STEERING WHEEL OR COLUMN REMOVAL PROCE-
DURES.
Whenever a wiper motor malfunction occurs, verify
that the wire harness is properly connected start nor-
mal diagnosis and repair procedures. Refer to Wiper
System Diagnosis.
Fig. 3 Wiper Switch and Terminals
Fig. 4 Ammeter Test
PLWINDSHIELD WIPERS AND WASHERS 8K - 3
DIAGNOSIS AND TESTING (Continued)
Page 317 of 1200
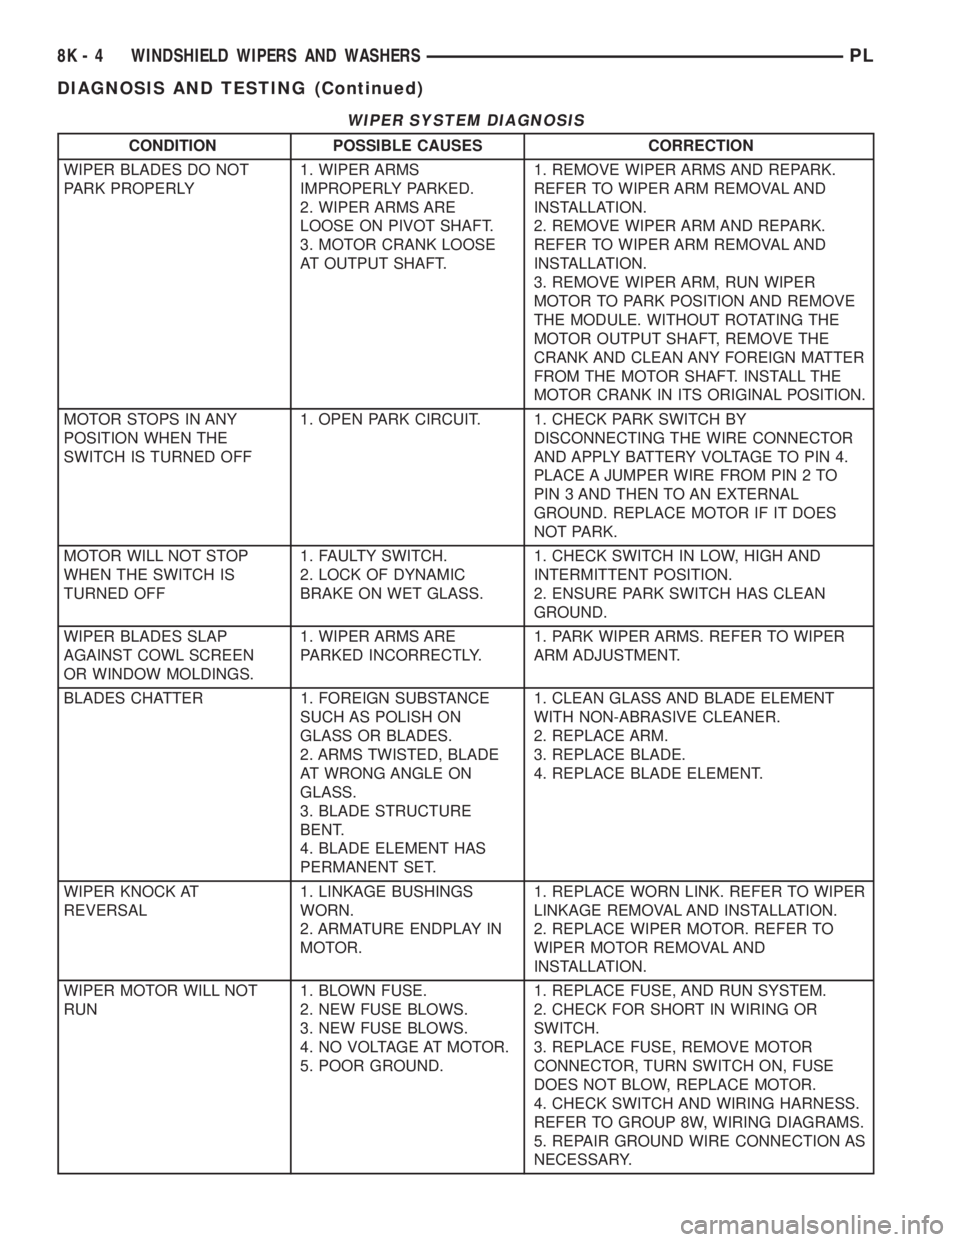
WIPER SYSTEM DIAGNOSIS
CONDITION POSSIBLE CAUSES CORRECTION
WIPER BLADES DO NOT
PARK PROPERLY1. WIPER ARMS
IMPROPERLY PARKED.
2. WIPER ARMS ARE
LOOSE ON PIVOT SHAFT.
3. MOTOR CRANK LOOSE
AT OUTPUT SHAFT.1. REMOVE WIPER ARMS AND REPARK.
REFER TO WIPER ARM REMOVAL AND
INSTALLATION.
2. REMOVE WIPER ARM AND REPARK.
REFER TO WIPER ARM REMOVAL AND
INSTALLATION.
3. REMOVE WIPER ARM, RUN WIPER
MOTOR TO PARK POSITION AND REMOVE
THE MODULE. WITHOUT ROTATING THE
MOTOR OUTPUT SHAFT, REMOVE THE
CRANK AND CLEAN ANY FOREIGN MATTER
FROM THE MOTOR SHAFT. INSTALL THE
MOTOR CRANK IN ITS ORIGINAL POSITION.
MOTOR STOPS IN ANY
POSITION WHEN THE
SWITCH IS TURNED OFF1. OPEN PARK CIRCUIT. 1. CHECK PARK SWITCH BY
DISCONNECTING THE WIRE CONNECTOR
AND APPLY BATTERY VOLTAGE TO PIN 4.
PLACE A JUMPER WIRE FROM PIN 2 TO
PIN 3 AND THEN TO AN EXTERNAL
GROUND. REPLACE MOTOR IF IT DOES
NOT PARK.
MOTOR WILL NOT STOP
WHEN THE SWITCH IS
TURNED OFF1. FAULTY SWITCH.
2. LOCK OF DYNAMIC
BRAKE ON WET GLASS.1. CHECK SWITCH IN LOW, HIGH AND
INTERMITTENT POSITION.
2. ENSURE PARK SWITCH HAS CLEAN
GROUND.
WIPER BLADES SLAP
AGAINST COWL SCREEN
OR WINDOW MOLDINGS.1. WIPER ARMS ARE
PARKED INCORRECTLY.1. PARK WIPER ARMS. REFER TO WIPER
ARM ADJUSTMENT.
BLADES CHATTER 1. FOREIGN SUBSTANCE
SUCH AS POLISH ON
GLASS OR BLADES.
2. ARMS TWISTED, BLADE
AT WRONG ANGLE ON
GLASS.
3. BLADE STRUCTURE
BENT.
4. BLADE ELEMENT HAS
PERMANENT SET.1. CLEAN GLASS AND BLADE ELEMENT
WITH NON-ABRASIVE CLEANER.
2. REPLACE ARM.
3. REPLACE BLADE.
4. REPLACE BLADE ELEMENT.
WIPER KNOCK AT
REVERSAL1. LINKAGE BUSHINGS
WORN.
2. ARMATURE ENDPLAY IN
MOTOR.1. REPLACE WORN LINK. REFER TO WIPER
LINKAGE REMOVAL AND INSTALLATION.
2. REPLACE WIPER MOTOR. REFER TO
WIPER MOTOR REMOVAL AND
INSTALLATION.
WIPER MOTOR WILL NOT
RUN1. BLOWN FUSE.
2. NEW FUSE BLOWS.
3. NEW FUSE BLOWS.
4. NO VOLTAGE AT MOTOR.
5. POOR GROUND.1. REPLACE FUSE, AND RUN SYSTEM.
2. CHECK FOR SHORT IN WIRING OR
SWITCH.
3. REPLACE FUSE, REMOVE MOTOR
CONNECTOR, TURN SWITCH ON, FUSE
DOES NOT BLOW, REPLACE MOTOR.
4. CHECK SWITCH AND WIRING HARNESS.
REFER TO GROUP 8W, WIRING DIAGRAMS.
5. REPAIR GROUND WIRE CONNECTION AS
NECESSARY.
8K - 4 WINDSHIELD WIPERS AND WASHERSPL
DIAGNOSIS AND TESTING (Continued)
Page 324 of 1200
WINDSHIELD WIPERS AND WASHERS
CONTENTS
page
WINDSHIELD WIPERS.................... 1
WINDSHIELD WIPERS
INDEX
page page
GENERAL INFORMATION
INTRODUCTION........................ 1
DIAGNOSIS AND TESTING
WINDSHIELD WIPER CONDITION........... 1WIPER MOTOR......................... 3
WIPER SWITCH......................... 5
GENERAL INFORMATION
INTRODUCTION
WARNING: VEHICLES ARE EQUIPPED WITH AN
AIRBAG, REFER TO GROUP 8M, RESTRAINT SYS-
TEMS FOR STEERING WHEEL OR COLUMN SER-
VICE PROCEDURES.
The windshield wipers will only operate with the
ignition switch in the ACCESSORY or IGNITION
RUN position. The wiper circuit is protect against
over loads by a fuse in the fuse block and a circuit
breaker within the wiper motor. This protects the cir-
cuitry of the wiper system and the vehicle.
The wiper motor has permanent magnet fields.
The intermittent wiper system, in addition to low
and high speed, has a delay mode and a pulse wipe
mode. The delay mode has a range of 1 to 15 seconds.
Pulse wipe is accomplished by momentarily moving
the stalk lever into the WASH position while the
wiper switch is in either OFF or DELAY position.
The wiper blades then sweep once or twice and
return to the previous wiper switch mode, OFF or
DELAY.
The intermittent wiper function is integral to the
wiper switch. All electronics and relay are inside the
switch assembly.
The wiper system completes the wipe cycle when
the switch is turned OFF. The blades park in the
lowest portion of the wipe pattern.
DIAGNOSIS AND TESTING
WINDSHIELD WIPER CONDITION
WARNING: ON VEHICLES EQUIPPED WITH AIR-
BAGS, SEE GROUP 8M, RESTRAINT SYSTEMS FOR
STEERING WHEEL OR COLUMN REMOVAL PROCE-
DURES.
The following is a list of general wiper motor sys-
tem problems, the tests that are to be performed to
locate the faulty part, and the corrective action to be
taken.
Whatever the problem, disconnect motor wire har-
ness and clean the terminals, then connect motor
wire harness and test.
MOTOR WILL NOT OPERATE IN SOME OR ALL
SWITCH POSITIONS
(1) Check fuse 15, in the fuse block (Fig. 1).
(a) If fuse is OK, go to Step 2.
(b) If fuse is defective, replace and check motor
operation in all switch positions.
(c) If motor is still inoperative and the fuse does
not blow, go to Step 2.
(d) If replacement fuse blows, go to Step 6.
PLWINDSHIELD WIPERS AND WASHERS 8K - 1