Page 135 of 3115
D12641
AT116-01
D12640
AT-28
- AUTOMATIC TRANSMISSIONFLOOR SHIFT ASSEMBLY
1882 Author�: Date�:
2004 LAND CRUISER (RM1071U)
INSTALLATION
1. INSTALL FLOOR SHIFT LEVER ASSEMBLY
(a) Install the floor shift lever assembly with the 6 bolts.
Torque: 8.3 N´m (85 kgf´cm, 73 in.´lbf)
(b) Connect the connector to the floor shift lever assembly.
2. INSTALL No.1 FLOOR SHIFT GEAR SHIFTING ROD
(a) Shift into the N position.
(b) Connect the No.1 floor shift gear shifting rod and the con-
necting rod swivel with the nut.
Torque: 13 N´m (130 kgf´cm, 9 ft.´lbf)
3. INSTALL UPPER CONSOL PANNEL
(See Page BO-84)
4. INSTALL TRANSFER SHIFT LEVER KNOB
Page 136 of 3115

AT115-01
D12649
D12648
D04855
AT-26
- AUTOMATIC TRANSMISSIONFLOOR SHIFT ASSEMBLY
1880 Author�: Date�:
2004 LAND CRUISER (RM1071U)
REASSEMBLY
1. REASSEMBLE SHIFT LEVER PLATE
(a) Install the 2 spring nuts.
(b) Install the 4 collars.
(c) Install the shift lever seal.
(d) Install the shaft lower control bush, the spacer, the 2 plate
washers and the swivel.
(e) Using pliers, install the clip.
(f) Apply MP grease to 2 new O-rings.
(g) Install the 2 O-rings, 2 new spacers, the plate washer, the
control lever and the nut.
Torque: 13 N´m (130 kgf´cm, 9 ft´lbf)
2. INSTALL SHIFT LEVER SUB-ASSEMBLY
(a) Apply MP grease to the pin.
(b) Install the shift lever sub-assembly and pin.
(c) Install the shift lever ring.
(d) Apply MP grease to the detent shift lever pin and the
spring.
(e) Install the detent shift lever pin and spring.
3. REASSEMBLE SHIFT LOCK SOLENOID
(a) Apply MP grease to the shift lock solenoid link.
(b) Install the shift lock solenoid link and the pin to the shift
lock solenoid plunger.
(c) Install the shift lock solenoid link with shift lock solenoid
plunger and the spring to the shift lock solenoid.
Page 137 of 3115

D12642
- AUTOMATIC TRANSMISSIONFLOOR SHIFT ASSEMBLY
AT-27
1881 Author�: Date�:
2004 LAND CRUISER (RM1071U)
4. CONNECT SHIFT LOCK CONTROL ECU, SHIFT LOCK
SOLENOID, SHIFT LOCK CONTROL SWITCH, INDI-
CATOR LAMP WIRE AND 2 TRANSMISSION CON-
TROL SWITCH
5. REASSEMBLE SHIFT LEVER GUIDE HOUSING
(a) Apply MP grease to the shift lever lock pin.
(b) Install the shift lever lock pin, the shift lock plate stopper
and the cushion to the shift lever guide housing.
(c) Install a new shift lever nut to the shift lever lock pin by
knocking them lightly via the 10 mm seated nut.
HINT:
Install the shift lever guide cushion of the shift lever nut in the
same way.
(d) Apply MP grease to the shift lock release button.
(e) Install the spring and the shift lock release button.
(f) Connect the transmission control switch connector to the
shift lever guide housing.
(g) Install the shift lock control ECU bracket to the shift lock
control ECU.
(h) Install the shift lock control ECU and the shift lock sole-
noid with the 3 screws to the shift lever guide housing.
(i) Install the shift lever guide cushion with 3 new shift lever
nuts.
6. INSTALL SHIFT LEVER GUIDE HOUSING
(a) Install the shift lever guide housing assembly with the 4
bolts and nuts to the shift lever plate.
Torque: 4.9 N´m (50 kgf´cm, 43 in.´lbf)
(b) Install the 2 transmission control switches and the shift
lock control switch to the shift lever guide housing.
(c) Connect the shift lock control ECU connector to the shift
lever plate.
7. INSTALL SLIDE COVER AND NO. 2 SLIDE COVER
8. INSTALL POSITION INDICATOR LIGHT GUIDE
(a) Install the position indicator light guide.
(b) Connect the indicator lamp wire to the position indicator
light guide.
9. INSTALL POSITION INDICATOR HOUSING
(a) Install the position indicator housing.
(b) Install the shift lock release cover to the position indicator
housing.
10. INSTALL SHIFT LEVER KNOB
Page 138 of 3115
AT07T-04
D12640
D12641
AT-22
- AUTOMATIC TRANSMISSIONFLOOR SHIFT ASSEMBLY
1876 Author�: Date�:
2004 LAND CRUISER (RM1071U)
REMOVAL
1. REMOVE TRANSFER SHIFT LEVER KNOB
2. REMOVE UPPER CONSOLE PANEL
(See page BO-84)
3. SEPARATE NO. 1 FLOOR SHIFT GEAR SHIFTING
ROD
(a) Shift into the N position.
(b) Remove the nut and separate the No. 1 floor shift gear
shifting rod from the connecting rod swivel.
4. REMOVE FLOOR SHIFT LEVER ASSEMBLY
(a) Disconnect the connector.
(b) Remove the 6 bolts.
Torque: 8.3 N´m (85 kgf´cm, 73 in.´lbf)
(c) Remove the floor shift lever assembly.
Page 139 of 3115
AT112-01
D12708
D12709
D12710
D12708
AT-12
- AUTOMATIC TRANSMISSIONPARKING LOCK PAWL
1866 Author�: Date�:
2004 LAND CRUISER (RM1071U)
PARKING LOCK PAWL
ON-VEHICLE REPAIR
1. REMOVE VALVE BODY (See page AT-8)
2. REMOVE PARKING LOCK PAWL BRACKET
3. REMOVE PARKING LOCK ROD
4. REMOVE SPRING FROM PARKING LOCK PAWL
SHAFT
5. REMOVE PARKING LOCK PAWL AND SHAFT
6. INSTALL PARKING LOCK PAWL AND SHAFT
7. INSTALL SPRING TO PARKING LOCK PAWL SHAFT
8. INSTALL PARKING LOCK PAWL BRACKET
HINT:
�Push the lock rod fully forward.
�Check that the parking lock pawl operates smoothly.
Torque: 7.4 N´m (75 kgf´cm, 65 in.´lbf)
9. INSTALL VALVE BODY (See page AT-8)
Page 140 of 3115
AT110-01
D12667
Lock Washer
- AUTOMATIC TRANSMISSIONPARK/NEUTRAL POSITION (PNP) SWITCH
AT-7
1861 Author�: Date�:
2004 LAND CRUISER (RM1071U)
PARK/NEUTRAL POSITION (PNP)
SWITCH
ON-VEHICLE REPAIR
1. REMOVE ENGINE NO. 2 UNDER COVER
2. DISCONNECT PARK/NEUTRAL POSITION SWITCH
CONNECTOR
3. REMOVE PARK/NEUTRAL POSITION SWITCH
(a) Pry off the lock washer and remove the nut.
(b) Remove the bolt and park/neutral position switch.
4. INSTALL PARK/NEUTRAL POSITION SWITCH
(a) Install the park/neutral position switch with the bolt.
Torque: 13 N´m (130 kgf´cm, 9 ft´lbf)
(b) Install a new lock washer and the nut.
Torque: 6.9 N´m (70 kgf´cm, 62 in.´lbf)
(c) Bent the claws on the lock washer to stake the nut.
(d) Adjust the park/neutral position switch
(See page DI-361).
5. CONNECT PARK/NEUTRAL POSITION SWITCH CON-
NECTOR
6. INSTALL ENGINE NO. 2 UNDER COVER
Page 144 of 3115

AT5436
SST
AT07X-03
AT5437
Hold
Turn
Free
Lock
Q04237
AT4184
AT-34
- AUTOMATIC TRANSMISSIONTORQUE CONVERTER CLUTCH AND DRIVE PLATE
1888 Author�: Date�:
2004 LAND CRUISER (RM1071U)
TORQUE CONVERTER CLUTCH
AND DRIVE PLATE
INSPECTION
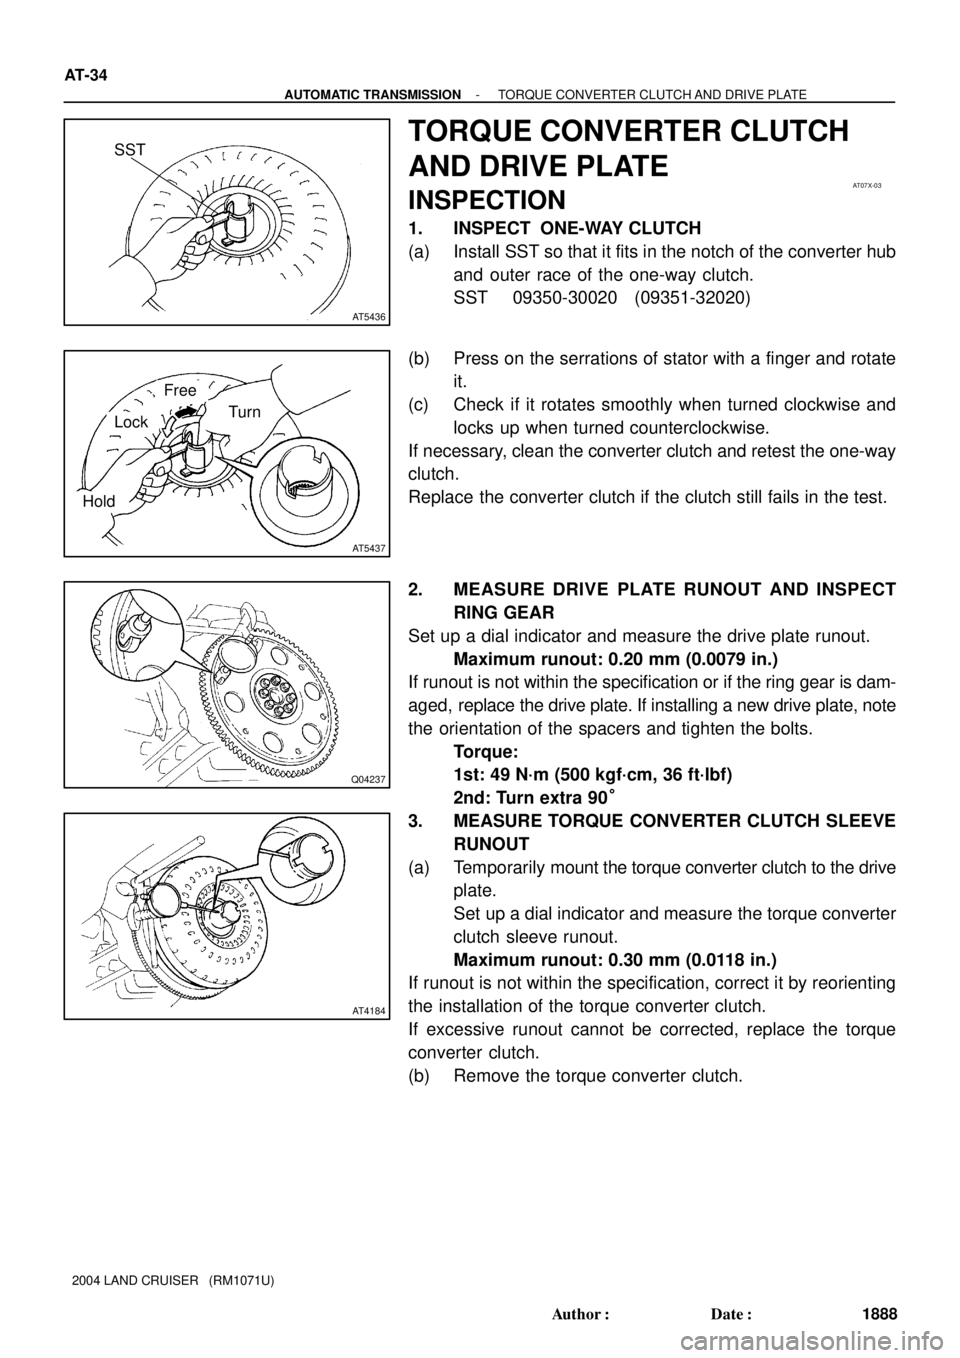
1. INSPECT ONE-WAY CLUTCH
(a) Install SST so that it fits in the notch of the converter hub
and outer race of the one-way clutch.
SST 09350-30020 (09351-32020)
(b) Press on the serrations of stator with a finger and rotate
it.
(c) Check if it rotates smoothly when turned clockwise and
locks up when turned counterclockwise.
If necessary, clean the converter clutch and retest the one-way
clutch.
Replace the converter clutch if the clutch still fails in the test.
2. MEASURE DRIVE PLATE RUNOUT AND INSPECT
RING GEAR
Set up a dial indicator and measure the drive plate runout.
Maximum runout: 0.20 mm (0.0079 in.)
If runout is not within the specification or if the ring gear is dam-
aged, replace the drive plate. If installing a new drive plate, note
the orientation of the spacers and tighten the bolts.
Torque:
1st: 49 N´m (500 kgf´cm, 36 ft´lbf)
2nd: Turn extra 90°
3. MEASURE TORQUE CONVERTER CLUTCH SLEEVE
RUNOUT
(a) Temporarily mount the torque converter clutch to the drive
plate.
Set up a dial indicator and measure the torque converter
clutch sleeve runout.
Maximum runout: 0.30 mm (0.0118 in.)
If runout is not within the specification, correct it by reorienting
the installation of the torque converter clutch.
If excessive runout cannot be corrected, replace the torque
converter clutch.
(b) Remove the torque converter clutch.
Page 145 of 3115

AT5436
SST
AT07X-03
AT5437
Hold
Turn
Free
Lock
Q04237
AT4184
AT-34
- AUTOMATIC TRANSMISSIONTORQUE CONVERTER CLUTCH AND DRIVE PLATE
1888 Author�: Date�:
2004 LAND CRUISER (RM1071U)
TORQUE CONVERTER CLUTCH
AND DRIVE PLATE
INSPECTION
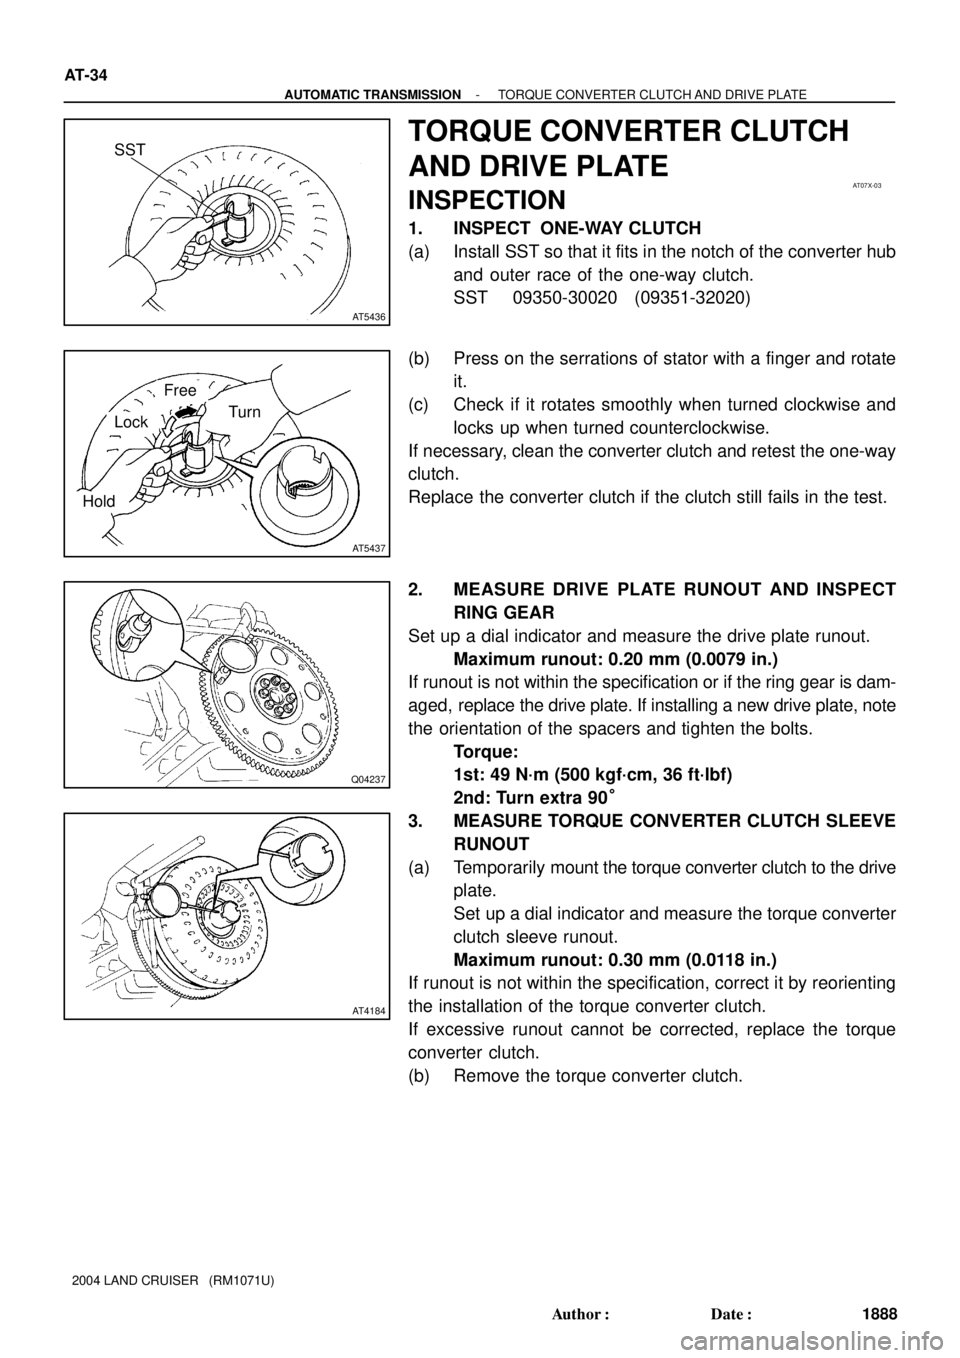
1. INSPECT ONE-WAY CLUTCH
(a) Install SST so that it fits in the notch of the converter hub
and outer race of the one-way clutch.
SST 09350-30020 (09351-32020)
(b) Press on the serrations of stator with a finger and rotate
it.
(c) Check if it rotates smoothly when turned clockwise and
locks up when turned counterclockwise.
If necessary, clean the converter clutch and retest the one-way
clutch.
Replace the converter clutch if the clutch still fails in the test.
2. MEASURE DRIVE PLATE RUNOUT AND INSPECT
RING GEAR
Set up a dial indicator and measure the drive plate runout.
Maximum runout: 0.20 mm (0.0079 in.)
If runout is not within the specification or if the ring gear is dam-
aged, replace the drive plate. If installing a new drive plate, note
the orientation of the spacers and tighten the bolts.
Torque:
1st: 49 N´m (500 kgf´cm, 36 ft´lbf)
2nd: Turn extra 90°
3. MEASURE TORQUE CONVERTER CLUTCH SLEEVE
RUNOUT
(a) Temporarily mount the torque converter clutch to the drive
plate.
Set up a dial indicator and measure the torque converter
clutch sleeve runout.
Maximum runout: 0.30 mm (0.0118 in.)
If runout is not within the specification, correct it by reorienting
the installation of the torque converter clutch.
If excessive runout cannot be corrected, replace the torque
converter clutch.
(b) Remove the torque converter clutch.