Page 379 of 3115
BO1J6-03
H18901
Energy Absorber
Fog LightRadiator Grille
: Specified torque
N´m (kgf´cm, ft´lbf)
3.0 (31, 27 in.´lbf)
Front Bumper Cover
x 4
58 (590, 43)
58 (590, 43)
58 (590, 43)
8.5 (87, 76 in.´lbf)
3.0 (31, 27 in.´lbf)
4.9 (50, 43 in.´lbf)
4.9 (50, 43 in.´lbf)
Front Bumper Reinforcement
58 (590, 43)
Fog Light BO-4
- BODYFRONT BUMPER
2578 Author�: Date�:
2004 LAND CRUISER (RM1071U)
FRONT BUMPER
COMPONENTS
Page 380 of 3115
BO1JC-03
H04760
SST
H04761
BO2556
BO-12
- BODYFRONT DOOR
2586 Author�: Date�:
2004 LAND CRUISER (RM1071U)
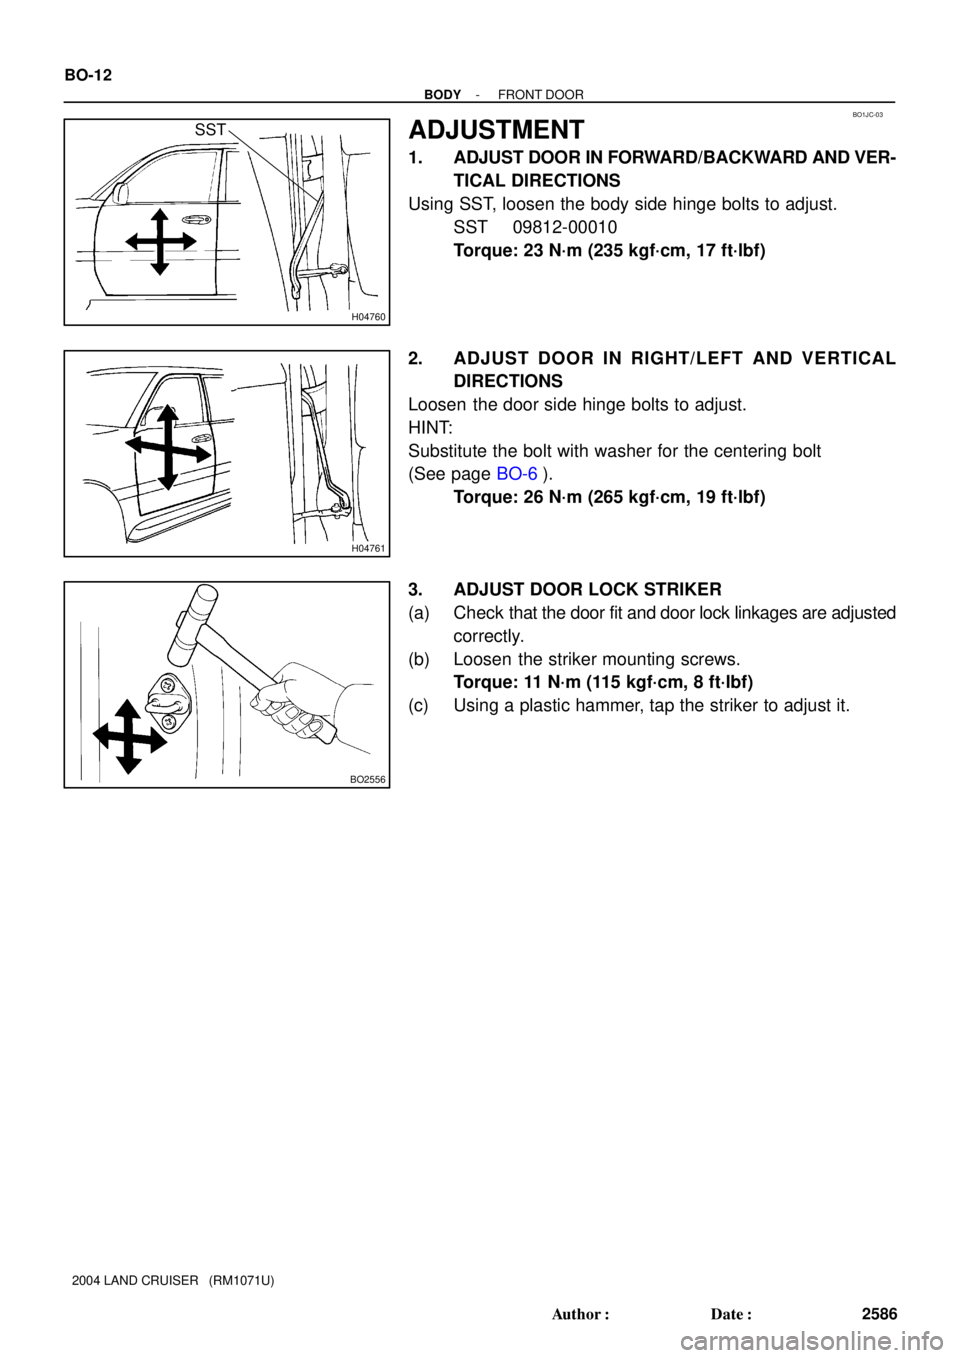
ADJUSTMENT
1. ADJUST DOOR IN FORWARD/BACKWARD AND VER-
TICAL DIRECTIONS
Using SST, loosen the body side hinge bolts to adjust.
SST 09812-00010
Torque: 23 N´m (235 kgf´cm, 17 ft´lbf)
2. ADJUST DOOR IN RIGHT/LEFT AND VERTICAL
DIRECTIONS
Loosen the door side hinge bolts to adjust.
HINT:
Substitute the bolt with washer for the centering bolt
(See page BO-6).
Torque: 26 N´m (265 kgf´cm, 19 ft´lbf)
3. ADJUST DOOR LOCK STRIKER
(a) Check that the door fit and door lock linkages are adjusted
correctly.
(b) Loosen the striker mounting screws.
Torque: 11 N´m (115 kgf´cm, 8 ft´lbf)
(c) Using a plastic hammer, tap the striker to adjust it.
Page 381 of 3115
BO1JA-04
H20972
Door Glass Run Door Glass
Outside Handle
Door Lock Cylinder
Door Lock
Window RegulatorLower FrameDoor Belt Moulding
Tweeter Speaker
Lower Frame
Bracket Garnish Outside Rear View Mirror
Service
Hole Cover Door Inside
Handle Bezel
No. 1Inside Handle
Door Courtesy Light
Door TrimSpeaker
Door Hinge Door Check
5.0 (51, 44 in.´lbf)
5.0 (51, 44 in.´lbf)
26 (265, 19)
26 (265, 19)
�
: Specified torqueN´m (kgf´cm, ft´lbf)
� Precoated part
8.0 (82, 71 in.´lbf)
27 (275, 20)
5.0 (51, 44 in.´lbf)
Power Window Switch
Door Lock Link
Protector
8.0 (82, 71 in.´lbf)
8.0 (82, 71 in.´lbf)Door Inside
Handle Bezel No. 2
Door Check Cover
8.0 (82, 71 in.´lbf)
8.0 (82, 71 in.´lbf)
5.0 (51, 44 in.´lbf)
23 (235, 17)
23 (235, 17)
BO-8
- BODYFRONT DOOR
2582 Author�: Date�:
2004 LAND CRUISER (RM1071U)
FRONT DOOR
COMPONENTS
Page 383 of 3115

6. REMOVE DOOR TRIM
(a) Remove the 2 caps and the 7 screws.
(b) Remove the 3 clips.
(c) Ins")
H04821
: Clip
H21409
H04754
H04755
BO-10
- BODYFRONT DOOR
2584 Author�: Date�:
2004 LAND CRUISER (RM1071U)
6. REMOVE DOOR TRIM
(a) Remove the 2 caps and the 7 screws.
(b) Remove the 3 clips.
(c) Insert a screwdriver between the door and the door trim
to pry the trim.
NOTICE:
Be careful not to damage the door and the door trim.
HINT:
Tape up the screwdriver tip before use.
(d) Pull the trim upward to remove it.
7. REMOVE INSIDE HANDLE
(a) Remove the screw and the inside handle.
(b) Disconnect the 2 control cables from the inside handle as
shown in the illustration.
8. REMOVE TWEETER SPEAKER
Disconnect the connector, then remove the bolt and the tweeter
speaker.
9. REMOVE OUTSIDE REAR VIEW MIRROR
Disconnect the connector, then remove the 3 bolts and the out-
side rear view mirror.
10. REMOVE SERVICE HOLE COVER
(a) Remove the clamps and the wire harness.
(b) Remove the service hole cover.
NOTICE:
Do not tear the cover.
HINT:
At the time of reassembly, pull out the 2 control cables and wire
harness through the service hole cover.
11. REMOVE DOOR BELT MOULDING
(a) Remove the screw.
(b) Using a scraper, remove the door belt moulding.
HINT:
Tape up the scraper tip before use.
12. REMOVE DOOR GLASS
(a) Open the door glass until the bolts appear in the service
hole.
(b) Remove the 2 bolts and the door glass.
Torque: 8.0 N´m (82 kgf´cm, 71 in.´lbf)
NOTICE:
Do not damage the door glass.
HINT:
Pull the glass upward to remove it.
13. REMOVE SPEAKER
Remove the 3 screws and the speaker, then disconnect the
connector.
14. REMOVE DOOR GLASS RUN
15. REMOVE LOWER FRAME
Remove the bolt and the lower frame.
Page 384 of 3115

16. REMOVE WINDOW REGULATOR
(a) Disconnect the connector, then remove the 5 bolts.
Torque: 8.0 N�")
H04756
H21413
H21410
H21411
- BODYFRONT DOOR
BO-1 1
2585 Author�: Date�:
2004 LAND CRUISER (RM1071U)
16. REMOVE WINDOW REGULATOR
(a) Disconnect the connector, then remove the 5 bolts.
Torque: 8.0 N´m (82 kgf´cm, 71 in.´lbf)
(b) Loosen the bolt and the window regulator.
Torque: 8.0 N´m (82 kgf´cm, 71 in.´lbf)
HINT:
�Remove the regulator through the service hole.
�At the time of reassembly, apply MP grease to the window
regulator.
NOTICE:
At the time of reassembly, do not apply grease to the spring
of the window regulator.
17. REMOVE DOOR LOCK
(a) Remove the clip and the door lock link protector.
(b) Disconnect the connector.
(c) Disconnect the 2 links from the outside handle and the
door lock cylinder.
(d) Using a torx wrench, remove the 3 screws and the door
lock through the service hole.
Torx wrench: T30 (Part No. 09042-00010 or locally
manufactured tool)
Torque: 5.0 N´m (51 kgf´cm, 44 in.´lbf)
HINT:
At the time of reassembly:
�Apply adhesive to the 3 screws.
Part No. 08833-00070, THREE BOND 1324 or equiva-
lent.
�Remove the protector, and apply MP grease to the sliding
and rotating parts of the door lock.
18. REMOVE OUTSIDE HANDLE WITH DOOR LOCK CYL-
INDER
(a) Remove the 2 bolts and the outside handle with the door
lock cylinder.
Torque: 5.0 N´m (51 kgf´cm, 44 in.´lbf)
(b) Remove the bolt and the door lock cylinder from the out-
side handle.
Torque: 5.0 N´m (51 kgf´cm, 44 in.´lbf)
Page 386 of 3115

BO1KT-04
H18928
Headrest
Headrest Support
Seatback Board
Lumber Support Seatback Frame
Seatback Pad Armrest
Seat Cushion Cover
Seat Cushion Pad
Seat Cushion Frame
Seat Cushion
Inner Shield
Front Seat Inner BeltReclining Adjuster Inside Shield
Lower Seat Cushion Shield
Seat Cushion
Outer Shield
Power Seat
Switch Knob Power Seat SwitchLumber Support Switch
Front Seat
Cushion ShieldSeat Position Control Relay Seatback Cover� Hog Ring
� Hog Ring
: Specified torqueN´m (kgf´cm, ft´lbf)
� Non-reusable part
Seat HeaterSeat Heater
Seat WireSeat Wire
Seat Adjuster Assembly
w/ Side Airbag:
Side Airbag Assembly
37 (380, 27)
21 (210, 15)
21 (210, 15)
43 (440, 32)
21 (210, 15)
42 (430, 31)
8.0 (82, 71 in.´lbf)
Seat Position Sensor Driver's Side:
42 (430, 31)
�
42 (430, 31)
42 (430, 31)
Armrest Cap
Armrest Bush
Spacer
4.7 (48, 42 in.´lbf)
w/ Side Airbag:
5.5 (56, 49 in.´lbf)
5.5 (56, 49 in.´lbf)
42 (430, 31)
43 (440, 32)
BO-104
- BODYFRONT SEAT
2678 Author�: Date�:
2004 LAND CRUISER (RM1071U)
FRONT SEAT
COMPONENTS
Page 392 of 3115
BO4J3-01
H18929
H04785
H04468
H21292
BO-1 14
- BODYFRONT SEAT
2688 Author�: Date�:
2004 LAND CRUISER (RM1071U)
REASSEMBLY
1. Driver 's Side:
INSTALL SEAT POSITION SENSOR
Install the seat position sensor with a new bolt, then connect the
connector.
Part No.:
Bolt: 90119-06871
Torque: 8.0 N´m (82 kgf´cm, 71 in.´lbf)
2. INSTALL SEAT POSITION CONTROL RELAY
Install the seat position control relay with the 2 bolts, then con-
nect the connectors.
Torque: 5.5 N´m (56 kgf´cm, 49 in.´lbf)
3. INSTALL SEATBACK COVER
Install the seatback cover to the seatback pad with new hog
rings.
4. INSTALL LUMBER SUPPORT
Install the lumber support and the spacer with the 2 bolts.
5. w/o Side Airbag:
INSTALL SEATBACK FRAME
(a) Install the seatback cover to the seatback frame.
(b) Install new hog rings.
(c) Install the 2 headrest supports.
Page 393 of 3115

6. w/ Side Airbag:
INSTALL SEATBACK FRAME
(a) Install the seatback cover to the seatback")
H20961
H21294
H19941
H21291
H20959
- BODYFRONT SEAT
BO-1 15
2689 Author�: Date�:
2004 LAND CRUISER (RM1071U)
6. w/ Side Airbag:
INSTALL SEATBACK FRAME
(a) Install the seatback cover to the seatback frame.
(b) Install new hog rings, the clamps and the 2 bolts.
Torque: 4.7 N´m (48 kgf´cm, 42 in.´lbf)
(c) Install the 2 headrest supports.
7. INSTALL SEATBACK ASSEMBLY
(a) w/o Side Airbag:
Install the RH reclining adjuster inside shield with a screw.
(b) w/ Side Airbag:
Place the airbag connector along the inner seat adjuster,
and then install the RH reclining adjuster inside shield
with a screw so that the connector is placed in between.
NOTICE:
When handling the airbag connector, take care not to dam-
age the airbag wire harness.
(c) Install the LH reclining adjuster inside shield with a screw.
(d) Install the seatback assembly with the 4 bolts.
Torque: 43 N´m (440 kgf´cm, 32 ft´lbf)
(e) Install new hog rings.
(f) Hang the hook.
(g) Connect the connectors.
8. INSTALL ARMREST
Torque: 37 N´m (380 kgf´cm, 27 ft´lbf)
9. INSTALL HEADREST
10. INSTALL SEAT CUSHION COVER (See page BO-1 10)
11. INSTALL SEAT CUSHION FRAME
(a) Install the seat cushion frame with new hog rings to the
seat cushion cover with pad.
(b) Hang the hook.
12. INSTALL SEAT CUSHION ASSEMBLY
(a) Install the seat cushion assembly with the 4 bolts to the
seat adjuster.
Torque: 21 N´m (210 kgf´cm, 15 ft´lbf)
(b) Engage the wire harness clamp.

3.0 (31, 27 in.´lbf)
Front Bumper Cover
x 4
58 (590, 43)
58 (590, 43)
58 (590, 43)
8.5 (87, 76 in.�")