1998 JAGUAR X308 module
[x] Cancel search: modulePage 1066 of 2490
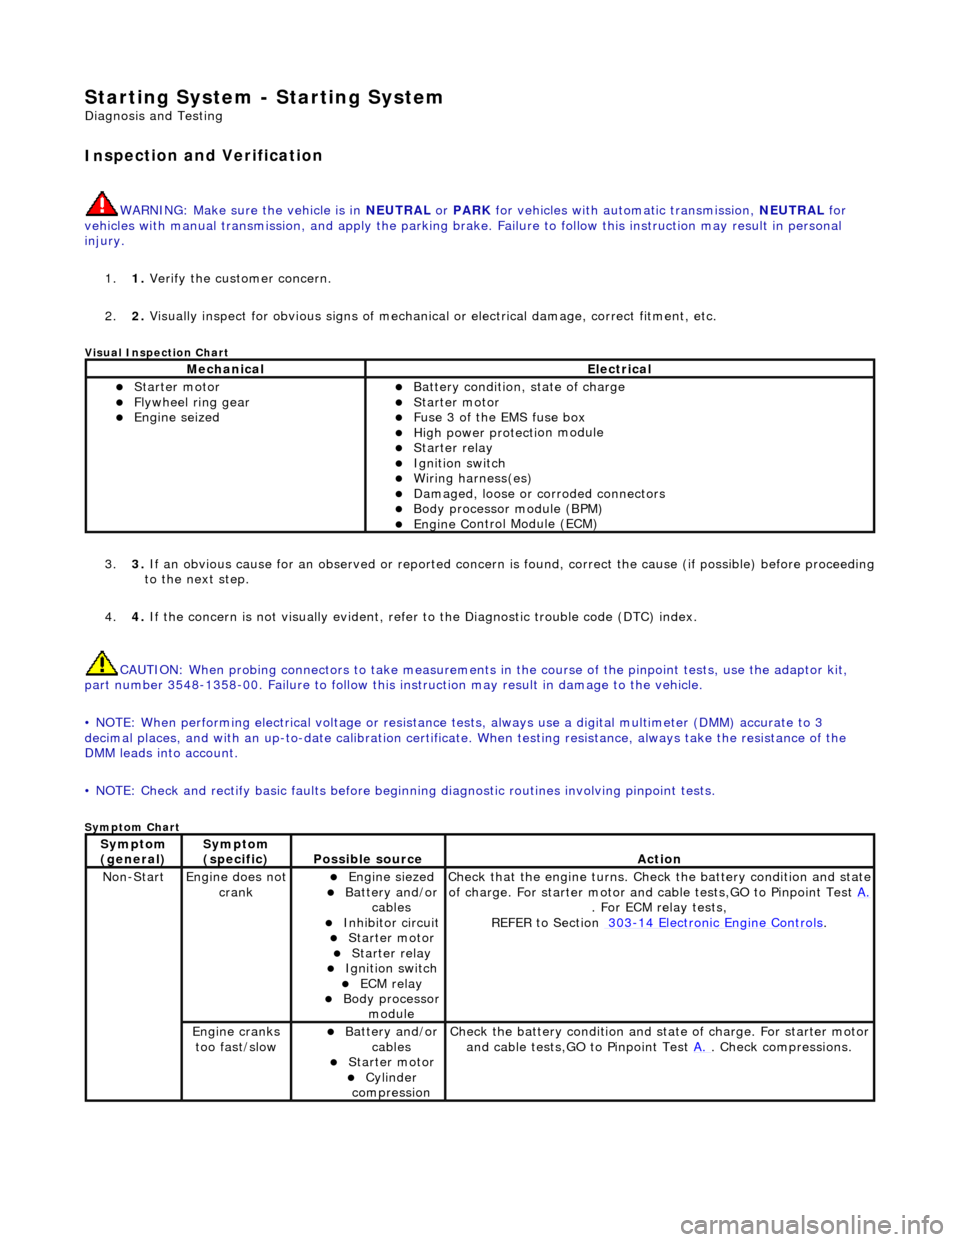
Starting System - Starting System
Diagn
osis and Testing
I
n
spection and Verification
W
A
RNING: Make sure
the vehicle is in NEUTRAL or PARK for vehicles with au tomatic transmission, NEUTRAL for
vehicles with manual transmissi on, and apply the parking brake. Failure to foll ow this instruction may result in personal
injury.
1. 1. Verify the customer concern.
2. 2. Visually inspect for obvious signs of mechanical or electrical damage, correct fitment, etc.
Vi
sual Inspection Chart
3.
3. If an obvi
ous cause for an observed or
reported concern is found, correct th e cause (if possible) before proceeding
to the next step.
4. 4. If the concern is not visually evident, refer to the Diagnostic trouble code (DTC) index.
CAUTION: When probing connectors to take measurements in the course of the pinpoint tests, use the adaptor kit,
part number 3548-1358-00. Failure to follow this in struction may result in damage to the vehicle.
• NOTE: When performing electrical voltag e or resistance tests, always use a digital multimeter (DMM) accurate to 3
decimal places, and with an up-t o-date calibration certificate. When testing resistance, always take the resistance of the
DMM leads into account.
• NOTE: Check and rectify basic faults before beginning diagnostic ro utines involving pinpoint tests.
Sym
ptom Chart
MechanicalElectrical
Starte
r motor
Flywheel
ring gear
Engine
s
eized
Batter
y condition, state of charge
Starte
r motor
F
u
se 3 of the EMS fuse box
High
power protec ti
on module
Starter relay Ignition switc
h
W
i
ring harness(es)
Damaged, loose or corroded connector
s
Body processor module (B
PM)
Engine
C
ontrol Module (ECM)
Sy
m
ptom
(
gene r
al)
Sy
m
ptom
(specific)
Possib l
e source
Acti
o
n
No
n
-Start
Engine does
not
crankEngine s
iezed
Batt
ery and
/or
cables
Inhibitor circuit St arte
r motor
Starter relay Ignition switc
h
ECM relay Body processor
modu le
Check that
the engine turns. Check the battery condition and state
of charge. For starter motor and ca ble tests,GO to Pinpoint Test A.
. For ECM relay
tests,
REFER to Section 303
-14
Electronic Engine Controls
.
Engine
c
ranks
too fast/slow
Batt ery and
/or
cables
St arte
r motor
Cy
linder
com
pression
Check the battery con
dition
and st
ate of charge. For starter motor
and cable tests,GO to Pinpoint Test A.
. Chec
k compressions.
Page 1073 of 2490
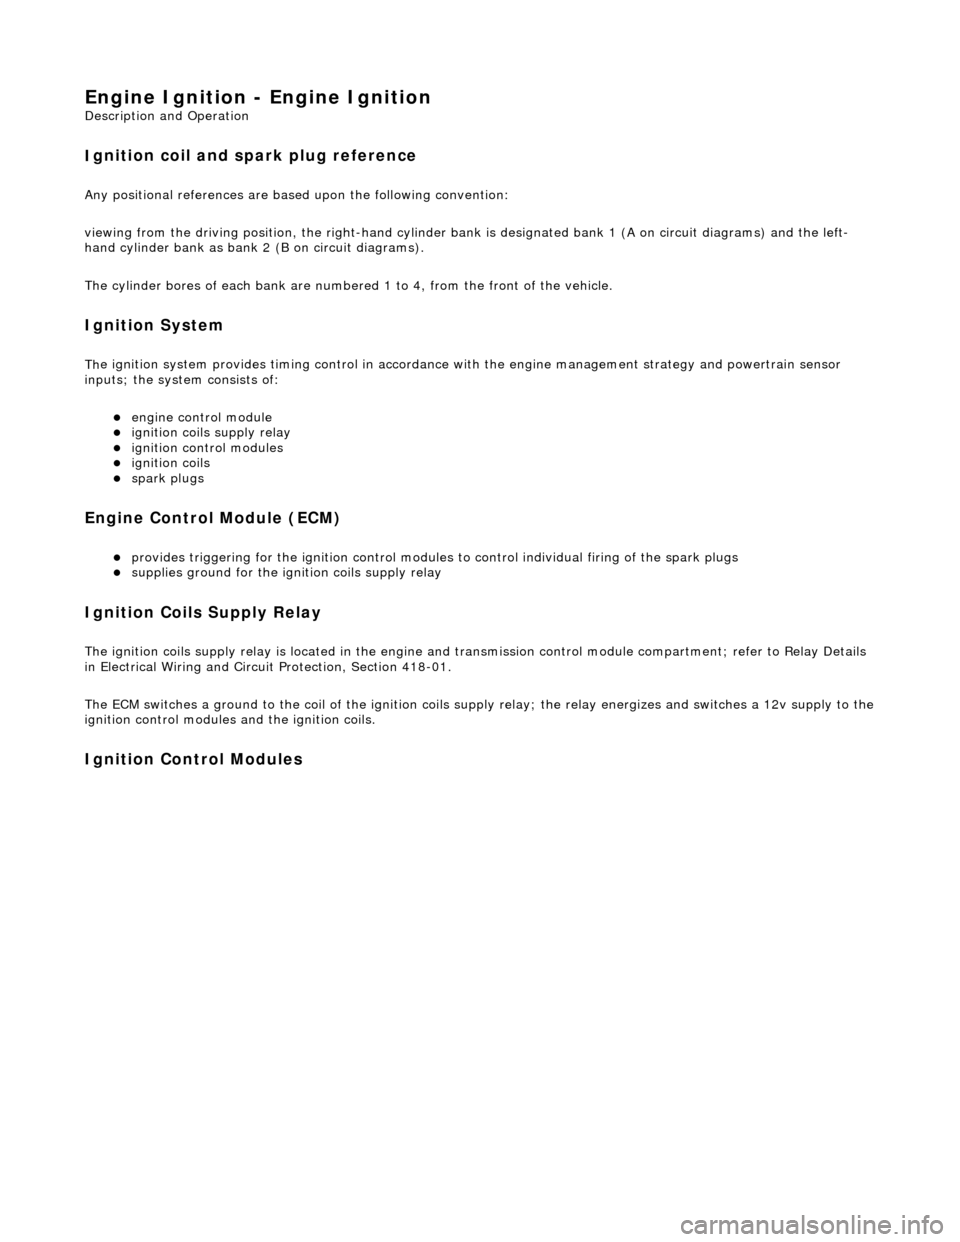
Engine Igni
tion -
Engine Ignition
Description an
d Operation
I
gnition coil and spark plug reference
Any positional r
eferences are base
d upon the following convention:
viewing from the driving position, the right-hand cylinder bank is designated bank 1 (A on circuit diagrams) and the left-
hand cylinder bank as bank 2 (B on circuit diagrams).
The cylinder bores of each bank are number ed 1 to 4, from the front of the vehicle.
Ig
nition System
Th
e ignition system provides timing cont
rol in accordance with the engine mana gement strategy and powertrain sensor
inputs; the system consists of:
engine
control module
igni
tion coils supply relay
ignit
ion control modules
igni
tion coils
spark plu
gs
Engine Control Module (ECM)
pr
ovides triggering for the ignition control modules
to control individual firing of the spark plugs
supplies ground for
the igni
tion coils supply relay
I
gnition Coils Supply Relay
The
ignition coils supply relay is located
in the engine and transmission control mo dule compartment; refer to Relay Details
in Electrical Wiring and Circuit Protection, Section 418-01.
The ECM switches a ground to the coil of the ignition coils supply relay; the relay energizes and switches a 12v supply to the
ignition control modules and the ignition coils.
I
gnition Control Modules
Page 1074 of 2490
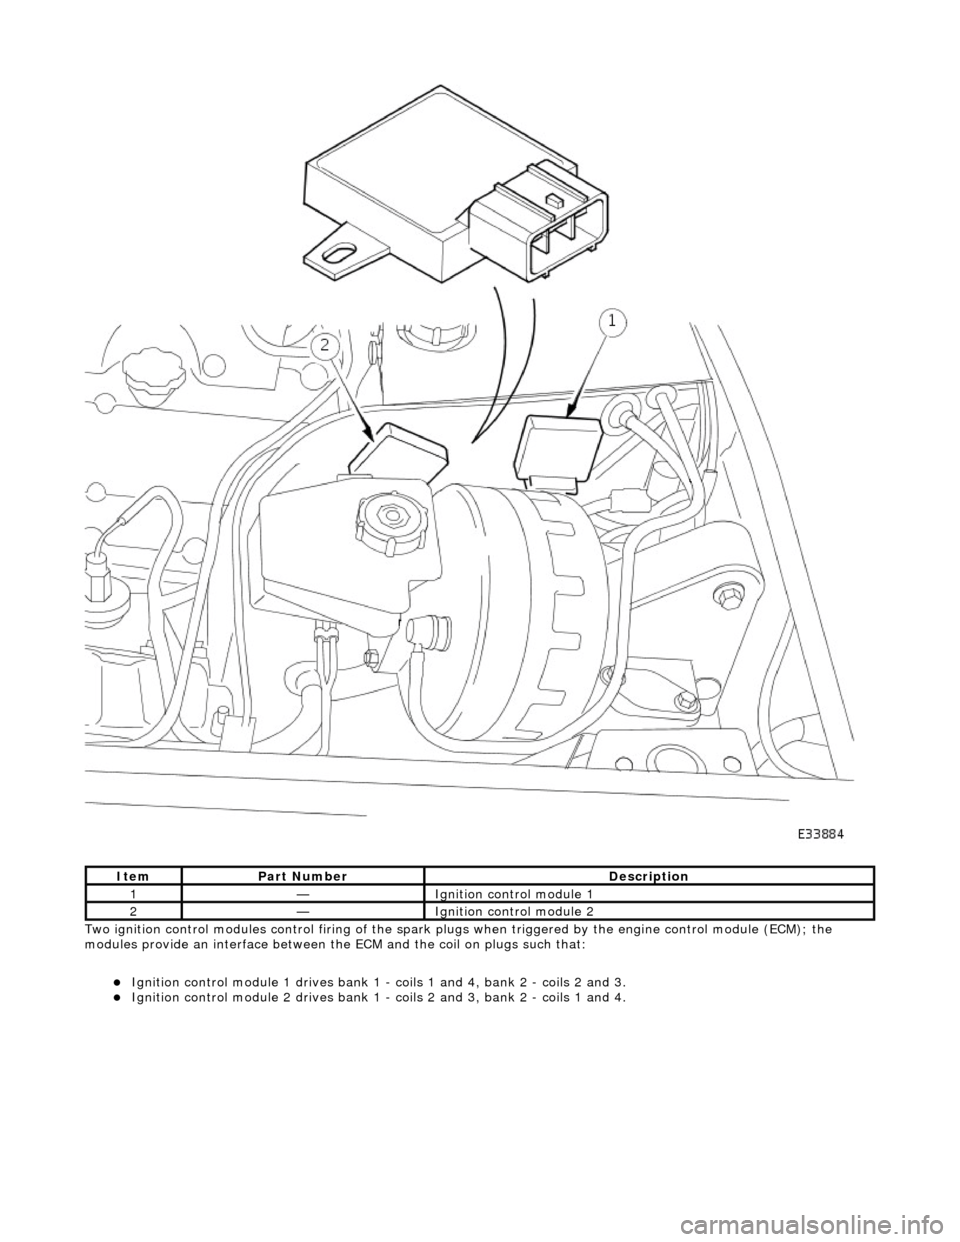
T w
o ignition control modules control firing of the spark plug
s when triggered by the engine control module (ECM); the
modules provide an interface between the ECM and the coil on plugs such that:
Ignition cont
rol module 1 drives bank 1 -
coils 1 and 4, bank 2 - coils 2 and 3.
Ignition cont
rol module 2 drives bank 1 -
coils 2 and 3, bank 2 - coils 1 and 4.
Ite
m
Par
t
Number
De
scr
iption
1—Ignition control
module 1
2—Ignition control module 2
Page 1075 of 2490
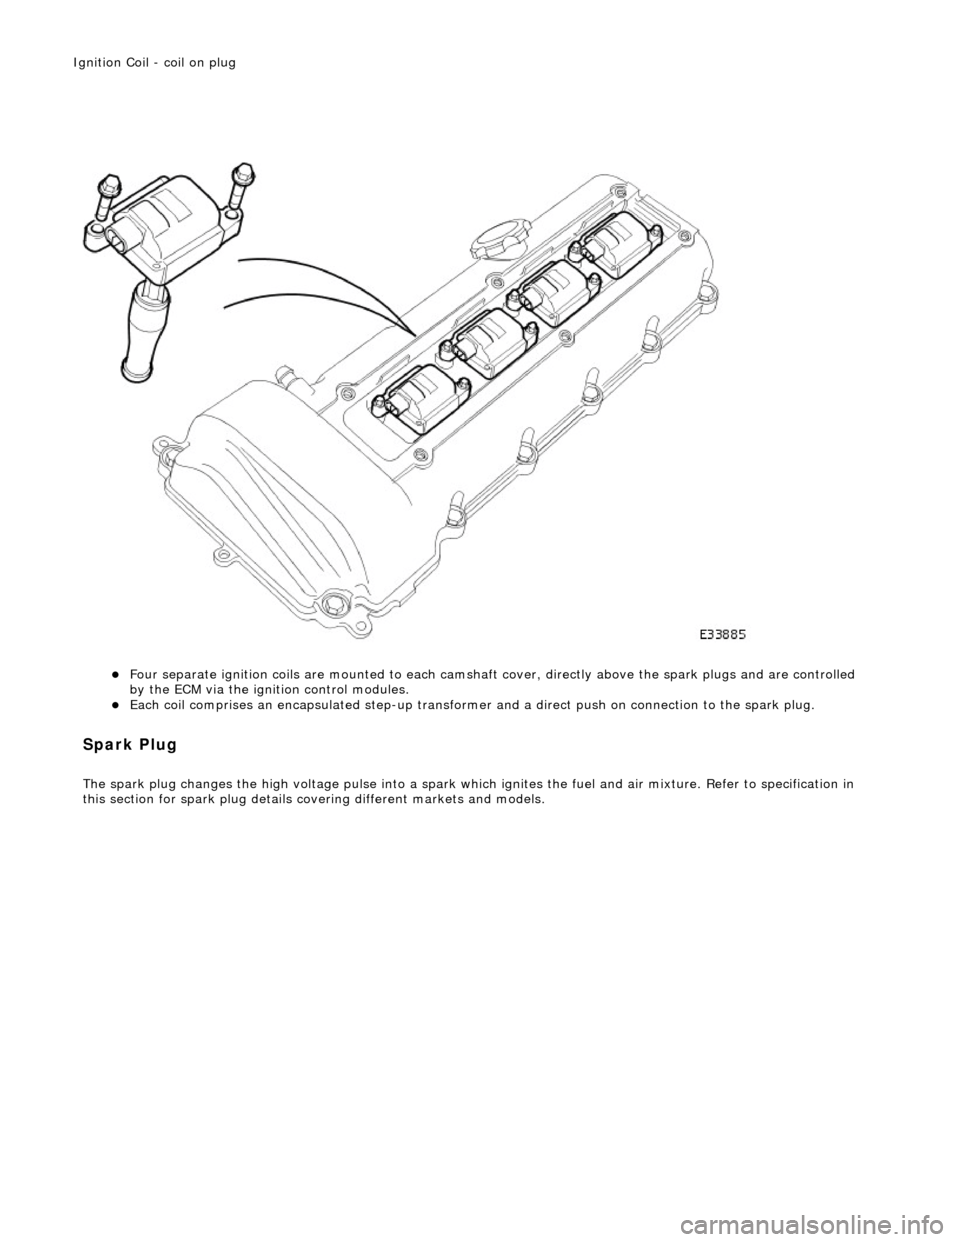
F
our separate ignition coils are mounte
d to each camshaft cover, directly above the spark plugs and are controlled
by the ECM via the ignition control modules.
Each
coil comprises an encapsulated step-up transformer
and a direct push on connection to the spark plug.
Spa
rk Plug
The spark plu
g changes the high voltage pulse into a spark whic
h ignites the fuel and air mixture. Refer to specification in
this section for spark plug details co vering different markets and models.
Igni
tion Coil - coil on plug
Page 1076 of 2490
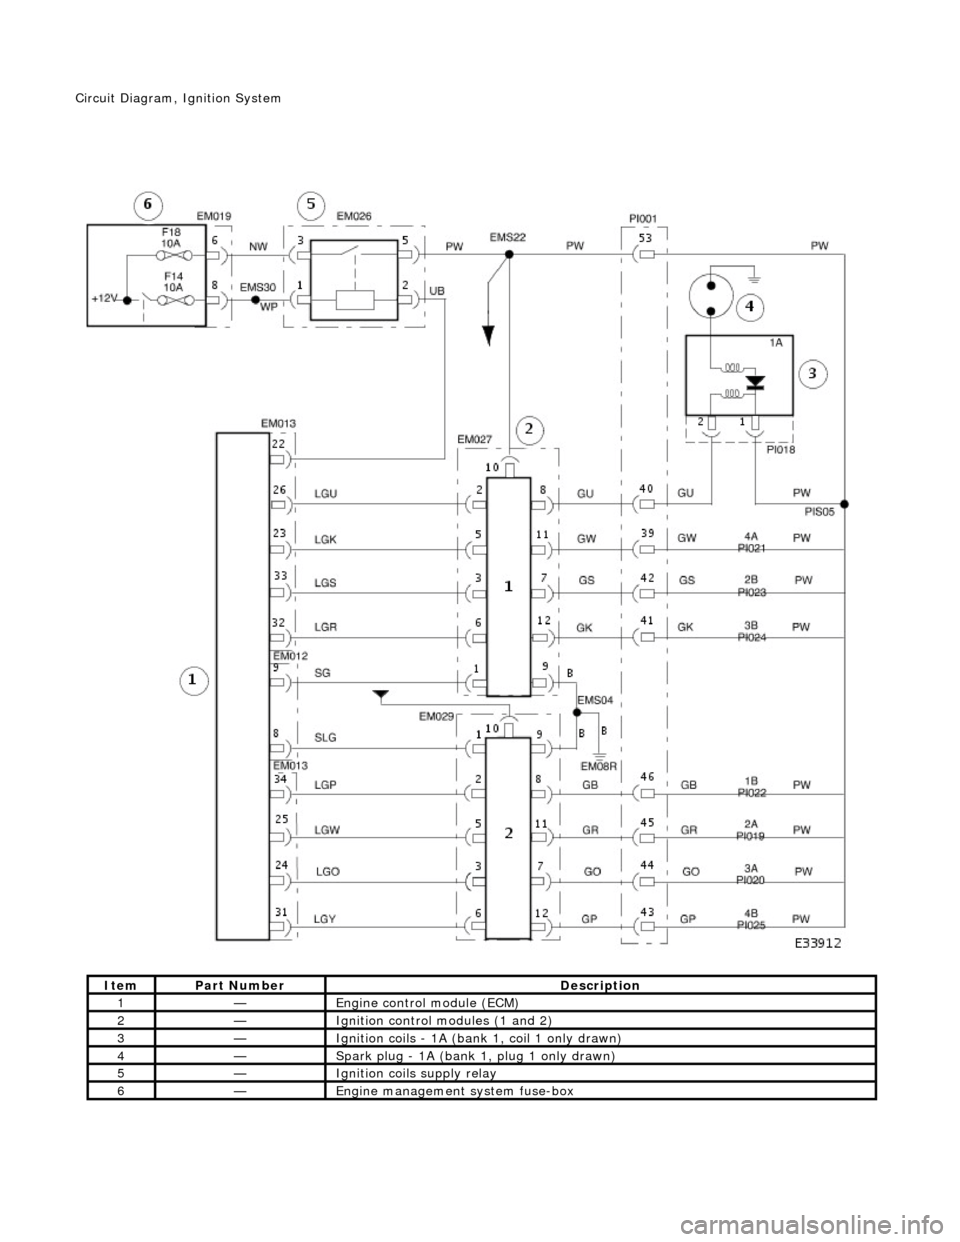
It e
m
Par
t
Number
De
scr
iption
1—Engine
control module (E
CM)
2—Ignition control
modules (1 and 2)
3—Igniti
on coils - 1A (bank 1, coil 1 only drawn)
4—Spark
plug - 1
A (bank 1, plug 1 only drawn)
5—Igni
ti
on coils supply relay
6—Engine
management system fuse-box
Ci
rcui
t Diagram,
Ignition System
Page 1077 of 2490
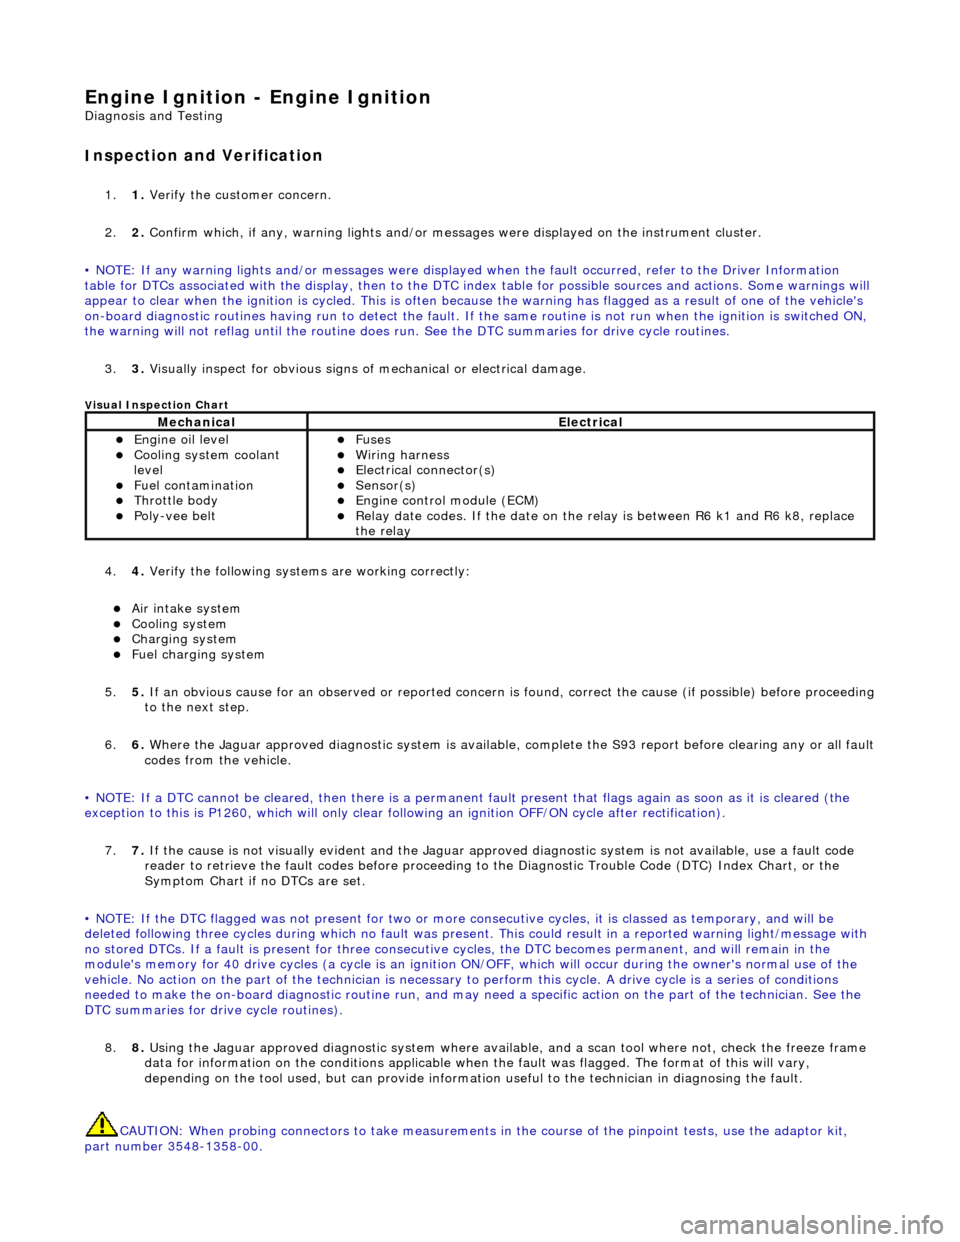
Engine Igni
tion -
Engine Ignition
D
iagnosis and Testing
I
nspection and Verification
1.
1. Veri
fy the customer concern.
2. 2. Confirm which, if any, warning li ghts and/or messages were displayed on the instrument cluster.
• NOTE: If any warning lights and/or me ssages were displayed when the fault occurred, refer to the Driver Information
table for DTCs associated with the display, then to the DTC index table for possible sources and actions. Some warnings will
appear to clear when the ignition is cycl ed. This is often because the warning has flagged as a resu lt of one of the vehicle's
on-board diagnostic routines having run to detect the fault. If the same routine is not run when the ignition is switched ON,
the warning will not reflag until the routine does run. See the DTC summaries for drive cycle routines.
3. 3. Visually inspect for obvious signs of mechanical or electrical damage.
V
isual Inspection Chart
4.
4. Veri
fy the following syst
ems are working correctly:
Air in
take system
Coo
ling system
Charging system
F
uel charging system
5. 5. If an obvious cause for an observed or reported concern is found, correct the cause (if possible) before proceeding
to the next step.
6. 6. Where the Jaguar approved diagnostic sy stem is available, complete the S93 report before clearing any or all fault
codes from the vehicle.
• NOTE: If a DTC cannot be cleared, then there is a permanent fault present that flag s again as soon as it is cleared (the
exception to this is P1260, which will only clear following an ignition OFF/ON cycle after rectification).
7. 7. If the cause is not visually evident and the Jaguar approv ed diagnostic system is not available, use a fault code
reader to retrieve the fault codes be fore proceeding to the Diagnostic Trou ble Code (DTC) Index Chart, or the
Symptom Chart if no DTCs are set.
• NOTE: If the DTC flagged was not present for two or more co nsecutive cycles, it is classed as temporary, and will be
deleted following three cycl es during which no fault was present. This could result in a reported wa rning light/message with
no stored DTCs. If a fault is present for three consecutive cycles, the DTC becomes permanent, and will remain in the
module's memory for 40 drive cycles (a cy cle is an ignition ON/OFF, which will occur during the owner's normal use of the
vehicle. No action on the part of the technician is necessary to perform this cycle. A drive cycle is a series of conditions
needed to make the on-board diagnostic ro utine run, and may need a specific action on the part of the technician. See the
DTC summaries for driv e cycle routines).
8. 8. Using the Jaguar approved diagnostic system where available, and a scan tool where not, check the freeze frame
data for information on the conditions applicable when the fault was flagged. The format of this will vary,
depending on the tool used, but can pr ovide information useful to the technician in diagnosing the fault.
CAUTION: When probing connectors to take measurements in the course of the pinpoint tests, use the adaptor kit,
part number 3548-1358-00.
MechanicalElectrical
Engi
ne oil level
Coo
ling system coolant
level
Fuel contamination
Throttle body Poly
-vee belt
F
uses
W
iring harness
E
lectrical connector(s)
Sens
or(s)
Engine
control module (ECM)
Relay date codes.
If the date on the relay is between R6 k1 and R6 k8, replace
the relay
Page 1083 of 2490
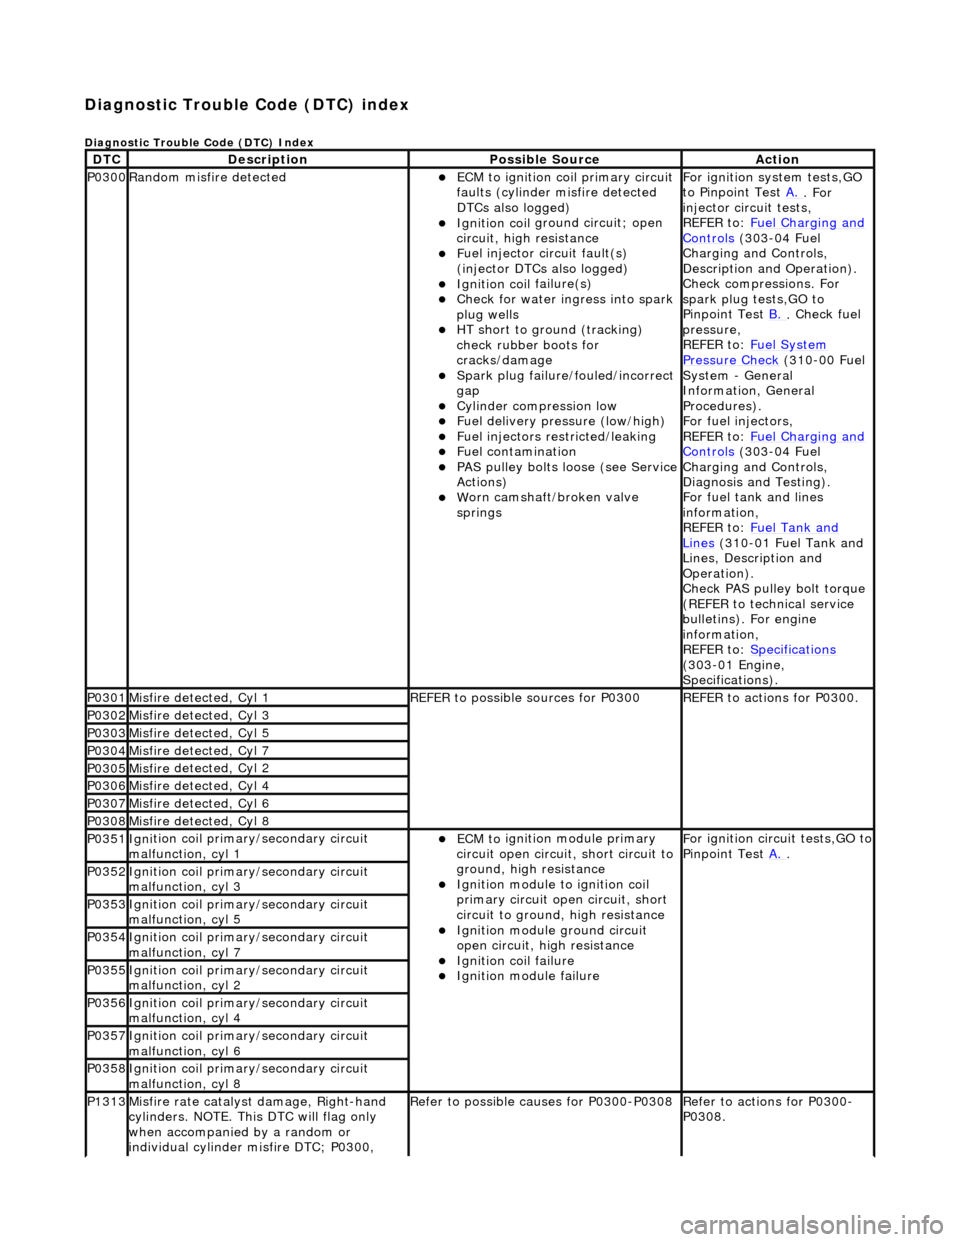
Diagnostic Trouble Code (D
TC) index
D
iagnostic Trouble Code (DTC) Index
DT
C
De
scription
Possib
le Source
Acti
on
P0300Ran
dom misfire detected
ECM t
o ignition coil primary circuit
faults (cylinder misfire detected
DTCs also logged)
Ignition coil
ground circuit; open
circuit, high resistance
F
uel injector circuit fault(s)
(injector DTCs also logged)
Ignition coil
failure(s)
Check f
or water ingress into spark
plug wells
HT sho
rt to ground (tracking)
check rubber boots for
cracks/damage
Spark plug
failure/fouled/incorrect
gap
Cy
linder compression low
F
uel delivery pressure (low/high)
F
uel injectors restricted/leaking
Fuel contamination
P
AS pulley bolts loose (see Service
Actions)
W
orn camshaft/broken valve
springs
For ign
ition system tests,GO
to Pinpoint Test A.
. For
inje
ctor circuit tests,
REFER to: Fuel Charging and
Controls (30
3-04 Fuel
Charging and Controls,
Description and Operation).
Check compressions. For
spark plug tests,GO to
Pinpoint Test B.
.
Check fuel
pressure,
REFER to: Fuel System
Pressure Check (31
0-00 Fuel
System - General
Information, General
Procedures).
For fuel injectors,
REFER to: Fuel Charging and
Controls (30
3-04 Fuel
Charging and Controls,
Diagnosis and Testing).
For fuel tank and lines
information,
REFER to: Fuel Tank and
Lin
es
(310-01 Fuel Tank and
Lines, Description and
Operation).
Check PAS pulley bolt torque
(REFER to technical service
bulletins). For engine
information,
REFER to: Specifications
(3
03-01 Engine,
Specifications).
P0301Misfire
detected, Cyl 1
R
EFER to possible sources for P0300
R
EFER to actions for P0300.
P0302Misfire
detected, Cyl 3
P0303Misfire
detected, Cyl 5
P0304Misfire
detected, Cyl 7
P0305Misfire
detected, Cyl 2
P0306Misfire
detected, Cyl 4
P0307Misfire
detected, Cyl 6
P0308Misfire
detected, Cyl 8
P0351Igni
tion coil primary/secondary circuit
malfunction, cyl 1
ECM to
ignition module primary
circuit open circuit, short circuit to
ground, high resistance
Igni
tion module to ignition coil
primary circuit open circuit, short
circuit to ground, high resistance
Ignition modu
le ground circuit
open circuit, hi gh resistance
Ignition coil
failure
Ignition modul
e failure
F
or ignition circuit tests,GO to
Pinpoint Test A.
.
P0352Igni
tion coil primary/secondary circuit
malfunction, cyl 3
P0353Igni
tion coil primary/secondary circuit
malfunction, cyl 5
P0354Igni
tion coil primary/secondary circuit
malfunction, cyl 7
P0355Igni
tion coil primary/secondary circuit
malfunction, cyl 2
P0356Igni
tion coil primary/secondary circuit
malfunction, cyl 4
P0357Igni
tion coil primary/secondary circuit
malfunction, cyl 6
P0358Igni
tion coil primary/secondary circuit
malfunction, cyl 8
P1313Misfire rate
catalyst damage, Right-hand
cylinders. NOTE. This DTC will flag only
when accompanied by a random or
individual cylinder misfire DTC; P0300,
R
efer to possible causes for P0300-P0308
R
efer to actions for P0300-
P0308.
Page 1084 of 2490
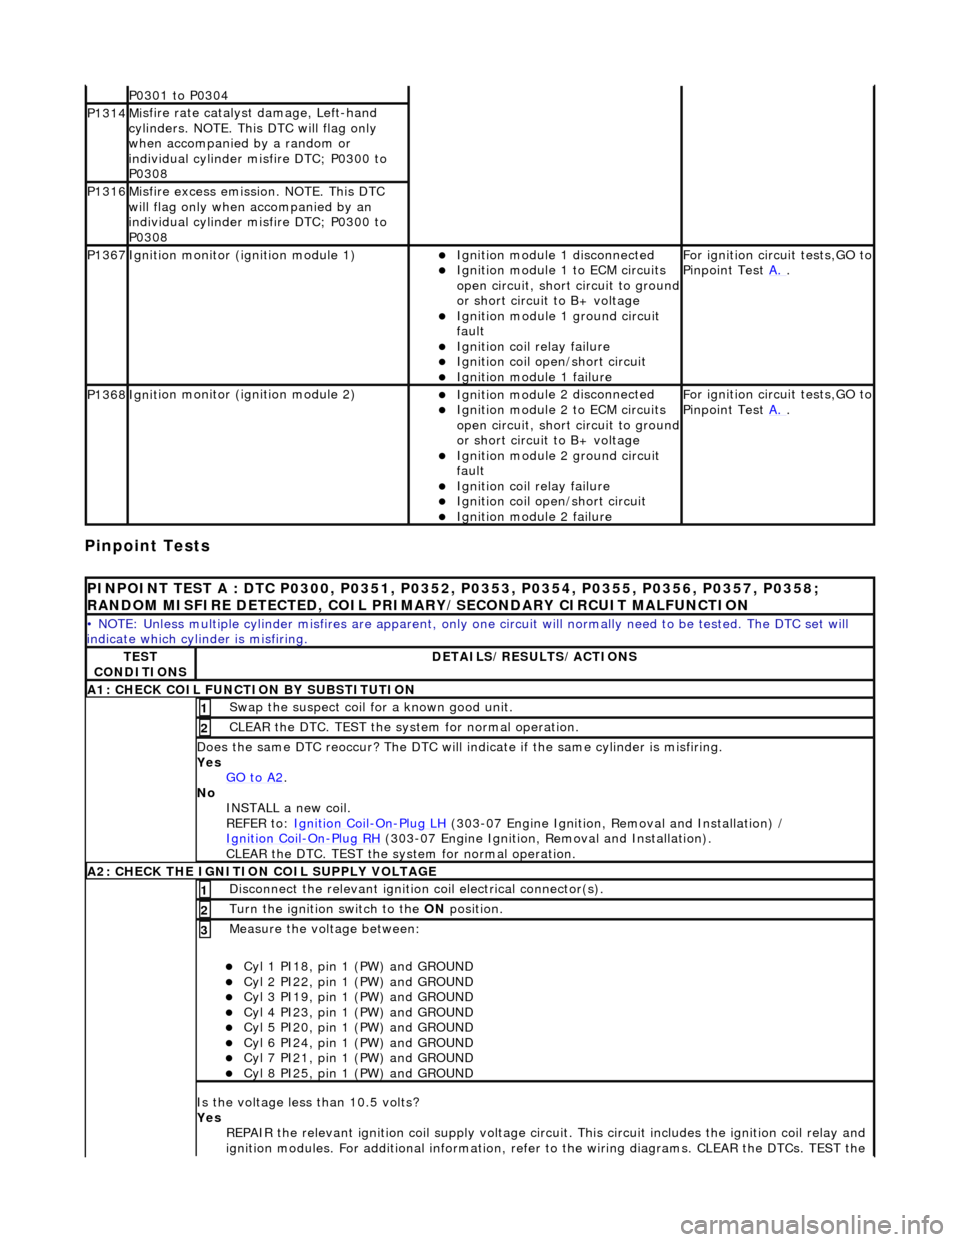
Pinpoint Tests
P0301 t
o P0304
P1314M
i
sfire rate catalyst damage, Left-hand
cylinders. NOTE. This DTC will flag only
when accompanied by a random or
individual cylinder misfire DTC; P0300 to
P0308
P1316M i
sfire excess emission. NOTE. This DTC
will flag only when accompanied by an
individual cylinder misfire DTC; P0300 to
P0308
P1367Ignit i
on monitor (ignition module 1)
Ignition modu
le
1 disconnected
Ignition modul e
1 to ECM circuits
open circuit, short circuit to ground
or short circuit to B+ voltage
Ignition modul e
1 ground circuit
fault
Ignition coil relay fai
lure
Ignition coil open/short
circuit
Ignition module
1 failure
F
o
r ignition circuit tests,GO to
Pinpoint Test A.
.
P1368Igniti
on monitor (ignition module 2)
Ignition modu
le
2 disconnected
Ignition modul e
2 to ECM circuits
open circuit, short circuit to ground
or short circuit to B+ voltage
Ignition modul e
2 ground circuit
fault
Ignition coil relay fai
lure
Ignition coil
open/short
circuit
Ignition modul
e
2 failure
F
o
r ignition circuit tests,GO to
Pinpoint Test A.
.
PINPOINT TES
T A : DTC P0300, P0351, P0352, P0353, P0354, P0355, P0356, P0357, P0358;
RANDOM MISFIRE DETECTED, COIL PRIMARY/SECONDARY CIRCUIT MALFUNCTION
• NO
TE: Unless multiple cylinder misfires are apparent, only on
e circuit will normally need to be tested. The DTC set will
indicate which cylinder is misfiring.
TE S
T
CONDITIONS
D E
TAILS/RESULTS/ACTIONS
A1
: CH
ECK COIL FUNCTI
ON BY SUBSTITUTION
Swap the suspect coi l
for a known good unit.
1
CLEAR t
h
e DTC. TEST the syst
em for normal operation.
2
Do
es the same DTC reoccur? The DTC will indicate if the same cylinder is misfiring.
Yes GO to A2
.
No
INST
ALL a new coil.
REFER to: Ignition Coil
-On-Plug
LH
(30
3-07 Engine Ignition, Removal and Installation) /
Ignition Coil
-On-Plu g
RH
(30
3-07 Engine Ignition, Removal and Installation).
CLEAR the DTC. TEST the system for normal operation.
A2: CHECK THE IGNIT
ION COIL SUPPLY VOLTAGE
Disc
onne
ct the relevant ignition
coil electrical connector(s).
1
Turn the ignition swit
ch to the ON
position.
2
Measure the voltage between:
Cyl 1 PI18, pin
1 (PW) and GROUND
Cy
l 2 PI22, pin
1 (PW) and GROUND
Cy
l 3 PI19, pin
1 (PW) and GROUND
Cy
l 4 PI23, pin
1 (PW) and GROUND
Cy
l 5 PI20, pin
1 (PW) and GROUND
Cy
l 6 PI24, pin
1 (PW) and GROUND
Cy
l 7 PI21, pin
1 (PW) and GROUND
Cy
l 8 PI25, pin
1 (PW) and GROUND
3
Is
t
he voltage less than 10.5 volts?
Yes REPAIR the relevant ignition coil su pply voltage circuit. This circuit includes the ignition coil relay and
ignition modules. For additional information, refer to the wiring diagrams. CLEAR the DTCs. TEST the