Page 2184 of 2490
4.
Fully raise glass and using linen tape, secure to top of door
frame.
5. Fit door glass lift motor. Refer to 86.25.04.
6. Fit door module. Refer to 86.80.34.
7. Reposition PVC inne r weathershield.
8. Position water shedder and carefully pass harness multiplugs
through penetration.
9. Ensuring door mating surfaces ar e clean and dry, firmly seat
water shedder.
10. Fit door casing. Refer to 76.34.01.
11. Connect ground cable to batter y terminal and fit cover to
battery. Refer to 86.15.15.
Page 2187 of 2490

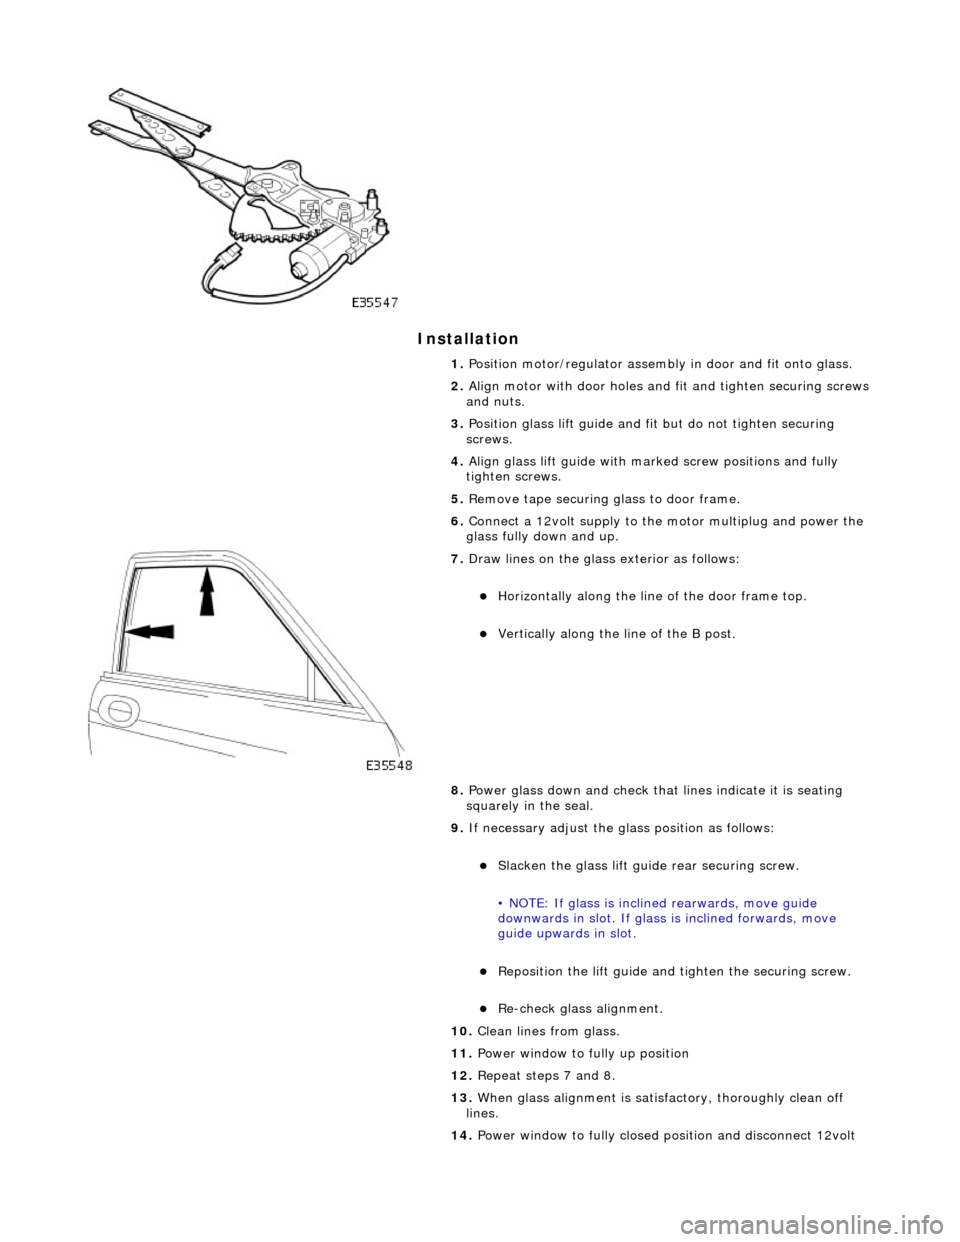
Installation
1. Position motor/regulator assembly in door and fit onto glass.
2. Align motor with door holes and fit and tighten securing screws
and nuts.
3. Position glass lift guide and fi t but do not tighten securing
screws.
4. Align glass lift guide with marked screw positions and fully
tighten screws.
5. Remove tape securing glass to door frame.
6. Connect a 12volt supply to the motor multiplug and power the
glass fully down and up.
7. Draw lines on the glass exterior as follows:
Horizontally along the line of the door frame top.
Vertically along the line of the B post.
8. Power glass down and check that lines indicate it is seating
squarely in the seal.
9. If necessary adjust the glass position as follows:
Slacken the glass lift guid e rear securing screw.
• NOTE: If glass is inclin ed rearwards, move guide
downwards in slot. If glass is inclined forwards, move
guide upwards in slot.
Reposition the lift guide and tighten the securing screw.
Re-check glass alignment.
10. Clean lines from glass.
11. Power window to fully up position
12. Repeat steps 7 and 8.
13. When glass alignment is satisf actory, thoroughly clean off
lines.
14. Power window to fully closed po sition and disconnect 12volt
Page 2188 of 2490
supply from motor multiplug.
15.
Adjust regulator up stop.
Slacken stop securing bolt.
Move stop rearwards to abut regulator quadrant.
Tighten stop securing bolt.
16. Reconnect harness multiplug to lift motor.
17. Fit door module. Refer to 86.80.34.
18. Reposition PVC weathershield.
19. Position water shedder and carefully pass harness multiplugs
through penetration.
20. Ensuring door mating surfaces ar e clean and dry, firmly seat
water shedder.
21. Fit casing/armrest assembly to door. Refer to 76.34.01.
22. Connect ground cable to batter y terminal and fit cover to
battery. Refer to 86.15.15.
Page 2193 of 2490
5. Fully raise glass and secure to top of door frame using linen
tape.
6. Correctly position glass rear guide and fit and tighten upper
securing bolt.
7. Fit and fully seat d oor outer finisher.
8. Fit and fully seat door outer waist rail.
9. Fit cheater i nner finisher.
Fit new plastic inserts to cheater.
Apply sealant to front edge of cheater.
Fit cheater inner trim, fully se ating dowels in inserts.
10. Fit and connect door glass lift motor. Refer to 86.25.09.
11. Fit and connect door control module. Refer to 86.80.33.
12. Reposition PVC weathershield.
13. Position water shedder and carefully pass harness multiplugs
through penetration.
14. Ensuring door mating surfaces ar e clean and dry, firmly seat
water shedder.
15. Fit casing/armrest assembly to door. Refer to 76.34.04.
16. Connect ground cable to batt ery terminal and fit battery
cover. Refer to 86.15.15.
Page 2196 of 2490

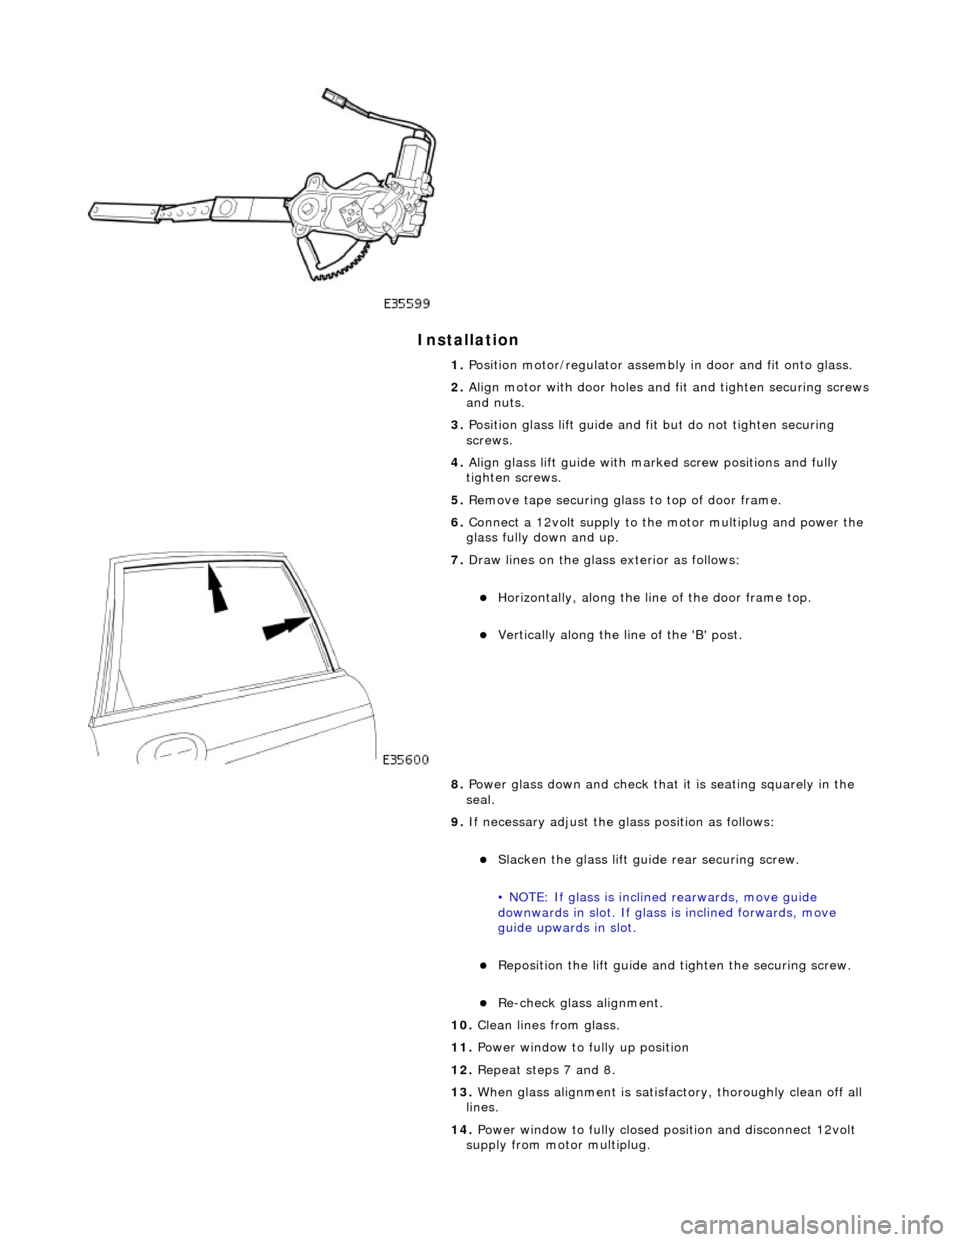
Installation
1. Position motor/regulator assembly in door and fit onto glass.
2. Align motor with door holes and fit and tighten securing screws
and nuts.
3. Position glass lift guide and fi t but do not tighten securing
screws.
4. Align glass lift guide with marked screw positions and fully
tighten screws.
5. Remove tape securing glass to top of door frame.
6. Connect a 12volt supply to the motor multiplug and power the
glass fully down and up.
7. Draw lines on the glass exterior as follows:
Horizontally, along the line of the door frame top.
Vertically along the line of the 'B' post.
8. Power glass down and check that it is seating squarely in the
seal.
9. If necessary adjust the glass position as follows:
Slacken the glass lift guid e rear securing screw.
• NOTE: If glass is inclin ed rearwards, move guide
downwards in slot. If glass is inclined forwards, move
guide upwards in slot.
Reposition the lift guide and tighten the securing screw.
Re-check glass alignment.
10. Clean lines from glass.
11. Power window to fully up position
12. Repeat steps 7 and 8.
13. When glass alignment is satisfac tory, thoroughly clean off all
lines.
14. Power window to fully closed po sition and disconnect 12volt
supply from motor multiplug.
Page 2197 of 2490
15. Adjust regulator up stop.
Slacken stop securing bolt.
Move stop rearwards to abut regulator quadrant.
Tighten stop securing bolt an d apply waterproof tape to
aperture in water shedder.
16. Reconnect harness multiplug to lift motor.
17. Fit door module. Refer to 86.80.34.
18. Reposition PVC weathershield.
19. Position water shedder and carefully pass harness multiplugs
through penetration.
20. Ensuring door mating surfaces ar e clean and dry, firmly seat
water shedder.
21. Fit casing/armrest assembly to door. Refer to 76.34.01.
22. Connect ground cable to batter y terminal and fit cover to
battery. Refer to 86.15.15.
Page 2200 of 2490
Glass, Frames and Mechanisms - Rear Quarter Window Glass
Removal and Installation
Removal
Special Tool(s)
Spray Bottle
WK9
Lubricant Concentrate
WK9L
Power Cutting Tool
WK10HD
Cutting Blade - Side
WK4ZS
Adhesive Removal Blade - Body
WK6
Betagun pneumatic application gun
Betagun 111
1. Remove the rear seat backrest.
For additional information, refer to: Rear Seat Backrest
(501-
10 Seating, Removal and Installation).
2. Remove both C-pill ar trim panels.
For additional information, refer to: C
-Pillar Trim Panel (501-05
Interior Trim and Ornamentatio n, Removal and Installation).
3. Place a suitable protective sheet over the parcel shelf and place
a protecting boar d over sheet.
4. Dispense 20ml of WK9L lubricant into the WK9 spray bottle, fill
Page 2203 of 2490

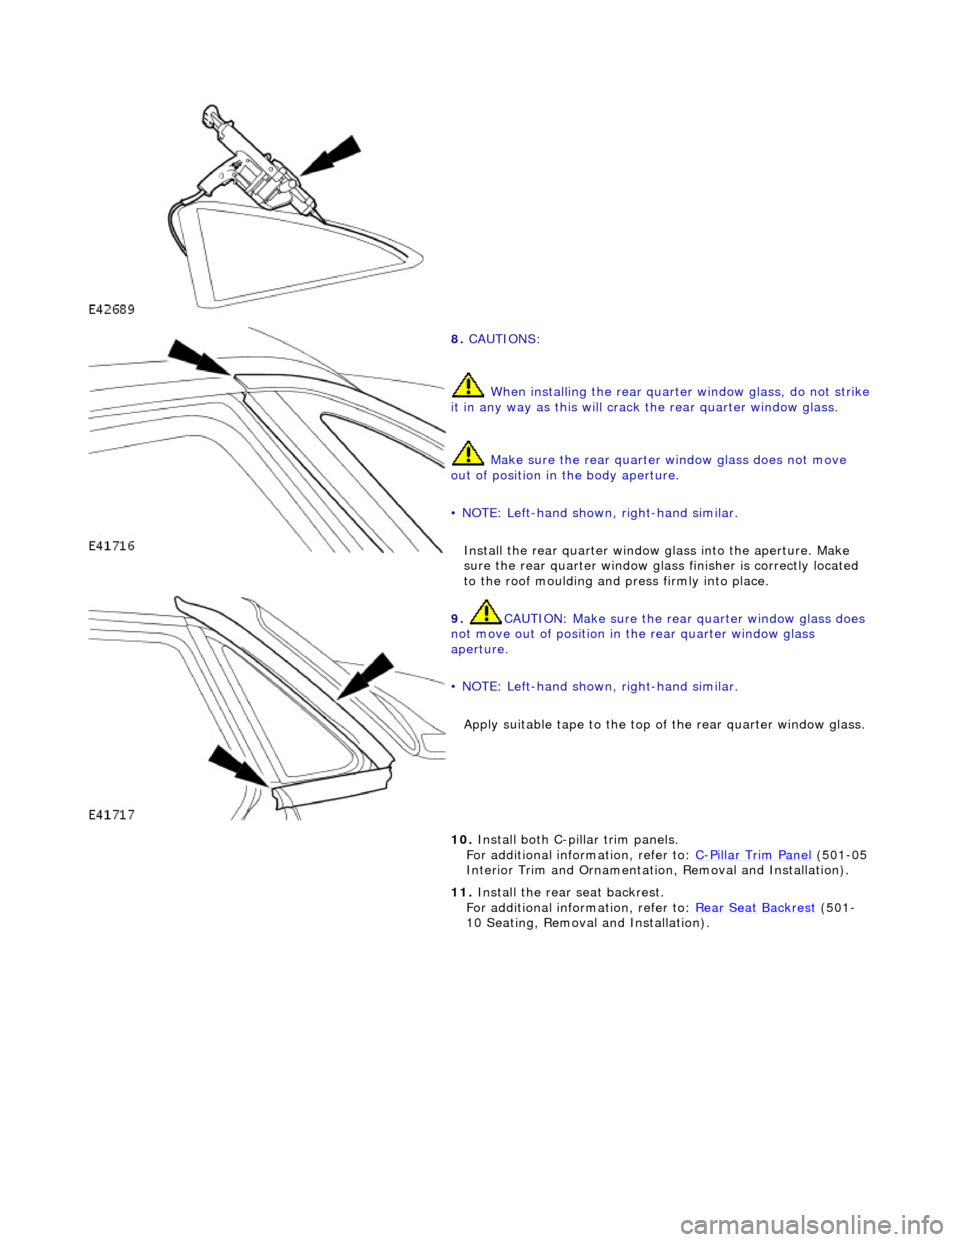
8. CAUTIONS:
When installing the rear quarte r window glass, do not strike it in any way as this will crack the rear quarter window glass.
Make sure the rear quarter window glass does not move
out of position in the body aperture.
• NOTE: Left-hand shown, right-hand similar.
Install the rear quar ter window glass into the aperture. Make
sure the rear quarter window glas s finisher is correctly located
to the roof moulding and press firmly into place.
9. CAUTION: Make sure the rear quarter window glass does
not move out of position in the rear quarter window glass
aperture.
• NOTE: Left-hand shown, right-hand similar.
Apply suitable tape to the top of the rear quarter window glass.
10. Install both C-pillar trim panels.
For additional information, refer to: C-Pillar Trim Panel (501-05
Interior Trim and Ornamentatio n, Removal and Installation).
11. Install the rear seat backrest.
For additional information, refer to: Rear Seat Backrest
(501-
10 Seating, Removal and Installation).