Page 2260 of 2490
Finally tighten centre mounting bracket to tunnel securing
bolts to 22-28Nm.
40. Install facia to air conditioning unit securing screws.
41. CAUTION: The 'A' post facia mounting brackets are pre-
set to the body and must no t under any circumstances be
disturbed.
Install bolts securing facia to LH 'A' post bracket and tighten to
22-28Nm.
42. Instal seat trim pad to facia RH end aperture.
43. Install bolt securing facia mounting bracket to bulkhead
adjacent to body processor.
44. Position ground cable eyelet on LH 'A' post stud and install
securing nut.
45. Connect passenger side facia harness to engine management
harness multiplugs (white and gr ey) and install multiplugs on
lower 'A' post retaining bracket.
Page 2263 of 2490
64.
Position driver stowage bin in facia, install securing screw and fully seat trim.
65. Install trim pad on driver si de lower 'A' post. Refer to
76.13.30.
66. Install driver side unders cuttle. Refer to 76.46.11.
67. Install combined windshield wi per/washer switch and audible
warning speaker assembly. Refer to 86.65.42.
68. Install steering column upper cowl. Refer to 76.46.02.
69. Install steering column lower cowl. Refer to 76.46.03.
70. Install steering wheel. Refer to 211-04.
71. Install driver side airbag. Refer to 76.73.39.
Page 2265 of 2490
Installation
1. Fit and fully seat new veneer panel securing clips to fascia.
2. Position center veneer panel on fascia, align dowels with clips
and press firmly at edges to fully seat.
3. Fit major gauge module veneer panel. Refer to 76.47.24.
4. Using new retaining clips, fit and fully seat passenger airbag
deployment door.
5. Connect ground cable to batt ery terrminal and fit battery
cover. Refer to 86.15.15.
Page 2266 of 2490
Instrument Panel and Console - Instrument Panel Lower Trim Panel
Removal and Installation
Removal
Installation
1.
Turn ignition switch to position 'II.'
2. Motor driver seat fully rearwards.
3. Turn ignition switch to position 'O.'
4. Slacken and remove the four underscuttle securing screws.
5. Remove and discard securing clips from screw locations.
6. Remove underscuttle from vehicle.
1. Fit new securing clips to screw locations.
2. Position and fully seat underscu ttle below fascia and fit and
tighten securing screws.
3. Return driver seat to original position.
Page 2268 of 2490
Installation
1.
Position roof console at headlini ng and connect lighting harness
multiplug and hands-free microphone multiplug if fitted.
2. Engage console in retaining clips.
3. Aligning with headlining aperture, seat console and rotate
fastener 1/4 turn to secure.
4. Close sunglasses compartment.
5. Connect ground cable to battery terminal and fit battery cover.
Refer to 86.15.15.
Page 2270 of 2490
1.
Fit trim panel assenbly to cupholder mechanism.
2. Fit and tighten the trim panel securing screws.
3. Fit and fully seat cupholder mechanism, ensuring tangs are
fully engaged.
4. Fit and tighten lid inner securing screws.
5. Fit cupholder latch and ti ghten securing screw.
6. Fit glovebox lid. Refer to 76.25.18.
Page 2271 of 2490

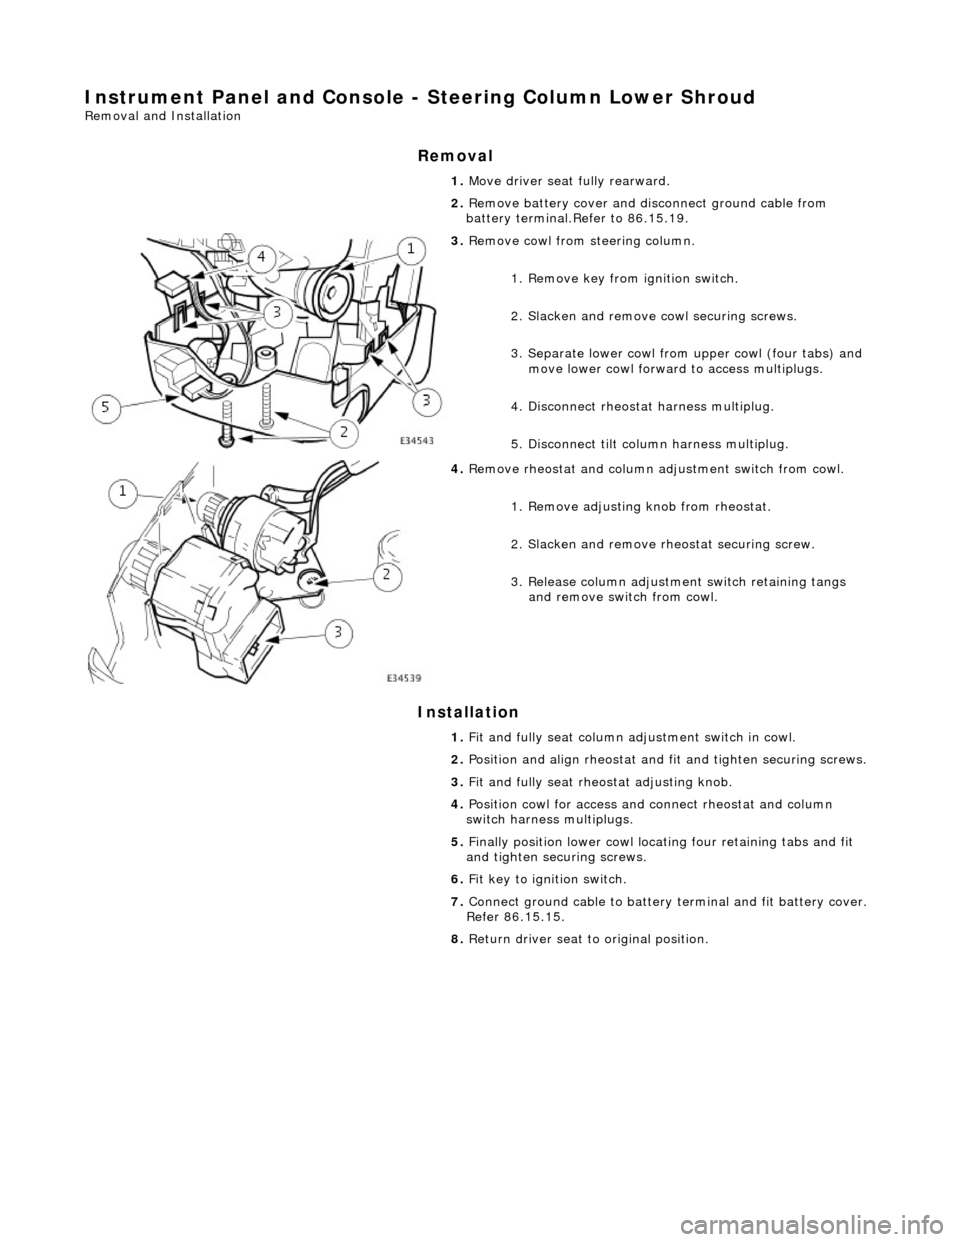
Instrument Panel and Console - Steering Column Lower Shroud
Removal and Installation
Removal
Installation
1.
Move driver seat fully rearward.
2. Remove battery cover and disconnect ground cable from
battery terminal.Refer to 86.15.19.
3. Remove cowl from steering column.
1. Remove key from ignition switch.
2. Slacken and remove cowl securing screws.
3. Separate lower cowl from upper cowl (four tabs) and move lower cowl forward to access multiplugs.
4. Disconnect rheostat harness multiplug.
5. Disconnect tilt column harness multiplug.
4. Remove rheostat and column adjustment switch from cowl.
1. Remove adjusting knob from rheostat.
2. Slacken and remove rh eostat securing screw.
3. Release column adjustment switch retaining tangs and remove switch from cowl.
1. Fit and fully seat column ad justment switch in cowl.
2. Position and align rheostat and fit and tighten securing screws.
3. Fit and fully seat rheo stat adjusting knob.
4. Position cowl for access and connect rheostat and column
switch harness multiplugs.
5. Finally position lower cowl locating four retaining tabs and fit
and tighten securing screws.
6. Fit key to ignition switch.
7. Connect ground cable to battery terminal and fit battery cover.
Refer 86.15.15.
8. Return driver seat to original position.
Page 2272 of 2490
Instrument Panel and Console - Steering Column Upper Shroud
Removal and Installation
Removal
Installation
1.
Move driver seat fully rearward.
2. Slacken and remove screws securing upper cowl to lower cowl
and separate the two cowls.
3. Move steering column to fully down position.
4. Remove upper cowl fr om steering column.
1. Position upper cowl on steering column.
2. Move column to the fully up position.
3. Fit upper cowl to lower cowl locating the four tabs, and fit and
tighten securing screws..
4. Return driver seat and column to original positions.