Page 103 of 1807

22SUPRAÐOUTLINE OF NEW FEATURES
SUPRA
OUTLINE NEW FEATURES
The Supra, which represents Toyota's advanced automotive technology, has earned a reputation as a truly luxurious
sports car. The following changes have been made for the 1997 model year.
1. Model Line±Up
�The JZA80L±ALPVZA model has been discontinued.
�The JZA80L±ALFVZA and JZA80L±AJFVZA models have been added.
2. Exterior Design
�The multi±reflector type headlights are adopted.
�The design of the turn signal light, front bumper and rear combination light has been changed.
3. Interior Equipment
The front seats have been changed from the separate±headrest type seats of the '96 model to the integrated headrest
type seats without changing their basic design.
4. 2JZ±GTE Engine
An aluminum radiator core is adopted for weight reduction.
5. Differential
�A differential gear ratio has been changed on he 2JZ±GE engine model.
�A helical gear type torque±sensing LSD is available as an option on the 2JZ±GE engine model and 2JZ±GTE engine
with automatic transmission model.
6. Drive Shaft
An outboard joint of drive shaft has been changed from cross±groove type CVJ (Constant±Velocity Joint) to Rzeppa
type CVJ on the 2JZ±GE engine model.
7. Brakes
�A master cylinder diameter has been changed on the 2JZ±GTE engine model.
�An ABS has been changed to the 2±position solenoid valve type actuator.
Page 378 of 1807

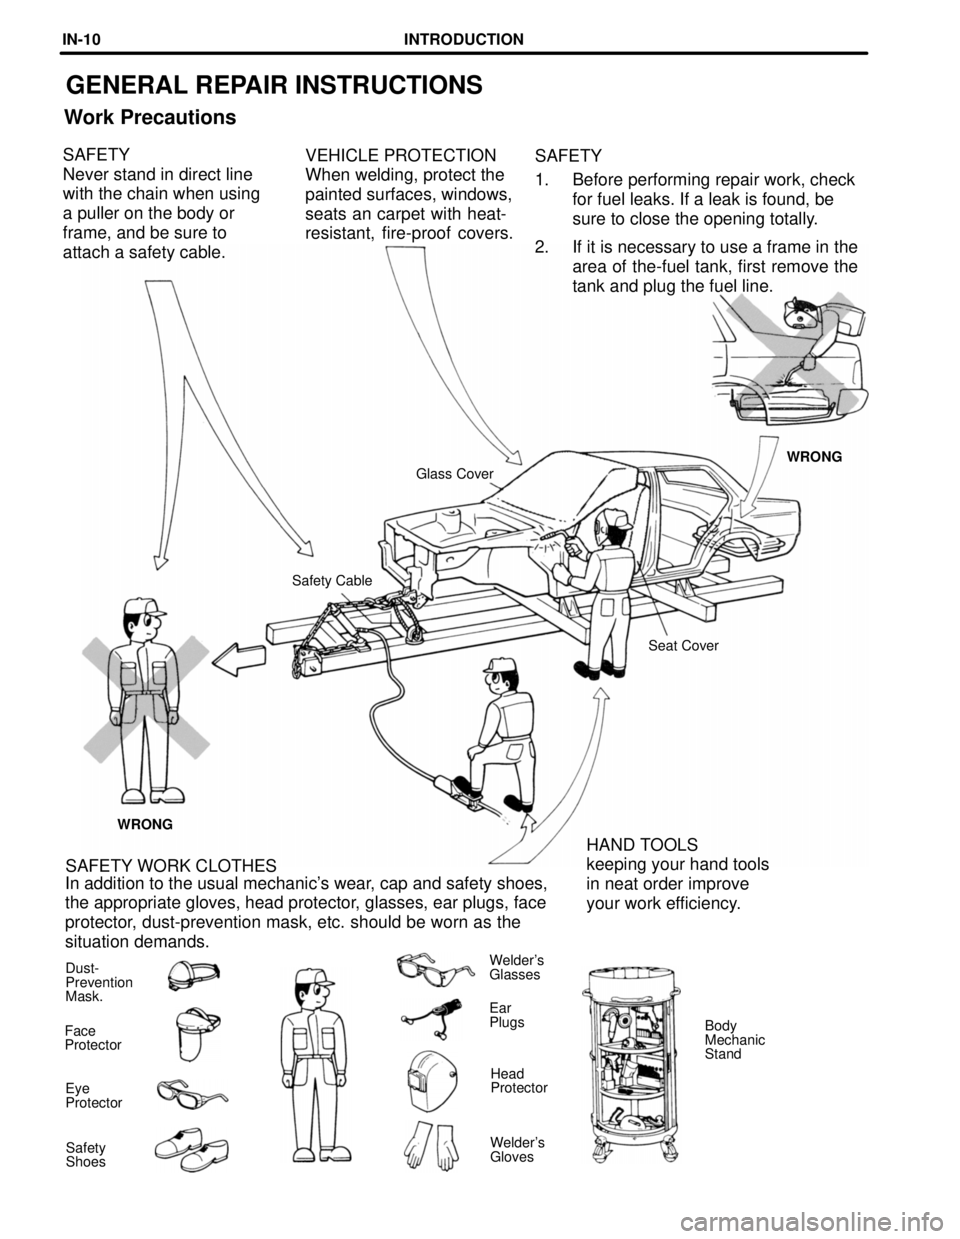
GENERAL REPAIR INSTRUCTIONS
Work Precautions
VEHICLE PROTECTION
When welding, protect the
painted surfaces, windows,
seats an carpet with heat-
resistant, fire-proof covers.SAFETY
1. Before performing repair work, check
for fuel leaks. If a leak is found, be
sure to close the opening totally.
2. If it is necessary to use a frame in the
area of the-fuel tank, first remove the
tank and plug the fuel line. SAFETY
Never stand in direct line
with the chain when using
a puller on the body or
frame, and be sure to
attach a safety cable.
WRONG
Glass Cover
Safety Cable
Seat Cover
WRONG
HAND TOOLS
keeping your hand tools
in neat order improve
your work efficiency. SAFETY WORK CLOTHES
In addition to the usual mechanic's wear, cap and safety shoes,
the appropriate gloves, head protector, glasses, ear plugs, face
protector, dust-prevention mask, etc. should be worn as the
situation demands.
Dust-
Prevention
Mask.Welder's
Glasses
Ear
Plugs
Body
Mechanic
Stand Face
Protector
Head
Protector
Eye
Protector
Welder's
Gloves Safety
Shoes
INTRODUCTIONIN-10
Page 1286 of 1807
EM0AI-02
P12293
P02267
P12308SST EM-34
- ENGINE MECHANICAL (2JZ-GTE)CYLINDER HEAD
1139 Author�: Date�:
1997 SUPRA (RM502U)
DISASSEMBLY
1. REMOVE ENGINE HANGERS AND GROUND STRAP
2. REMOVE CAMSHAFT POSITION SENSORS
3. REMOVE EGR COOLER
4. REMOVE VALVE LIFTERS AND SHIMS
HINT:
Store the valve lifters and shims in correct order.
5. REMOVE VALVES
(a) Using SST, compress the valve spring and remove the 2
keepers.
SST 09202-70020 (09202-00010)
(b) Remove the spring retainer, valve spring, valve and
spring seat.
HINT:
Store the valves, valve springs, spring seats and spring retain-
ers in correct order.
(c) Using needle-nose pliers, remove the oil seal.
Page 1290 of 1807

EM2534
Overall Length
EM0255
P02127
45°
Carbide
Cutter
Z00373
Width
P03966
45°
15°
Width EM-38
- ENGINE MECHANICAL (2JZ-GTE)CYLINDER HEAD
1143 Author�: Date�:
1997 SUPRA (RM502U)
(d) Check the valve overall length.
Standard overall length:
Intake 98.29 - 98.79 mm (3.8697 - 3.8894 in.)
Exhaust 98.84 - 99.34 mm (3.8913 - 3.9110 in.)
Minimum overall length:
Intake 98.19 mm (3.8657 in.)
Exhaust 98.74 mm (3.8874 in.)
If the overall length is less than minimum, replace the valve.
(e) Check the surface of the valve stem tip for wear.
If the valve stem tip is worn, resurface the tip with a grinder or
replace the valve.
NOTICE:
Do not grind off more than the minimum overall length.
11. INSPECT AND CLEAN VALVE SEATS
(a) Using a 45° carbide cutter, resurface the valve seats.
Remove only enough metal to clean the seats.
(b) Check the valve seating position.
Apply a thin coat of prussian blue (or white lead) to the
valve face. Lightly press the valve against the seat. Do not
rotate the valve.
(c) Check the valve face and seat for the following:
�If blue appears 360° around the face, the valve is
concentric. If not, replace the valve.
�If blue appears 360° around the valve seat, the
guide and face are concentric. If not, resurface the
seat.
�Check that the seat contact is in the middle of the
valve face with the following width:
Intake 1.0 - 1.4 mm (0.039 - 0.055 in.)
Exhaust 1.2 - 1.6 mm (0.047 - 0.063 in.)
If not, correct the valve seats as follows:
�If the seating is too high on the valve face, use 15°
and 45° cutters to correct the seat.
Page 1421 of 1807

MA01E-01
MA-2
- MAINTENANCEINSIDE VEHICLE
39 Author�: Date�:
1997 SUPRA (RM502U)
INSIDE VEHICLE
GENERAL MAINTENANCE
These are maintenance and inspection items which are considered to be the owner's responsibility.
They can be done by the owner or they can have them done at a service shop.
These items include those which should be checked on a daily basis, those which, in most cases, do not
require (special) tools and those which are considered to be reasonable for the owner to do.
Items and procedures for general maintenance are as follows.
1. GENERAL NOTES
�Maintenance items may vary from country to country. Check the owner's manual supplement in which
the maintenance schedule is shown.
�Every service item in the periodic maintenance schedule must be performed.
�Periodic maintenance service must be performed according to whichever interval in the periodic main-
tenance schedule occurs first, the odometer reading (miles) or the time interval (months).
�Maintenance service after the last period should be performed at the same interval as before unless
otherwise noted.
�Failure to do even one item an cause the engine to run poorly and increase exhaust emissions.
2. LIGHTS
(a) Check that the headlights, stop lights, taillights, turn signal lights, and other lights are all working.
(b) Check the headlight aim.
3. WARNING LIGHTS AND BUZZERS
Check that all warning lights and buzzers function properly.
4. HORN
Check that it is working.
5. WINDSHIELD GLASS
Check for scratches, pits or abrasions.
6. WINDSHIELD WIPER AND WASHER
(a) Check operation of the wipers and washer.
(b) Check that the wipers do not streak.
7. WINDSHIELD DEFROSTER
Check that air comes out from the defroster outlet when operating the heater or air conditioner.
8. REAR VIEW MIRROR
Check that it is mounted securely.
9. SUN VISORS
Check that they move freely and are mounted securely.
10. STEERING WHEEL
Check that it has the specified freeplay. Be alert for changes in steering condition, such as hard steering,
excessive freeplay or strange noises.
11. SEATS
(a) Check that the seat adjusters operate smoothly.
(b) Check that all latches lock securely in any position.
(c) Check that the head restraints move up and down smoothly and that the locks hold securely in any
latch position.
(d) For fold-down seat backs, check that the latches lock securely.
12. SEAT BELTS
(a) Check that the seat belt system such as the buckles, retractors and anchors operate properly and
smoothly.
(b) Check that the belt webbing is not cut, frayed, worn or damaged.
Page 1425 of 1807

B03052
37 N´m
B03053
200 N´m
125 N´m
B03054
58 N´m
175 N´m
MA01J-01
MA-8
- MAINTENANCEBODY
45 Author�: Date�:
1997 SUPRA (RM502U)
BODY
INSPECTION
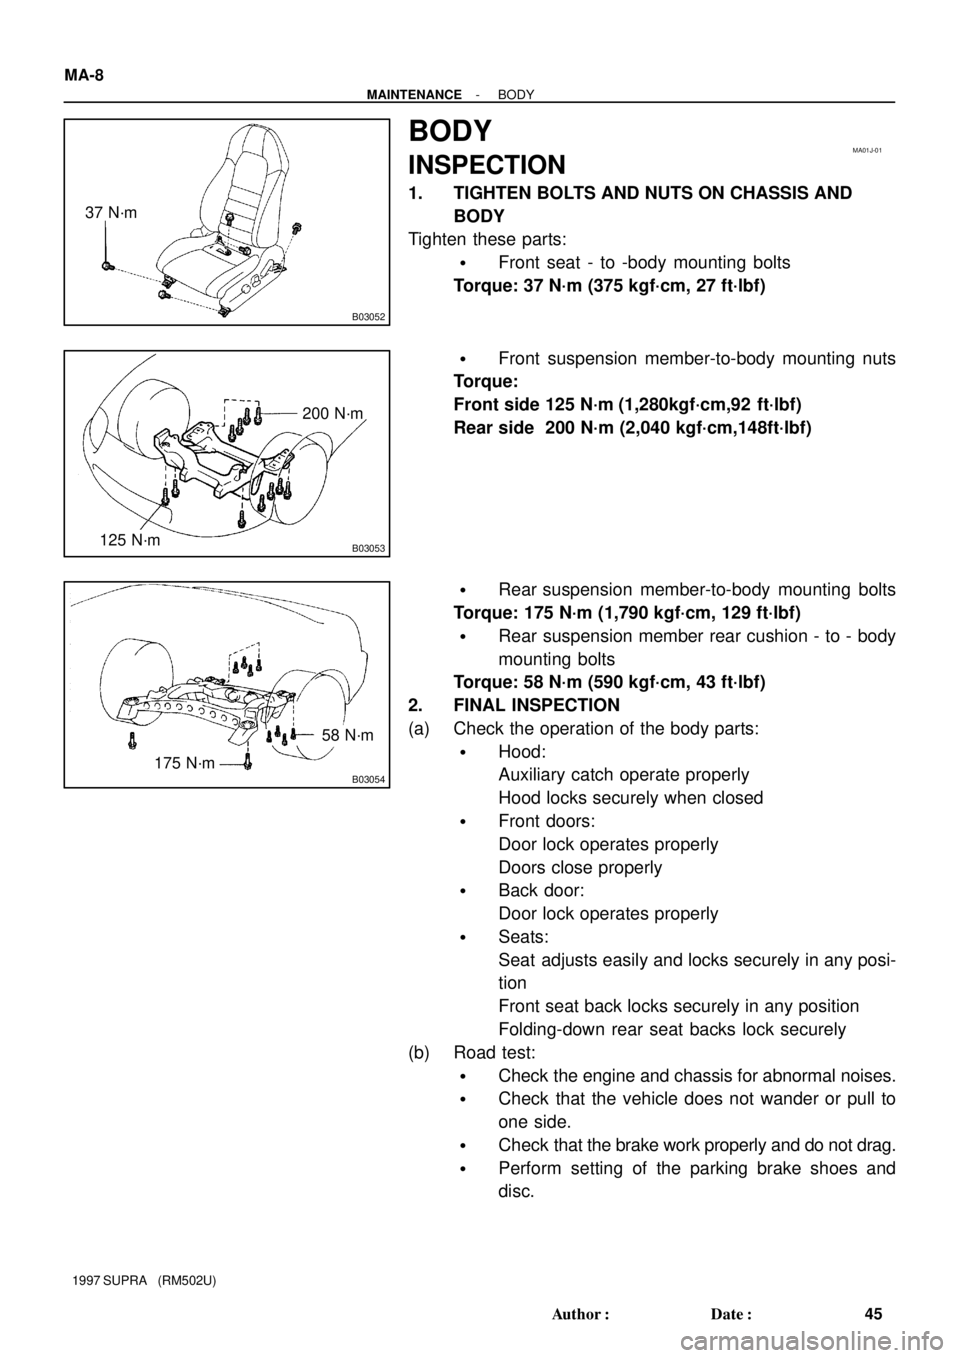
1. TIGHTEN BOLTS AND NUTS ON CHASSIS AND
BODY
Tighten these parts:
�Front seat - to -body mounting bolts
Torque: 37 N´m (375 kgf´cm, 27 ft´lbf)
�Front suspension member-to-body mounting nuts
Torque:
Front side 125 N´m (1,280kgf´cm,92 ft´lbf)
Rear side 200 N´m (2,040 kgf´cm,148ft´lbf)
�Rear suspension member-to-body mounting bolts
Torque: 175 N´m (1,790 kgf´cm, 129 ft´lbf)
�Rear suspension member rear cushion - to - body
mounting bolts
Torque: 58 N´m (590 kgf´cm, 43 ft´lbf)
2. FINAL INSPECTION
(a) Check the operation of the body parts:
�Hood:
Auxiliary catch operate properly
Hood locks securely when closed
�Front doors:
Door lock operates properly
Doors close properly
�Back door:
Door lock operates properly
�Seats:
Seat adjusts easily and locks securely in any posi-
tion
Front seat back locks securely in any position
Folding-down rear seat backs lock securely
(b) Road test:
�Check the engine and chassis for abnormal noises.
�Check that the vehicle does not wander or pull to
one side.
�Check that the brake work properly and do not drag.
�Perform setting of the parking brake shoes and
disc.
Page 1426 of 1807
- MAINTENANCEBODY
MA-9
46 Author�: Date�:
1997 SUPRA (RM502U)
(c) Be sure to deliver a clean car. especially check:
�Steering wheel
�Shift lever knob
�All switch knobs
�Seats
Page 1608 of 1807

SR14B-01
R06961
SST
R07510
SST
SR4371Matchmarks
Z06090
Chisel
R07107SST
- STEERINGPOWER STEERING GEAR
SR-39
1923 Author�: Date�:
1997 SUPRA (RM502U)
DISASSEMBLY
NOTICE:
When using a vise, do not overtighten it.
1. SECURE PS GEAR ASSEMBLY IN VISE
Using SST, secure the gear assembly in a vise.
SST 09612-00012
2. REMOVE 2 TURN PRESSURE TUBES
(a) Remove the union bolt and 2 gaskets.
(b) Using SST, remove the tube.
SST 09633-00020
(c) Remove the 2 union seats from the rack housing.
3. REMOVE RH AND LH TIE ROD ENDS AND LOCK
NUTS
Place matchmarks on the tie rod end and rack end, and loosen
the lock nut.
4. REMOVE RH AND LH CLIPS, RACK BOOTS AND
CLAMPS
NOTICE:
�Be careful not to damage the boot.
�Mark the RH and LH boots.
5. REMOVE RH AND LH RACK ENDS AND CLAW WASH-
ERS
(a) Using a chisel and a hammer, unstake the washer.
NOTICE:
Avoid any impact to the steering rack.
(b) Using a spanner (22 mm) to hold the steering rack and us-
ing SST, remove the rack end.
SST 09922-10010
NOTICE:
�Use SST 09922-10010 in the direction shown in the il-
lustration.
�Mark the RH and LH rack ends.