Page 276 of 1807
BO0QM-01
BO-20
- BODYFRONT WIPER AND WASHER
2100 Author�: Date�:
1997 SUPRA (RM502U)
REMOVAL
REMOVE THESE PARTS:
(a) Wiper arms and blades
(b) Cowl top ventilator louver
REMOVE FRONT WIPER MOTOR
(a) Disconnect the connector, then unfasten the 3 bolts.
(b) Remove the wiper motor with the link.
Page 277 of 1807
BO0QN-01
N08468
AA
BB
C
C
D
BE3367
2 - 2.5 mm
(0.079 - 0.098 in.)
0.7 - 0.75 mm
(0.028 - 0.030 in.)
- BODYFRONT WIPER AND WASHER
BO-21
2101 Author�: Date�:
1997 SUPRA (RM502U)
ADJUSTMENT
1. INSPECT FRONT WASHER NOZZLE
(a) While operating the washer, check that both the point
where the washer fluid from the upper nozzles hits the
windshield, and the up surge area, are within the range
indicated by the hatched line.
ºAº: Approx. 275 mm (10.8 in.)
ºBº: Approx. 150 mm (5.9 in.)
ºCº: Approx. 50 mm (2.0 in.)
ºDº: Within 100 mm (3.9 in.)
(b) Ensure that the lower point where the washer fluid hits the
windshield is within the range of the wiping pattern (the
area of the glass which is wiped by the wiper blades).
2. ADJUST FRONT WASHER NOZZLE
Using a tool like that shown in the illustration, change the direc-
tion of the nozzle hole to adjust the point where washer fluid
strikes the windshield.
Page 288 of 1807

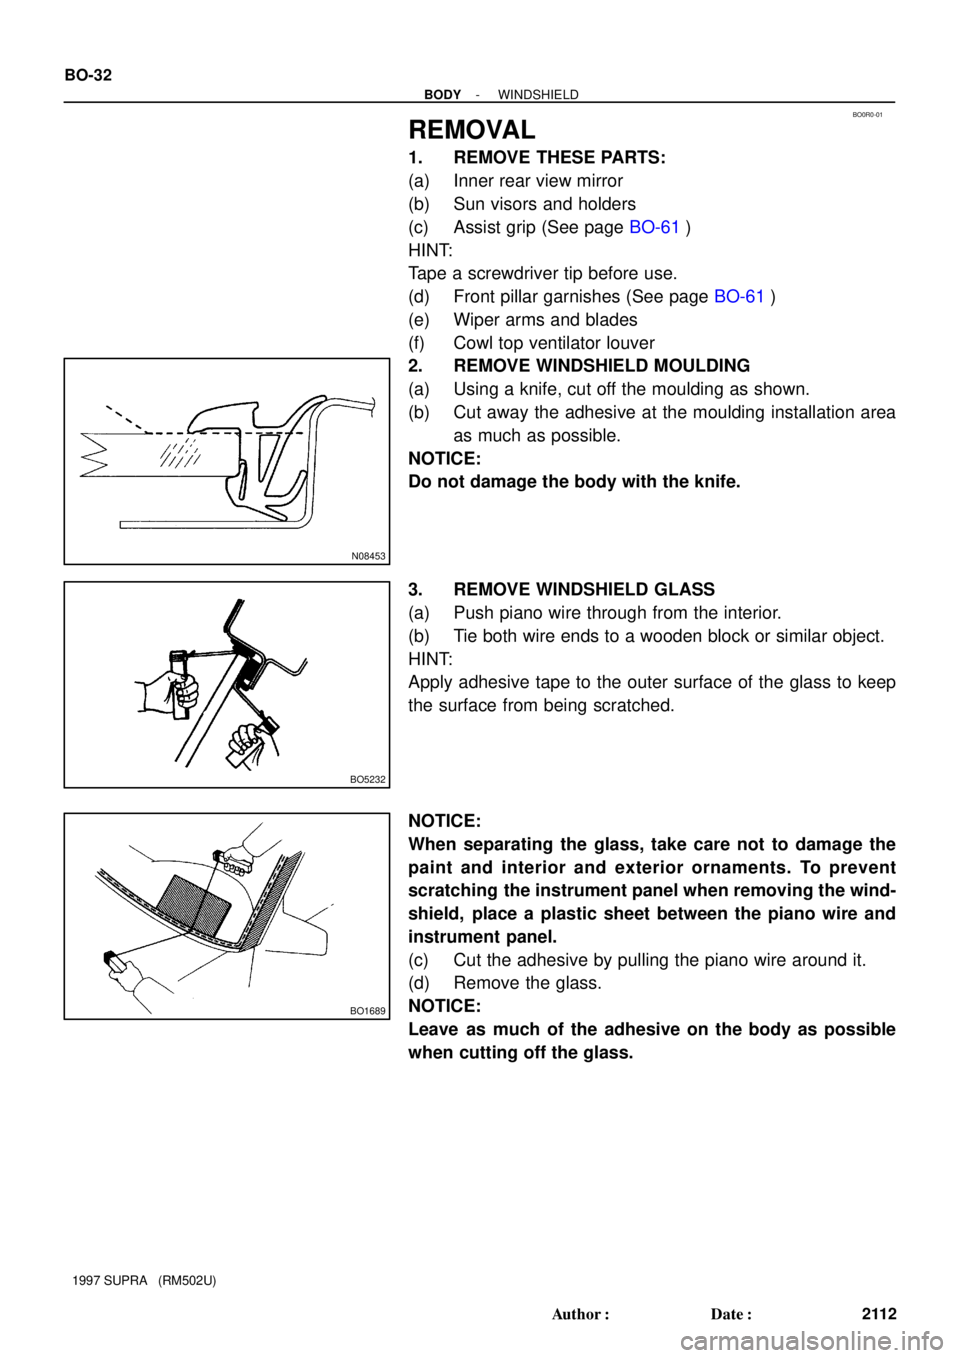
BO0R0-01
N08453
BO5232
BO1689
BO-32
- BODYWINDSHIELD
2112 Author�: Date�:
1997 SUPRA (RM502U)
REMOVAL
1. REMOVE THESE PARTS:
(a) Inner rear view mirror
(b) Sun visors and holders
(c) Assist grip (See page BO-61)
HINT:
Tape a screwdriver tip before use.
(d) Front pillar garnishes (See page BO-61)
(e) Wiper arms and blades
(f) Cowl top ventilator louver
2. REMOVE WINDSHIELD MOULDING
(a) Using a knife, cut off the moulding as shown.
(b) Cut away the adhesive at the moulding installation area
as much as possible.
NOTICE:
Do not damage the body with the knife.
3. REMOVE WINDSHIELD GLASS
(a) Push piano wire through from the interior.
(b) Tie both wire ends to a wooden block or similar object.
HINT:
Apply adhesive tape to the outer surface of the glass to keep
the surface from being scratched.
NOTICE:
When separating the glass, take care not to damage the
paint and interior and exterior ornaments. To prevent
scratching the instrument panel when removing the wind-
shield, place a plastic sheet between the piano wire and
instrument panel.
(c) Cut the adhesive by pulling the piano wire around it.
(d) Remove the glass.
NOTICE:
Leave as much of the adhesive on the body as possible
when cutting off the glass.
Page 292 of 1807
N08452
BO-36
- BODYWINDSHIELD
2116 Author�: Date�:
1997 SUPRA (RM502U)
12. INSTALL WINDSHIELD MOULDING
Place the moulding onto the body and tap it by hand.
13. INSPECT FOR LEAKS AND REPAIR
(a) Do a leak test after the hardening time has elapsed.
(b) Seal any leak with auto glass sealer.
Part No. 08833-00030 or equivalent
14. INSTALL THESE PARTS:
(a) Cowl top ventilator louver
(b) Wiper arms and blades
Torque: 22 N´m (225 kgf´cm, 16 ft´lbf)
(c) Front pillar garnishes
(d) Assist grip
(e) Sun visors and holders
(f) Inner rear view mirror
Page 1419 of 1807

MA01D-01
- MAINTENANCEOUTSIDE VEHICLE
MA-1
38 Author�: Date�:
1997 SUPRA (RM502U)
OUTSIDE VEHICLE
GENERAL MAINTENANCE
These are maintenance and inspection items which are considered to be the owner's responsibility.
They can be done by the owner or they can have them done at a service shop.
These items include those which should be checked on a daily basis, those which, in most cases, do not
require (special) tools and those which are considered to be reasonable for the owner to do.
Items and procedures for general maintenance are as follows.
1. GENERAL NOTES
�Maintenance items may vary from country to country. Check the owner's manual supplement in which
the maintenance schedule is shown.
�Every service item in the periodic maintenance schedule must be performed.
�Periodic maintenance service must be performed according to whichever interval in the periodic main-
tenance schedule occurs first, the odometer reading (miles) or the time interval (months).
�Maintenance service after the last period should be performed at the same interval as before unless
otherwise noted.
�Failure to do even one item an cause the engine to run poorly and increase exhaust emissions.
2. TIRES
(a) Check the pressure with a gauge. If necessary, adjust.
(b) Check for cuts, damage, uneven or excessive wear.
3. WHEEL NUTS
When checking the tires, check the nuts for looseness or for missing nuts. If necessary, tighten them.
4. WINDSHIELD WIPER BLADES
Check for wear or cracks whenever they do not wipe clean. If necessary, replace.
5. FLUID LEAKS
(a) Check underneath for leaking fuel, oil, water or other fluid.
(b) If you smell gasoline fumes or notice any leak, have the cause found and corrected.
6. DOORS AND ENGINE HOOD
(a) Check that all doors and the tailgate operate smoothly, and that all latches lock securely.
(b) Check that the engine hood secondary latch secures the hood from opening when the primary latch
is released.