Page 1947 of 4133

Parts ordering notes
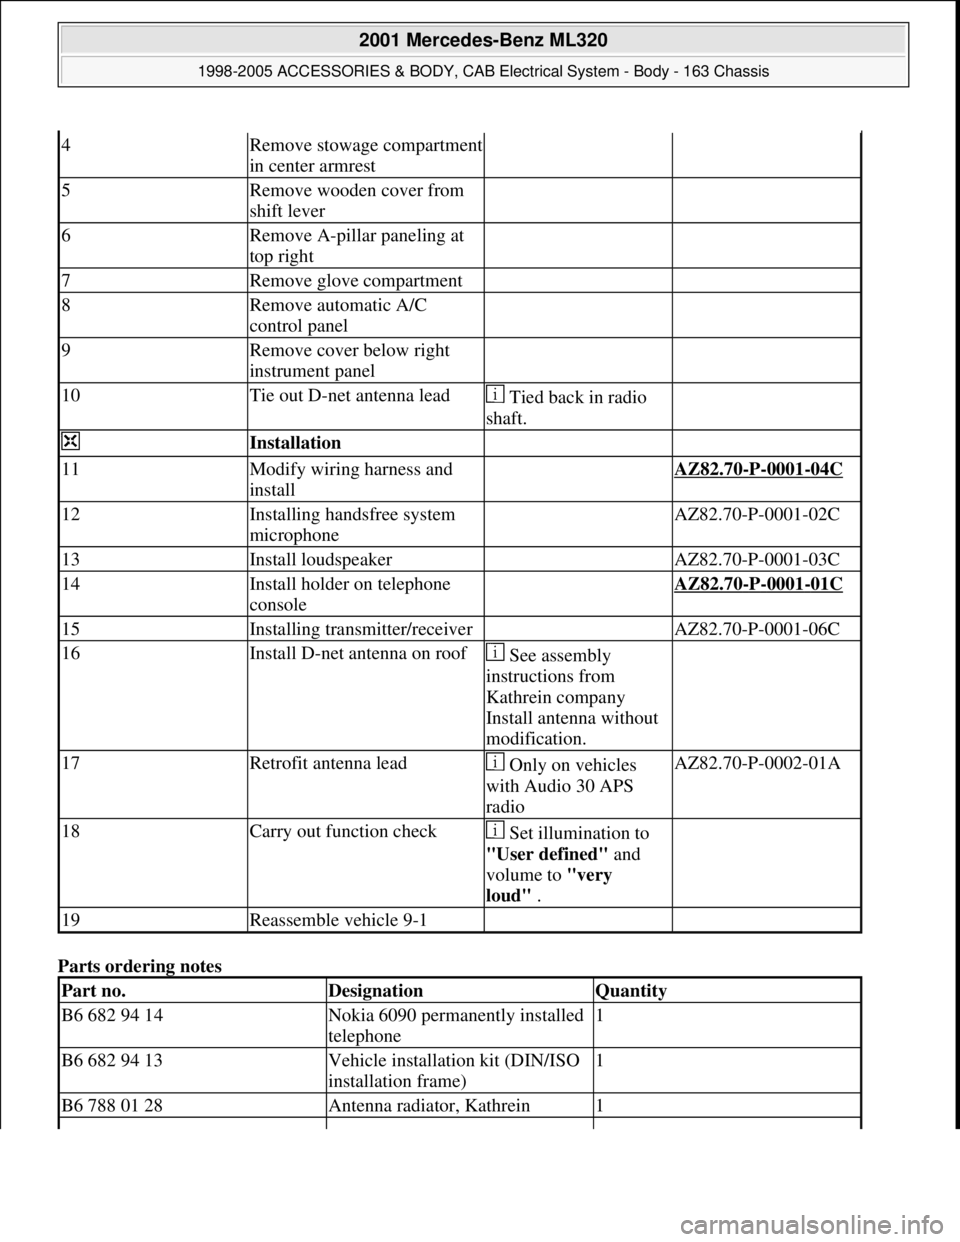
4Remove stowage compartment
in center armrest
5Remove wooden cover from
shift lever
6Remove A-pillar paneling at
top right
7Remove glove compartment
8Remove automatic A/C
control panel
9Remove cover below right
instrument panel
10Tie out D-net antenna lead Tied back in radio
shaft.
Installation
11Modify wiring harness and
install AZ82.70-P-0001-04C
12Installing handsfree system
microphone AZ82.70-P-0001-02C
13Install loudspeaker AZ82.70-P-0001-03C
14Install holder on telephone
console AZ82.70-P-0001-01C
15Installing transmitter/receiver AZ82.70-P-0001-06C
16Install D-net antenna on roof See assembly
instructions from
Kathrein company
Install antenna without
modification.
17Retrofit antenna lead Only on vehicles
with Audio 30 APS
radioAZ82.70-P-0002-01A
18Carry out function check Set illumination to
"User defined" and
volume to "very
loud" .
19Reassemble vehicle 9-1
Part no.DesignationQuantity
B6 682 94 14Nokia 6090 permanently installed
telephone1
B6 682 94 13Vehicle installation kit (DIN/ISO
installation frame)1
B6 788 01 28Antenna radiator, Kathrein1
2001 Mercedes-Benz ML320
1998-2005 ACCESSORIES & BODY, CAB Electrical System - Body - 163 Chassis
me
Saturday, October 02, 2010 3:30:14 PMPage 452 © 2006 Mitchell Repair Information Company, LLC.
Page 1955 of 4133

gas. Risk of poisoning
and caustic burns from
swallowing battery
electrolyte. Risk of
injury from caustic burns
to eyes and skin from
battery electrolyte or
from handling damaged
lead-acid batteriesflames or smoking. Wear
acid-resistant gloves,
clothing and glasses. Pour
battery electrolyte only
into suitable and
appropriately marked
containers.
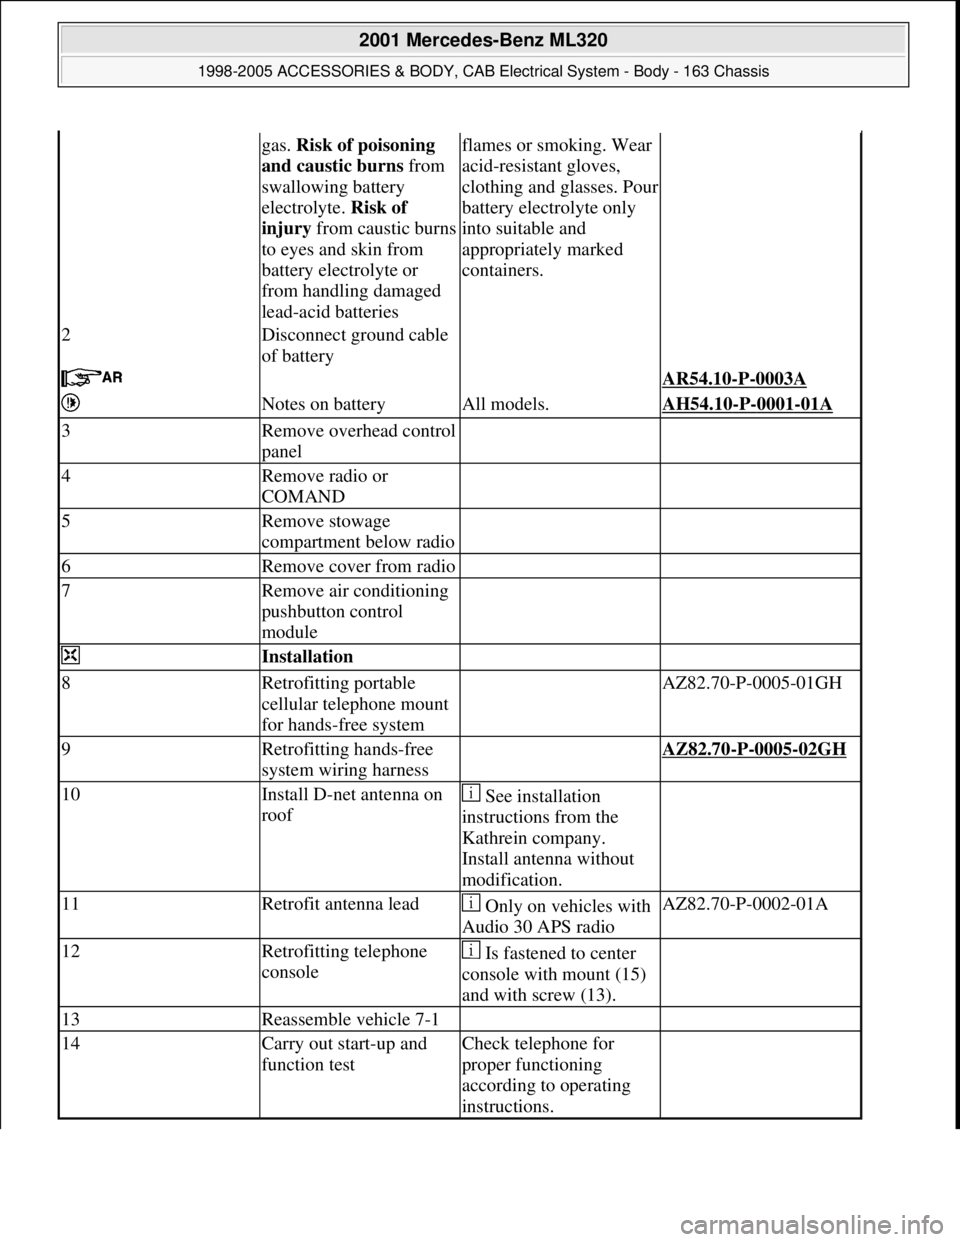
2Disconnect ground cable
of battery
AR54.10-P-0003A
Notes on batteryAll models.AH54.10-P-0001-01A
3Remove overhead control
panel
4Remove radio or
COMAND
5Remove stowage
compartment below radio
6Remove cover from radio
7Remove air conditioning
pushbutton control
module
Installation
8Retrofitting portable
cellular telephone mount
for hands-free system AZ82.70-P-0005-01GH
9Retrofitting hands-free
system wiring harness AZ82.70-P-0005-02GH
10Install D-net antenna on
roof See installation
instructions from the
Kathrein company.
Install antenna without
modification.
11Retrofit antenna lead Only on vehicles with
Audio 30 APS radioAZ82.70-P-0002-01A
12Retrofitting telephone
console Is fastened to center
console with mount (15)
and with screw (13).
13Reassemble vehicle 7-1
14Carry out start-up and
function testCheck telephone for
proper functioning
according to operating
instructions.
2001 Mercedes-Benz ML320
1998-2005 ACCESSORIES & BODY, CAB Electrical System - Body - 163 Chassis
me
Saturday, October 02, 2010 3:30:14 PMPage 460 © 2006 Mitchell Repair Information Company, LLC.
Page 2009 of 4133

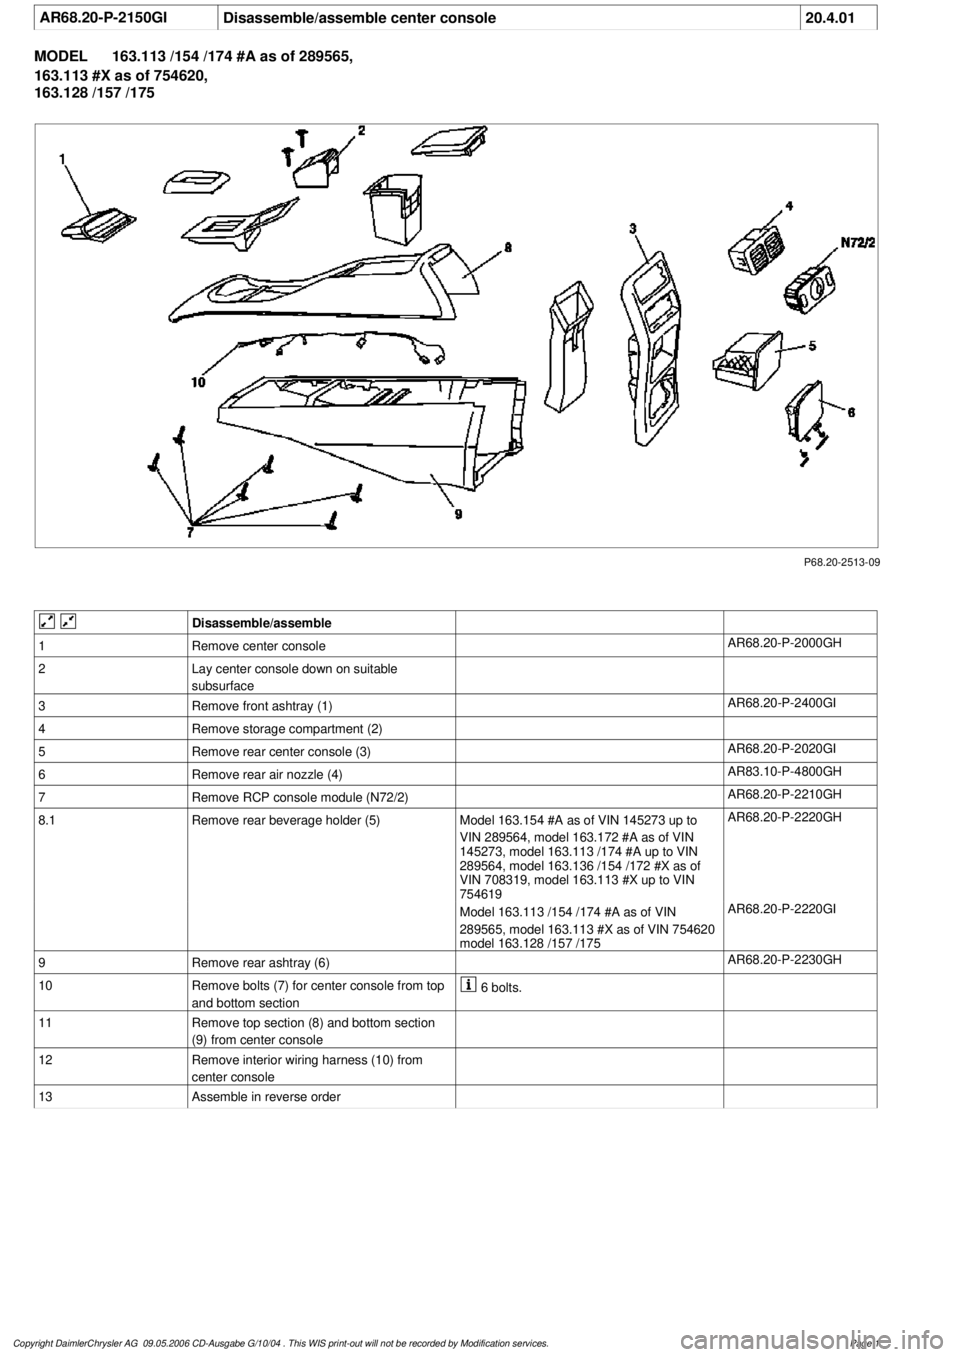
AR68.20-P-2150GI
Disassemble/assemble center console
20.4.01
MODEL
163.113 /154 /174 #A as of 289565,
163.113 #X as of 754620,
163.128 /157 /175
P68.20-2513-09
Disassemble/assemble
1
Remove center console
AR68.20-P-2000GH
2
Lay center console down on suitable
subsurface
3
Remove front ashtray (1)
AR68.20-P-2400GI
4
Remove storage compartment (2)
5
Remove rear center console (3)
AR68.20-P-2020GI
6
Remove rear air nozzle (4)
AR83.10-P-4800GH
7
Remove RCP console module (N72/2)
AR68.20-P-2210GH
8.1
Remove rear beverage holder (5)
Model 163.154 #A as of VIN 145273 up to
VIN 289564, model 163.172 #A as of VIN
145273, model 163.113 /174 #A up to VIN
289564, model 163.136 /154 /172 #X as of
VIN 708319, model 163.113 #X up to VIN
754619
AR68.20-P-2220GH
Model 163.113 /154 /174 #A as of VIN
289565, model 163.113 #X as of VIN 754620
model 163.128 /157 /175
AR68.20-P-2220GI
9
Remove rear ashtray (6)
AR68.20-P-2230GH
10
Remove bolts (7) for center console from top
and bottom section
6 bolts.
11
Remove top section (8) and bottom section
(9) from center console
12
Remove interior wiring harness (10) from
center console
13
Assemble in reverse order
Copyright DaimlerChrysler AG 09.05.2006 CD-Ausgabe G/10/04 . This WIS print-out will not be recorde
d by Modification services.
Page 1
Page 2010 of 4133
AR68.20-P-2400GI
Remove/install ashtray housing in front center console
20.4.01
MODEL
163.113 /154 /174 #A as of 289565,
163.113 #X as of 754620,
163.128 /157 /175
P68.20-2459-04
1
Center console
2
Plug
3
Bolts
4
Front ashtray
Remove/install
1
Remove center console (1)
AR68.20-P-2000GH
2
Lay center console down on suitable
subsurface
Do not damage center console
3
Disconnect plug (2)
4
Remove bolts (3)
5
Remove front ashtray (4)
Installation:
Ensure that ashtray is
seated correctly in center console.
6
Install in the reverse order
Copyright DaimlerChrysler AG 09.05.2006 CD-Ausgabe G/10/04 . This WIS print-out will not be recorde
d by Modification services.
Page 1
Page 2012 of 4133
AR83.10-P-4800GH
Removing and installing rear air nozzle
30.5.01
MODEL
163.113 /154 /174 #A as of 289565,
163.113 #X as of 754620,
163.128 /157 /175
P68.20-2494-11
1
Rear center console.
2
Retaining clips
3
Air nozzle
Remove/install
1
Remove rear center console (1)
AR68.20-P-2020GI
2
Loosen retaining clamps (2) on the sides of
the air nozzle (3)
3
Remove air nozzle (3) from the rear center
console
4
Install in the reverse order
Copyright DaimlerChrysler AG 09.05.2006 CD-Ausgabe G/10/04 . This WIS print-out will not be recorde
d by Modification services.
Page 1
Page 2013 of 4133
AR68.20-P-2230GH
Remove/install rear ashtray
9.5.01
MODEL
163.113 /154 /174 #A as of 289565,
163.113 #X as of 754620,
163.128 /157 /175
P68.20-2498-11
1
Rear center console.
2
Locking pin
3
Ashtray
Remove/install
1
Remove rear center console (1)
AR68.20-P-2020GI
2
Remove locking pin (2) from ashtray hinge
3
Remove ashtray (3)
4
Install in the reverse order
Copyright DaimlerChrysler AG 10.05.2006 CD-Ausgabe G/10/04 . This WIS print-out will not be recorde
d by Modification services.
Page 1
Page 2014 of 4133
AR68.20-P-2220GI
Remove/install rear beverage holder
9.5.01
MODEL
163.113 /154 /174 #A as of 289565,
163.113 #X as of 754620,
163.128 /157 /175
P68.20-2497-11
1
Rear center console.
2
Air nozzle
3
Beverage holder
4
Ball joint
5
Bolts
6
Paneling
Remove/install
1
Remove rear center console (1)
AR68.20-P-2020GI
2
Separate air nozzle (2) from beverage holder
(3)
Loosen ball joint (4) from bottom of
beverage holder.
3
Unscrew bolts (5) from sides of beverage
holder
4
Remove beverage holder (3)
Press onto paneling (6).
5
Install in the reverse order
Copyright DaimlerChrysler AG 09.05.2006 CD-Ausgabe G/10/04 . This WIS print-out will not be recorde
d by Modification services.
Page 1
Page 2015 of 4133
AR68.20-P-2220GI
Remove/install rear beverage holder
9.5.01
MODEL
163.113 /154 /174 #A as of 289565,
163.113 #X as of 754620,
163.128 /157 /175
P68.20-2497-11
1
Rear center console.
2
Air nozzle
3
Beverage holder
4
Ball joint
5
Bolts
6
Paneling
Remove/install
1
Remove rear center console (1)
AR68.20-P-2020GI
2
Separate air nozzle (2) from beverage holder
(3)
Loosen ball joint (4) from bottom of
beverage holder.
3
Unscrew bolts (5) from sides of beverage
holder
4
Remove beverage holder (3)
Press onto paneling (6).
5
Install in the reverse order
Copyright DaimlerChrysler AG 10.05.2006 CD-Ausgabe G/10/04 . This WIS print-out will not be recorde
d by Modification services.
Page 1