1997 MERCEDES-BENZ ML430 center console
[x] Cancel search: center consolePage 3571 of 4133

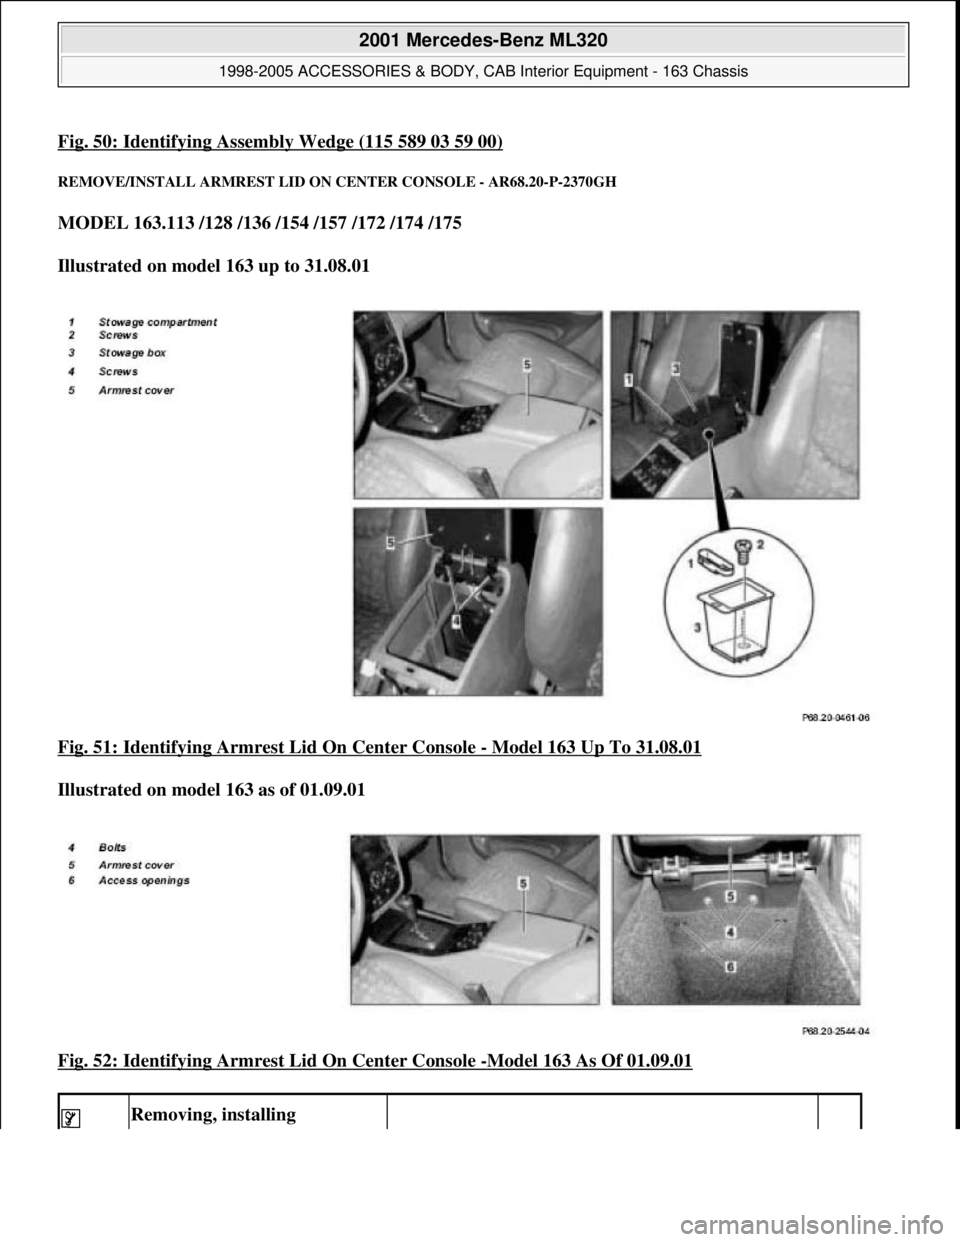
Fig. 50: Identifying Assembly Wedge (115 589 03 59 00)
REMOVE/INSTALL ARMRES T LID ON CENTER CONSOLE - AR68.20-P-2370GH
MODEL 163.113 /128 /136 /154 /157 /172 /174 /175
Illustrated on model 163 up to 31.08.01
Fig. 51: Identifying Armrest Lid On Center Console
- Model 163 Up To 31.08.01
Illustrated on model 163 as of 01.09.01
Fig. 52: Identifying Armrest Lid On Center Console
-Model 163 As Of 01.09.01
Removing, installing
2001 Mercedes-Benz ML320
1998-2005 ACCESSORIES & BODY, CAB In terior Equipment - 163 Chassis
me
Saturday, October 02, 2010 3:35:22 PMPage 53 © 2006 Mitchell Repair Information Company, LLC.
Page 3572 of 4133

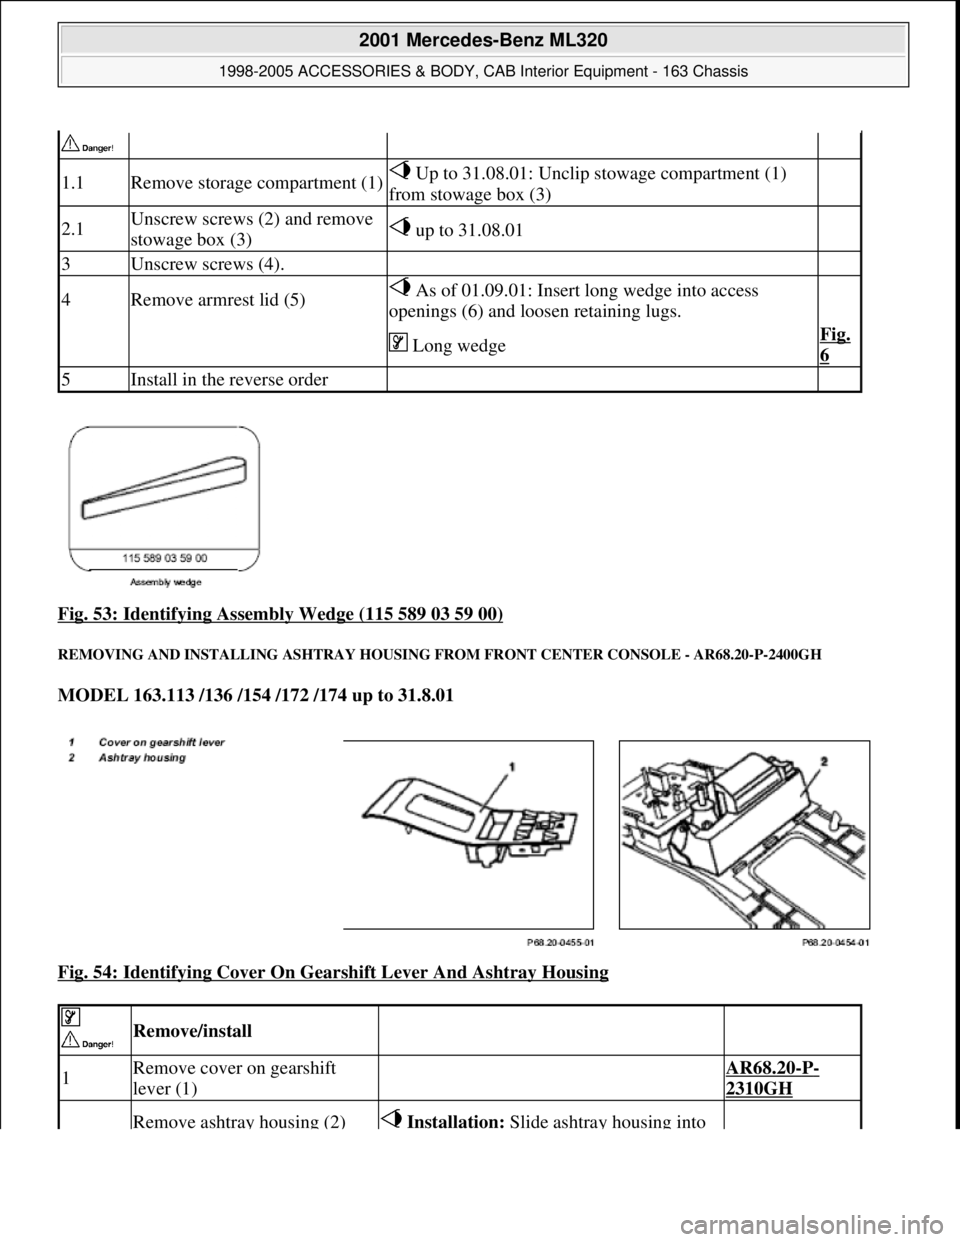
Fig. 53: Identifying Assembly Wedge (115 589 03 59 00)
REMOVING AND INST ALLING ASHTRAY HOUSING FROM FR ONT CENTER CONSOLE - AR68.20-P-2400GH
MODEL 163.113 /136 /154 /172 /174 up to 31.8.01
Fig. 54: Identifying Cover On Gear shift Lever And Ashtray Housing
1.1Remove storage compartment (1) Up to 31.08.01: Unclip stowage compartment (1)
from stowage box (3)
2.1Unscrew screws (2) and remove
stowage box (3) up to 31.08.01
3Unscrew screws (4).
4Remove armrest lid (5) As of 01.09.01: Insert long wedge into access
openings (6) and loosen retaining lugs.
Long wedgeFig.
6
5Install in the reverse order
Remove/install
1Remove cover on gearshift
lever (1) AR68.20-P-
2310GH
Remove ashtray housing (2) Installation: Slide ashtray housing into
2001 Mercedes-Benz ML320
1998-2005 ACCESSORIES & BODY, CAB In terior Equipment - 163 Chassis
me
Saturday, October 02, 2010 3:35:22 PMPage 54 © 2006 Mitchell Repair Information Company, LLC.
Page 3573 of 4133

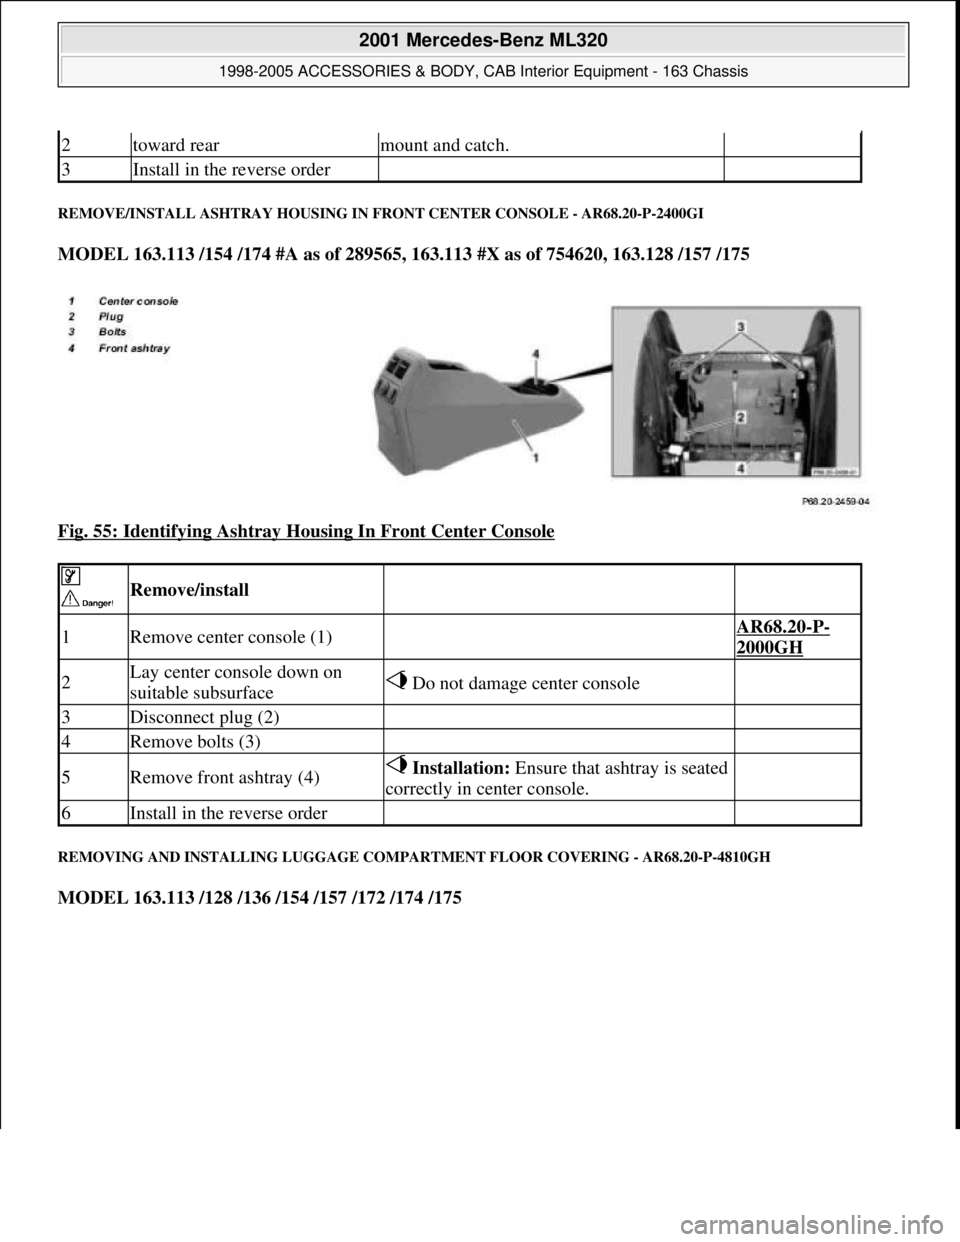
REMOVE/INSTALL ASHTRAY HOUSING IN FRONT CENTER CONSOLE - AR68.20-P-2400GI
MODEL 163.113 /154 /174 #A as of 289565, 163.113 #X as of 754620, 163.128 /157 /175
Fig. 55: Identifying Ashtray Housing In Front Center Console
REMOVING AND INSTALLING LUGGAGE COMPARTMENT FLOOR COVERING - AR68.20-P-4810GH
MODEL 163.113 /128 /136 /154 /157 /172 /174 /175
2toward rearmount and catch.
3Install in the reverse order
Remove/install
1Remove center console (1) AR68.20-P-
2000GH
2Lay center console down on
suitable subsurface Do not damage center console
3Disconnect plug (2)
4Remove bolts (3)
5Remove front ashtray (4) Installation: Ensure that ashtray is seated
correctly in center console.
6Install in the reverse order
2001 Mercedes-Benz ML320
1998-2005 ACCESSORIES & BODY, CAB Interior Equipment - 163 Chassis
me
Saturday, October 02, 2010 3:35:22 PMPage 55 © 2006 Mitchell Repair Information Company, LLC.
Page 3833 of 4133

SI91.60-P-0002A
Service information on immobilization of a passenger-side airbag where a
rearward mounted (reboard) child seat is fitted
17.3.99
MODEL
124, 126, 129, 140, 163, 168, 170, 202, 203, 208, 210, 215, 220, 463
Modification notes
18.11.00
Supersedes Service Information SI91.60-P-0002A dated
15.11.00
Remove the SI SI91.60-P-0002A from your file
It is recommended to place the child seat in the rear area if
possible.
If, in exceptional cases, the owner wishes a rearward mounted child
seat to be expressly attached on the front passenger seat, the front
passenger airbag should be immobilized.
As a general rule, there is no approval for immobilizing the front
passenger airbag on models fitted with ACSR, which is visible from
the "airbag OFF" indicator light in the center console. On such
models, an MB child seat with ACSR should be used for safety and
cost reasons.
-----------------------------------------------------------------------------------------
On models fitted with seat belt force limiter, it is essential for
safety reasons to
D
program the front passenger ETR to "NO".
D
unplug the connector at the front passenger ETR.
No provision is made for immobilizing the seat occupied
recognition, the automatic child seat recognition (ACSR), as well as
the side airbag and window airbag.
In the event that it is necessary to immobilize the seat occupied
recognition and automatic child seat recognition (ACSR), for example
if a Recaro seat is installed, this can be carried out in exceptional
cases after agreement has been obtained from GSP/SPS, tel. 07031
/ 90 - 81815.
-----------------------------------------------------------------------------------------
After immobilizing the front passenger airbag or additionally the
ETR, it is essential to
D
have the customer sign the confirmation after immobilization.
D
affix a sticker at a clearly visible point in the area of the front
passenger airbag.
D
affix a sticker in the Owner's Manual, in the section Airbag.
Carry out the remaining procedure as stated below.
-----------------------------------------------------------------------------------------
Deactivation can be reversed at any time.
Immobilization and re-activation must be entered in the
vehicle documents!
The vehicle should be presented in such a case to a technical
inspection center (DEKRA, TÜV). The completed confirmation
should be submitted to the vehicle registration authorities for
entry.
-----------------------------------------------------------------------------------------
Perform version coding / procedure
Model
Version
Coding with HHT
2)
or STAR Diagnosis tool (DAS)
Unplug
connector of
passenger side
airbag
3)
Unplug
connector of
passenger side
emergency
tensioning
retractor
Insert
replacement resistor
3)
Passenger-side
airbag
NO
Passenger side
emergency
tensioning
retractor NO
124
All
--X-X
126
All
--X-X
129
up to 06/93
--X-X
129
as of 07/93 without ACSR
X-X--
140
up to 06/93
--X-X
140
as of 07/93 without ACSR
X-X--
140
as of 07/93 with ACSR
1)
-----
163
up to VIN 145263
--X-X
163
as of VIN 145264
-----
168
All
-----
170
without ACSR
XXXX-
170
with ACSR
1)
-----
202
without seat belt force limiter
X-X--
202
as of 06/97
4)
XXXX-
202
with ACSR
1)
-----
203
All
-----
208
All
-----
210
without ACSR
XXXX-
210
with ACSR
1)
-----
215
All
-----
220
All
-----
Copyright DaimlerChrysler AG 14.06.2006 CD-Ausgabe G/10/04 . This WIS print-out will not be recorde
d by Modification services.
Page 1
Page 3834 of 4133

463
All
-----
1)
Recognition: existing "airbag Off" warning light in center
console.
2)
With HHT functions menu point 5 Coding Reboard child seat. If
only the passenger side airbag is de-activated, then program
menu point Vehicle equipment.
3)
Depending on model and version, unplug one or two
connectors at the passenger side airbag and insert the
corresponding replacement resistors.
4)
Without ACSR, with seat belt force limiter.
Immobilizing passenger side airbag certificate
Model 124, 126, 129, 140, 163 up to VIN
145263, 170, 202, 210
Have customer sign certificate after
immobilization
OF91.60-P-1000-01A
Cancel immobilization
D
To re-activate the passenger side airbag remove the ignition
resistor at the cable.
D
Fit together connector at passenger side airbag.
D
Fit together connector at passenger side ETR (on models fitted
with seat belt force limiter).
D
Use HHT or STAR Diagnosis tool (DAS) to re-program
passenger side airbag and passenger side ETR in the SRS
control module to "YES".
D
Remove sticker on passenger side airbag and render invalid in
Owner's Manual.
D
Complete re-activation on certificate after immobilization.
D
If re-activated, delete de-activation in vehicle documents.
Parts ordering notes
Part no.
Designation
Quantity
140 868 00 50
Ignition resistor (replacement resistor)
as required
140 817 15 20
Sticker (without seat belt force limiter)
2
210 817 20 20
Sticker (with seat belt force limiter)
2
Copyright DaimlerChrysler AG 14.06.2006 CD-Ausgabe G/10/04 . This WIS print-out will not be recorde
d by Modification services.
Page 2
Page 3982 of 4133

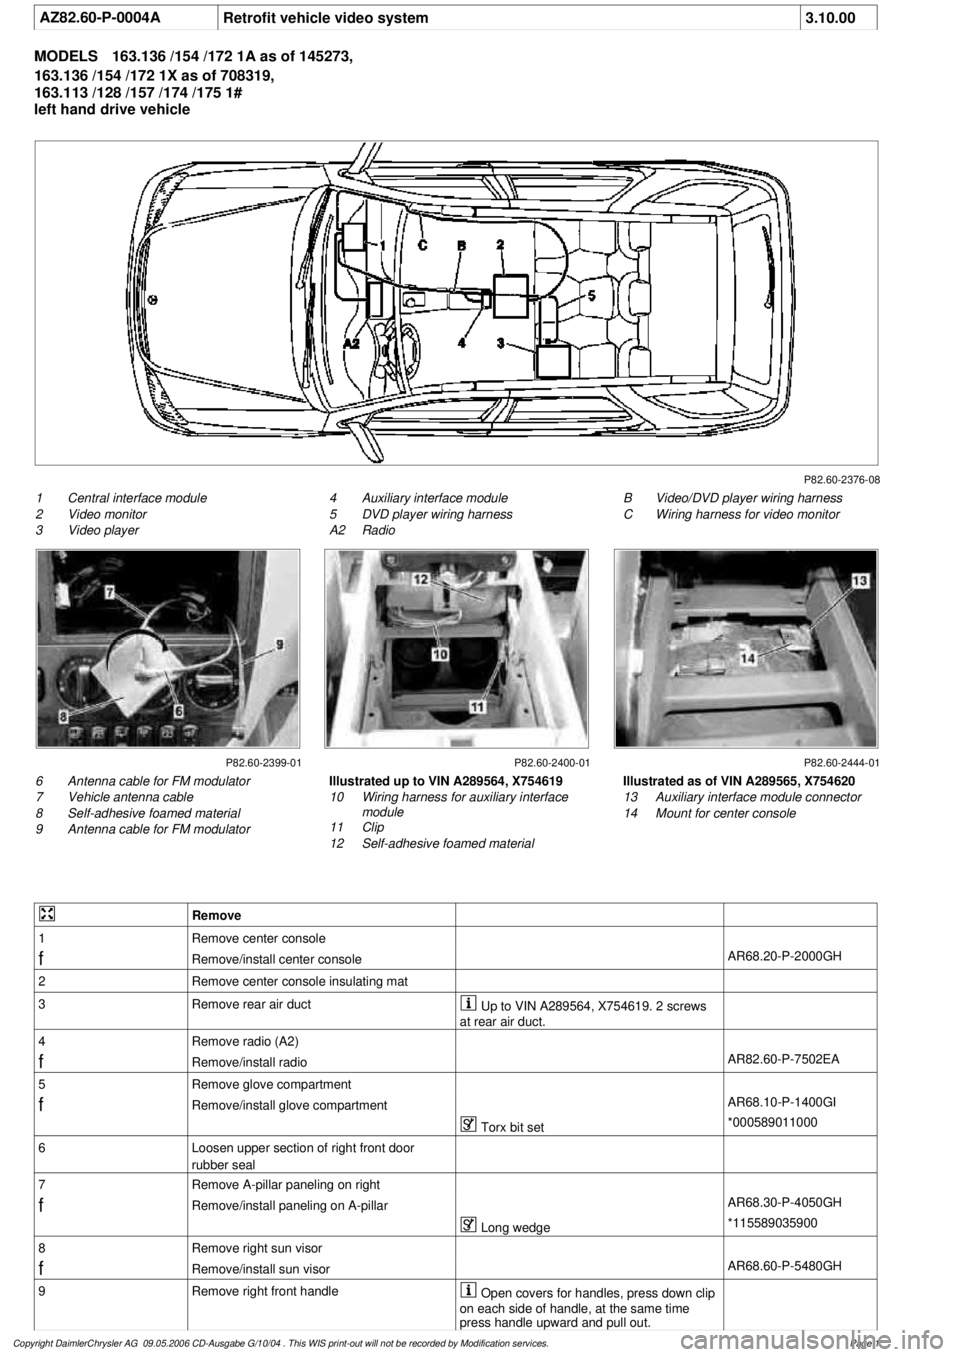
AZ82.60-P-0004A
Retrofit vehicle video system
3.10.00
MODELS
163.136 /154 /172 1A as of 145273,
163.136 /154 /172 1X as of 708319,
163.113 /128 /157 /174 /175 1#
left hand drive vehicle
P82.60-2376-08
1
Central interface module
2
Video monitor
3
Video player
B
Video/DVD player wiring harness
C
Wiring harness for video monitor
4
Auxiliary interface module
5
DVD player wiring harness
A2
Radio
P82.60-2399-01 P82.60-2400-01 P82.60-2444-01
6
Antenna cable for FM modulator
7
Vehicle antenna cable
8
Self-adhesive foamed material
9
Antenna cable for FM modulator
Illustrated as of VIN A289565, X754620
13
Auxiliary interface module connector
14
Mount for center console
Illustrated up to VIN A289564, X754619
10
Wiring harness for auxiliary interface
module
11
Clip
12
Self-adhesive foamed material
Remove
1
Remove center console
f
Remove/install center console
AR68.20-P-2000GH
2
Remove center console insulating mat
3
Remove rear air duct
Up to VIN A289564, X754619. 2 screws
at rear air duct.
4
Remove radio (A2)
f
Remove/install radio
AR82.60-P-7502EA
5
Remove glove compartment
f
Remove/install glove compartment
AR68.10-P-1400GI
Torx bit set
*000589011000
6
Loosen upper section of right front door
rubber seal
7
Remove A-pillar paneling on right
f
Remove/install paneling on A-pillar
AR68.30-P-4050GH
Long wedge
*115589035900
8
Remove right sun visor
f
Remove/install sun visor
AR68.60-P-5480GH
9
Remove right front handle
Open covers for handles, press down clip
on each side of handle, at the same time
press handle upward and pull out.
Copyright DaimlerChrysler AG 09.05.2006 CD-Ausgabe G/10/04 . This WIS print-out will not be recorde
d by Modification services.
Page 1
Page 3983 of 4133

10
Remove edge guard for tilting/sliding roof
cutout
11
Release upper right B-pillar paneling
12
Remove covers at lower rear seat
Do NOT remove center cover for lower
40% seat. Do NOT reinstall curtain on 60%
front bench seat.
f
Remove and install cover on bottom of rear
seat
AR91.12-P-1100GH
13
Release side shade at the 60% bench
Fold shade upward so that the working
area is not obstructed.
14
Remove 40% rear seat
f
Remove and install bench
AR91.12-P-1010GI
Torx bit set
*000589011000
Install
15
Retrofit central interface module (1)
AZ82.60-P-0004-01A
16
Insert antenna cable for FM modulator (6) into
vehicle antenna cable (7)
17
Cover connector with self-adhesive foamed
material (8)
18
Plug remaining antenna cable of FM
modulator (9) into radio
19
Install radio (A2)
f
Remove/install radio
AR82.60-P-7502EA
20
Retrofit video monitor (2) and wiring harness
of video monitor (C)
With
glass version of electric sliding/tilting
roof, code 414a.
AZ82.60-P-0004-02A
Except
glass version of electric
sliding/tilting roof, code 414a.
AZ82.60-P-0004-02B
21
Secure upper right B-pillar paneling
Ensure that the lugs of the seat belt height
adjustment are located correctly in the recess
clearance of the paneling.
22
Install right front handle
23
Install right sun visor
f
Remove/install sun visor
AR68.60-P-5480GH
24
Install right front A-pillar cover
f
Remove/install paneling on A-pillar
AR68.30-P-4050GH
25
Re-secure upper area of rubber door seal
26
Route wiring harness of video/DVD player
(B), additional interface module (4) and wiring
harness of video monitor (C) later
Up to VIN A289564, X754619.
AZ82.60-P-0004-03A
As of VIN A289565, X754620.
AZ82.60-P-0004-03B
27
Retrofit auxiliary interface module (4) in
center console
Up to VIN A289564, X754619.
AZ82.60-P-0004-04A
As of VIN A289565, X754620.
AZ82.60-P-0004-04B
28
Install center console insulating mat
29
Install center console
f
Remove/install center console
AR68.20-P-2000GH
30.1
Plug in plug of additional interface module
and secure the wiring harness of the
additional interface module (10) to the clip
(11) together with the wiring harness of the
rear power windows in the center console
Up to VIN A289564, X754619.
30.2
Insert auxiliary interface module (13)
connector and route between center console
mount (14) and center console.
As of VIN A289565, X754620.
31.1
Secure auxiliary interface module plug in the
left rear corner of the ashtray housing using
self-adhesive foamed material (12)
Up to VIN A289564, X754619.
32
Open ashtray and cup holder and close to
check correct function
33
Attach side shade of the 60% bench
34.1
Retrofit video player (3)
AZ82.60-P-0004-05A
*BA91.12-P-1005-03A
*BA91.12-P-1008-03A
34.2
Retrofit DVD player
AZ82.60-P-0005-01GH
35
Install 40% rear seat
f
Remove and install bench
AR91.12-P-1010GI
Torx bit set
*000589011000
Copyright DaimlerChrysler AG 09.05.2006 CD-Ausgabe G/10/04 . This WIS print-out will not be recorde
d by Modification services.
Page 2