Page 3533 of 4133

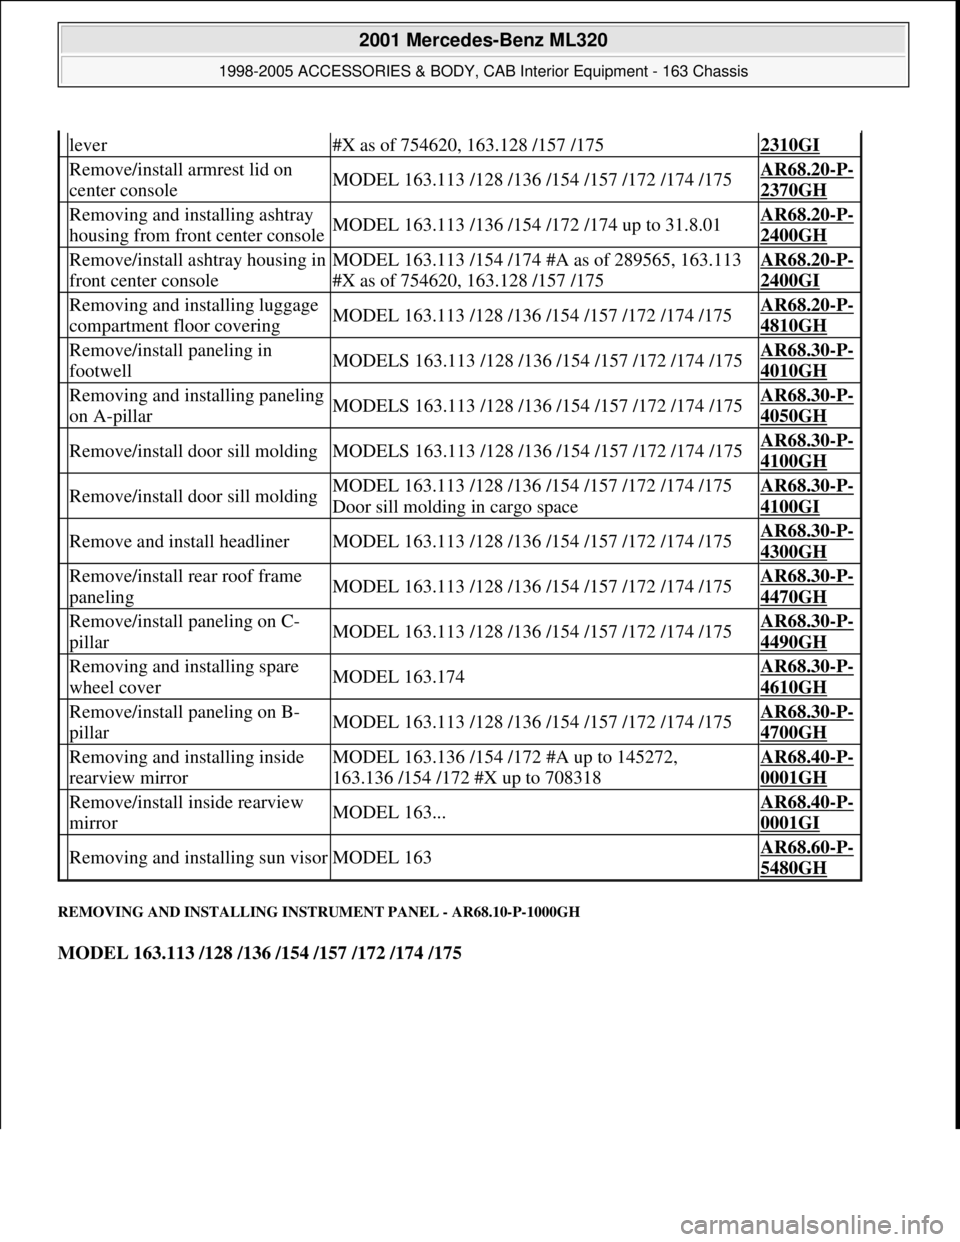
REMOVING AND INSTALLING INSTRUMENT PANEL - AR68.10-P-1000GH
MODEL 163.113 /128 /136 /154 /157 /172 /174 /175
lever#X as of 754620, 163.128 /157 /1752310GI
Remove/install armrest lid on
center consoleMODEL 163.113 /128 /136 /154 /157 /172 /174 /175AR68.20-P-
2370GH
Removing and installing ashtray
housing from front center consoleMODEL 163.113 /136 /154 /172 /174 up to 31.8.01AR68.20-P-
2400GH
Remove/install ashtray housing in
front center consoleMODEL 163.113 /154 /174 #A as of 289565, 163.113
#X as of 754620, 163.128 /157 /175AR68.20-P-
2400GI
Removing and installing luggage
compartment floor coveringMODEL 163.113 /128 /136 /154 /157 /172 /174 /175AR68.20-P-
4810GH
Remove/install paneling in
footwellMODELS 163.113 /128 /136 /154 /157 /172 /174 /175AR68.30-P-
4010GH
Removing and installing paneling
on A-pillarMODELS 163.113 /128 /136 /154 /157 /172 /174 /175AR68.30-P-
4050GH
Remove/install door sill moldingMODELS 163.113 /128 /136 /154 /157 /172 /174 /175AR68.30-P-
4100GH
Remove/install door sill moldingMODEL 163.113 /128 /136 /154 /157 /172 /174 /175
Door sill molding in cargo spaceAR68.30-P-
4100GI
Remove and install headlinerMODEL 163.113 /128 /136 /154 /157 /172 /174 /175AR68.30-P-
4300GH
Remove/install rear roof frame
panelingMODEL 163.113 /128 /136 /154 /157 /172 /174 /175AR68.30-P-
4470GH
Remove/install paneling on C-
pillarMODEL 163.113 /128 /136 /154 /157 /172 /174 /175AR68.30-P-
4490GH
Removing and installing spare
wheel coverMODEL 163.174AR68.30-P-
4610GH
Remove/install paneling on B-
pillarMODEL 163.113 /128 /136 /154 /157 /172 /174 /175AR68.30-P-
4700GH
Removing and installing inside
rearview mirrorMODEL 163.136 /154 /172 #A up to 145272,
163.136 /154 /172 #X up to 708318AR68.40-P-
0001GH
Remove/install inside rearview
mirrorMODEL 163...AR68.40-P-
0001GI
Removing and installing sun visorMODEL 163AR68.60-P-
5480GH
2001 Mercedes-Benz ML320
1998-2005 ACCESSORIES & BODY, CAB Interior Equipment - 163 Chassis
me
Saturday, October 02, 2010 3:35:21 PMPage 15 © 2006 Mitchell Repair Information Company, LLC.
Page 3542 of 4133

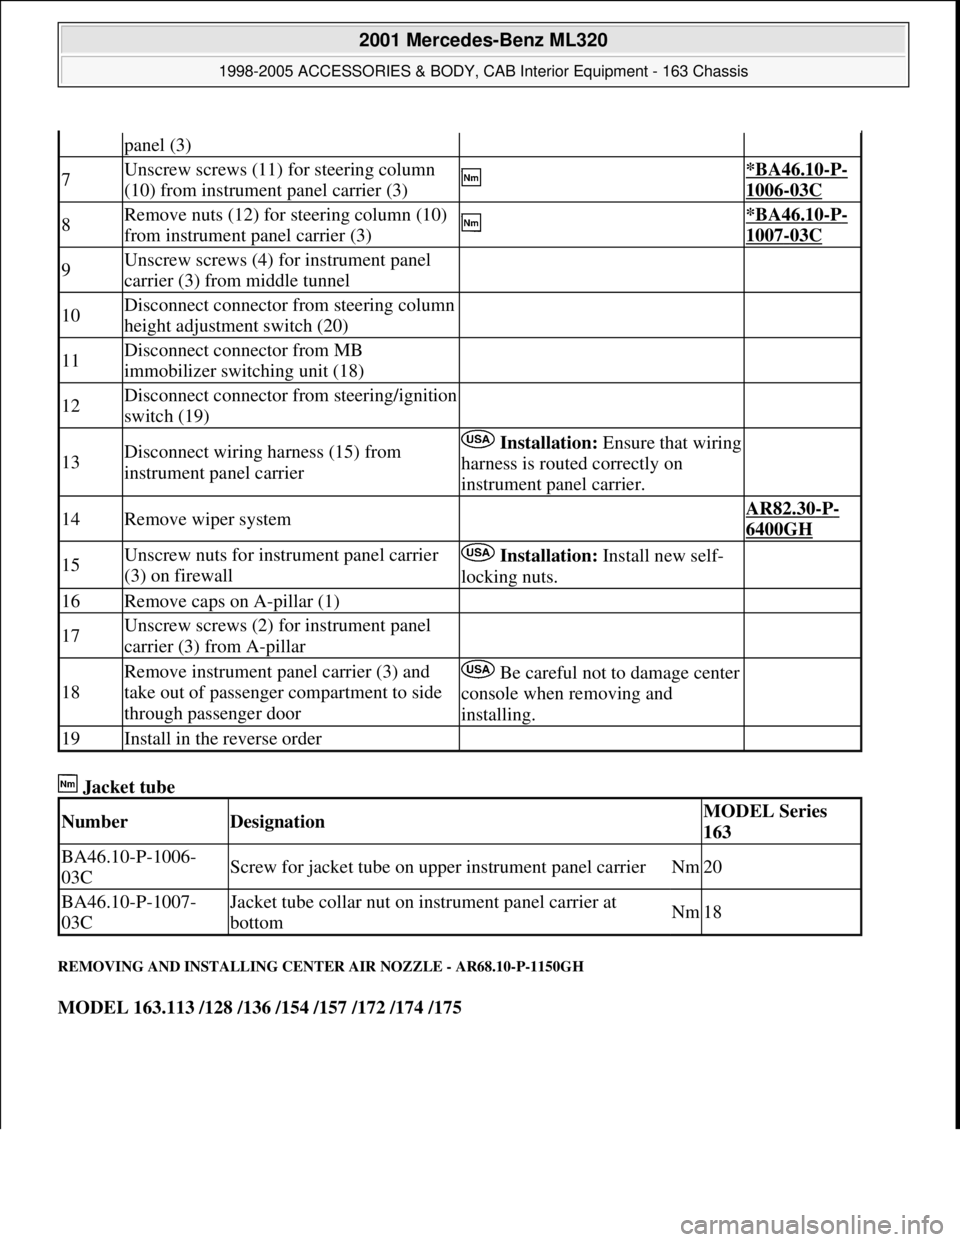
Jacket tube
REMOVING AND INSTALLING CENTER AIR NOZZLE - AR68.10-P-1150GH
MODEL 163.113 /128 /136 /154 /157 /172 /174 /175
panel (3)
7Unscrew screws (11) for steering column
(10) from instrument panel carrier (3) *BA46.10-P-
1006-03C
8Remove nuts (12) for steering column (10)
from instrument panel carrier (3) *BA46.10-P-
1007-03C
9Unscrew screws (4) for instrument panel
carrier (3) from middle tunnel
10Disconnect connector from steering column
height adjustment switch (20)
11Disconnect connector from MB
immobilizer switching unit (18)
12Disconnect connector from steering/ignition
switch (19)
13Disconnect wiring harness (15) from
instrument panel carrier Installation:Ensure that wiring
harness is routed correctly on
instrument panel carrier.
14Remove wiper system AR82.30-P-
6400GH
15Unscrew nuts for instrument panel carrier
(3) on firewall Installation: Install new self-
locking nuts.
16Remove caps on A-pillar (1)
17Unscrew screws (2) for instrument panel
carrier (3) from A-pillar
18
Remove instrument panel carrier (3) and
take out of passenger compartment to side
through passenger doorBe careful not to damage center
console when removing and
installing.
19Install in the reverse order
NumberDesignationMODEL Series
163
BA46.10-P-1006-
03CScrew for jacket tube on upper instrument panel carrierNm20
BA46.10-P-1007-
03CJacket tube collar nut on instrument panel carrier at
bottomNm18
2001 Mercedes-Benz ML320
1998-2005 ACCESSORIES & BODY, CAB Interior Equipment - 163 Chassis
me
Saturday, October 02, 2010 3:35:21 PMPage 24 © 2006 Mitchell Repair Information Company, LLC.
Page 3556 of 4133
REMOVE/INSTALL CENTER CONSOLE - AR68.20-P-2000GH
MODEL 163.113 /128 /136 /154 /157 /172 /174 /175
Fig. 32: Identifying Center Console Housing And Screws
Fig. 33: Identifying Center Console Screws
11Remove beverage holder (3)
12Install in the reverse order
2001 Mercedes-Benz ML320
1998-2005 ACCESSORIES & BODY, CAB In terior Equipment - 163 Chassis
me
Saturday, October 02, 2010 3:35:21 PMPage 38 © 2006 Mitchell Repair Information Company, LLC.
Page 3557 of 4133

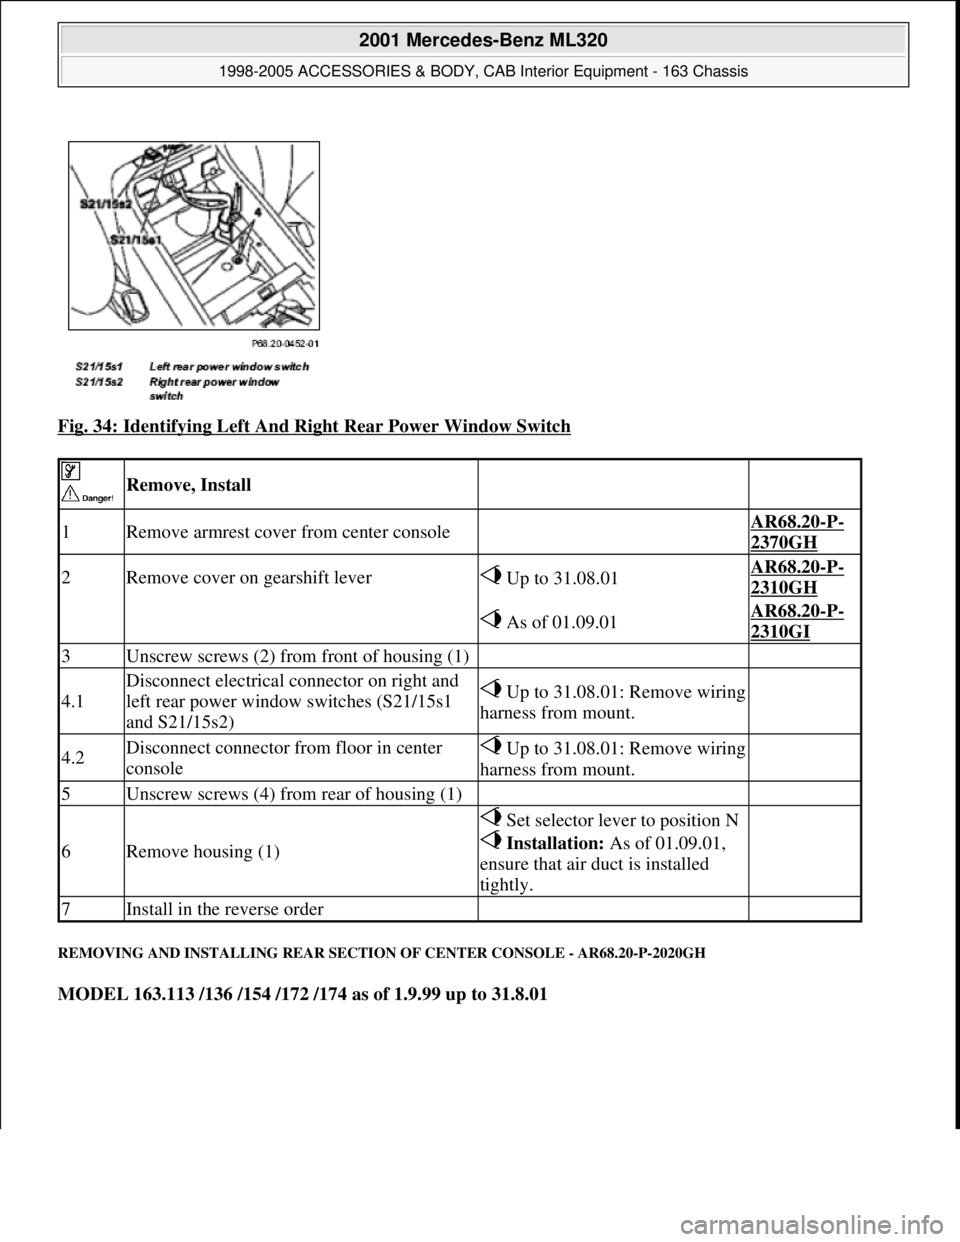
Fig. 34: Identifying Left And Right Rear Power Window Switch
REMOVING AND INSTALLING REAR SECTION OF CENTER CONSOLE - AR68.20-P-2020GH
MODEL 163.113 /136 /154 /172 /174 as of 1.9.99 up to 31.8.01
Remove, Install
1Remove armrest cover from center console AR68.20-P-
2370GH
2Remove cover on gearshift lever Up to 31.08.01AR68.20-P-
2310GH
As of 01.09.01AR68.20-P-
2310GI
3Unscrew screws (2) from front of housing (1)
4.1
Disconnect electrical connector on right and
left rear power window switches (S21/15s1
and S21/15s2)Up to 31.08.01: Remove wiring
harness from mount.
4.2Disconnect connector from floor in center
consoleUp to 31.08.01: Remove wiring
harness from mount.
5Unscrew screws (4) from rear of housing (1)
6Remove housing (1)
Set selector lever to position N
Installation: As of 01.09.01,
ensure that air duct is installed
tightly.
7Install in the reverse order
2001 Mercedes-Benz ML320
1998-2005 ACCESSORIES & BODY, CAB Interior Equipment - 163 Chassis
me
Saturday, October 02, 2010 3:35:22 PMPage 39 © 2006 Mitchell Repair Information Company, LLC.
Page 3558 of 4133
Fig. 35: Identifying Center Console Rear Section Components
Remove, install
1Open rear cupholder (1), release from center console and fold
down
2Remove screws (2)
3Unclip rear section (3) at top (arrows) Fig.
6
4Release tabs (4) at bottom Danger of
breaking.
5Pull rear section (3) away from center console
6Unplug connectors for rear window switches
7Install in reverse order
2001 Mercedes-Benz ML320
1998-2005 ACCESSORIES & BODY, CAB Interior Equipment - 163 Chassis
me
Saturday, October 02, 2010 3:35:22 PMPage 40 © 2006 Mitchell Repair Information Company, LLC.
Page 3559 of 4133
Fig. 36: Identifying Long Wedge (115 589 03 59 00)
REMOVE/INSTALL REAR CENTER CONSOLE - AR68.20-P-2020GI
MODEL 163.113 /154 /174 #A as of 289565,163.113 #X as of 754620,163.128 /157 /175
Fig. 37: Identifying Rear Center Console Components
Remove/install
1Remove armrest lid (1) AR68.20-P-
2370GH
2Remove stowage box on center console Press center pin approx. 4 mm down,
then remove rivet upward
3Remove bolts (2) from beverage holder
4Remove ashtray inner section
5Remove ashtray paneling (3)
Danger of breaking clips (4).
Loosen clips (4) and pull bottom
edge of cover toward rear and remove
upward
6Remove bolts (5)
7Unclip rear center console (6) at top
(arrows). Long wedgeFig. 6
Remove rear center console (6) from
2001 Mercedes-Benz ML320
1998-2005 ACCESSORIES & BODY, CAB Interior Equipment - 163 Chassis
me
Saturday, October 02, 2010 3:35:22 PMPage 41 © 2006 Mitchell Repair Information Company, LLC.
Page 3560 of 4133
Fig. 38: Identifying Long Wedge (115 589 03 59 00)
REMOVE/INSTALL FLOOR COVE RING - AR68.20-P-2040GH
MODEL 163.113 /128 /136 /154 /157 /172 /174 /175
Fig. 39: Identifying Floor Covering Components
8center console
9Disconnect connector from rear control
panel control module and ashtrayDisconnect connector for rear ashtray
from ashtray housing
10Install in the reverse order
Remove/install
AR91.10-P-
2001 Mercedes-Benz ML320
1998-2005 ACCESSORIES & BODY, CAB In terior Equipment - 163 Chassis
me
Saturday, October 02, 2010 3:35:22 PMPage 42 © 2006 Mitchell Repair Information Company, LLC.
Page 3561 of 4133

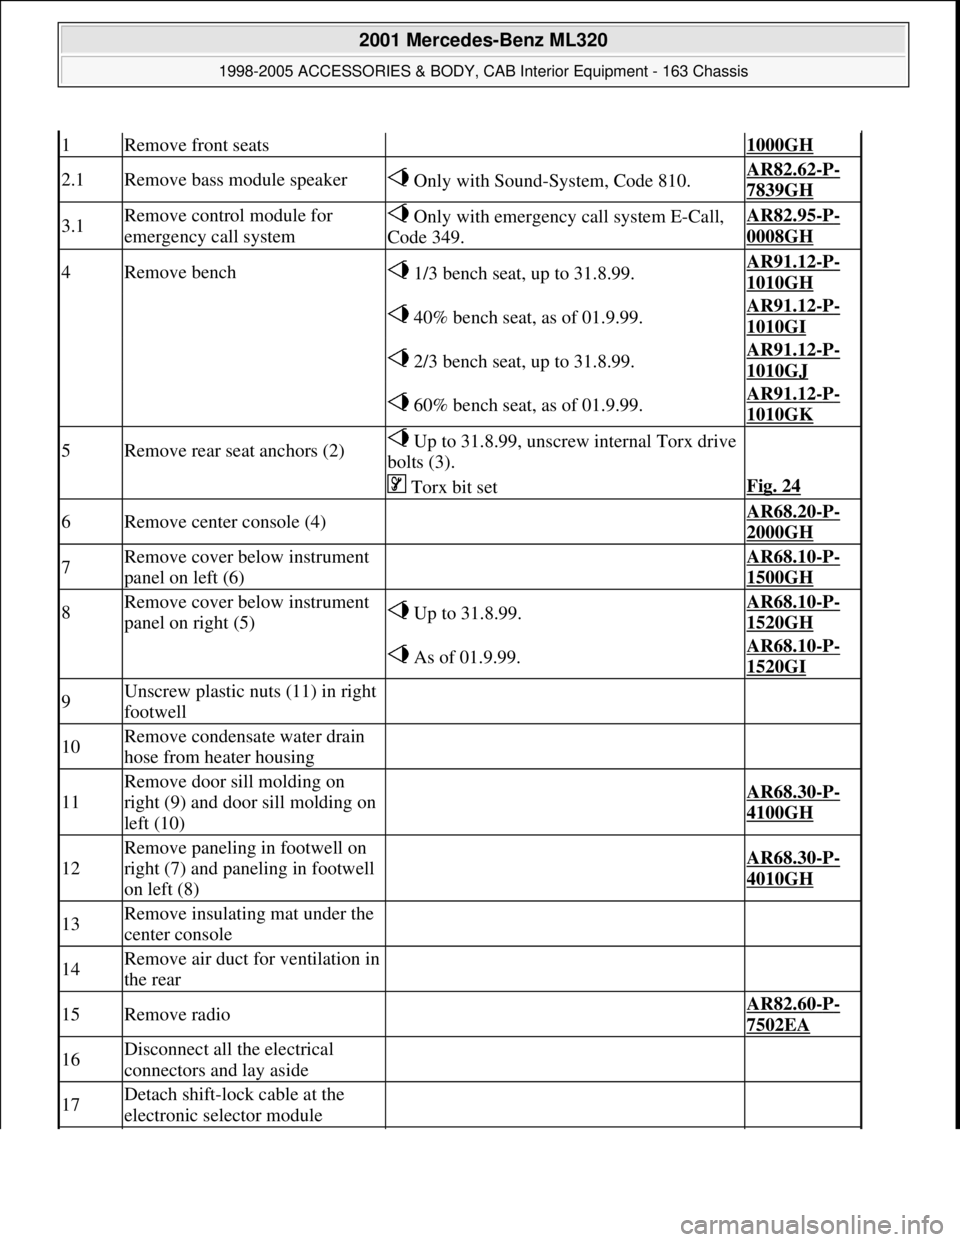
1Remove front seats 1000GH
2.1Remove bass module speaker Only with Sound-System, Code 810.AR82.62-P-
7839GH
3.1Remove control module for
emergency call system Only with emergency call system E-Call,
Code 349.AR82.95-P-
0008GH
4Remove bench 1/3 bench seat, up to 31.8.99.AR91.12-P-
1010GH
40% bench seat, as of 01.9.99.AR91.12-P-
1010GI
2/3 bench seat, up to 31.8.99.AR91.12-P-
1010GJ
60% bench seat, as of 01.9.99.AR91.12-P-
1010GK
5Remove rear seat anchors (2) Up to 31.8.99, unscrew internal Torx drive
bolts (3).
Torx bit setFig. 24
6Remove center console (4) AR68.20-P-
2000GH
7Remove cover below instrument
panel on left (6) AR68.10-P-
1500GH
8Remove cover below instrument
panel on right (5) Up to 31.8.99.AR68.10-P-
1520GH
As of 01.9.99.AR68.10-P-
1520GI
9Unscrew plastic nuts (11) in right
footwell
10Remove condensate water drain
hose from heater housing
11
Remove door sill molding on
right (9) and door sill molding on
left (10)
AR68.30-P-
4100GH
12
Remove paneling in footwell on
right (7) and paneling in footwell
on left (8)
AR68.30-P-
4010GH
13Remove insulating mat under the
center console
14Remove air duct for ventilation in
the rear
15Remove radio AR82.60-P-
7502EA
16Disconnect all the electrical
connectors and lay aside
17Detach shift-lock cable at the
electronic selector module
2001 Mercedes-Benz ML320
1998-2005 ACCESSORIES & BODY, CAB Interior Equipment - 163 Chassis
me
Saturday, October 02, 2010 3:35:22 PMPage 43 © 2006 Mitchell Repair Information Company, LLC.