Page 201 of 227
Wiring diagrams 12•39
12
3261 Jaguar XJ6
Typical 1993 and 1994 windscreen washer and wiper system
Page 202 of 227

3261 Jaguar XJ6
Dimensions and weights . . . . . . . . . . . . . . . . . . .REF•1
Jacking and vehicle support . . . . . . . . . . . . . . . .REF•1
Radio/cassette unit anti-theft system . . . . . . . . .REF•1
Conversion factors . . . . . . . . . . . . . . . . . . . . . . .REF•2
Use of English . . . . . . . . . . . . . . . . . . . . . . . . . . .REF•3
Buying spare parts . . . . . . . . . . . . . . . . . . . . . . . .REF•4
Vehicle identification . . . . . . . . . . . . . . . . . . . . . .REF•4General repair procedures . . . . . . . . . . . . . . . . .REF•5
Tools and working facilities . . . . . . . . . . . . . . . . .REF•6
MOT test checks . . . . . . . . . . . . . . . . . . . . . . . . .REF•8
Fault finding . . . . . . . . . . . . . . . . . . . . . . . . . . . .REF•12
Glossary of technical terms . . . . . . . . . . . . . . . .REF•18
Index . . . . . . . . . . . . . . . . . . . . . . . . . . . . . . . . .REF•22
Dimensions and weights
Note:All figures are approximate, and may vary according to model. Refer to manufacturer’s data for exact figures.
Dimensions
Overall length . . . . . . . . . . . . . . . . . . . . . . . . . . . . . . . . . . . . . . . . . . . . . 4988 mm
Overall width (including mirrors) . . . . . . . . . . . . . . . . . . . . . . . . . . . . . . . 2015 mm
Overall height (unladen) . . . . . . . . . . . . . . . . . . . . . . . . . . . . . . . . . . . . . 1358 mm
Wheelbase . . . . . . . . . . . . . . . . . . . . . . . . . . . . . . . . . . . . . . . . . . . . . . . 2870 mm
Weights
Kerb weight . . . . . . . . . . . . . . . . . . . . . . . . . . . . . . . . . . . . . . . . . . . . . . . 1770 kg
Maximum gross vehicle weight . . . . . . . . . . . . . . . . . . . . . . . . . . . . . . . 2190 kg
Maximum towing weight:
Braked trailer . . . . . . . . . . . . . . . . . . . . . . . . . . . . . . . . . . . . . . . . . . . . 1500 kg
Unbraked trailer . . . . . . . . . . . . . . . . . . . . . . . . . . . . . . . . . . . . . . . . . 750 kg
Maximum axle load:
Front axle . . . . . . . . . . . . . . . . . . . . . . . . . . . . . . . . . . . . . . . . . . . . . . 1050 kg
Rear axle . . . . . . . . . . . . . . . . . . . . . . . . . . . . . . . . . . . . . . . . . . . . . . . 1170 kg
Maximum roof rack load . . . . . . . . . . . . . . . . . . . . . . . . . . . . . . . . . . . . . 100 kg
ReferenceREF•1
Radio/cassette unit anti-theft system - precaution
Some models are equipped with an audio
system which includes an anti-theft feature, to
deter thieves. If the power source to the unit is
cut, the anti-theft system will activate. Even if
the power source is immediately reconnected,
the radio/cassette unit will not function untilthe correct security code has been entered.
Therefore if you do not know the correct
security code for the unit, do notdisconnect
the battery negative lead, or remove the
radio/cassette unit from the vehicle.The procedure for reprogramming a unit
that has been disconnected from its power
supply varies from model to model - consult
the handbook supplied with the unit for
specific details or refer to your Jaguar dealer. The jack supplied with the vehicle tool kit
should only be used for changing the
roadwheels - see “Wheel changing”at the
front of this manual. When carrying out any
other kind of work, raise the vehicle using a
hydraulic (or “trolley”) jack, and always
supplement the jack with axle stands
positioned under the vehicle jacking points.
To raise the front of the vehicle, place a
block of wood on the jack head and positionthe jack underneath the centre of the front
crossmember. Lift the vehicle to the required
height and support it on axle stands
positioned underneath the vehicle jacking
points on the sills.
To raise the rear of the vehicle, place a
block of wood on the jack head and position
the jack underneath the centre of the rear
crossmember. Lift the vehicle to the required
height and support it on axle standspositioned underneath the vehicle jacking
points on the sills.
The jack supplied with the vehicle locates in
the jacking points on the sills. Ensure that the
jack head is correctly engaged before
attempting to raise the vehicle.
Neverwork under, around, or near a raised
vehicle, unless it is adequately supported in at
least two places.
Jacking and vehicle support
Page 203 of 227

Inches (in) x 25.4 = Millimetres (mm) x 0.0394 = Inches (in)
Feet (ft) x 0.305 = Metres (m) x 3.281 = Feet (ft)
Miles x 1.609 = Kilometres (")
3261 Jaguar XJ6
REF•2Conversion factors
Length (distance)
Inches (in) x 25.4 = Millimetres (mm) x 0.0394 = Inches (in)
Feet (ft) x 0.305 = Metres (m) x 3.281 = Feet (ft)
Miles x 1.609 = Kilometres (km) x 0.621 = Miles
Volume (capacity)
Cubic inches (cu in; in3) x 16.387 = Cubic centimetres (cc; cm3) x 0.061 = Cubic inches (cu in; in3)
Imperial pints (Imp pt) x 0.568 = Litres (l) x 1.76 = Imperial pints (Imp pt)
Imperial quarts (Imp qt) x 1.137 = Litres (l) x 0.88 = Imperial quarts (Imp qt)
Imperial quarts (Imp qt) x 1.201 = US quarts (US qt) x 0.833 = Imperial quarts (Imp qt)
US quarts (US qt) x 0.946 = Litres (l) x 1.057 = US quarts (US qt)
Imperial gallons (Imp gal) x 4.546 = Litres (l) x 0.22 = Imperial gallons (Imp gal)
Imperial gallons (Imp gal) x 1.201 = US gallons (US gal) x 0.833 = Imperial gallons (Imp gal)
US gallons (US gal) x 3.785 = Litres (l) x 0.264 = US gallons (US gal)
Mass (weight)
Ounces (oz) x 28.35 = Grams (g) x 0.035 = Ounces (oz)
Pounds (lb) x 0.454 = Kilograms (kg) x 2.205 = Pounds (lb)
Force
Ounces-force (ozf; oz) x 0.278 = Newtons (N) x 3.6 = Ounces-force (ozf; oz)
Pounds-force (lbf; lb) x 4.448 = Newtons (N) x 0.225 = Pounds-force (lbf; lb)
Newtons (N) x 0.1 = Kilograms-force (kgf; kg) x 9.81 = Newtons (N)
Pressure
Pounds-force per square inch x 0.070 = Kilograms-force per square x 14.223 = Pounds-force per square inch
(psi; lbf/in2; lb/in2) centimetre (kgf/cm2; kg/cm2) (psi; lbf/in2; lb/in2)
Pounds-force per square inch x 0.068 = Atmospheres (atm) x 14.696 = Pounds-force per square inch
(psi; lbf/in
2; lb/in2)(psi; lbf/in2; lb/in2)
Pounds-force per square inch x 0.069 = Bars x 14.5 = Pounds-force per square inch
(psi; lbf/in
2; lb/in2)(psi; lbf/in2; lb/in2)
Pounds-force per square inch x 6.895 = Kilopascals (kPa) x 0.145 = Pounds-force per square inch
(psi; lbf/in
2; lb/in2)(psi; lbf/in2; lb/in2)
Kilopascals (kPa) x 0.01 = Kilograms-force per square x 98.1 = Kilopascals (kPa)
centimetre (kgf/cm
2; kg/cm2)
Millibar (mbar) x 100 = Pascals (Pa) x 0.01 = Millibar (mbar)
Millibar (mbar) x 0.0145 = Pounds-force per square inch x 68.947 = Millibar (mbar)
(psi; lbf/in
2; lb/in2)
Millibar (mbar) x 0.75 = Millimetres of mercury (mmHg) x 1.333 = Millibar (mbar)
Millibar (mbar) x 0.401 = Inches of water (inH
2O) x 2.491 = Millibar (mbar)
Millimetres of mercury (mmHg) x 0.535 = Inches of water (inH
2O) x 1.868 = Millimetres of mercury (mmHg)
Inches of water (inH
2O) x 0.036 = Pounds-force per square inch x 27.68 = Inches of water (inH2O)
(psi; lbf/in2; lb/in2)
Torque (moment of force)
Pounds-force inches x 1.152 = Kilograms-force centimetre x 0.868 = Pounds-force inches
(lbf in; lb in) (kgf cm; kg cm) (lbf in; lb in)
Pounds-force inches x 0.113 = Newton metres (Nm) x 8.85 = Pounds-force inches
(lbf in; lb in)(lbf in; lb in)
Pounds-force inches x 0.083 = Pounds-force feet (lbf ft; lb ft) x 12 = Pounds-force inches
(lbf in; lb in)(lbf in; lb in)
Pounds-force feet (lbf ft; lb ft) x 0.138 = Kilograms-force metres x 7.233 = Pounds-force feet (lbf ft; lb ft)
(kgf m; kg m)
Pounds-force feet (lbf ft; lb ft) x 1.356 = Newton metres (Nm) x 0.738 = Pounds-force feet (lbf ft; lb ft)
Newton metres (Nm) x 0.102 = Kilograms-force metres x 9.804 = Newton metres (Nm)
(kgf m; kg m)
Power
Horsepower (hp) x 745.7 = Watts (W) x 0.0013 = Horsepower (hp)
Velocity (speed)
Miles per hour (miles/hr; mph) x 1.609 = Kilometres per hour (km/hr; kph) x 0.621 = Miles per hour (miles/hr; mph)
Fuel consumption*
Miles per gallon (mpg) x 0.354 = Kilometres per litre (km/l) x 2.825 = Miles per gallon (mpg)
Temperature
Degrees Fahrenheit = (°C x 1.8) + 32 Degrees Celsius (Degrees Centigrade; °C) = (°F - 32) x 0.56
* It is common practice to convert from miles per gallon (mpg) to litres/100 kilometres (l/100km), where mpg x l/100 km = 282
Page 204 of 227

3261 Jaguar XJ6
Use of EnglishREF•3
As the main part of this book has been written in the US, it uses the appropriate US component names, phrases, and spelling. Some of these
differ from those used in the UK. Normally, these cause no difficulty, but to make sure, a glossary is printed below. When ordering spare parts,
remember the parts list may use some of these words:
AMERICAN ENGLISH
Aluminum Aluminium
Antenna Aerial
Authorized Authorised
Auto parts stores Motor factors
Axleshaft Halfshaft
Back-up Reverse
Barrel Choke/venturi
Block Chock
Box-end wrench Ring spanner
Bushing Bush
Carburetor Carburettor
Center Centre
Coast Freewheel
Color Colour
Convertible Drop head coupe
Cotter pin Split pin
Counterclockwise Anti-clockwise
Countershaft (of gearbox) Layshaft
Dashboard Facia
Denatured alcohol Methylated spirit
Dome lamp Interior light
Driveaxle Driveshaft
Driveshaft Propeller shaft
Fender Wing/mudguard
Firewall Bulkhead
Flashlight Torch
Float bowl Float chamber
Floor jack Trolley jack
Freeway, turnpike etc Motorway
Freeze plug Core plug
Frozen Seized
Gas tank Petrol tank
Gasoline (gas) Petrol
Gearshift Gearchange
Generator (DC) Dynamo
Ground (electrical) Earth
Header Exhaust manifold
Heat riser Hot spot
High Top gear
Hood (engine cover) Bonnet
Installation Refitting
Intake Inlet
Jackstands Axle stands
Jumper cable Jump lead
Keeper Collet
Kerosene Paraffin
Knock pin Roll pin
Lash Clearance
Lash Free-play
Latch Catch
Latches Locks
License plate Number plate
Light Lamp
Lock (for valve spring retainer) Split cotter (for valve spring cap)
Lopes Hunts
Lug nut/bolt Wheel nut/bolt
Metal chips or debris Swarf
Misses Misfires
AMERICAN ENGLISH
Muffler Silencer
Odor Odour
Oil pan Sump
Open flame Naked flame
Panel wagon/van Van
Parking brake Handbrake
Parking light Sidelight
Pinging Pinking
Piston pin or wrist pin Gudgeon pin
Piston pin or wrist pin Small end, little end
Pitman arm Drop arm
Power brake booster Servo unit
Primary shoe (of brake) Leading shoe (of brake)
Prussian blue Engineer’s blue
Pry Prise (force apart)
Prybar Lever
Prying Levering
Quarter window Quarterlight
Recap Retread
Release cylinder Slave cylinder
Repair shop Garage
Replacement Renewal
Ring gear (of differential) Crownwheel
Rocker panel (beneath doors) Sill panel (beneath doors)
Rod bearing Big-end bearing
Rotor/disk Disc (brake)
Secondary shoe (of brake) Trailing shoe (of brake)
Sedan Saloon
Setscrew, Allen screw Grub screw
Shock absorber, shock Damper
Snap-ring Circlip
Soft top Hood
Spacer Distance piece
Spare tire Spare wheel
Spark plug wires HT leads
Spindle arm Steering arm
Stabilizer or sway bar Anti-roll bar
Station wagon Estate car
Stumbles Hesitates
Tang or lock Tab washer
Throw-out bearing Thrust bearing
Tie-rod or connecting rod (of steering) Trackrod
Tire Tyre
Transmission Gearbox
Troubleshooting Fault finding/diagnosis
Trunk Boot (luggage compartment)
Turn signal Indicator
TV (throttle valve) cable Kickdown cable
Unpublicized Unpublicised
Valve cover Rocker cover
Valve lifter Tappet
Valve lifter or tappet Cam follower or tappet
Vapor Vapour
Vise Vice
Wheel cover Roadwheel trim
Whole drive line Transmission
Windshield Windscreen
Wrench Spanner
Page 205 of 227

3261 Jaguar XJ6
REF•4Buying spare parts
Spare parts are available from many
sources, including maker’s appointed
garages, accessory shops, and motor factors.
To be sure of obtaining the correct parts, it
will sometimes be necessary to quote the
vehicle identification number. If possible, it
can also be useful to take the old parts along
for positive identification. Items such as
starter motors and alternators may be
available under a service exchange scheme -
any parts returned should be clean.
Our advice regarding spare parts is as
follows.
Officially appointed garages
This is the best source of parts which are
peculiar to your car, and which are not
otherwise generally available (eg, badges,
interior trim, certain body panels, etc). It is
also the only place at which you should buy
parts if the vehicle is still under warranty.
Accessory shops
These are very good places to buy
materials and components needed for themaintenance of your car (oil, air and fuel
filters, light bulbs, drivebelts, greases, brake
pads, touch-up paint, etc). Components of
this nature sold by a reputable shop are
usually of the same standard as those used
by the car manufacturer.
Besides components, these shops also sell
tools and general accessories, usually have
convenient opening hours, charge lower
prices, and can often be found close to home.
Some accessory shops have parts counters
where components needed for almost any
repair job can be purchased or ordered.
Motor factors
Good factors will stock all the more
important components which wear out
comparatively quickly, and can sometimes
supply individual components needed for the
overhaul of a larger assembly (eg, brake seals
and hydraulic parts, bearing shells, pistons,
valves). They may also handle work such as
cylinder block reboring, crankshaft regrinding,
etc.
Tyre and exhaust specialists
These outlets may be independent, or
members of a local or national chain. They
frequently offer competitive prices when
compared with a main dealer or local garage,
but it will pay to obtain several quotes before
making a decision. When researching prices,
also ask what “extras” may be added - for
instance fitting a new valve and balancing the
wheel are both commonly charged on top of
the price of a new tyre.
Other sources
Beware of parts or materials obtained from
market stalls, car boot sales or similar outlets.
Such items are not invariably sub-standard,
but there is little chance of compensation if
they do prove unsatisfactory. In the case of
safety-critical components such as brake
pads, there is the risk of financial loss, and
also of an accident causing injury or death.
Second-hand parts or assemblies obtained
from a car breaker can be a good buy in some
circumstances, but this sort of purchase is
best made by the experienced DIY mechanic.
Vehicle identification
Modifications are a continuing and
unpublicised process in vehicle manufacture,
quite apart from major model changes. Spare
parts manuals and lists are compiled upon a
numerical basis, the individual vehicle
identification numbers being essential to
correct identification of the part concerned.
When ordering spare parts, always give as
much information as possible. Quote the car
model, year of manufacture and registration,
chassis and engine numbers as appropriate.
The Vehicle Identification Number (VIN)
plate is attached to the base of the driver’s
door pillar left-hand wing valance and is
visible once the bonnet has been opened. The
vehicle identification (chassis) number is also
stamped onto a plate located inside the
windscreen and may also be stamped onto
the right-hand inner wing panel in the engine
compartment (see illustrations).
The trim code and paint codeare also
stamped onto the VIN plate.
The engine numberis stamped onto the
right-hand side of the cylinder block, next to
the distributor (see illustration).
The automatic transmission numberis
stamped onto a metal label attached to the
left-hand side of the transmission housing,
just above the sump (see illustration).The VIN is stamped on the right inner wing
panel of the engine compartment
The engine identification number is
stamped on the right side of the engine
block just behind the distributorThe transmission identification number is
located on the left side of the transmission
housing just above the sump
The VIN is also present on the left side of
the dashboard
Page 206 of 227

3261 Jaguar XJ6
General repair proceduresREF•5
Whenever servicing, repair or overhaul work
is carried out on the car or its components, it
is necessary to observe the following
procedures and instructions. This will assist in
carrying out the operation efficiently and to a
professional standard of workmanship.
Joint mating faces and gaskets
When separating components at their
mating faces, never insert screwdrivers or
similar implements into the joint between the
faces in order to prise them apart. This can
cause severe damage which results in oil
leaks, coolant leaks, etc upon reassembly.
Separation is usually achieved by tapping
along the joint with a soft-faced hammer in
order to break the seal. However, note that
this method may not be suitable where
dowels are used for component location.
Where a gasket is used between the mating
faces of two components, ensure that it is
renewed on reassembly, and fit it dry unless
otherwise stated in the repair procedure. Make
sure that the mating faces are clean and dry,
with all traces of old gasket removed. When
cleaning a joint face, use a tool which is not
likely to score or damage the face, and remove
any burrs or nicks with an oilstone or fine file.
Make sure that tapped holes are cleaned
with a pipe cleaner, and keep them free of
jointing compound, if this is being used,
unless specifically instructed otherwise.
Ensure that all orifices, channels or pipes
are clear, and blow through them, preferably
using compressed air.
Oil seals
Oil seals can be removed by levering them
out with a wide flat-bladed screwdriver or
similar tool. Alternatively, a number of self-
tapping screws may be screwed into the seal,
and these used as a purchase for pliers or
similar in order to pull the seal free.
Whenever an oil seal is removed from its
working location, either individually or as part
of an assembly, it should be renewed.
The very fine sealing lip of the seal is easily
damaged, and will not seal if the surface it
contacts is not completely clean and free from
scratches, nicks or grooves. If the original
sealing surface of the component cannot be
restored, and the manufacturer has not made
provision for slight relocation of the seal
relative to the sealing surface, the component
should be renewed.
Protect the lips of the seal from any surface
which may damage them in the course of
fitting. Use tape or a conical sleeve where
possible. Lubricate the seal lips with oil before
fitting and, on dual-lipped seals, fill the space
between the lips with grease.
Unless otherwise stated, oil seals must be
fitted with their sealing lips toward the
lubricant to be sealed.
Use a tubular drift or block of wood of the
appropriate size to install the seal and, if the
seal housing is shouldered, drive the seal
down to the shoulder. If the seal housing isunshouldered, the seal should be fitted with
its face flush with the housing top face (unless
otherwise instructed).
Screw threads and fastenings
Seized nuts, bolts and screws are quite a
common occurrence where corrosion has set
in, and the use of penetrating oil or releasing
fluid will often overcome this problem if the
offending item is soaked for a while before
attempting to release it. The use of an impact
driver may also provide a means of releasing
such stubborn fastening devices, when used
in conjunction with the appropriate
screwdriver bit or socket. If none of these
methods works, it may be necessary to resort
to the careful application of heat, or the use of
a hacksaw or nut splitter device.
Studs are usually removed by locking two
nuts together on the threaded part, and then
using a spanner on the lower nut to unscrew
the stud. Studs or bolts which have broken off
below the surface of the component in which
they are mounted can sometimes be removed
using a stud extractor. Always ensure that a
blind tapped hole is completely free from oil,
grease, water or other fluid before installing
the bolt or stud. Failure to do this could cause
the housing to crack due to the hydraulic
action of the bolt or stud as it is screwed in.
When tightening a castellated nut to accept
a split pin, tighten the nut to the specified
torque, where applicable, and then tighten
further to the next split pin hole. Never
slacken the nut to align the split pin hole,
unless stated in the repair procedure.
When checking or retightening a nut or bolt
to a specified torque setting, slacken the nut
or bolt by a quarter of a turn, and then
retighten to the specified setting. However,
this should not be attempted where angular
tightening has been used.
For some screw fastenings, notably
cylinder head bolts or nuts, torque wrench
settings are no longer specified for the latter
stages of tightening, “angle-tightening” being
called up instead. Typically, a fairly low torque
wrench setting will be applied to the
bolts/nuts in the correct sequence, followed
by one or more stages of tightening through
specified angles.
Locknuts, locktabs and washers
Any fastening which will rotate against a
component or housing during tightening
should always have a washer between it and
the relevant component or housing.
Spring or split washers should always be
renewed when they are used to lock a critical
component such as a big-end bearing
retaining bolt or nut. Locktabs which are
folded over to retain a nut or bolt should
always be renewed.
Self-locking nuts can be re-used in non-
critical areas, providing resistance can be felt
when the locking portion passes over the bolt
or stud thread. However, it should be noted
that self-locking stiffnuts tend to lose theireffectiveness after long periods of use, and
should be renewed as a matter of course.
Split pins must always be replaced with
new ones of the correct size for the hole.
When thread-locking compound is found
on the threads of a fastener which is to be re-
used, it should be cleaned off with a wire
brush and solvent, and fresh compound
applied on reassembly.
Special tools
Some repair procedures in this manual
entail the use of special tools such as a press,
two or three-legged pullers, spring
compressors, etc. Wherever possible, suitable
readily-available alternatives to the
manufacturer’s special tools are described,
and are shown in use. In some instances,
where no alternative is possible, it has been
necessary to resort to the use of a
manufacturer’s tool, and this has been done
for reasons of safety as well as the efficient
completion of the repair operation. Unless you
are highly-skilled and have a thorough
understanding of the procedures described,
never attempt to bypass the use of any
special tool when the procedure described
specifies its use. Not only is there a very great
risk of personal injury, but expensive damage
could be caused to the components involved.
Environmental considerations
When disposing of used engine oil, brake
fluid, antifreeze, etc, give due consideration to
any detrimental environmental effects. Do not,
for instance, pour any of the above liquids
down drains into the general sewage system,
or onto the ground to soak away. Many local
council refuse tips provide a facility for waste
oil disposal, as do some garages. If none of
these facilities are available, consult your local
Environmental Health Department, or the
National Rivers Authority, for further advice.
With the universal tightening-up of
legislation regarding the emission of
environmentally-harmful substances from
motor vehicles, most current vehicles have
tamperproof devices fitted to the main
adjustment points of the fuel system. These
devices are primarily designed to prevent
unqualified persons from adjusting the fuel/air
mixture, with the chance of a consequent
increase in toxic emissions. If such devices
are encountered during servicing or overhaul,
they should, wherever possible, be renewed
or refitted in accordance with the vehicle
manufacturer’s requirements or current
legislation.
Note: It is
antisocial and
illegal to dump oil
down the drain.
To find the
location of your
local oil recycling
bank, call this
number free.
Page 207 of 227

3261 Jaguar XJ6
REF•6Tools and working facilities
Introduction
A selection of good tools is a fundamental
requirement for anyone contemplating the
maintenance and repair of a motor vehicle.
For the owner who does not possess any,
their purchase will prove a considerable
expense, offsetting some of the savings made
by doing-it-yourself. However, provided that
the tools purchased meet the relevant national
safety standards and are of good quality, they
will last for many years and prove an
extremely worthwhile investment.
To help the average owner to decide which
tools are needed to carry out the various tasks
detailed in this manual, we have compiled
three lists of tools under the following
headings: Maintenance and minor repair,
Repair and overhaul, and Special. Newcomers
to practical mechanics should start off with
the Maintenance and minor repairtool kit, and
confine themselves to the simpler jobs around
the vehicle. Then, as confidence and
experience grow, more difficult tasks can be
undertaken, with extra tools being purchased
as, and when, they are needed. In this way, a
Maintenance and minor repairtool kit can be
built up into a Repair and overhaultool kit over
a considerable period of time, without any
major cash outlays. The experienced do-it-
yourselfer will have a tool kit good enough for
most repair and overhaul procedures, and will
add tools from the Specialcategory when it is
felt that the expense is justified by the amount
of use to which these tools will be put.
Maintenance
and minor repair tool kit
The tools given in this list should be
considered as a minimum requirement if
routine maintenance, servicing and minor
repair operations are to be undertaken. We
recommend the purchase of combination
spanners (ring one end, open-ended the
other); although more expensive than open-
ended ones, they do give the advantages of
both types of spanner.
MCombination spanners:
Metric - 8 to 19 mm inclusive
MAdjustable spanner - 35 mm jaw (approx.)
MSpark plug spanner (with rubber insert) -
petrol models
MSpark plug gap adjustment tool - petrol
models
MSet of feeler blades
MBrake bleed nipple spanner
MScrewdrivers:
Flat blade - 100 mm long x 6 mm dia
Cross blade - 100 mm long x 6 mm dia
MCombination pliers
MHacksaw (junior)
MTyre pump
MTyre pressure gauge
MOil can
MOil filter removal tool
MFine emery cloth
MWire brush (small)
MFunnel (medium size)
Repair and overhaul tool kit
These tools are virtually essential for
anyone undertaking any major repairs to a
motor vehicle, and are additional to those
given in the Maintenance and minor repairlist.
Included in this list is a comprehensive set of
sockets. Although these are expensive, they
will be found invaluable as they are so
versatile - particularly if various drives are
included in the set. We recommend the half-
inch square-drive type, as this can be used
with most proprietary torque wrenches.
The tools in this list will sometimes need to
be supplemented by tools from the Speciallist:
MSockets (or box spanners) to cover range in
previous list (including Torx sockets)
MReversible ratchet drive (for use with
sockets)
MExtension piece, 250 mm (for use with
sockets)
MUniversal joint (for use with sockets)
MTorque wrench (for use with sockets)
MSelf-locking grips
MBall pein hammer
MSoft-faced mallet (plastic/aluminium or
rubber)
MScrewdrivers:
Flat blade - long & sturdy, short (chubby),
and narrow (electrician’s) types
Cross blade – Long & sturdy, and short
(chubby) types
MPliers:
Long-nosed
Side cutters (electrician’s)
Circlip (internal and external)
MCold chisel - 25 mm
MScriber
MScraper
MCentre-punch
MPin punch
MHacksaw
MBrake hose clamp
MBrake/clutch bleeding kit
MSelection of twist drills
MSteel rule/straight-edge
MAllen keys (inc. splined/Torx type)
MSelection of files
MWire brush
MAxle stands
MJack (strong trolley or hydraulic type)
MLight with extension lead
Sockets and reversible ratchet drive
Clutch plate alignment setPiston ring compressorSpline bit set
Valve spring compressor
Page 208 of 227

3261 Jaguar XJ6
Tools and working facilitiesREF•7
Special tools
The tools in this list are those which are not
used regularly, are expensive to buy, or which
need to be used in accordance with their
manufacturers’ instructions. Unless relatively
difficult mechanical jobs are undertaken
frequently, it will not be economic to buy
many of these tools. Where this is the case,
you could consider clubbing together with
friends (or joining a motorists’ club) to make a
joint purchase, or borrowing the tools against
a deposit from a local garage or tool hire
specialist. It is worth noting that many of the
larger DIY superstores now carry a large
range of special tools for hire at modest rates.
The following list contains only those tools
and instruments freely available to the public,
and not those special tools produced by the
vehicle manufacturer specifically for its dealer
network. You will find occasional references
to these manufacturers’ special tools in the
text of this manual. Generally, an alternative
method of doing the job without the vehicle
manufacturers’ special tool is given. However,
sometimes there is no alternative to using
them. Where this is the case and the relevant
tool cannot be bought or borrowed, you will
have to entrust the work to a dealer.
MValve spring compressor
MValve grinding tool
MPiston ring compressor
MPiston ring removal/installation tool
MCylinder bore hone
MBalljoint separator
MCoil spring compressors (where applicable)
MTwo/three-legged hub and bearing puller
MImpact screwdriver
MMicrometer and/or vernier calipers
MDial gauge
MStroboscopic timing light
MDwell angle meter/tachometer
MUniversal electrical multi-meter
MCylinder compression gauge
MHand-operated vacuum pump and gauge
MClutch plate alignment set
MBrake shoe steady spring cup removal tool
MBush and bearing removal/installation set
MStud extractors
MTap and die set
MLifting tackle
MTrolley jack
Buying tools
Reputable motor accessory shops and
superstores often offer excellent quality tools
at discount prices, so it pays to shop around.
Remember, you don’t have to buy the most
expensive items on the shelf, but it is always
advisable to steer clear of the very cheap
tools. Beware of ‘bargains’ offered on market
stalls or at car boot sales. There are plenty of
good tools around at reasonable prices, but
always aim to purchase items which meet the
relevant national safety standards. If in doubt,
ask the proprietor or manager of the shop for
advice before making a purchase.
Care and maintenance of tools
Having purchased a reasonable tool kit, it is
necessary to keep the tools in a clean and
serviceable condition. After use, always wipe
off any dirt, grease and metal particles using a
clean, dry cloth, before putting the tools away.
Never leave them lying around after they have
been used. A simple tool rack on the garage
or workshop wall for items such as
screwdrivers and pliers is a good idea. Store
all normal spanners and sockets in a metal
box. Any measuring instruments, gauges,
meters, etc, must be carefully stored where
they cannot be damaged or become rusty.
Take a little care when tools are used.
Hammer heads inevitably become marked,
and screwdrivers lose the keen edge on their
blades from time to time. A little timely
attention with emery cloth or a file will soon
restore items like this to a good finish.
Working facilities
Not to be forgotten when discussing tools
is the workshop itself. If anything more than
routine maintenance is to be carried out, a
suitable working area becomes essential.
It is appreciated that many an owner-
mechanic is forced by circumstances to
remove an engine or similar item without the
benefit of a garage or workshop. Having done
this, any repairs should always be done under
the cover of a roof.
Wherever possible, any dismantling should
be done on a clean, flat workbench or table at
a suitable working height.
Any workbench needs a vice; one with a jaw
opening of 100 mm is suitable for most jobs.
As mentioned previously, some clean dry
storage space is also required for tools, as well
as for any lubricants, cleaning fluids, touch-up
paints etc, which become necessary.
Another item which may be required, and
which has a much more general usage, is an
electric drill with a chuck capacity of at least 8
mm. This, together with a good range of twist
drills, is virtually essential for fitting
accessories.
Last, but not least, always keep a supply of
old newspapers and clean, lint-free rags
available, and try to keep any working area as
clean as possible.
Stroboscopic timing light Stud extractor setCompression tester
Dial test indicator (“dial gauge”)Micrometer set
 1
1 2
2 3
3 4
4 5
5 6
6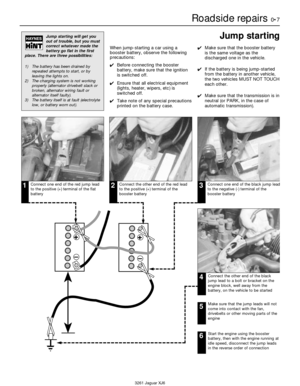 7
7 8
8 9
9 10
10 11
11 12
12 13
13 14
14 15
15 16
16 17
17 18
18 19
19 20
20 21
21 22
22 23
23 24
24 25
25 26
26 27
27 28
28 29
29 30
30 31
31 32
32 33
33 34
34 35
35 36
36 37
37 38
38 39
39 40
40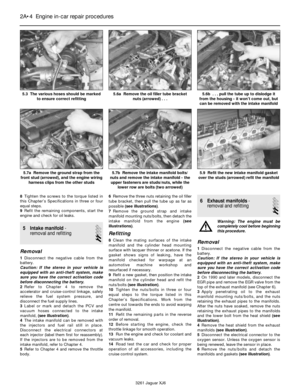 41
41 42
42 43
43 44
44 45
45 46
46 47
47 48
48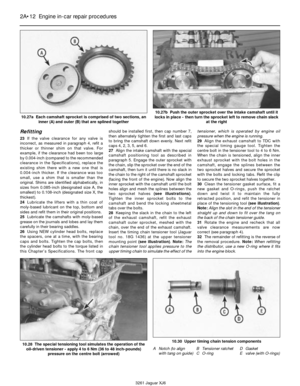 49
49 50
50 51
51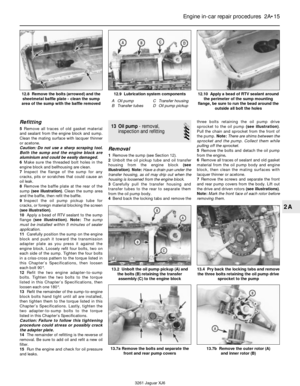 52
52 53
53 54
54 55
55 56
56 57
57 58
58 59
59 60
60 61
61 62
62 63
63 64
64 65
65 66
66 67
67 68
68 69
69 70
70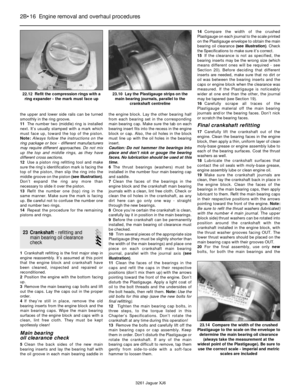 71
71 72
72 73
73 74
74 75
75 76
76 77
77 78
78 79
79 80
80 81
81 82
82 83
83 84
84 85
85 86
86 87
87 88
88 89
89 90
90 91
91 92
92 93
93 94
94 95
95 96
96 97
97 98
98 99
99 100
100 101
101 102
102 103
103 104
104 105
105 106
106 107
107 108
108 109
109 110
110 111
111 112
112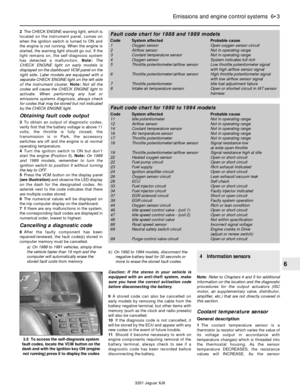 113
113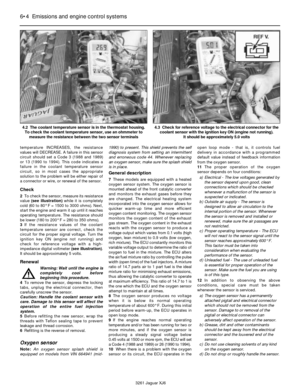 114
114 115
115 116
116 117
117 118
118 119
119 120
120 121
121 122
122 123
123 124
124 125
125 126
126 127
127 128
128 129
129 130
130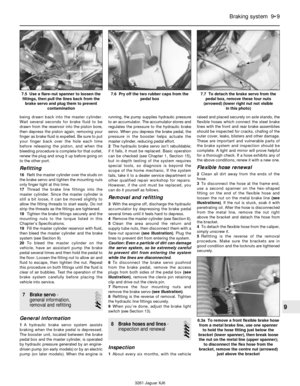 131
131 132
132 133
133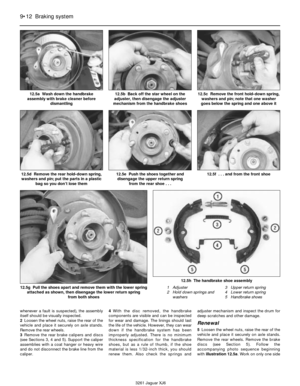 134
134 135
135 136
136 137
137 138
138 139
139 140
140 141
141 142
142 143
143 144
144 145
145 146
146 147
147 148
148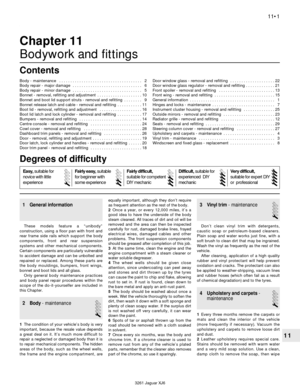 149
149 150
150 151
151 152
152 153
153 154
154 155
155 156
156 157
157 158
158 159
159 160
160 161
161 162
162 163
163 164
164 165
165 166
166 167
167 168
168 169
169 170
170 171
171 172
172 173
173 174
174 175
175 176
176 177
177 178
178 179
179 180
180 181
181 182
182 183
183 184
184 185
185 186
186 187
187 188
188 189
189 190
190 191
191 192
192 193
193 194
194 195
195 196
196 197
197 198
198 199
199 200
200 201
201 202
202 203
203 204
204 205
205 206
206 207
207 208
208 209
209 210
210 211
211 212
212 213
213 214
214 215
215 216
216 217
217 218
218 219
219 220
220 221
221 222
222 223
223 224
224 225
225 226
226