Page 754 of 1503
ATF Cooler
The radiator is mounted at the front of the vehicle. The ATF cooler is installed directly on the transmission housing. The
ATF is cooled by the engine coolant.ProCarManuals.com
Page 756 of 1503
LOCK-UP CONTROL SOLENOID
VALVE ASSEMBLY
MAINSHAFT SPEED SENSOR
LINEAR SOLENOID
ENGINE COOLANT TEMPERATURE (ECT)
SENSOR
THROTTLE POSITION (TP)
SENSOR
COUNTERSHAFT SPEED
SENSOR
SHIFT CONTROL SOLENOID
VALVE ASSEMBLY
VEHICLE SPEED SENSOR (VSS)
TRANSMISSION CONTROL
MODULE (TCM)
TCS CONTROL UNIT
ENGINE CONTROL MODULE
(ECM)ProCarManuals.com
Page 765 of 1503
Transmission Contro l Modul e (TCM )
Replacemen t
SRS component s ar e locate d i n thi s area . Revie w th e
SR S componen t locations , precautions , an d procedure s
in th e SR S ( sectio n 24 ) befor e performin g repair s o r ser -
vice .
1 . Remov e th e sea t bac k panel s (se e sectio n 20 ).
2 . Remov e th e connecto r holde r fro m th e TC S contro l
unit, an d disconnec t th e antenn a lead .
3. Remov e th e TC S contro l unit .
NOTE : D o no t disconnec t th e connector s fro m th e
TCS contro l unit .
4. Disconnec t th e A (26P ) an d B (22P ) connector s fro m
the TCM , the n remov e th e TCM .
ProCarManuals.com
Page 771 of 1503

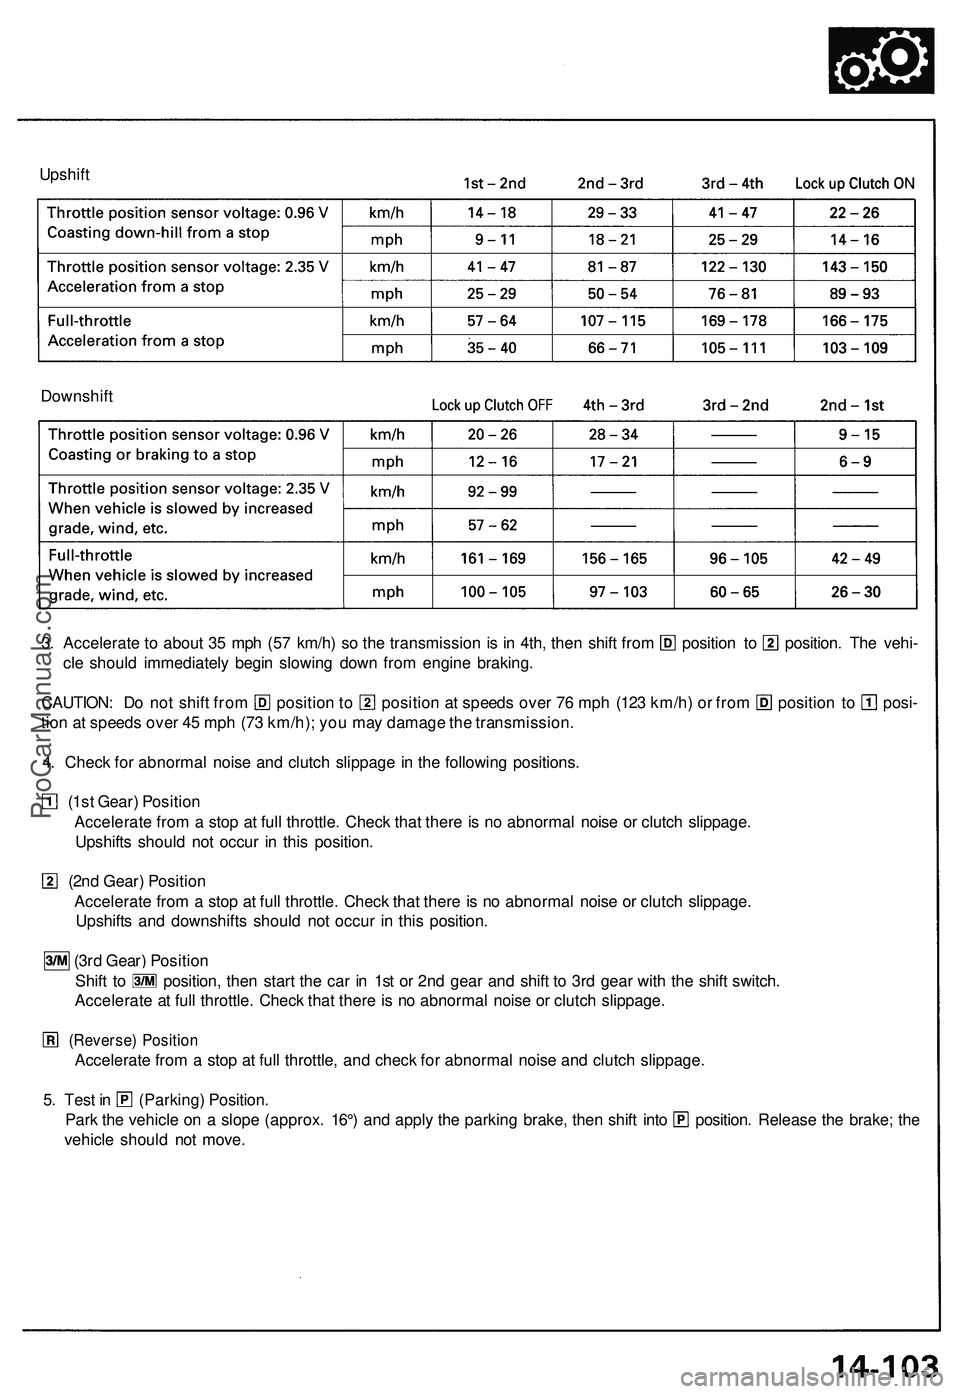
Upshift
Downshift
3. Accelerate to about 35 mph (57 km/h) so the transmission is in 4th, then shift from position to position. The vehi-
cle should immediately begin slowing down from engine braking.
CAUTION: Do not shift from position to position at speeds over 76 mph (123 km/h) or from position to posi-
tion at speeds over 45 mph (73 km/h); you may damage the transmission.
4. Check for abnormal noise and clutch slippage in the following positions.
(1st Gear) Position
Accelerate from a stop at full throttle. Check that there is no abnormal noise or clutch slippage.
Upshifts should not occur in this position.
(2nd Gear) Position
Accelerate from a stop at full throttle. Check that there is no abnormal noise or clutch slippage.
Upshifts and downshifts should not occur in this position.
(3rd Gear) Position
Shift to position, then start the car in 1st or 2nd gear and shift to 3rd gear with the shift switch.
Accelerate at full throttle. Check that there is no abnormal noise or clutch slippage.
(Reverse) Position
Accelerate from a stop at full throttle, and check for abnormal noise and clutch slippage.
5. Test in (Parking) Position.
Park the vehicle on a slope (approx. 16°) and apply the parking brake, then shift into position. Release the brake; the
vehicle should not move.ProCarManuals.com
Page 773 of 1503

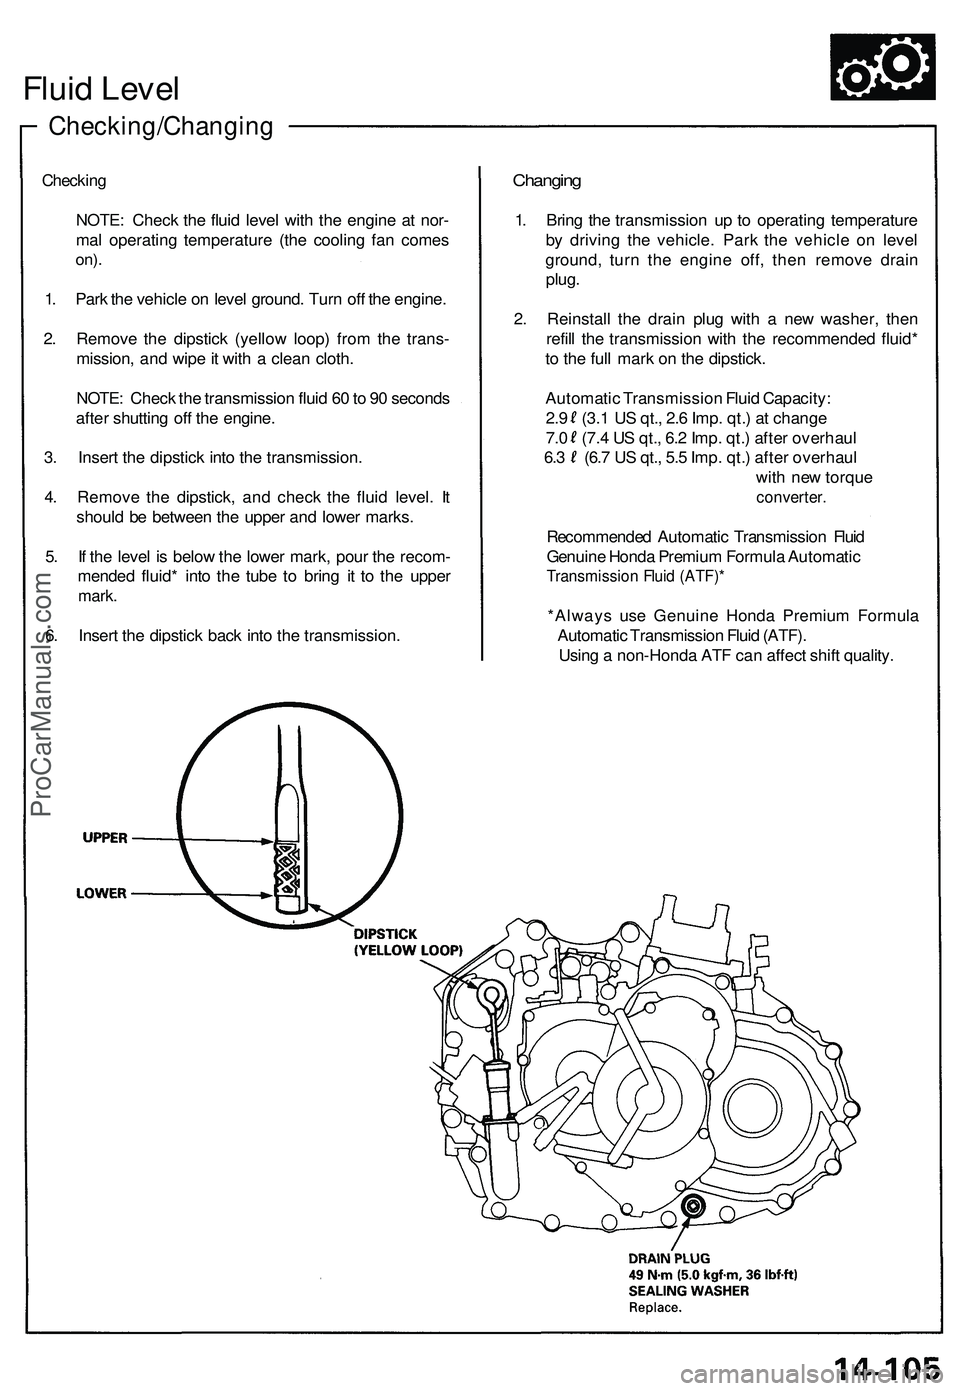
Checking/Changing
Fluid Leve l
Checkin g
NOTE : Chec k th e flui d leve l wit h th e engin e a t nor -
ma l operatin g temperatur e (th e coolin g fa n come s
on).
1. Par k th e vehicl e o n leve l ground . Tur n of f th e engine .
2 . Remov e th e dipstic k (yello w loop ) fro m th e trans -
mission , an d wip e it wit h a clea n cloth .
NOTE : Chec k th e transmissio n flui d 6 0 to 9 0 second s
afte r shuttin g of f th e engine .
3 . Inser t th e dipstic k int o th e transmission .
4 . Remov e th e dipstick , an d chec k th e flui d level . I t
shoul d b e betwee n th e uppe r an d lowe r marks .
5 . I f th e leve l i s belo w th e lowe r mark , pou r th e recom -
mende d fluid * int o th e tub e t o brin g i t t o th e uppe r
mark.
6. Inser t th e dipstic k bac k int o th e transmission .
Changing
1. Brin g th e transmissio n u p t o operatin g temperatur e
b y drivin g th e vehicle . Par k th e vehicl e o n leve l
ground , tur n th e engin e off , the n remov e drai n
plug .
2 . Reinstal l th e drai n plu g wit h a ne w washer , the n
refil l th e transmissio n wit h th e recommende d fluid *
t o th e ful l mar k o n th e dipstick .
Automati c Transmissio n Flui d Capacity :
2. 9 (3. 1 U S qt. , 2. 6 Imp . qt. ) a t chang e
7. 0 (7. 4 U S qt. , 6. 2 Imp . qt. ) afte r overhau l
6.3 (6. 7 U S qt. , 5. 5 Imp . qt. ) afte r overhau l
wit h ne w torqu e
converter .
Recommende d Automati c Transmissio n Fluid
Genuin e Hond a Premiu m Formul a Automati c
Transmissio n Flui d (ATF) *
*Alway s us e Genuin e Hond a Premiu m Formul a
Automati c Transmissio n Flui d (ATF) .
Usin g a non-Hond a AT F ca n affec t shif t quality .
ProCarManuals.com
Page 780 of 1503
20. Remove the intermediate shaft heat shield cover and the intermediate shaft mounting bolts.
21. Pry the intermediate shaft out of the differential. Pull and remove it.
NOTE:
• Coat all precision finished surfaces with clean engine oil.
• Tie a plastic bag over the intermediate shaft end.
Removal (cont'd)
Transmission
22. Remove the parking brake cable holder and the wheel sensor wire clamp.
23. Make a reference mark on the flange of the adjusting bolt, adjusting cam and lower control arm.
24. Separate the toe control arm from the side beam.
25. Remove the damper fork bolt.
26. Separate the lower control arm from the side beam.
27. Pry the left driveshaft out of the differential. Pull and remove it.
NOTE:
• Coat all precision finished surfaces with clean engine oil.
• Tie a plastic bag over the driveshaft end.ProCarManuals.com
Page 781 of 1503
28. Remove the one upper arm mounting bolt shown.
29. Remove the shift cable cover and shift cable holder.
30. Remove the shift cable from the control lever.
31. Remove the torque converter cover, then remove the drive plate bolts.
32. Attach a chain hoist to the transmission hangers.
33. Place a jack under the transmission, and raise the transmission just enough to take weight off of the mounts.
34. Remove the front engine mounting bolts on the transmission side, and retighten the bolt on the engine side.
CAUTION: Loosen the front engine mounting bolt on the engine side, but do not remove it. After removing the
two bolts on the transmission side, be sure to retighten the bolt on the engine side.
35. Remove the rear transmission mounting bolts.
36. Remove the transmission housing mounting bolts.
37. Pull the transmission away from the engine until it clears the dowel pins, then lower it on the transmission jack.ProCarManuals.com
Page 782 of 1503
Illustrated Index
Left Side Cover/TransmissionProCarManuals.com