Page 700 of 1503
Mainshaft Thrust Shim
Adjustment
1. Remove the thrust shim and oil guide plate from the
transmission housing.
2. Install the mainshaft in the transmission housing.
Do not install the clutch housing side ball bearing.
3. Measure between the end of the
transmission housing and mainshaft. Use a straight
edge and feeler gauge, and measure at three loca-
tions and average the readings.
5. Select the proper thrust shim on the basis of the
following calculations. Do not use more than two
thrust shims.
4. Set the mainshaft ball bearing in the clutch hous-
ing, and measure distance between the sur-
faces of the clutch housing and the bearing in-
ner race. Use a straight edge and feeler gauge, and
measure at three locations and average the read-
ings. Do not install the spring washer.ProCarManuals.com
Page 701 of 1503

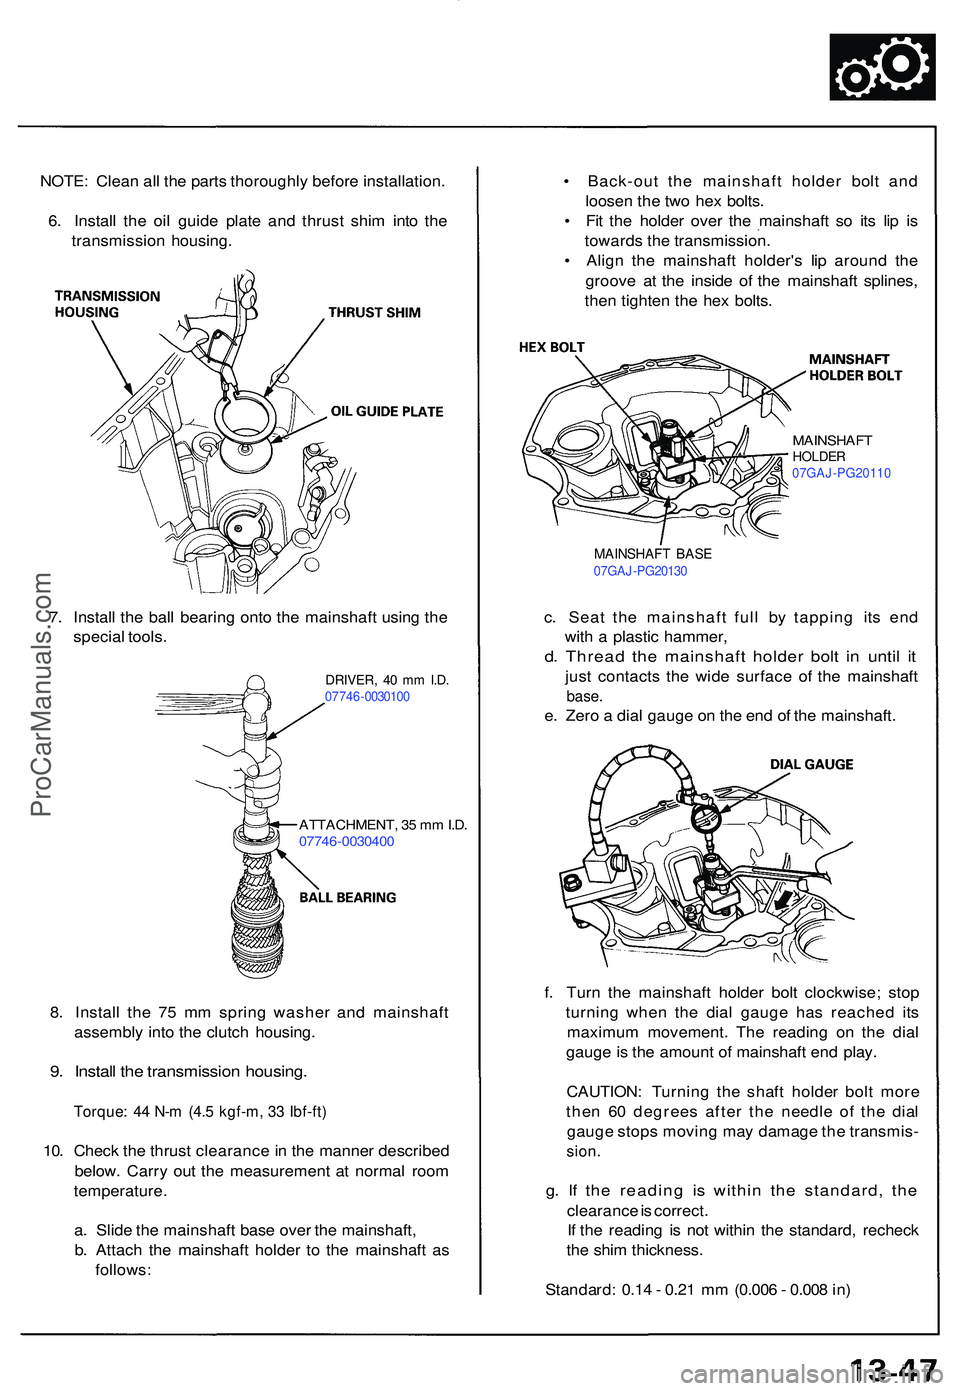
NOTE: Clea n al l th e part s thoroughl y befor e installation .
6 . Instal l th e oi l guid e plat e an d thrus t shi m int o th e
transmissio n housing .
DRIVER, 4 0 m m I.D .07746 -003010 0
7. Instal l th e bal l bearin g ont o th e mainshaf t usin g th e
specia l tools .
ATTACHMENT , 3 5 m m I.D .
0774 6-003040 0
8. Instal l th e 7 5 m m sprin g washe r an d mainshaf t
assembl y int o th e clutc h housing .
9. Instal l th e transmissio n housing .
Torque: 4 4 N- m (4. 5 kgf-m , 3 3 Ibf-ft )
10. Chec k th e thrus t clearanc e in th e manne r describe d
below . Carr y ou t th e measuremen t a t norma l roo m
temperature .
a . Slid e th e mainshaf t bas e ove r th e mainshaft ,
b . Attac h th e mainshaf t holde r t o th e mainshaf t a s
follows : f
. Tur n th e mainshaf t holde r bol t clockwise ; sto p
turnin g whe n th e dia l gaug e ha s reache d it s
maximu m movement . Th e readin g o n th e dia l
gaug e is th e amoun t o f mainshaf t en d play .
CAUTION : Turnin g th e shaf t holde r bol t mor e
the n 6 0 degree s afte r th e needl e o f th e dia l
gaug e stop s movin g ma y damag e th e transmis -sion.
g. I f th e readin g i s withi n th e standard , th e
clearanc e is correct .
I f th e readin g i s no t withi n th e standard , rechec k
th e shi m thickness .
Standard : 0.1 4 - 0.2 1 m m (0.00 6 - 0.00 8 in )
•
Back-ou t th e mainshaf t holde r bol t an d
loose n th e tw o he x bolts .
• Fi t th e holde r ove r th e mainshaf t s o it s li p i s
toward s th e transmission .
• Alig n th e mainshaf t holder' s li p aroun d th e
groov e a t th e insid e o f th e mainshaf t splines ,
the n tighte n th e he x bolts .
MAINSHAF T BAS E07GA J-PG2013 0
MAINSHAF THOLDER07GAJ-PG2011 0
c. Sea t th e mainshaf t ful l b y tappin g it s en d
wit h a plasti c hammer ,
d. Threa d th e mainshaf t holde r bol t i n unti l i t
jus t contact s th e wid e surfac e o f th e mainshaf t
base.
e. Zer o a dia l gaug e o n th e en d o f th e mainshaft .
ProCarManuals.com
Page 702 of 1503
Transmission
Reassembly
1. Install the oil seal, shift arm, and shift lever in the
transmission housing.
3. Install the oil seal, select arm, and select lever in the
clutch housing.
2. Install the shift detent spring and spring set plate.
4. Install the differential assembly into the clutch
housing.ProCarManuals.com
Page 704 of 1503
Transmission
Reassembly (cont'd)
9. Install the reverse shift arm.
11. Install the dowel pins on the clutch housing.
12. Place the transmission housing over the clutch
housing, being careful to line up the shafts.
10. Apply liquid gasket to the surface of the transmis-
sion housing mating with the clutch housing as
shown, and note those items:
Use liquid gasket (P/N 08718 - 0001).
Remove any dirt or oil from the sealing surface.
Seal the entire circumference of the bolt holes to
prevent oil leakage.
If 20 minutes have passed after applying liquid
gasket, reapply it and assemble the housings.
After assembly, wait at least 30 minutes before
refilling with oil.
a. Place the shift lever as a shown.ProCarManuals.com
Page 705 of 1503
13. Lower the transmission housing with snap ring
pliers, and set the snap ring in the groove of the
countershaft bearing.
b. Lower the transmission housing, then place the
shift arm in the groove of the shift piece by turn-
ing the shift lever.
c. Check the operation of the shift lever.
14. Check that the snap ring is securely seated in the
groove of the countershaft bearing.ProCarManuals.com
Page 707 of 1503
Transmission Assembly
Installation
MOTE: Use only Super High Temp Urea Grease (P/N 08798 - 9002).
1. Place the transmission on the transmission jack, and raise it to the engine level.
Check that the two dowel pins are installed in the clutch housing.
2. Set the release fork to the clutch housing.
3. Install the two transmission housing mounting bolts and engine stiffener.
4. Install the three rear transmission mounting bolts.
5. Loosen the front engine mounting bolt, then install the two front engine
mounting bolts to the transmission side.
6. Remove the transmission jack.
7. Install the clutch housing cover.
8. Install the release fork in the release hanger, then install the slave cylinder.
9. Connect the shift cable and select cable. Take care not to bend the cables.
10. Install the upper cover, change wire bracket and lower cover.
11. Install the upper control arm mounting bolt.ProCarManuals.com
Page 708 of 1503
Transmission Assembl y
Installatio n (cont'd )
12. Instal l a ne w se t rin g o n th e en d o f th e lef t driveshaf t an d intermediat e shaft .
13 . Instal l th e lef t driveshaf t (se e sectio n 16 ).
14 . Instal l th e lowe r contro l ar m to th e sid e bea m (se e sectio n 18 ). Alig n th e referenc e mark s o n th e adjustin g bolt , adjust -
in g ca m an d lowe r contro l arm .
15 . Instal l th e dampe r for k bol t (se e sectio n 18 ).
16 . Instal l th e to e contro l ar m to th e sid e bea m (se e sectio n 18 ). Mak e sur e tha t th e arro w mark s o n th e to e contro l ar m
are aligned .
17. Instal l th e whee l senso r wir e clam p an d parkin g brak e cabl e holder .
18 . Instal l th e intermediat e shaft , an d tighte n th e intermediat e shaf t mountin g bolt s t o th e intermediat e shaf t suppor t
base.
19. Instal l th e intermediat e shaf t hea t cover .
ProCarManuals.com
Page 710 of 1503

Transmission Assembl y
Installatio n (cont'd )
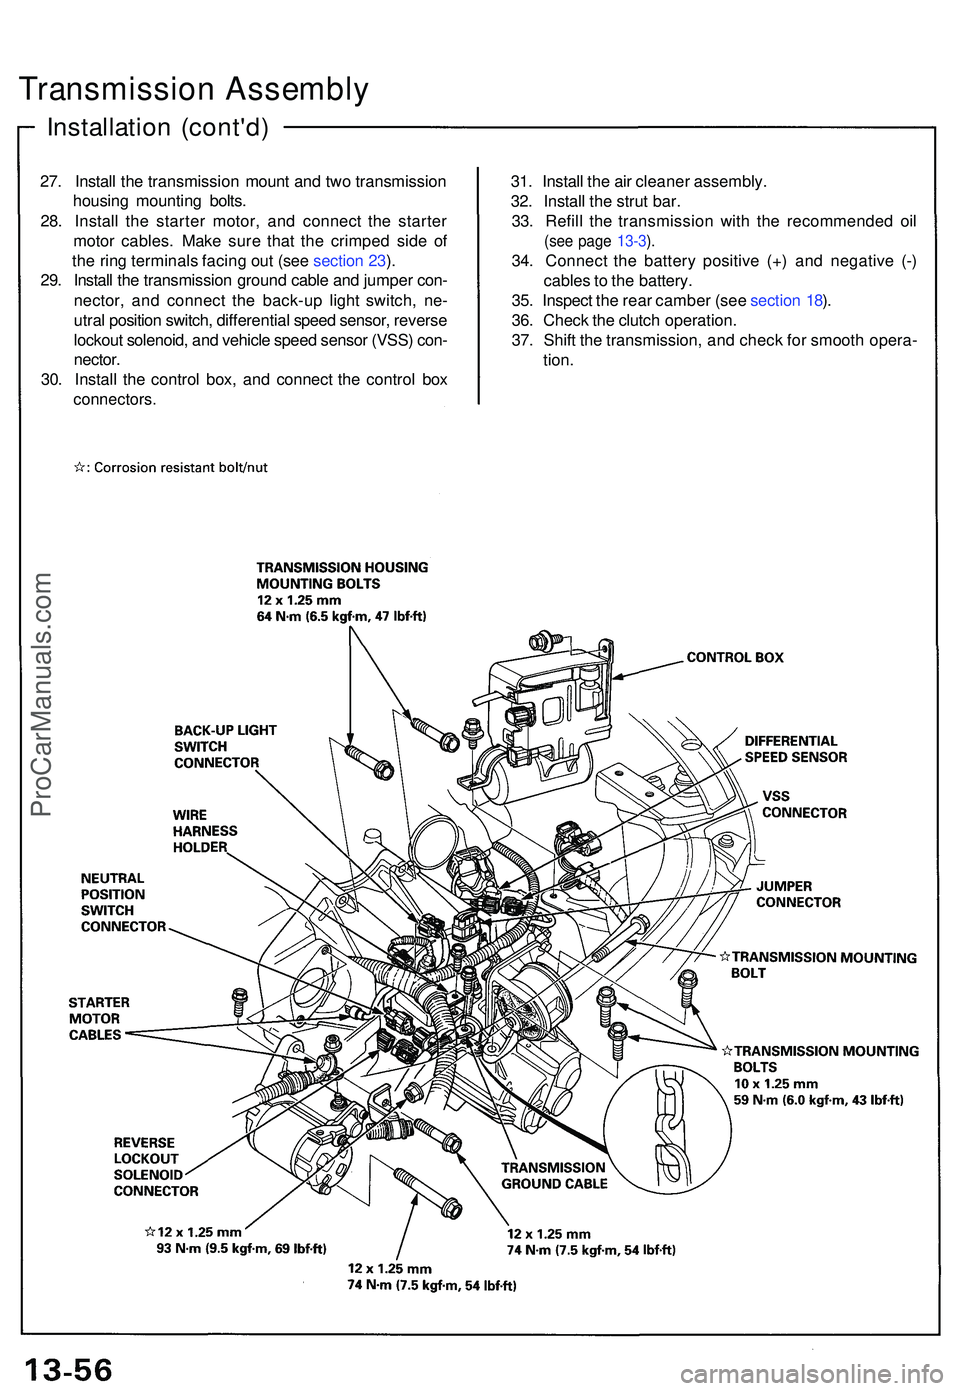
27. Instal l th e transmissio n moun t an d tw o transmissio n
housin g mountin g bolts .
28 . Instal l th e starte r motor , an d connec t th e starte r
moto r cables . Mak e sur e tha t th e crimpe d sid e o f
th e rin g terminal s facin g ou t (se e sectio n 23 ).
29 . Instal l th e transmissio n groun d cabl e an d jumpe r con -
nector , an d connec t th e back-u p ligh t switch , ne -
utra l positio n switch , differentia l spee d sensor , revers e
lockou t solenoid , an d vehicl e spee d senso r (VSS ) con -
nector .
30 . Instal l th e contro l box , an d connec t th e contro l bo x
connectors .
31. Instal l th e ai r cleane r assembly .
32 . Instal l th e stru t bar .
33 . Refil l th e transmissio n wit h th e recommende d oi l
(se e pag e 13-3 ).
34 . Connec t th e batter y positiv e (+ ) an d negativ e (- )
cable s to th e battery .
35 . Inspec t th e rea r cambe r (se e sectio n 18 ).
36 . Chec k th e clutc h operation .
37 . Shif t th e transmission, and chec k fo r smoot h opera -
tion .
ProCarManuals.com