Page 209 of 1399

−
BODY ELECTRICAL POWER SEAT CONTROL SYSTEM
BE−65
1996 LAND CRUISER (RM451U)
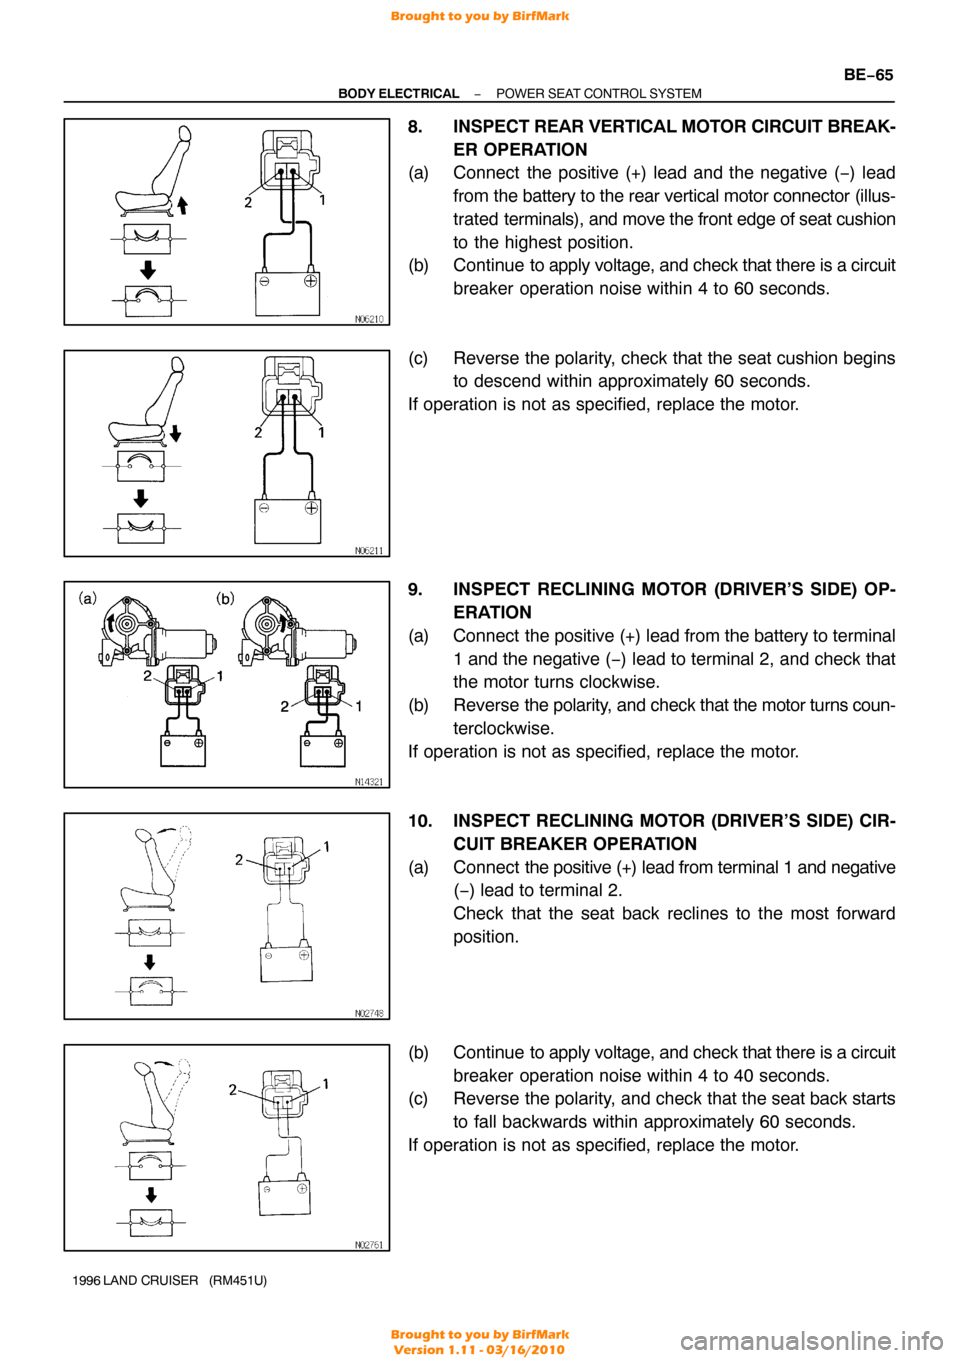
8. INSPECT REAR VERTICAL MOTOR CIRCUIT BREAK-
ER OPERATION
(a) Connect the positive (+) lead and the negative ( −) lead
from the battery to the rear vertical motor connector (illus-
trated terminals), and move the front edge of seat cushion
to the highest position.
(b) Continue to apply voltage, and check that there is a circuit
breaker operation noise within 4 to 60 seconds.
(c) Reverse the polarity, check that the seat cushion begins to descend within approximately 60 seconds.
If operation is not as specified, replace the motor.
9. INSPECT RECLINING MOTOR (DRIVER’S SIDE) OP- ERATION
(a) Connect the positive (+) lead from the battery to terminal 1 and the negative ( −) lead to terminal 2, and check that
the motor turns clockwise.
(b) Reverse the polarity, and check that the motor turns coun-
terclockwise.
If operation is not as specified, replace the motor.
10. INSPECT RECLINING MOTOR (DRIVER’S SIDE) CIR- CUIT BREAKER OPERATION
(a) Connect the positive (+) lead from terminal 1 and negative
(−) lead to terminal 2.
Check that the seat back reclines to the most forward
position.
(b) Continue to apply voltage, and check that there is a circuit breaker operation noise within 4 to 40 seconds.
(c) Reverse the polarity, and check that the seat back starts
to fall backwards within approximately 60 seconds.
If operation is not as specified, replace the motor.
Brought to you by BirfMark
Brought to you by BirfMark
Version 1.11 - 03/16/2010
Page 210 of 1399

BE−66
−
BODY ELECTRICAL POWER SEAT CONTROL SYSTEM
1996 LAND CRUISER (RM451U)
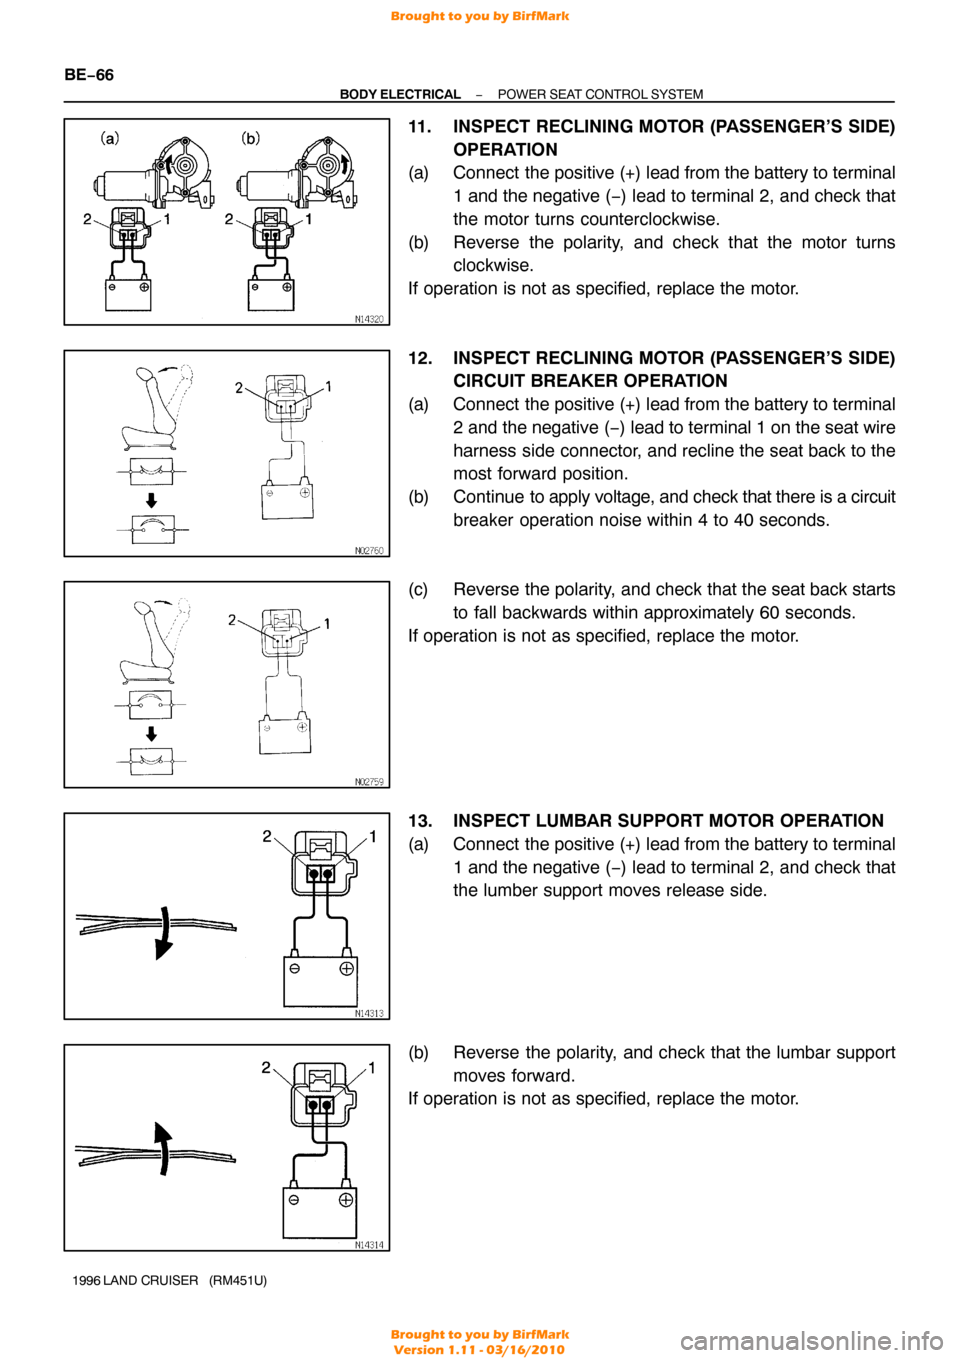
11. INSPECT RECLINING MOTOR (PASSENGER’S SIDE)
OPERATION
(a) Connect the positive (+) lead from the battery to terminal
1 and the negative ( −) lead to terminal 2, and check that
the motor turns counterclockwise.
(b) Reverse the polarity, and check that the motor turns clockwise.
If operation is not as specified, replace the motor.
12. INSPECT RECLINING MOTOR (PASSENGER’S SIDE) CIRCUIT BREAKER OPERATION
(a) Connect the positive (+) lead from the battery to terminal 2 and the negative ( −) lead to terminal 1 on the seat wire
harness side connector, and recline the seat back to the
most forward position.
(b) Continue to apply voltage, and check that there is a circuit breaker operation noise within 4 to 40 seconds.
(c) Reverse the polarity, and check that the seat back starts to fall backwards within approximately 60 seconds.
If operation is not as specified, replace the motor.
13. INSPECT LUMBAR SUPPORT MOTOR OPERATION
(a) Connect the positive (+) lead from the battery to terminal 1 and the negative ( −) lead to terminal 2, and check that
the lumber support moves release side.
(b) Reverse the polarity, and check that the lumbar support moves forward.
If operation is not as specified, replace the motor.
Brought to you by BirfMark
Brought to you by BirfMark
Version 1.11 - 03/16/2010
Page 239 of 1399
BE1MT−01
−
BODY ELECTRICAL CLOCK
BE−95
1233
Author�: Date�:
1996 LAND CRUISER (RM451U)
CLOCK
TROUBLESHOOTING
HINT:
Troubleshoot the lock according to the table below.
Clock will not operate1
Clock loses or gains time2
1.5 seconds/day
Brought to you by BirfMark
Brought to you by BirfMark
Version 1.11 - 03/16/2010
Page 240 of 1399
BE−96
−
BODY ELECTRICAL CLOCK
1234
Author�: Date�:
1996 LAND CRUISER (RM451U)
Brought to you by BirfMark
Brought to you by BirfMark
Version 1.11 - 03/16/2010
Page 246 of 1399
BO5235
Centering BoltBolt
with W asher
BO37J−01
BO−6
−
BODY HOOD
1240
Author�: Date�:
1996 LAND CRUISER (RM451U)
HOOD
ADJUSTMENT
HINT:
Since the centering bolt is used as the hood hinge and lock set
bolt, the hood and lock cannot be adjusted with it on. Substitute
the bolt with washer for the centering bolt.
1. ADJUST HOOD IN FORW ARD/REARWARD AND LEFT
/RIGHT DIRECTIONS
Adjust the hood by loosening the hood side hinge bolts. Torque: 18 N·m (185 kgf·cm, 13 ft·lbf)
2. ADJUST FRONT EDGE OF HOOD IN VERTICAL DIRECTIONS
(a) Loosen the lock nut.
(b) Adjust the hood by turning the cushions.
3. ADJUST REAR EDGE OF HOOD IN VERTICAL DIREC-
TIONS
Adjust the hood by loosening the body side hinge bolts.
4. ADJUST HOOD LOCK
Adjust the hood lock by loosening the mounting bolts. Torque: 8.0 N·m (80 kgf·cm, 69 in.·lbf)
Brought to you by BirfMark
Brought to you by BirfMark
Version 1.11 - 03/16/2010
Page 249 of 1399

BO37N−01
BO2455
Cotton
TapePanel
Cover
−
BODY FRONT DOOR
BO−9
1996 LAND CRUISER (RM451U)
DISASSEMBLY
HINT:
Tape a screwdriver tip before using to pry parts.
1. REMOVE DOOR INSIDE HANDLE BEZEL
2. REMOVE ARMREST
3. REMOVE ARMREST PANEL BASE UPPER
4. REMOVE COURTESY LIGHT
5. REMOVE LOWER FRAME BRACKET GARNISH
6. REMOVE DOOR TRIM
(a) Remove the 3 screws from the door trim.
(b) Using a screwdriver, remove the clip and remove the trim
by pulling all of the trim up.
(c) Remove the 11 screws and armrest base from the door
trim.
(d) Remove the inner weatherstrip from the door trim.
(e) Remove the 8 screws and door pocket from the door trim.
7. REMOVE DOOR BELT MOULDING
Pry out the clip from the edge of the panel, and remove the
moulding .
8. REMOVE DOOR WEATHERSTRIP
NOTICE:
Do not pull strongly on the weatherstrip as it may tear.
9. REMOVE DOOR INSIDE HANDLE
10. REMOVE DOOR LOCK CONTROL RELAY
11. REMOVE SERVICE HOLE COVER
NOTICE:
Do not block the trim clip sealing with the tape.
12. REMOVE OUTSIDE REAR VIEW MIRROR
13. REMOVE DOOR GLASS RUN
14. REMOVE REAR LOWER FRAME
Brought to you by BirfMark
Brought to you by BirfMark
Version 1.11 - 03/16/2010
Page 250 of 1399
BO−10
−
BODY FRONT DOOR
1996 LAND CRUISER (RM451U)
HINT:
At the time of reassembly, adjust the equalizer arm up to down
and tighten if where dimensions A and B, as shown are equal.
15. REMOVE DOOR GLASS
16. REMOVE WINDOW REGULATOR
Torque: 5.0 N·m (50 kgf·cm, 43 in.·lbf)
HINT:
At the time of reassembly, apply MP grease to the sliding sur-
face and gears of the window regulator.
NOTICE:
Do not apply grease to the spring.
17. REMOVE LOCKING AND OPENING CONTROL LINK
18. REMOVE DOOR LOCK
HINT:
At the time of reassembly, apply adhesive to the 3 screws. Part No.08833 −00070, THREE BOND 1324 or equiva-
lent
Torque: 5.0 N·m (50 kgf·cm, 43 in.·lbf)
HINT:
At the time of reassembly, apply MP grease to the sliding sur-
face of the door lock.
19. REMOVE DOOR OUTSIDE HANDLE
20. REMOVE DOOR LOCK CYLINDER
21. REMOVE DOOR SPEAKER
Brought to you by BirfMark
Brought to you by BirfMark
Version 1.11 - 03/16/2010
Page 252 of 1399
BO37M−01
BO2556
BO−12
−
BODY FRONT DOOR
1996 LAND CRUISER (RM451U)
ADJUSTMENT
1. ADJUST DOOR IN FORWARD/REARWARD AND VER-
TICAL DIRECTIONS
Using SST, adjust the door by loosening the body side hinge
bolts. SST 09812−00010
Torque: 24 N·m (240 kgf·cm, 17 ft·lbf)
2. ADJUST DOOR IN LEFT/RIGHT AND VERTICAL DIRECTIONS
Loosen the door side hinge bolts to adjust. Torque: 24 N·m (240 kgf·cm, 17 ft·lbf)
3. ADJUST DOOR LOCK STRIKER
(a) Check that the door fit and door lock linkages are adjusted
correctly.
(b) Loosen the striker mounting screws to adjust.
(c) Using a plastic hammer, tap the striker to adjust it.
Brought to you by BirfMark
Brought to you by BirfMark
Version 1.11 - 03/16/2010