Page 326 of 1399
BO−86
−
BODY FRONT SEAT (Power Adjuster Type)
1996 LAND CRUISER (RM451U)
(e) Remove the 2 screws, vertical adjuster bush, rear vertical
motor and No. 2 vertical seat link.
14. REMOVE FRONT VERTICAL MOTOR
(a) Using the 5.0 mm (0.20 in.) hexagon wrench, and remove
the 2 housing support bracket screws.
Torque: 10 N·m (100 kgf·cm, 7.0 ft·lbf)
(b) Hold the No. 1 vertical travel jack screw with a plier, re- move the nut and washer.
HINT:
At the time of reassembly, apply adhesive to nut. Part No. 08833− 00070, THREE BOND 1324 or equiva-
lent
Torque: 2.0 N·m (20 kgf·cm, 15 ft·lbf)
(c) Remove the 2 screws, vertical adjuster bush, front vertical
motor and No. 1 vertical seat link.
15. REMOVE FRONT SEAT TRACK
(a) Remove the 2 bolts and front seat motor side housing. Torque: 20 N·m (210 kgf·cm, 15 ft·lbf)
Brought to you by BirfMark
Brought to you by BirfMark
Version 1.11 - 03/16/2010
Page 327 of 1399
−
BODY FRONT SEAT (Power Adjuster Type)
BO−87
1996 LAND CRUISER (RM451U)
(b) Remove the 2 bolts, seat track inner reinforcement, then
separate the seat track RH and LH.
Torque: 20 N·m (210 kgf·cm, 15 ft·lbf)
(c) Remove the reclining connecting rod.
16. REMOVE SEAT WIRE
17. REMOVE RECLINING MOTOR
18. REMOVE RECLINING HINGE COVER
Brought to you by BirfMark
Brought to you by BirfMark
Version 1.11 - 03/16/2010
Page 333 of 1399

−
BODY SEAT BELT
BO−93
1996 LAND CRUISER (RM451U)
SEAT BELT
INSPECTION
CAUTION:
Replace the seat belt assembly")
BO0632
BO39M−01
BO0633
15°
45°
N10070
Full Belt Length
minus 200 mm
(7.87 in.)
−
BODY SEAT BELT
BO−93
1996 LAND CRUISER (RM451U)
SEAT BELT
INSPECTION
CAUTION:
Replace the seat belt assembly (outer belt, inner belt, bolts,
nuts or sill −bar) if it has been used in a severe impact. The
entire assembly should be replaced even if damage is not
obvious.
1. All seat belts: RUNNING TEST (IN SAFE AREA)
(a) Fasten the front seat belts.
(b) Drive the car at 10 mph (16 km/h) and make a very hard stop.
Check that the belt locks and cannot be extended at this
time.
HINT:
Conduct this test in a safe area. If the belt does not lock, remove
the belt mechanism assembly and conduct the following static
check. Also, whenever installing a new belt assembly, verify the
proper operation before installation.
2. Driver ’s seat belt (ELR): STATIC TEST
(a) Make sure that the belt locks when pulled out quickly.
(b) Remove the locking retractor assembly.
(c) Tilt the retractor slowly.
(d) Make sure that the belt can be pulled out at a tilt of 15 de-
grees or less, and cannot be pulled out at over 45 degrees
of tilt.
If a problem is found, replace the assembly.
3. Except driver’s seat belt (ALR/ELR):
STATIC TEST
(a) Make sure that the belt locks when pulled out quickly.
(b) Remove the locking retractor assembly.
(c) Pull out the whole belt and measure the length of the whole belt.
Then retract the belt slightly and pull it out again.
(d) Make sure that the belt cannot be extended further.
If a problem is found, replace the assembly.
(e) Retract the whole belt, then pull it out to the full length mi-
nus 200 mm (7.87 in.).
(f) Tilt the retractor slowly.
(g) Make sure that the belt can be pulled out at a tilt of 15 de-
grees or less, and cannot be pulled out at over 45 degrees
of tilt.
If a problem is found, replace the assembly.
Brought to you by BirfMark
Brought to you by BirfMark
Version 1.11 - 03/16/2010
Page 336 of 1399
−
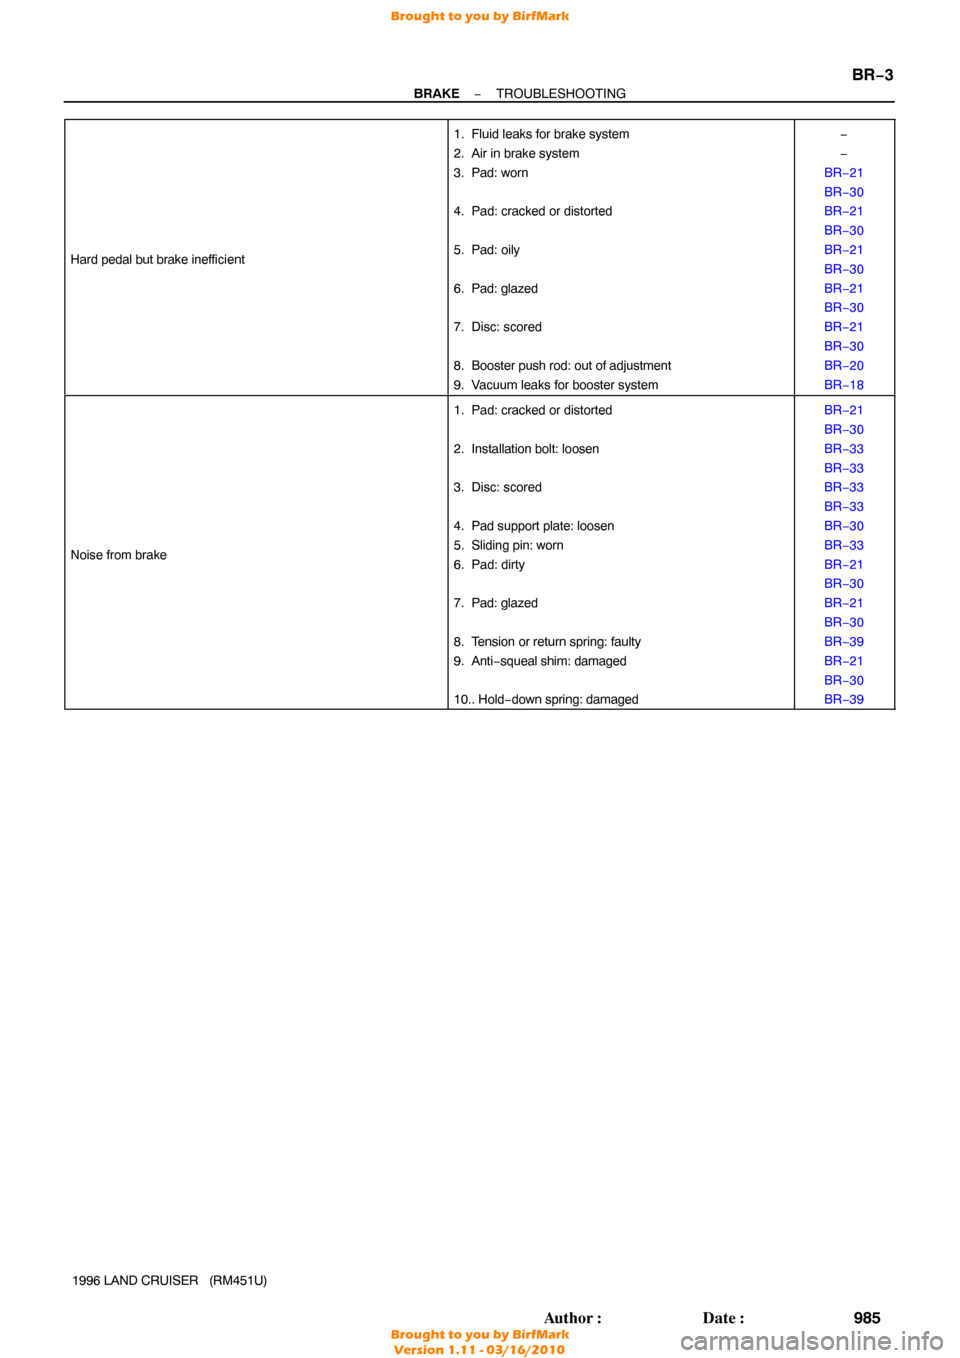
BRAKE TROUBLESHOOTING
BR−3
985
Author�: Date�:
1996 LAND CRUISER (RM451U)
Hard pedal but brake inef
ficient
1. Fluid leaks for brake system
2. Air in brake system
3. Pad: worn
4. Pad: cracked or distorted
5. Pad: oily
6. Pad: glazed
7. Disc: scored
8. Booster push rod: out of adjustment
9. Vacuum leaks for booster system−
−
BR−21
BR−30
BR−21
BR−30
BR−21
BR−30
BR−21
BR−30
BR−21
BR−30
BR−20
BR−18
Noise from brake
1. Pad: cracked or distorted
2. Installation bolt: loosen
3. Disc: scored
4. Pad support plate: loosen
5. Sliding pin: worn
6. Pad: dirty
7. Pad: glazed
8. Tension or return spring: faulty
9. Anti− squeal shim: damaged
10.. Hold− down spring: damagedBR−21
BR−30
BR−33
BR−33
BR−33
BR−33
BR−30
BR−33
BR−21
BR−30
BR−21
BR−30
BR−39
BR−21
BR−30
BR−39
Brought to you by BirfMark
Brought to you by BirfMark
Version 1.11 - 03/16/2010
Page 344 of 1399

DISASSEMBLY
1. REMOVE RESERVOIR
(a) Remove the set screw and pull out the reservoir.
Torque: 1.7 N´m (17.5 kgf´cm,")
BR1CJ-01
R12236
A
-
BRAKE BRAKE MASTER CYLINDER
BR-1 1
1996 LAND CRUISER (RM451U)
DISASSEMBLY
1. REMOVE RESERVOIR
(a) Remove the set screw and pull out the reservoir.
Torque: 1.7 N´m (17.5 kgf´cm, 15.2 in.´lbf)
(b) Remove the cap and strainer from the reservoir.
2. REMOVE 2 GROMMETS
3. REMOVE BOLT AND CLAMP FROM CYLINDER BODY
4. PLACE CYLINDER IN VISE
5. REMOVE PISTON STOPPER BOLT
Using a screwdriver, push the pistons in all the way and remove
the piston stopper bolt and gasket.
HINT:
Tape the screwdriver tip before use. Torque: 10 N´m (100 kgf´cm, 7 ft´lbf)
6. REMOVE 2 PISTONS AND SPRINGS
(a) Push in the piston with a screwdriver and remove the snap ring with snap ring pliers.
HINT:
Tape the screwdriver tip before use.
(b) Remove the No.1 piston and spring by hand, pulling straight out, not at an angle.
NOTICE:
If pulled out and installed at an angle, there is a possibly
that the cylinder bore could be damaged.
NOTICE:
Be careful not to damage the rubber lips on the pistons.
(c) Place a rag and 2 wooden blocks on the work table, and lightly tap the cylinder flange against the block edges until
the No.2 piston drops out of the cylinder.
HINT:
Make sure that the distance (A) from the rag to the top of the
blocks is at least 100 mm (3.94 in.).
Brought to you by BirfMark
Brought to you by BirfMark
Version 1.11 - 03/16/2010
Page 358 of 1399
BR1CU−03
−
BRAKE FRONT BRAKE CALIPER
BR−25
1996 LAND CRUISER (RM451U)
REMOVAL
1. DISCONNECT FLEXIBLE HOSE
(a) Remove the union bolt and 2 gaskets from the caliper,
then disconnect the flexible hose from the caliper.
Torque: 30 N·m (310 kgf·cm, 22 ft·lbf)
(b) Use a container to catch the brake fluid as it drains out.
2. REMOVE CALIPER
Remove the 2 mounting bolts and caliper. Torque: 123 N·m (1,250 kgf·cm, 90 ft·lbf)
3. REMOVE THESE PARTS:
�Clip
�2 pins
�Anti−rattle spring
�2 pads
�4 anti−squeal shims
Brought to you by BirfMark
Brought to you by BirfMark
Version 1.11 - 03/16/2010
Page 360 of 1399

INSPECTION
1. MEASURE PAD LINING THICKNESS
Using a ruler, measure the pad lining thickness.
Standard thickness: 9.5")
BR1CX−03
BR0251
−
BRAKE FRONT BRAKE CALIPER
BR−27
1996 LAND CRUISER (RM451U)
INSPECTION
1. MEASURE PAD LINING THICKNESS
Using a ruler, measure the pad lining thickness.
Standard thickness: 9.5 mm (0.374 in.)
Minimum thickness: 1.0 mm (0.039 in.)
Replace the pad if the thickness is less than the minimum (the
1.0 mm slit is no longer visible), or if it shows signs of uneven
wear.
2. MEASURE DISC THICKNESS
Using a micrometer, measure the disc thickness. Standard thickness: 32.0 mm (1.260 in.)
Minimum thickness: 30.0 mm (1.181 in.)
If the disc is scored or worn, or if its thickness is less than the
minimum, repair or replace the disc.
3. MEASURE DISC RUNOUT
Using a dial indicator, measure the disc runout at a position 10
mm (0.39 in.) from the outside edge. Maximum disc runout: 0.15 mm (0.0059 in.)
If the runout is greater than the maximum, replace the disc or
grind it on a ”On−Car” brake lathe.
HINT:
Before measuring the runout, confirm that the front hub bearing
play is within the specification.
4. IF NECESSARY, REPLACE DISC
(a) Remove the front axle hub (See page SA−7).
(b) Remove the disc from the axle hub.
(c) Install a new disc and torque the bolts. Torque: 74 N·m (750 kgf·cm, 54 ft·lbf)
(d) Install the axle hub and adjust the front bearing preload (See page SA−9 ).
Brought to you by BirfMark
Brought to you by BirfMark
Version 1.11 - 03/16/2010
Page 367 of 1399
BR1D2−01
BR−34
−
BRAKE REAR BRAKE CALIPER
1996 LAND CRUISER (RM451U)
REMOVAL
1. DISCONNECT FLEXIBLE HOSE
(a) Remove the union bolt and 2 gaskets from the caliper, then disconnect the flexible hose from the cali-
per.
Torque: 30 N·m (310 kgf·cm, 22 ft·lbf)
(b) Use a container to catch the brake fluid as it drains out.
2. REMOVE CALIPER
Remove the 2 sliding pins and caliper. Torque: 88 N·m (900 kgf·cm, 65 ft·lbf)
3. REMOVE THESE PARTS:
(a) 2 pads with anti −squeal shim
(b) 4 pad support plates
Brought to you by BirfMark
Brought to you by BirfMark
Version 1.11 - 03/16/2010

1996 LAND CRUISER (RM451U)
(e) Remove the 2 screws, vertical adjuster bush, rear vertical
motor and No. 2 vertical seat link.
14. REMOVE FRONT VE")

BO−87
1996 LAND CRUISER (RM451U)
(b) Remove the 2 bolts, seat track inner reinforcement, then
separate the seat track RH and LH.
Torque: 20 N·m (210 k")

REMOVAL
1. DISCONNECT FLEXIBLE HOSE
(a) Remove the union bolt and 2 gaskets from the caliper,
then disconnect the flexible")

REMOVAL
1. DISCONNECT FLEXIBLE HOSE
(a) Remove the union bolt and 2 gaskets from the caliper, then disconnect the flexible")