Page 1020 of 2890
G4M0497
4) Connect stabilizer link to transverse link, and tempo-
rarily tighten bolts.
CAUTION:
Discard loosened self-locking nut and replace with a
new one.
5) Tighten the following points in the order shown below
when wheels are in full contact with the ground and vehicle
is at curb weight condition.
(1) Transverse link and stabilizer link
Tightening torque:
29±5 N⋅m (3.0±0.5 kg-m, 21.7±3.6 ft-lb)
(2) Transverse link and crossmember
Tightening torque:
98±15 N⋅m (10.0±1.5 kg-m, 72±11 ft-lb)
G4M0928
(3) Transverse link rear bushing and body
Tightening torque:
245±49 N⋅m (25±5 kg-m, 181±36 ft-lb)
NOTE:
�Move rear bushing back and forth until transverse link-
to-rear bushing clearance is established (as indicated in
figure.) before tightening.
�Check wheel alignment and adjust if necessary.
19
4-1SERVICE PROCEDURE
2. Front Transverse Link
Page 1021 of 2890
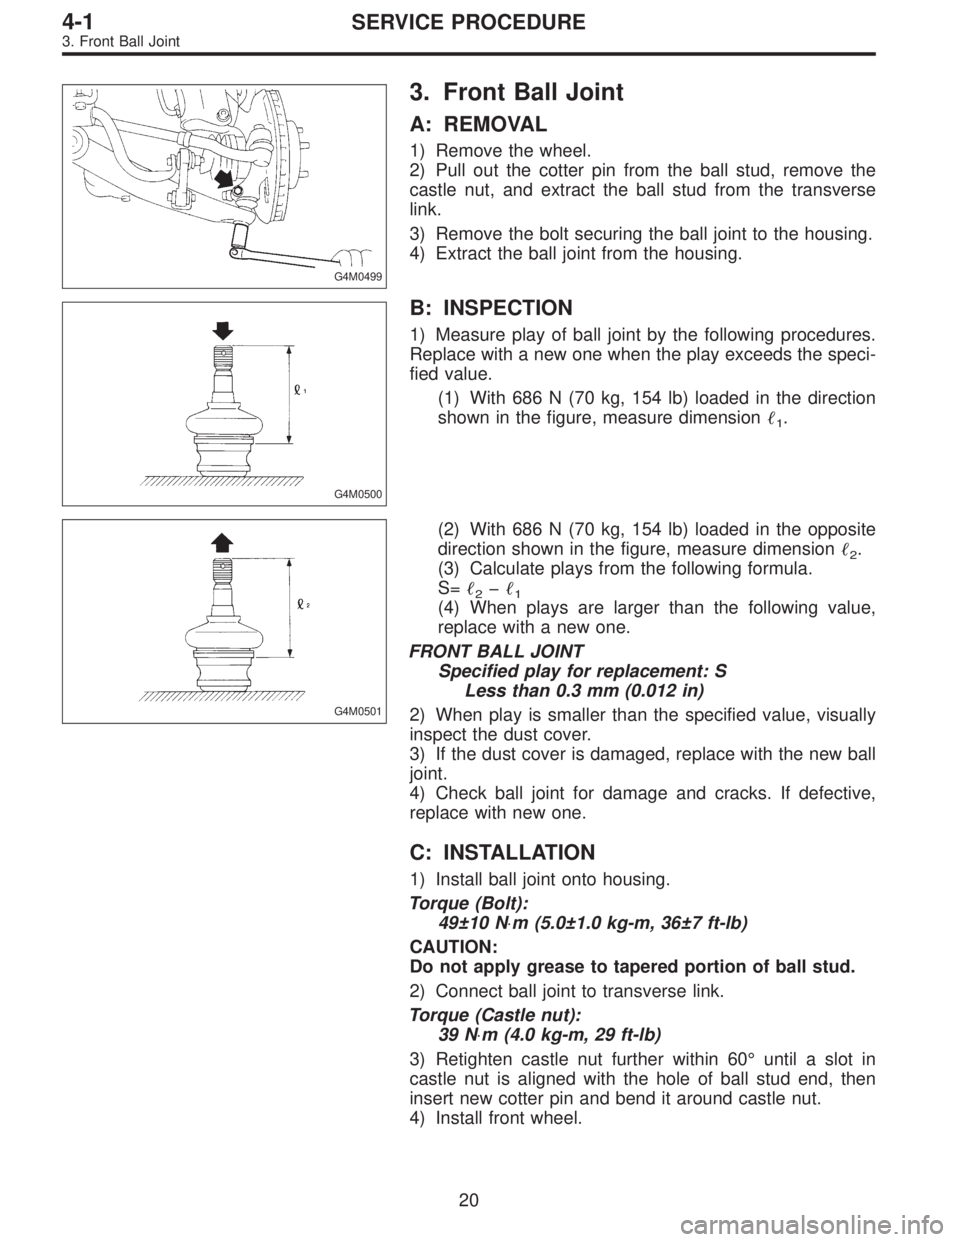
G4M0499
3. Front Ball Joint
A: REMOVAL
1) Remove the wheel.
2) Pull out the cotter pin from the ball stud, remove the
castle nut, and extract the ball stud from the transverse
link.
3) Remove the bolt securing the ball joint to the housing.
4) Extract the ball joint from the housing.
G4M0500
B: INSPECTION
1) Measure play of ball joint by the following procedures.
Replace with a new one when the play exceeds the speci-
fied value.
(1) With 686 N (70 kg, 154 lb) loaded in the direction
shown in the figure, measure dimension�
1.
G4M0501
(2) With 686 N (70 kg, 154 lb) loaded in the opposite
direction shown in the figure, measure dimension�
2.
(3) Calculate plays from the following formula.
S=�
2�1(4) When plays are larger than the following value,
replace with a new one.
FRONT BALL JOINT
Specified play for replacement: S
Less than 0.3 mm (0.012 in)
2) When play is smaller than the specified value, visually
inspect the dust cover.
3) If the dust cover is damaged, replace with the new ball
joint.
4) Check ball joint for damage and cracks. If defective,
replace with new one.
C: INSTALLATION
1) Install ball joint onto housing.
Torque (Bolt):
49±10 N⋅m (5.0±1.0 kg-m, 36±7 ft-lb)
CAUTION:
Do not apply grease to tapered portion of ball stud.
2) Connect ball joint to transverse link.
Torque (Castle nut):
39 N⋅m (4.0 kg-m, 29 ft-lb)
3) Retighten castle nut further within 60°until a slot in
castle nut is aligned with the hole of ball stud end, then
insert new cotter pin and bend it around castle nut.
4) Install front wheel.
20
4-1SERVICE PROCEDURE
3. Front Ball Joint
Page 1022 of 2890
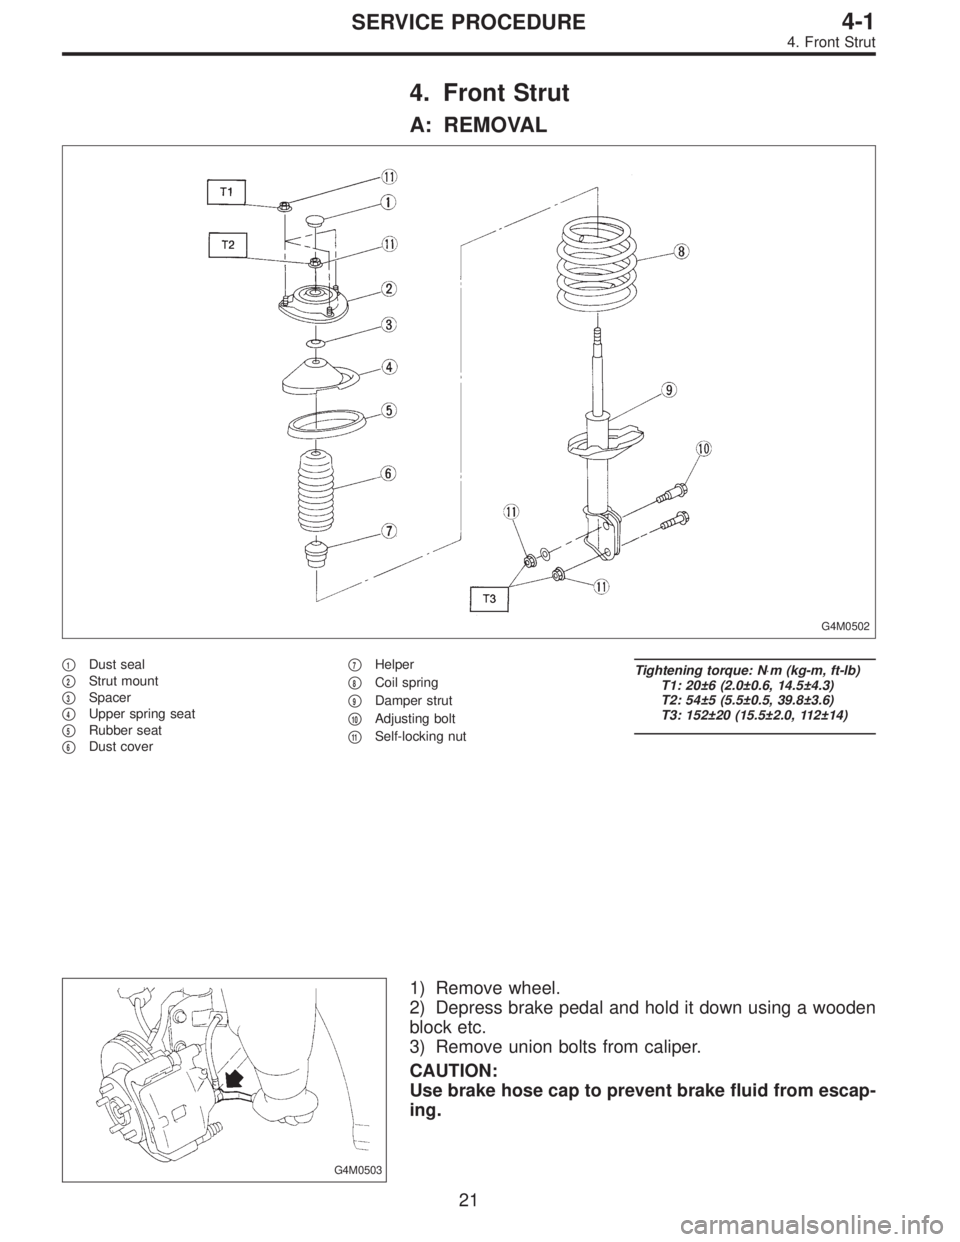
4. Front Strut
A: REMOVAL
G4M0502
�1Dust seal
�
2Strut mount
�
3Spacer
�
4Upper spring seat
�
5Rubber seat
�
6Dust cover�
7Helper
�
8Coil spring
�
9Damper strut
�
10Adjusting bolt
�
11Self-locking nut
Tightening torque: N⋅m (kg-m, ft-lb)
T1: 20±6 (2.0±0.6, 14.5±4.3)
T2: 54±5 (5.5±0.5, 39.8±3.6)
T3: 152±20 (15.5±2.0, 112±14)
G4M0503
1) Remove wheel.
2) Depress brake pedal and hold it down using a wooden
block etc.
3) Remove union bolts from caliper.
CAUTION:
Use brake hose cap to prevent brake fluid from escap-
ing.
21
4-1SERVICE PROCEDURE
4. Front Strut
Page 1026 of 2890
G4M0511
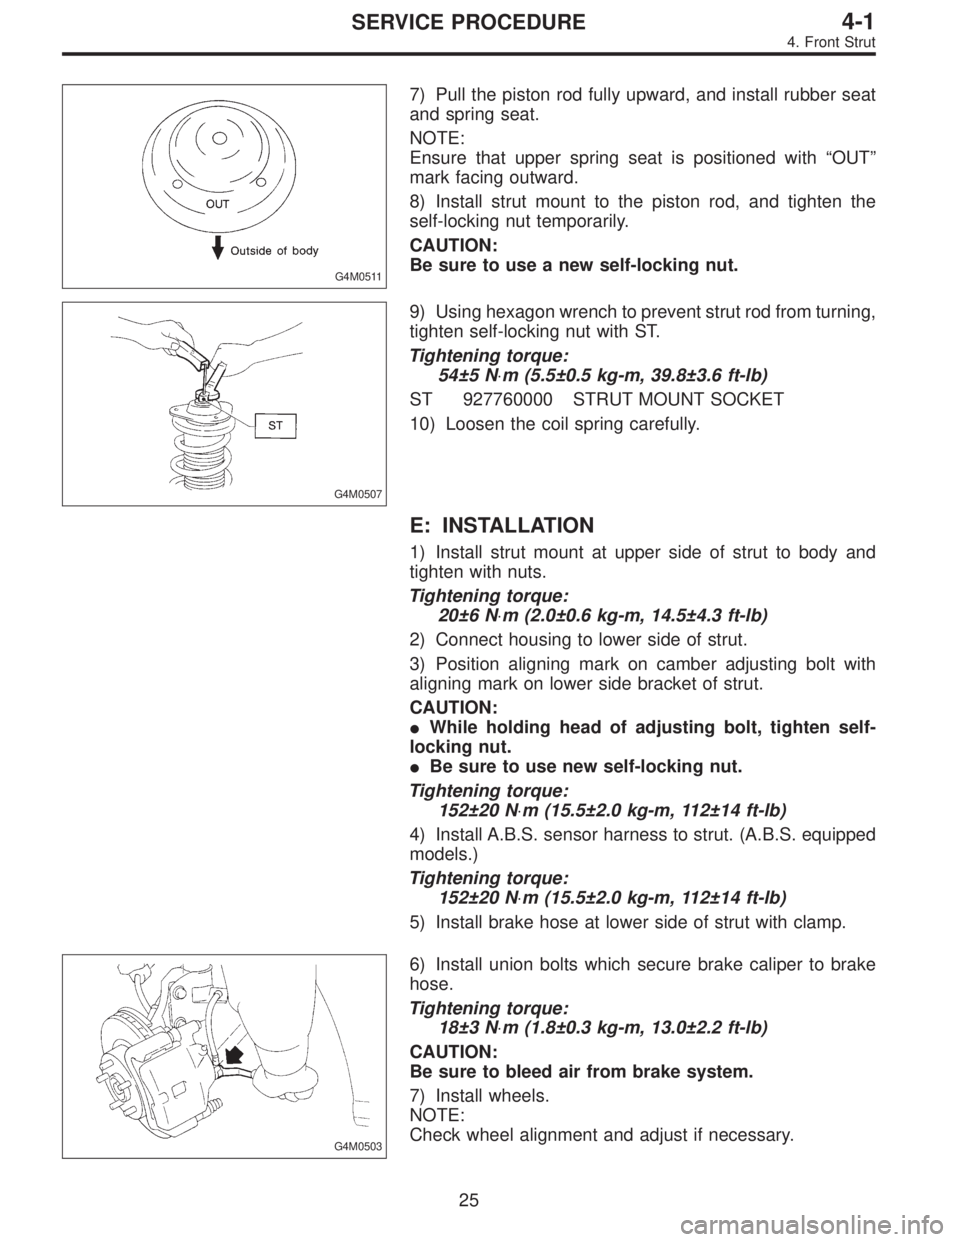
7) Pull the piston rod fully upward, and install rubber seat
and spring seat.
NOTE:
Ensure that upper spring seat is positioned with“OUT”
mark facing outward.
8) Install strut mount to the piston rod, and tighten the
self-locking nut temporarily.
CAUTION:
Be sure to use a new self-locking nut.
G4M0507
9) Using hexagon wrench to prevent strut rod from turning,
tighten self-locking nut with ST.
Tightening torque:
54±5 N⋅m (5.5±0.5 kg-m, 39.8±3.6 ft-lb)
ST 927760000 STRUT MOUNT SOCKET
10) Loosen the coil spring carefully.
E: INSTALLATION
1) Install strut mount at upper side of strut to body and
tighten with nuts.
Tightening torque:
20±6 N⋅m (2.0±0.6 kg-m, 14.5±4.3 ft-lb)
2) Connect housing to lower side of strut.
3) Position aligning mark on camber adjusting bolt with
aligning mark on lower side bracket of strut.
CAUTION:
�While holding head of adjusting bolt, tighten self-
locking nut.
�Be sure to use new self-locking nut.
Tightening torque:
152±20 N⋅m (15.5±2.0 kg-m, 112±14 ft-lb)
4) Install A.B.S. sensor harness to strut. (A.B.S. equipped
models.)
Tightening torque:
152±20 N⋅m (15.5±2.0 kg-m, 112±14 ft-lb)
5) Install brake hose at lower side of strut with clamp.
G4M0503
6) Install union bolts which secure brake caliper to brake
hose.
Tightening torque:
18±3 N⋅m (1.8±0.3 kg-m, 13.0±2.2 ft-lb)
CAUTION:
Be sure to bleed air from brake system.
7) Install wheels.
NOTE:
Check wheel alignment and adjust if necessary.
25
4-1SERVICE PROCEDURE
4. Front Strut
Page 1028 of 2890
G4M0516
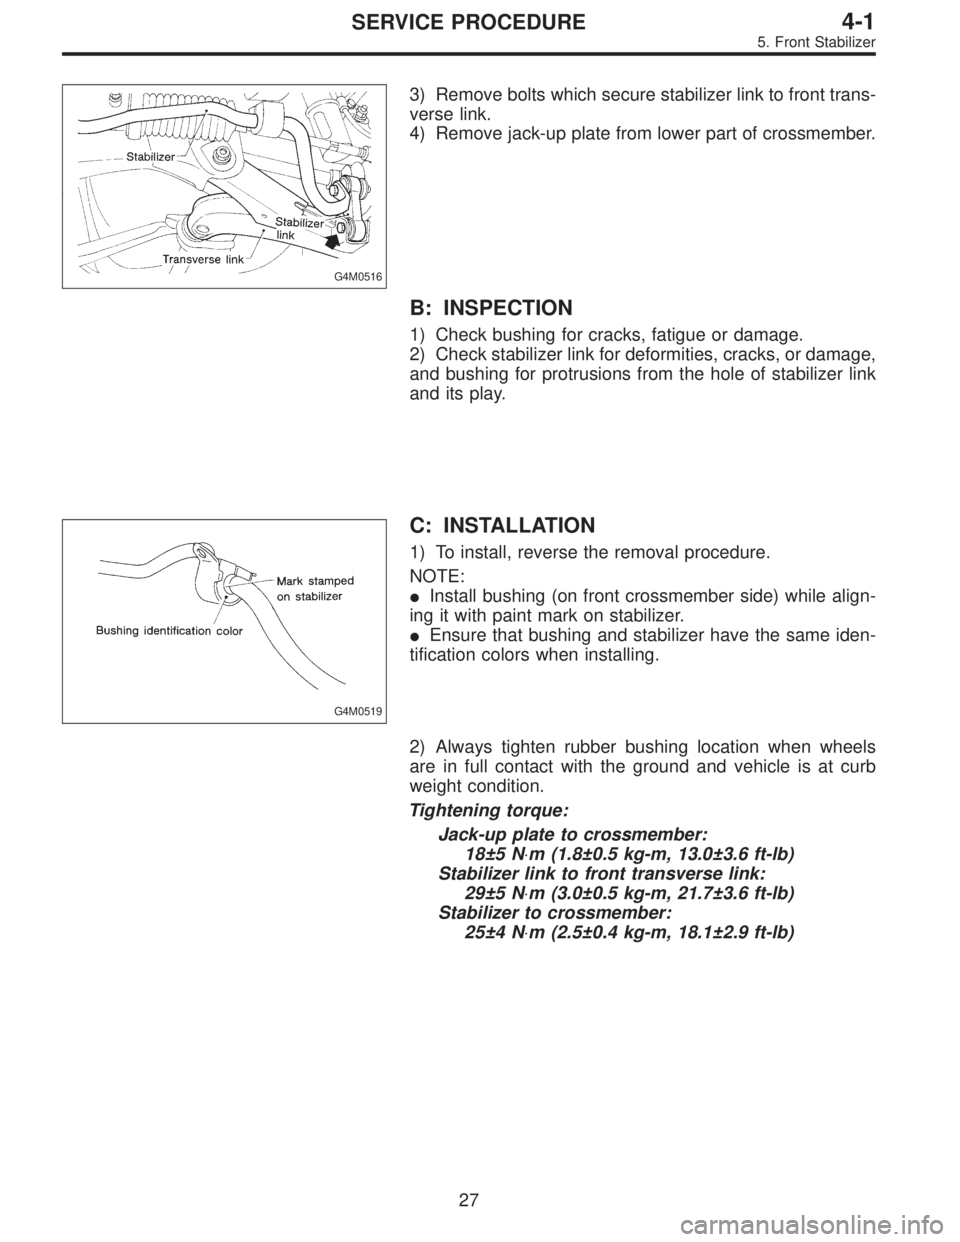
3) Remove bolts which secure stabilizer link to front trans-
verse link.
4) Remove jack-up plate from lower part of crossmember.
B: INSPECTION
1) Check bushing for cracks, fatigue or damage.
2) Check stabilizer link for deformities, cracks, or damage,
and bushing for protrusions from the hole of stabilizer link
and its play.
G4M0519
C: INSTALLATION
1) To install, reverse the removal procedure.
NOTE:
�Install bushing (on front crossmember side) while align-
ing it with paint mark on stabilizer.
�Ensure that bushing and stabilizer have the same iden-
tification colors when installing.
2) Always tighten rubber bushing location when wheels
are in full contact with the ground and vehicle is at curb
weight condition.
Tightening torque:
Jack-up plate to crossmember:
18±5 N⋅m (1.8±0.5 kg-m, 13.0±3.6 ft-lb)
Stabilizer link to front transverse link:
29±5 N⋅m (3.0±0.5 kg-m, 21.7±3.6 ft-lb)
Stabilizer to crossmember:
25±4 N⋅m (2.5±0.4 kg-m, 18.1±2.9 ft-lb)
27
4-1SERVICE PROCEDURE
5. Front Stabilizer
Page 1030 of 2890
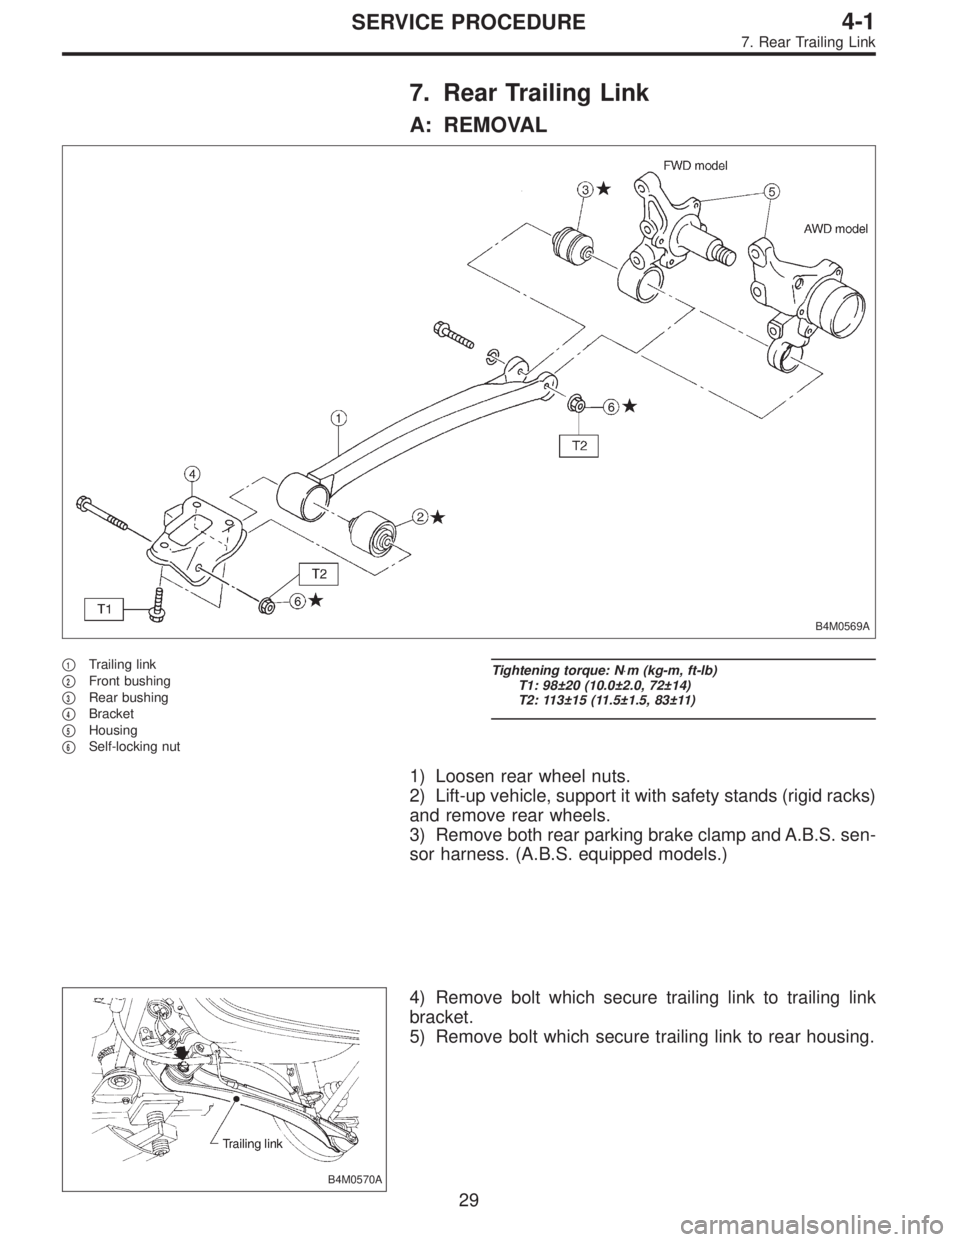
7. Rear Trailing Link
A: REMOVAL
B4M0569A
�1Trailing link
�
2Front bushing
�
3Rear bushing
�
4Bracket
�
5Housing
�
6Self-locking nut
Tightening torque: N⋅m (kg-m, ft-lb)
T1: 98±20 (10.0±2.0, 72±14)
T2: 113±15 (11.5±1.5, 83±11)
1) Loosen rear wheel nuts.
2) Lift-up vehicle, support it with safety stands (rigid racks)
and remove rear wheels.
3) Remove both rear parking brake clamp and A.B.S. sen-
sor harness. (A.B.S. equipped models.)
B4M0570A
4) Remove bolt which secure trailing link to trailing link
bracket.
5) Remove bolt which secure trailing link to rear housing.
29
4-1SERVICE PROCEDURE
7. Rear Trailing Link
Page 1043 of 2890
E: INSTALLATION
1) Install strut mount cap.
2) Tighten self-locking nut used to secure strut mount to
vehicle body.
CAUTION:
Use a new self-locking nut.
NOTE:
Tighten strut mount and cap as a unit.
Tightening torque:
20±6 N⋅m (2.0±0.6 kg-m, 14.5±4.3 ft-lb)
3) Tighten bolts securing rear strut to housing.
Tightening torque:
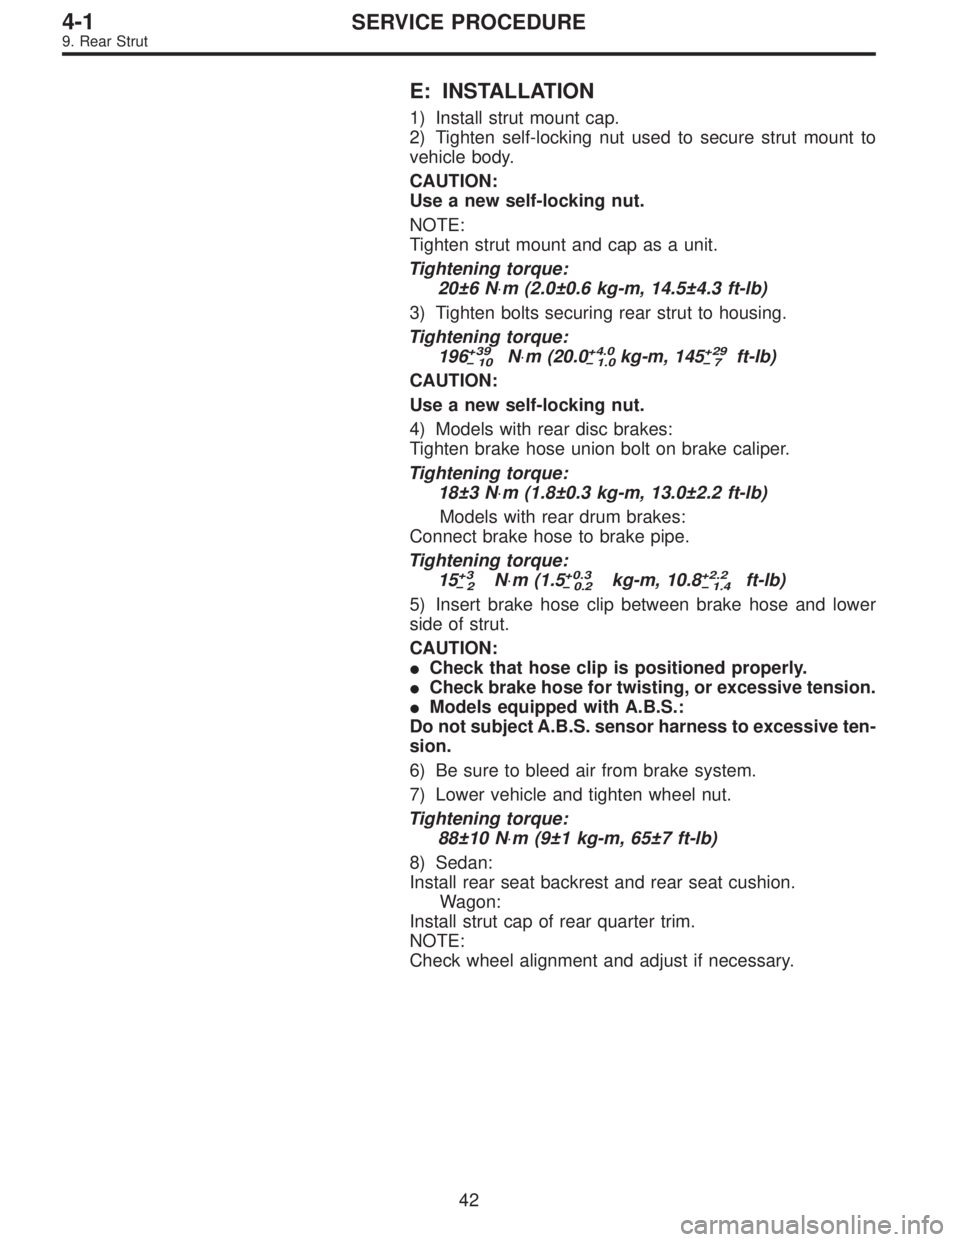
196
+39
10N⋅m (20.0+4.0
1.0kg-m, 145+29
7ft-lb)
CAUTION:
Use a new self-locking nut.
4) Models with rear disc brakes:
Tighten brake hose union bolt on brake caliper.
Tightening torque:
18±3 N⋅m (1.8±0.3 kg-m, 13.0±2.2 ft-lb)
Models with rear drum brakes:
Connect brake hose to brake pipe.
Tightening torque:
15
+3
2N⋅m (1.5+0.3
0.2kg-m, 10.8+2.2
1.4ft-lb)
5) Insert brake hose clip between brake hose and lower
side of strut.
CAUTION:
�Check that hose clip is positioned properly.
�Check brake hose for twisting, or excessive tension.
�Models equipped with A.B.S.:
Do not subject A.B.S. sensor harness to excessive ten-
sion.
6) Be sure to bleed air from brake system.
7) Lower vehicle and tighten wheel nut.
Tightening torque:
88±10 N⋅m (9±1 kg-m, 65±7 ft-lb)
8) Sedan:
Install rear seat backrest and rear seat cushion.
Wagon:
Install strut cap of rear quarter trim.
NOTE:
Check wheel alignment and adjust if necessary.
42
4-1SERVICE PROCEDURE
9. Rear Strut
Page 1044 of 2890
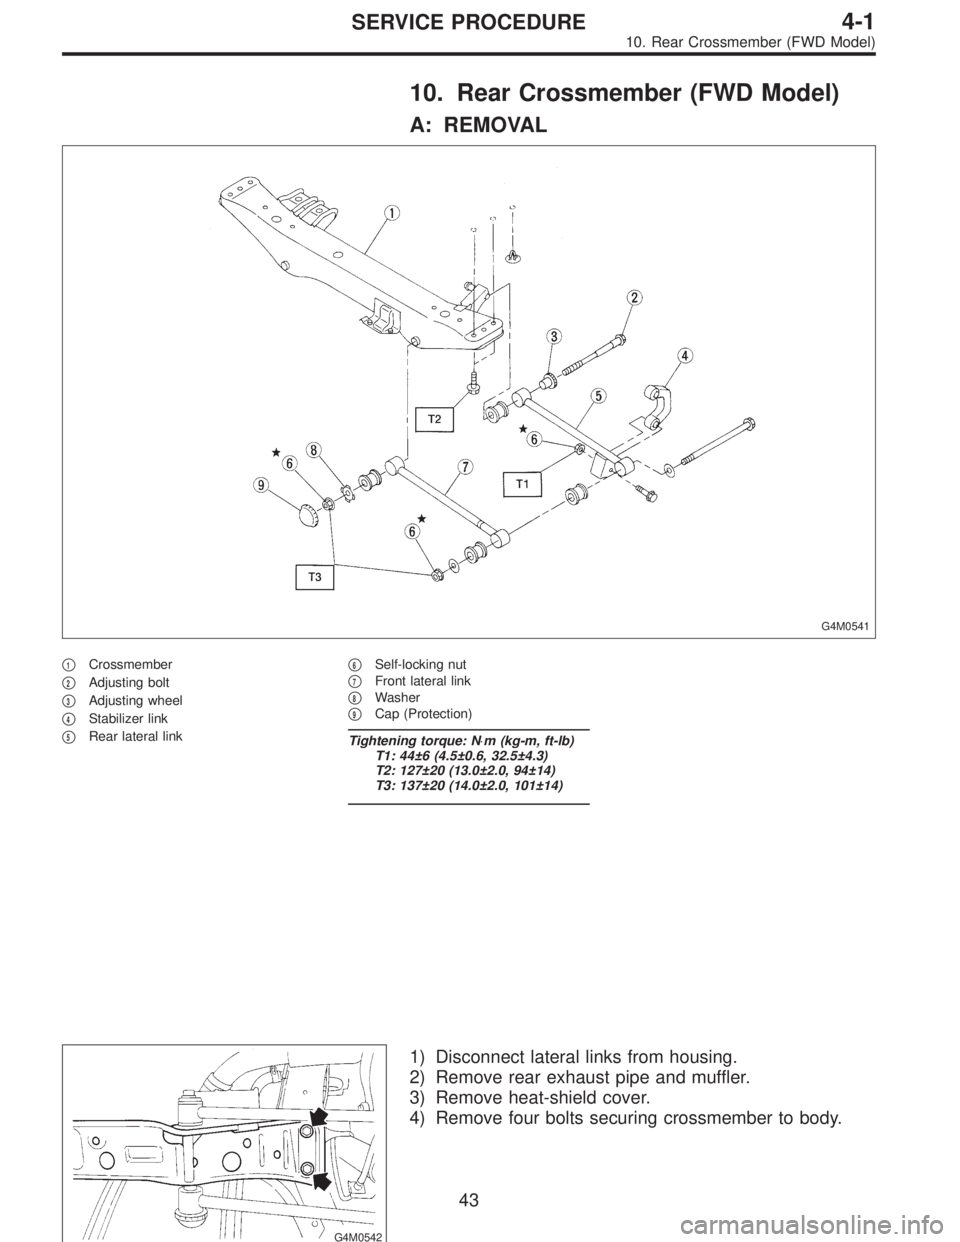
10. Rear Crossmember (FWD Model)
A: REMOVAL
G4M0541
�1Crossmember
�
2Adjusting bolt
�
3Adjusting wheel
�
4Stabilizer link
�
5Rear lateral link�
6Self-locking nut
�
7Front lateral link
�
8Washer
�
9Cap (Protection)
Tightening torque: N⋅m (kg-m, ft-lb)
T1: 44±6 (4.5±0.6, 32.5±4.3)
T2: 127±20 (13.0±2.0, 94±14)
T3: 137±20 (14.0±2.0, 101±14)
G4M0542
1) Disconnect lateral links from housing.
2) Remove rear exhaust pipe and muffler.
3) Remove heat-shield cover.
4) Remove four bolts securing crossmember to body.
43
4-1SERVICE PROCEDURE
10. Rear Crossmember (FWD Model)