1996 CHRYSLER VOYAGER engine
[x] Cancel search: enginePage 1188 of 1938
HYDRAULIC LASH ADJUSTER NOISE
A tappet-like noise may be produced from several
items. Refer to Lash Adjuster Noise - Diagnosis in
Standard Service Procedures, outlined in this Group.
Lash adjusters are replaced with the rocker
arm as an assembly.
VALVE SEALS AND SPRINGS IN VEHICLE
REMOVAL
(1) Remove rocker arm shafts assemblies as previ-
ously outlined in this section.
(2) Rotate crankshaft until piston is at TDC on
compression.
(3) With air hose attached to adapter tool installed
in spark plug hole, apply 90-120 psi air pressure.
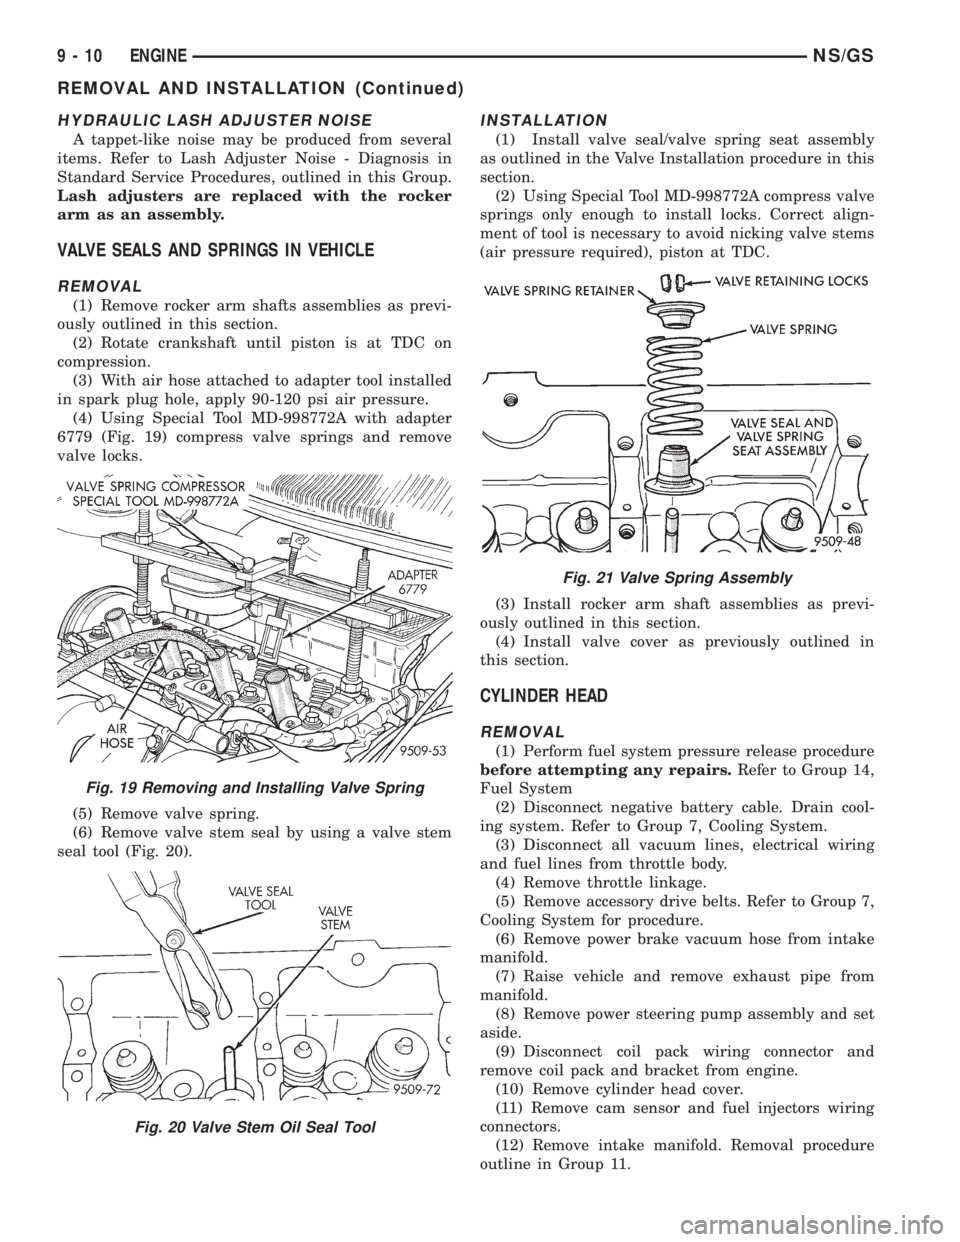
(4) Using Special Tool MD-998772A with adapter
6779 (Fig. 19) compress valve springs and remove
valve locks.
(5) Remove valve spring.
(6) Remove valve stem seal by using a valve stem
seal tool (Fig. 20).
INSTALLATION
(1) Install valve seal/valve spring seat assembly
as outlined in the Valve Installation procedure in this
section.
(2) Using Special Tool MD-998772A compress valve
springs only enough to install locks. Correct align-
ment of tool is necessary to avoid nicking valve stems
(air pressure required), piston at TDC.
(3) Install rocker arm shaft assemblies as previ-
ously outlined in this section.
(4) Install valve cover as previously outlined in
this section.
CYLINDER HEAD
REMOVAL
(1) Perform fuel system pressure release procedure
before attempting any repairs.Refer to Group 14,
Fuel System
(2) Disconnect negative battery cable. Drain cool-
ing system. Refer to Group 7, Cooling System.
(3) Disconnect all vacuum lines, electrical wiring
and fuel lines from throttle body.
(4) Remove throttle linkage.
(5) Remove accessory drive belts. Refer to Group 7,
Cooling System for procedure.
(6) Remove power brake vacuum hose from intake
manifold.
(7) Raise vehicle and remove exhaust pipe from
manifold.
(8) Remove power steering pump assembly and set
aside.
(9) Disconnect coil pack wiring connector and
remove coil pack and bracket from engine.
(10) Remove cylinder head cover.
(11) Remove cam sensor and fuel injectors wiring
connectors.
(12) Remove intake manifold. Removal procedure
outline in Group 11.
Fig. 19 Removing and Installing Valve Spring
Fig. 20 Valve Stem Oil Seal Tool
Fig. 21 Valve Spring Assembly
9 - 10 ENGINENS/GS
REMOVAL AND INSTALLATION (Continued)
Page 1189 of 1938
(13) Remove timing belt and camshaft sprocket.
Refer to procedure outlined in this section.
(14) Remove rocker arm shaft assemblies.
(15) Remove cylinder head bolts.
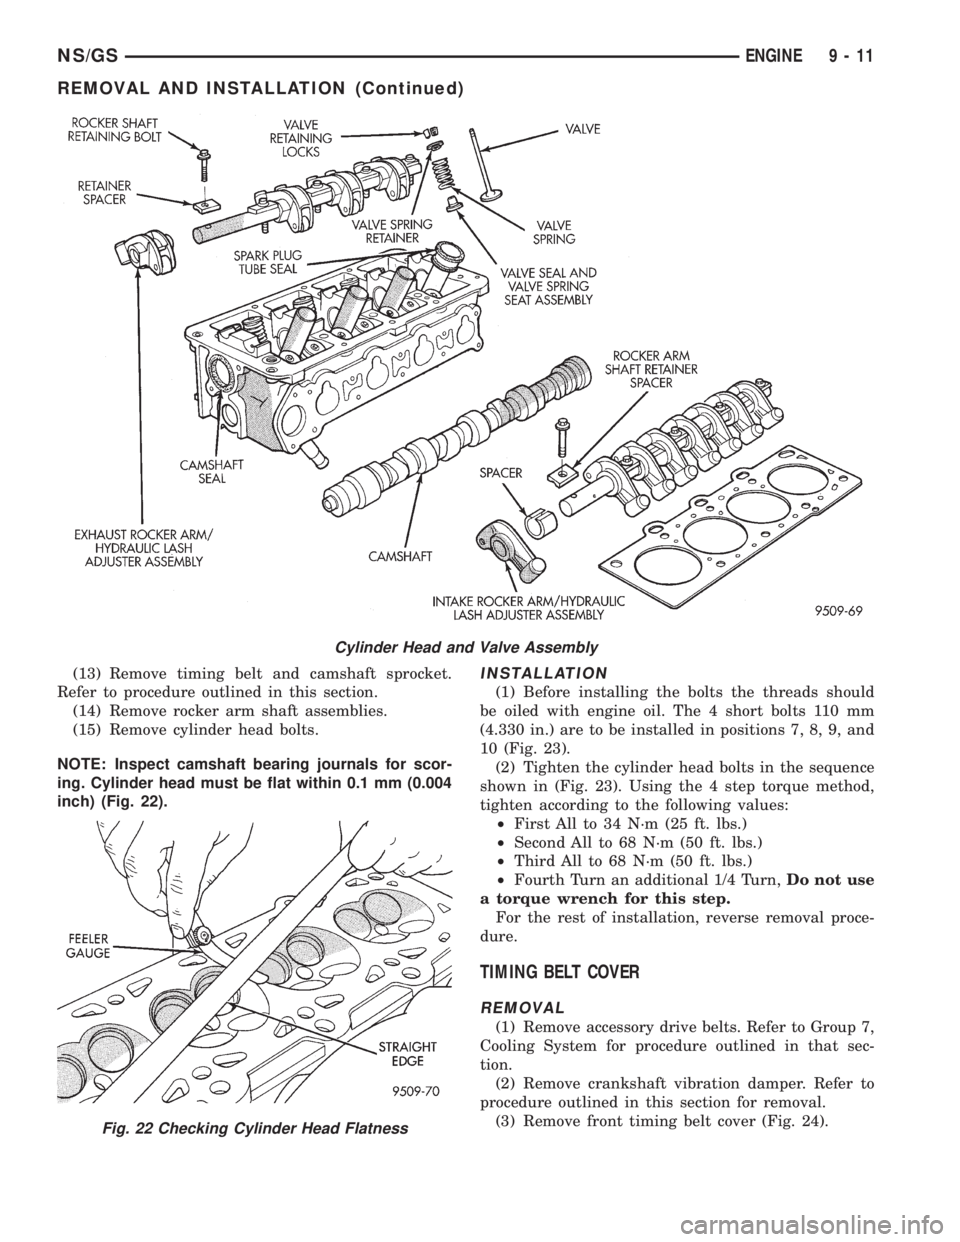
NOTE: Inspect camshaft bearing journals for scor-
ing. Cylinder head must be flat within 0.1 mm (0.004
inch) (Fig. 22).INSTALLATION
(1) Before installing the bolts the threads should
be oiled with engine oil. The 4 short bolts 110 mm
(4.330 in.) are to be installed in positions 7, 8, 9, and
10 (Fig. 23).
(2) Tighten the cylinder head bolts in the sequence
shown in (Fig. 23). Using the 4 step torque method,
tighten according to the following values:
²First All to 34 N´m (25 ft. lbs.)
²Second All to 68 N´m (50 ft. lbs.)
²Third All to 68 N´m (50 ft. lbs.)
²Fourth Turn an additional 1/4 Turn,Do not use
a torque wrench for this step.
For the rest of installation, reverse removal proce-
dure.
TIMING BELT COVER
REMOVAL
(1) Remove accessory drive belts. Refer to Group 7,
Cooling System for procedure outlined in that sec-
tion.
(2) Remove crankshaft vibration damper. Refer to
procedure outlined in this section for removal.
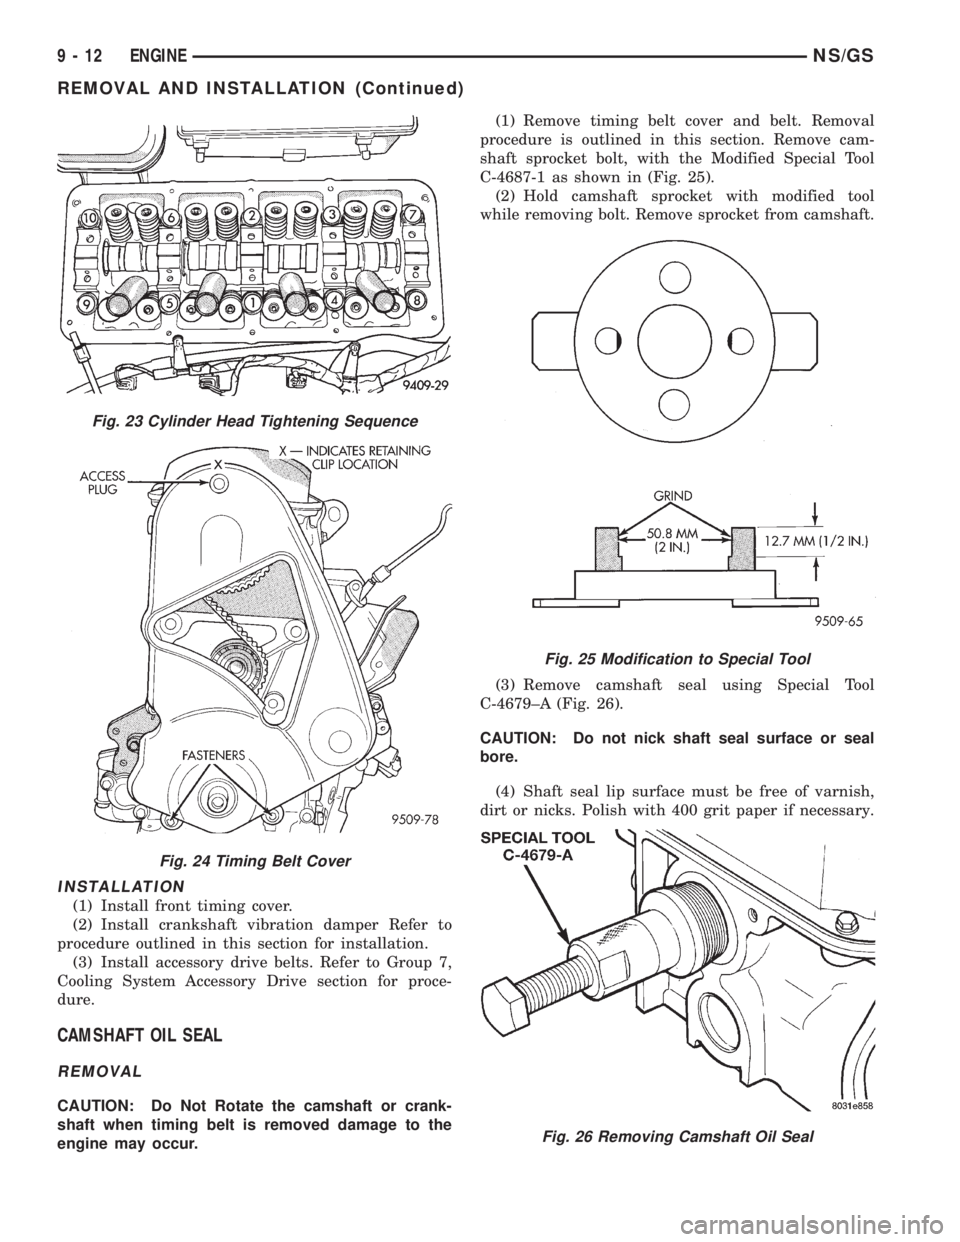
(3) Remove front timing belt cover (Fig. 24).
Cylinder Head and Valve Assembly
Fig. 22 Checking Cylinder Head Flatness
NS/GSENGINE 9 - 11
REMOVAL AND INSTALLATION (Continued)
Page 1190 of 1938
INSTALLATION
(1) Install front timing cover.
(2) Install crankshaft vibration damper Refer to
procedure outlined in this section for installation.
(3) Install accessory drive belts. Refer to Group 7,
Cooling System Accessory Drive section for proce-
dure.
CAMSHAFT OIL SEAL
REMOVAL
CAUTION: Do Not Rotate the camshaft or crank-
shaft when timing belt is removed damage to the
engine may occur.(1) Remove timing belt cover and belt. Removal
procedure is outlined in this section. Remove cam-
shaft sprocket bolt, with the Modified Special Tool
C-4687-1 as shown in (Fig. 25).
(2) Hold camshaft sprocket with modified tool
while removing bolt. Remove sprocket from camshaft.
(3) Remove camshaft seal using Special Tool
C-4679±A (Fig. 26).
CAUTION: Do not nick shaft seal surface or seal
bore.
(4) Shaft seal lip surface must be free of varnish,
dirt or nicks. Polish with 400 grit paper if necessary.
Fig. 23 Cylinder Head Tightening Sequence
Fig. 24 Timing Belt Cover
Fig. 25 Modification to Special Tool
Fig. 26 Removing Camshaft Oil Seal
9 - 12 ENGINENS/GS
REMOVAL AND INSTALLATION (Continued)
Page 1191 of 1938
INSTALLATION
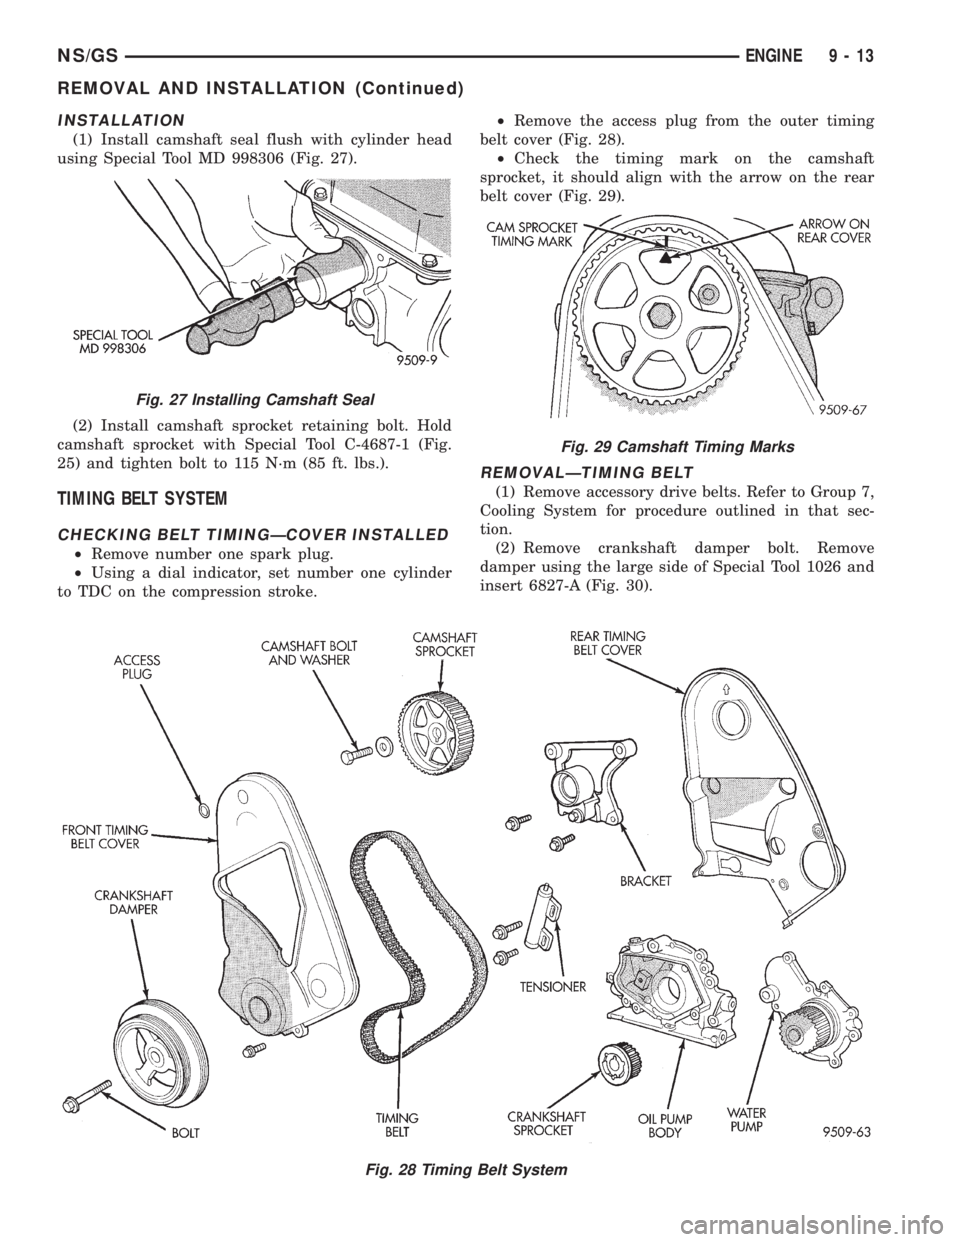
(1) Install camshaft seal flush with cylinder head
using Special Tool MD 998306 (Fig. 27).
(2) Install camshaft sprocket retaining bolt. Hold
camshaft sprocket with Special Tool C-4687-1 (Fig.
25) and tighten bolt to 115 N´m (85 ft. lbs.).
TIMING BELT SYSTEM
CHECKING BELT TIMINGÐCOVER INSTALLED
²Remove number one spark plug.
²Using a dial indicator, set number one cylinder
to TDC on the compression stroke.²Remove the access plug from the outer timing
belt cover (Fig. 28).
²Check the timing mark on the camshaft
sprocket, it should align with the arrow on the rear
belt cover (Fig. 29).
REMOVALÐTIMING BELT
(1) Remove accessory drive belts. Refer to Group 7,
Cooling System for procedure outlined in that sec-
tion.
(2) Remove crankshaft damper bolt. Remove
damper using the large side of Special Tool 1026 and
insert 6827-A (Fig. 30).
Fig. 27 Installing Camshaft Seal
Fig. 28 Timing Belt System
Fig. 29 Camshaft Timing Marks
NS/GSENGINE 9 - 13
REMOVAL AND INSTALLATION (Continued)
Page 1192 of 1938
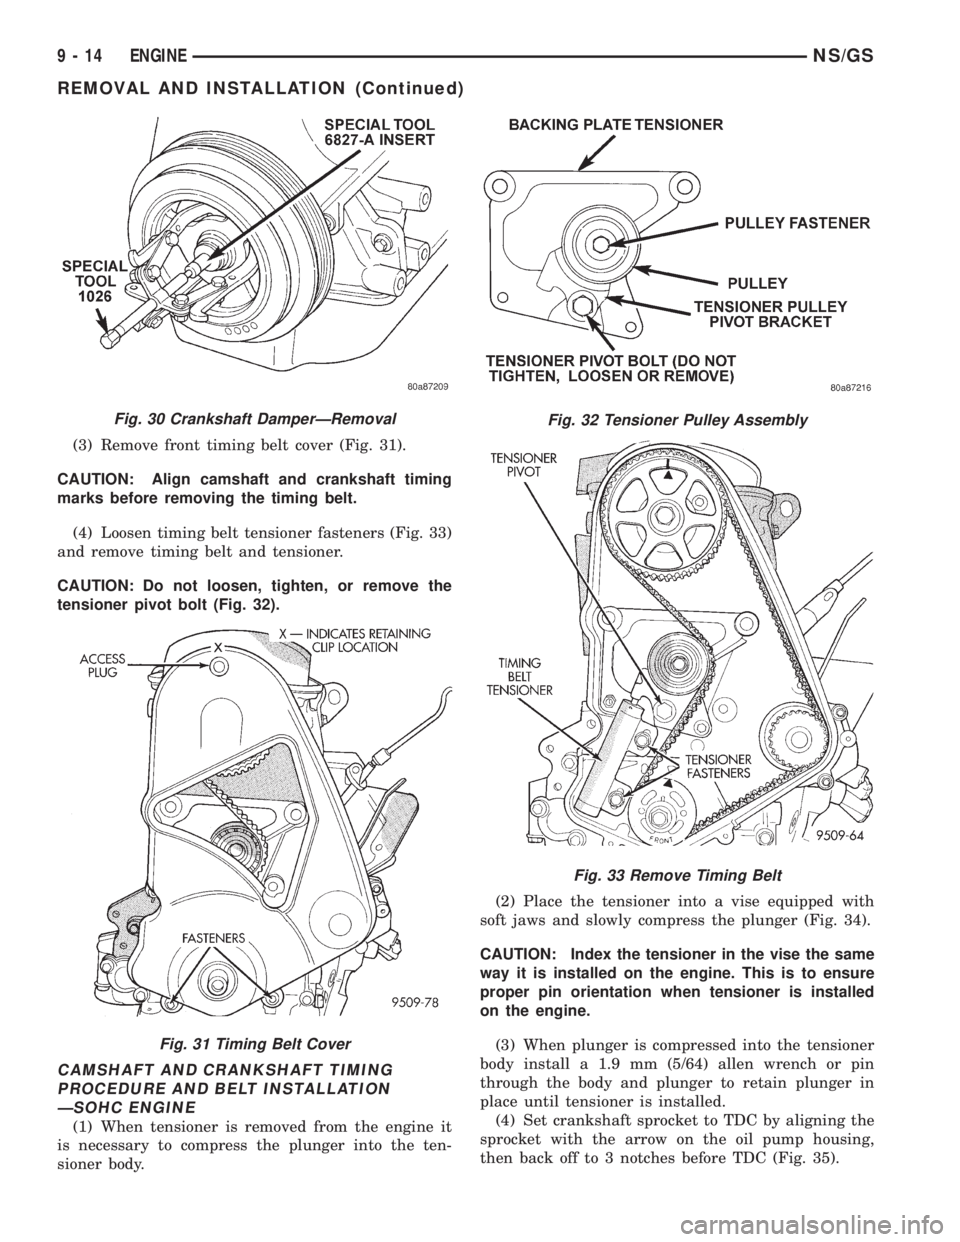
(3) Remove front timing belt cover (Fig. 31).
CAUTION: Align camshaft and crankshaft timing
marks before removing the timing belt.
(4) Loosen timing belt tensioner fasteners (Fig. 33)
and remove timing belt and tensioner.
CAUTION: Do not loosen, tighten, or remove the
tensioner pivot bolt (Fig. 32).
CAMSHAFT AND CRANKSHAFT TIMING
PROCEDURE AND BELT INSTALLATION
ÐSOHC ENGINE
(1) When tensioner is removed from the engine it
is necessary to compress the plunger into the ten-
sioner body.(2) Place the tensioner into a vise equipped with
soft jaws and slowly compress the plunger (Fig. 34).
CAUTION: Index the tensioner in the vise the same
way it is installed on the engine. This is to ensure
proper pin orientation when tensioner is installed
on the engine.
(3) When plunger is compressed into the tensioner
body install a 1.9 mm (5/64) allen wrench or pin
through the body and plunger to retain plunger in
place until tensioner is installed.
(4) Set crankshaft sprocket to TDC by aligning the
sprocket with the arrow on the oil pump housing,
then back off to 3 notches before TDC (Fig. 35).
Fig. 30 Crankshaft DamperÐRemoval
Fig. 31 Timing Belt Cover
Fig. 32 Tensioner Pulley Assembly
Fig. 33 Remove Timing Belt
9 - 14 ENGINENS/GS
REMOVAL AND INSTALLATION (Continued)
Page 1193 of 1938
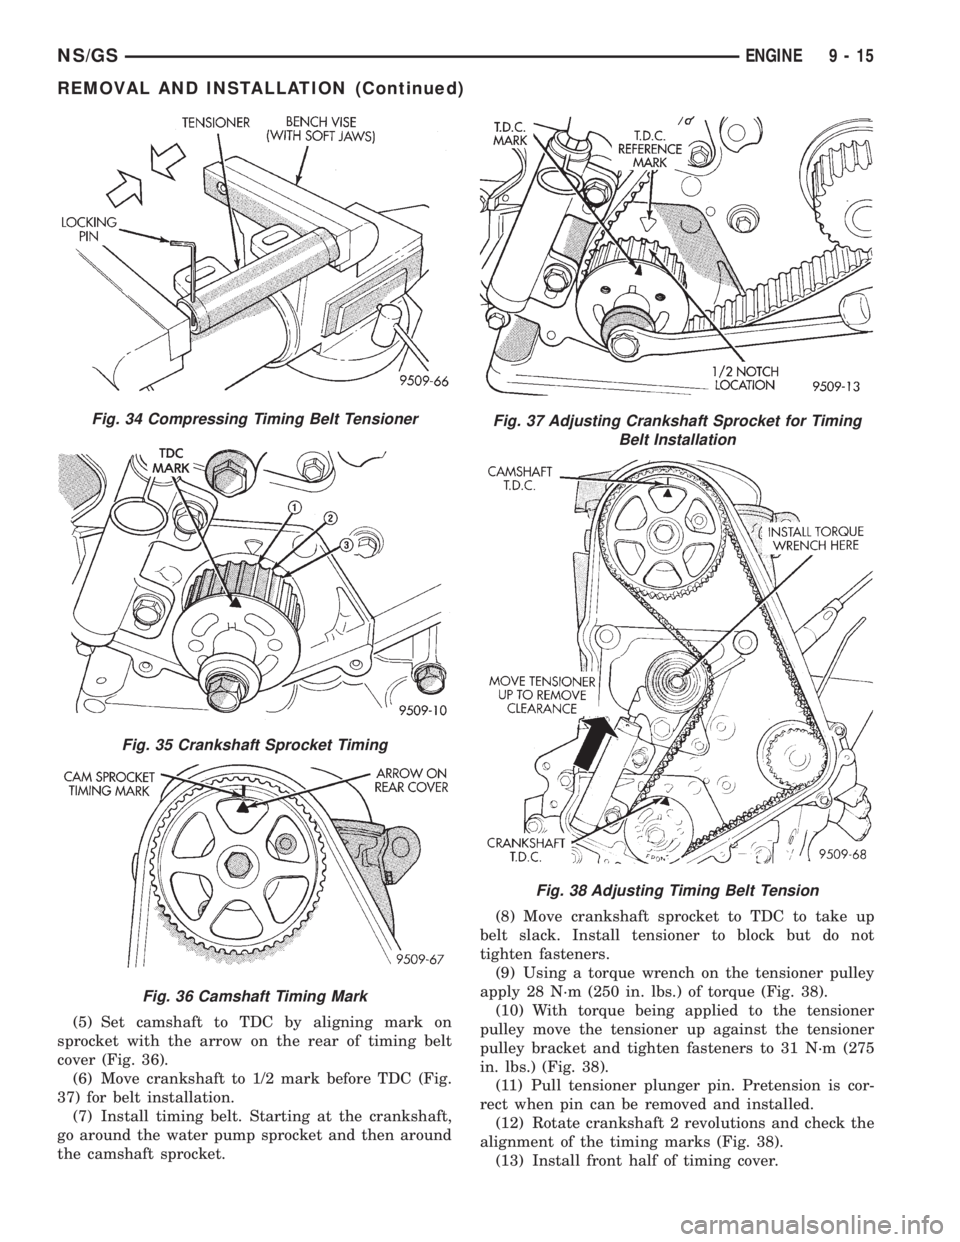
(5) Set camshaft to TDC by aligning mark on
sprocket with the arrow on the rear of timing belt
cover (Fig. 36).
(6) Move crankshaft to 1/2 mark before TDC (Fig.
37) for belt installation.
(7) Install timing belt. Starting at the crankshaft,
go around the water pump sprocket and then around
the camshaft sprocket.(8) Move crankshaft sprocket to TDC to take up
belt slack. Install tensioner to block but do not
tighten fasteners.
(9) Using a torque wrench on the tensioner pulley
apply 28 N´m (250 in. lbs.) of torque (Fig. 38).
(10) With torque being applied to the tensioner
pulley move the tensioner up against the tensioner
pulley bracket and tighten fasteners to 31 N´m (275
in. lbs.) (Fig. 38).
(11) Pull tensioner plunger pin. Pretension is cor-
rect when pin can be removed and installed.
(12) Rotate crankshaft 2 revolutions and check the
alignment of the timing marks (Fig. 38).
(13) Install front half of timing cover.
Fig. 34 Compressing Timing Belt Tensioner
Fig. 35 Crankshaft Sprocket Timing
Fig. 36 Camshaft Timing Mark
Fig. 37 Adjusting Crankshaft Sprocket for Timing
Belt Installation
Fig. 38 Adjusting Timing Belt Tension
NS/GSENGINE 9 - 15
REMOVAL AND INSTALLATION (Continued)
Page 1194 of 1938
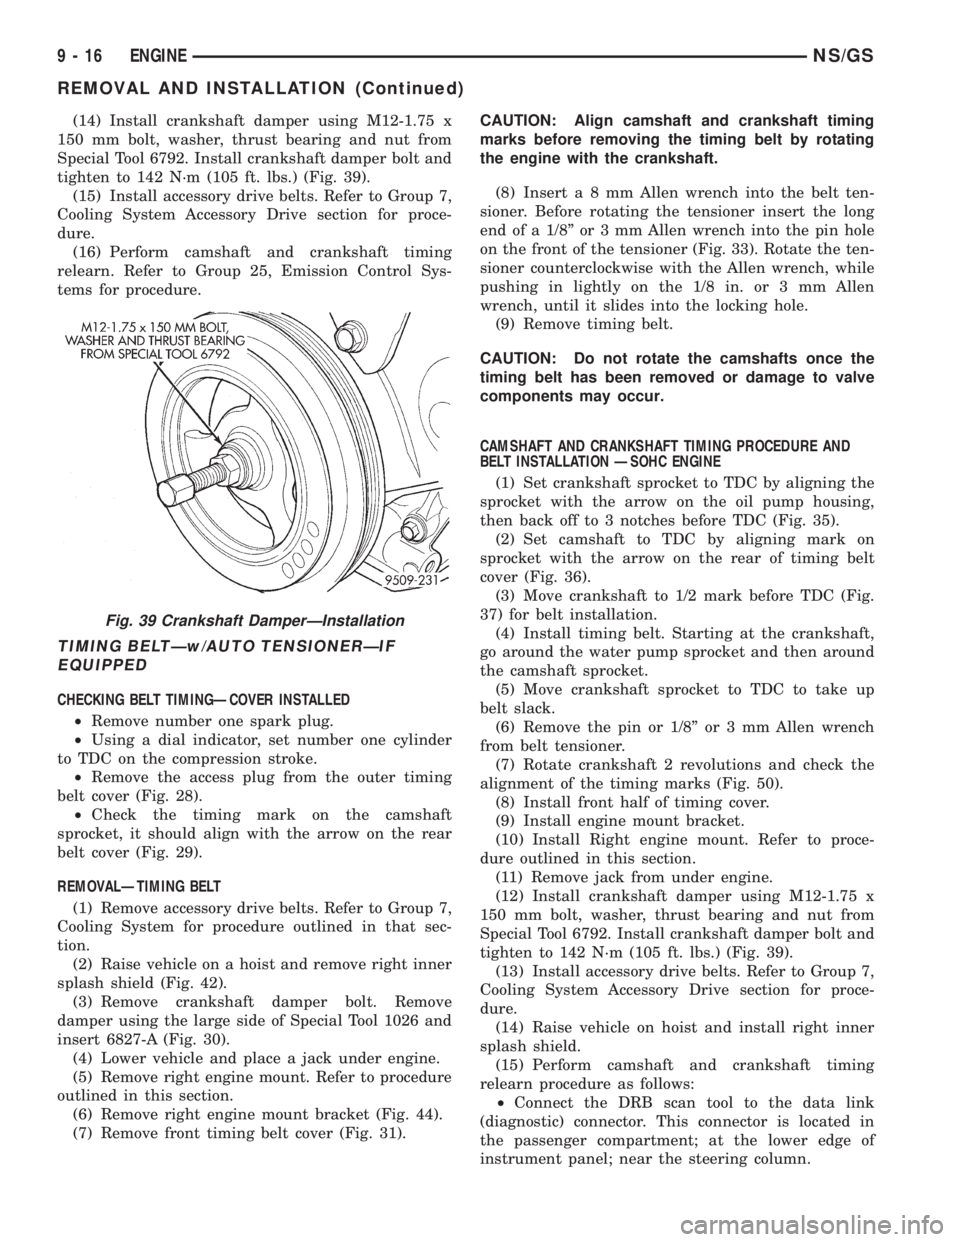
(14) Install crankshaft damper using M12-1.75 x
150 mm bolt, washer, thrust bearing and nut from
Special Tool 6792. Install crankshaft damper bolt and
tighten to 142 N´m (105 ft. lbs.) (Fig. 39).
(15) Install accessory drive belts. Refer to Group 7,
Cooling System Accessory Drive section for proce-
dure.
(16) Perform camshaft and crankshaft timing
relearn. Refer to Group 25, Emission Control Sys-
tems for procedure.
TIMING BELTÐw/AUTO TENSIONERÐIF
EQUIPPED
CHECKING BELT TIMINGÐCOVER INSTALLED
²Remove number one spark plug.
²Using a dial indicator, set number one cylinder
to TDC on the compression stroke.
²Remove the access plug from the outer timing
belt cover (Fig. 28).
²Check the timing mark on the camshaft
sprocket, it should align with the arrow on the rear
belt cover (Fig. 29).
REMOVALÐTIMING BELT
(1) Remove accessory drive belts. Refer to Group 7,
Cooling System for procedure outlined in that sec-
tion.
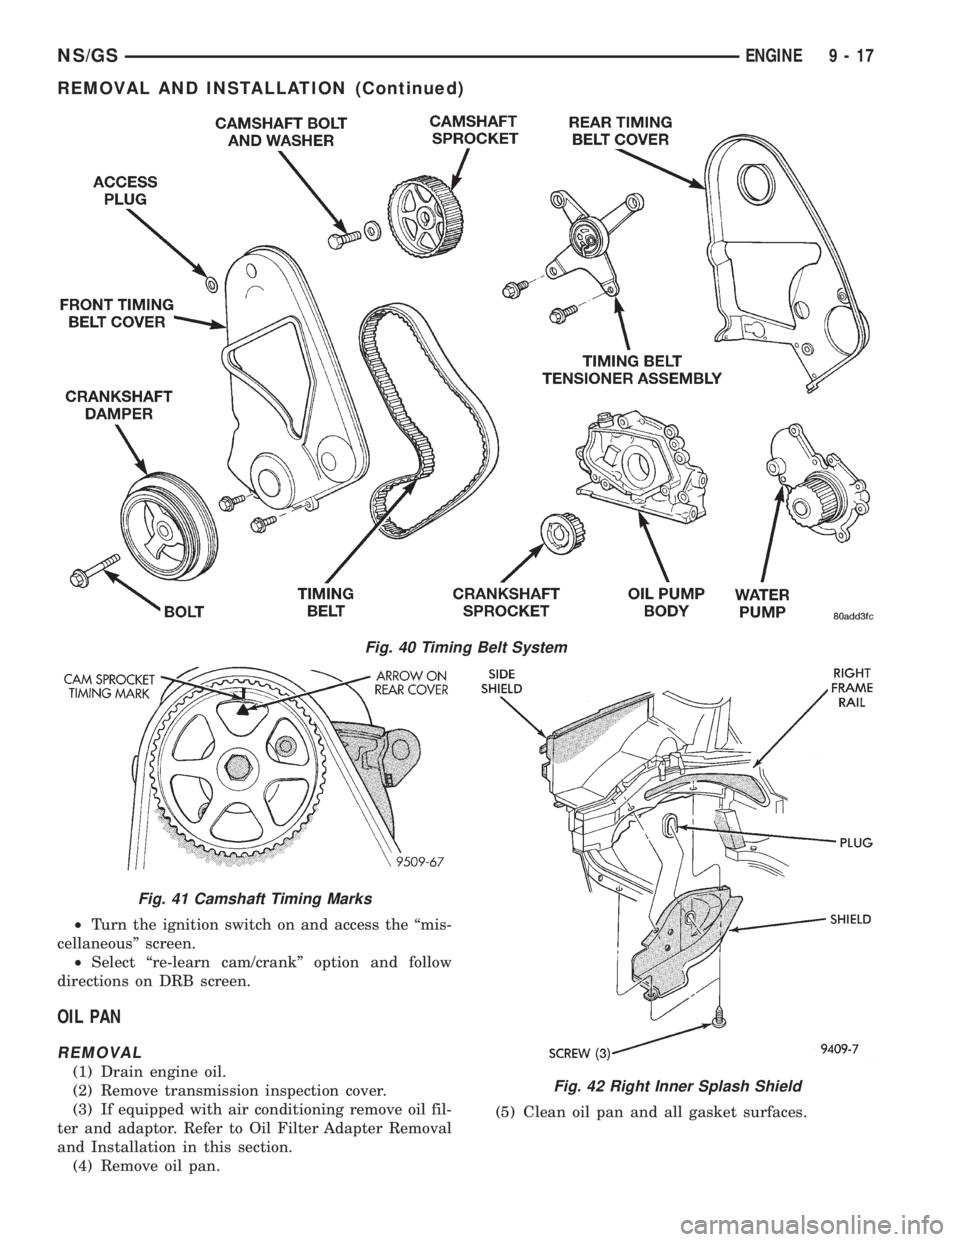
(2) Raise vehicle on a hoist and remove right inner
splash shield (Fig. 42).
(3) Remove crankshaft damper bolt. Remove
damper using the large side of Special Tool 1026 and
insert 6827-A (Fig. 30).
(4) Lower vehicle and place a jack under engine.
(5) Remove right engine mount. Refer to procedure
outlined in this section.
(6) Remove right engine mount bracket (Fig. 44).
(7) Remove front timing belt cover (Fig. 31).CAUTION: Align camshaft and crankshaft timing
marks before removing the timing belt by rotating
the engine with the crankshaft.
(8) Inserta8mmAllen wrench into the belt ten-
sioner. Before rotating the tensioner insert the long
end of a 1/8º or 3 mm Allen wrench into the pin hole
on the front of the tensioner (Fig. 33). Rotate the ten-
sioner counterclockwise with the Allen wrench, while
pushing in lightly on the 1/8 in. or 3 mm Allen
wrench, until it slides into the locking hole.
(9) Remove timing belt.
CAUTION: Do not rotate the camshafts once the
timing belt has been removed or damage to valve
components may occur.
CAMSHAFT AND CRANKSHAFT TIMING PROCEDURE AND
BELT INSTALLATION ÐSOHC ENGINE
(1) Set crankshaft sprocket to TDC by aligning the
sprocket with the arrow on the oil pump housing,
then back off to 3 notches before TDC (Fig. 35).
(2) Set camshaft to TDC by aligning mark on
sprocket with the arrow on the rear of timing belt
cover (Fig. 36).
(3) Move crankshaft to 1/2 mark before TDC (Fig.
37) for belt installation.
(4) Install timing belt. Starting at the crankshaft,
go around the water pump sprocket and then around
the camshaft sprocket.
(5) Move crankshaft sprocket to TDC to take up
belt slack.
(6) Remove the pin or 1/8º or 3 mm Allen wrench
from belt tensioner.
(7) Rotate crankshaft 2 revolutions and check the
alignment of the timing marks (Fig. 50).
(8) Install front half of timing cover.
(9) Install engine mount bracket.
(10) Install Right engine mount. Refer to proce-
dure outlined in this section.
(11) Remove jack from under engine.
(12) Install crankshaft damper using M12-1.75 x
150 mm bolt, washer, thrust bearing and nut from
Special Tool 6792. Install crankshaft damper bolt and
tighten to 142 N´m (105 ft. lbs.) (Fig. 39).
(13) Install accessory drive belts. Refer to Group 7,
Cooling System Accessory Drive section for proce-
dure.
(14) Raise vehicle on hoist and install right inner
splash shield.
(15) Perform camshaft and crankshaft timing
relearn procedure as follows:
²Connect the DRB scan tool to the data link
(diagnostic) connector. This connector is located in
the passenger compartment; at the lower edge of
instrument panel; near the steering column.
Fig. 39 Crankshaft DamperÐInstallation
9 - 16 ENGINENS/GS
REMOVAL AND INSTALLATION (Continued)
Page 1195 of 1938
²Turn the ignition switch on and access the ªmis-
cellaneousº screen.
²Select ªre-learn cam/crankº option and follow
directions on DRB screen.
OIL PAN
REMOVAL
(1) Drain engine oil.
(2) Remove transmission inspection cover.
(3) If equipped with air conditioning remove oil fil-
ter and adaptor. Refer to Oil Filter Adapter Removal
and Installation in this section.
(4) Remove oil pan.(5) Clean oil pan and all gasket surfaces.
Fig. 40 Timing Belt System
Fig. 41 Camshaft Timing Marks
Fig. 42 Right Inner Splash Shield
NS/GSENGINE 9 - 17
REMOVAL AND INSTALLATION (Continued)