1996 CHRYSLER VOYAGER engine
[x] Cancel search: enginePage 1931 of 1938
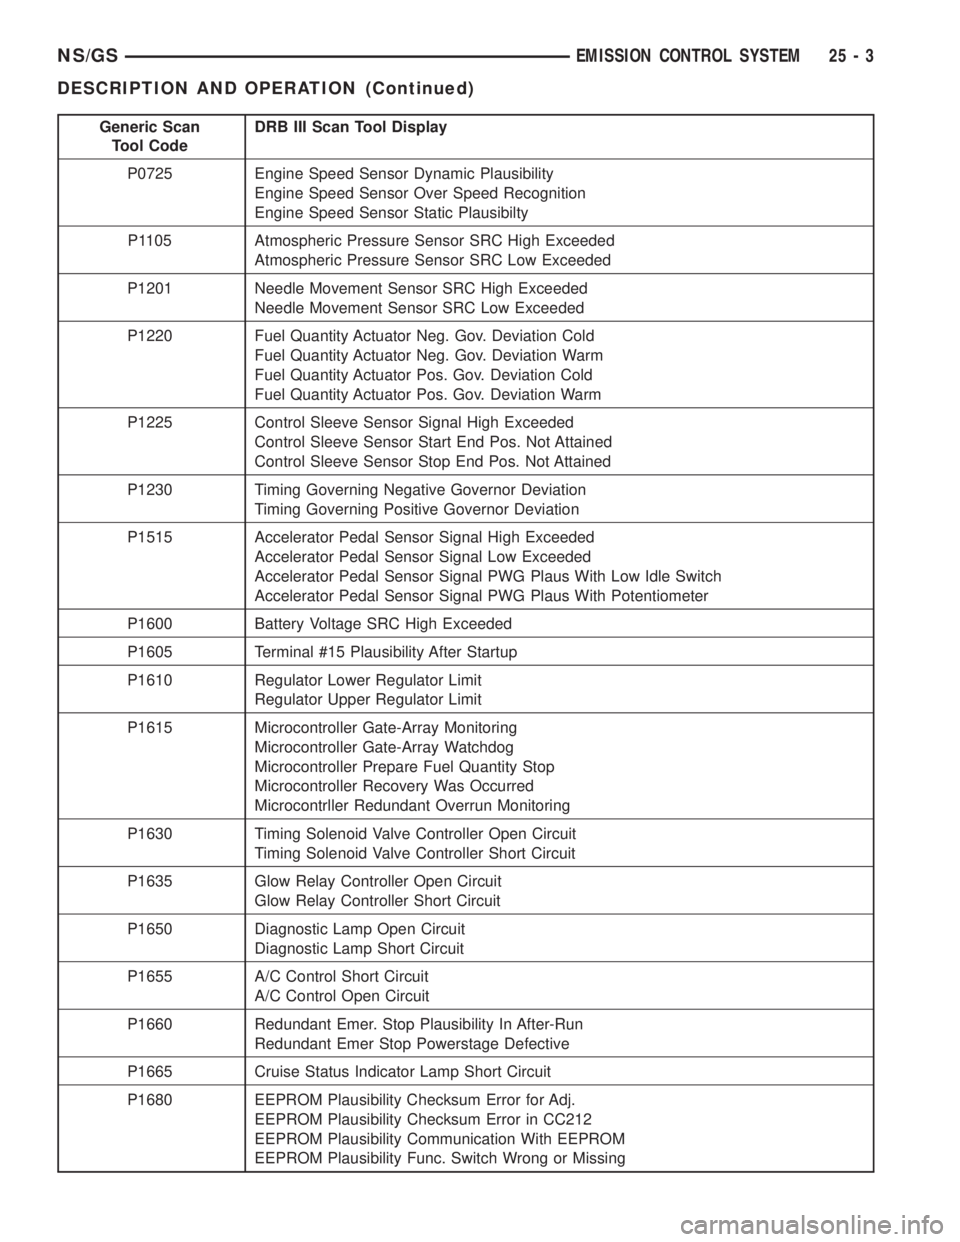
Generic Scan
Tool CodeDRB III Scan Tool Display
P0725 Engine Speed Sensor Dynamic Plausibility
Engine Speed Sensor Over Speed Recognition
Engine Speed Sensor Static Plausibilty
P1105 Atmospheric Pressure Sensor SRC High Exceeded
Atmospheric Pressure Sensor SRC Low Exceeded
P1201 Needle Movement Sensor SRC High Exceeded
Needle Movement Sensor SRC Low Exceeded
P1220 Fuel Quantity Actuator Neg. Gov. Deviation Cold
Fuel Quantity Actuator Neg. Gov. Deviation Warm
Fuel Quantity Actuator Pos. Gov. Deviation Cold
Fuel Quantity Actuator Pos. Gov. Deviation Warm
P1225 Control Sleeve Sensor Signal High Exceeded
Control Sleeve Sensor Start End Pos. Not Attained
Control Sleeve Sensor Stop End Pos. Not Attained
P1230 Timing Governing Negative Governor Deviation
Timing Governing Positive Governor Deviation
P1515 Accelerator Pedal Sensor Signal High Exceeded
Accelerator Pedal Sensor Signal Low Exceeded
Accelerator Pedal Sensor Signal PWG Plaus With Low Idle Switch
Accelerator Pedal Sensor Signal PWG Plaus With Potentiometer
P1600 Battery Voltage SRC High Exceeded
P1605 Terminal #15 Plausibility After Startup
P1610 Regulator Lower Regulator Limit
Regulator Upper Regulator Limit
P1615 Microcontroller Gate-Array Monitoring
Microcontroller Gate-Array Watchdog
Microcontroller Prepare Fuel Quantity Stop
Microcontroller Recovery Was Occurred
Microcontrller Redundant Overrun Monitoring
P1630 Timing Solenoid Valve Controller Open Circuit
Timing Solenoid Valve Controller Short Circuit
P1635 Glow Relay Controller Open Circuit
Glow Relay Controller Short Circuit
P1650 Diagnostic Lamp Open Circuit
Diagnostic Lamp Short Circuit
P1655 A/C Control Short Circuit
A/C Control Open Circuit
P1660 Redundant Emer. Stop Plausibility In After-Run
Redundant Emer Stop Powerstage Defective
P1665 Cruise Status Indicator Lamp Short Circuit
P1680 EEPROM Plausibility Checksum Error for Adj.
EEPROM Plausibility Checksum Error in CC212
EEPROM Plausibility Communication With EEPROM
EEPROM Plausibility Func. Switch Wrong or Missing
NS/GSEMISSION CONTROL SYSTEM 25 - 3
DESCRIPTION AND OPERATION (Continued)
Page 1933 of 1938
EXHAUST EMISSION CONTROLSÐ2.5L DIESEL ENGINE
INDEX
page page
DESCRIPTION AND OPERATION
EXHAUST GAS RECIRCULATION (EGR)
SYSTEM............................. 5
VACUUM HOSE ROUTING SCHEMATIC...... 5
DIAGNOSIS AND TESTING
EGR GAS FLOW TEST................... 6
ELECTRIC VACUUM MODULATOR (EVM)
TEST............................... 7REMOVAL AND INSTALLATION
EGR TUBE............................. 7
EGRVALVE ............................ 7
ELECTRIC VACUUM MODULATOR (EVM)..... 7
SPECIFICATIONS
TORQUE CHARTÐ2.5L DIESEL............ 8
DESCRIPTION AND OPERATION
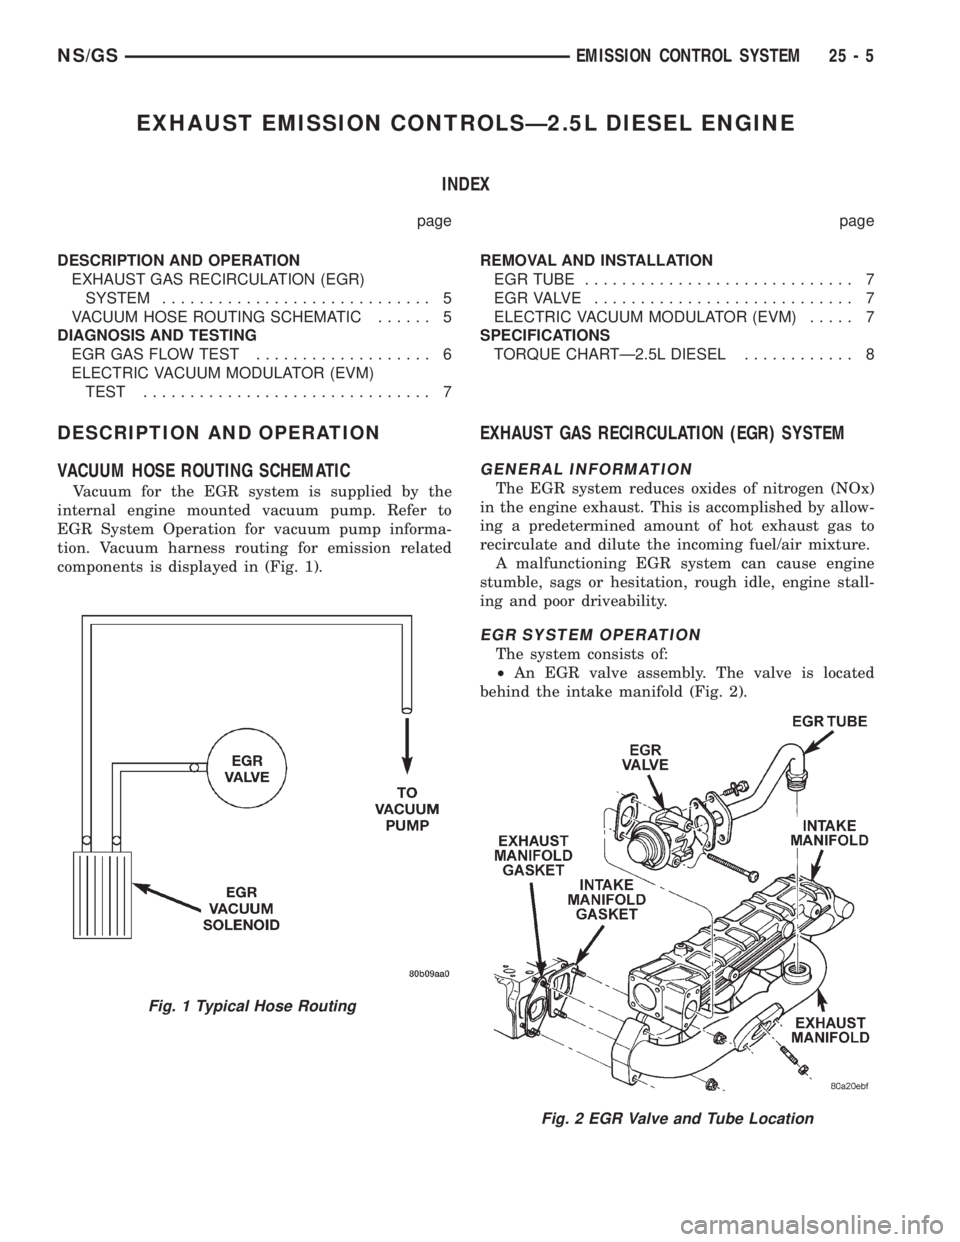
VACUUM HOSE ROUTING SCHEMATIC
Vacuum for the EGR system is supplied by the
internal engine mounted vacuum pump. Refer to
EGR System Operation for vacuum pump informa-
tion. Vacuum harness routing for emission related
components is displayed in (Fig. 1).
EXHAUST GAS RECIRCULATION (EGR) SYSTEM
GENERAL INFORMATION
The EGR system reduces oxides of nitrogen (NOx)
in the engine exhaust. This is accomplished by allow-
ing a predetermined amount of hot exhaust gas to
recirculate and dilute the incoming fuel/air mixture.
A malfunctioning EGR system can cause engine
stumble, sags or hesitation, rough idle, engine stall-
ing and poor driveability.
EGR SYSTEM OPERATION
The system consists of:
²An EGR valve assembly. The valve is located
behind the intake manifold (Fig. 2).
Fig. 1 Typical Hose Routing
Fig. 2 EGR Valve and Tube Location
NS/GSEMISSION CONTROL SYSTEM 25 - 5
Page 1934 of 1938
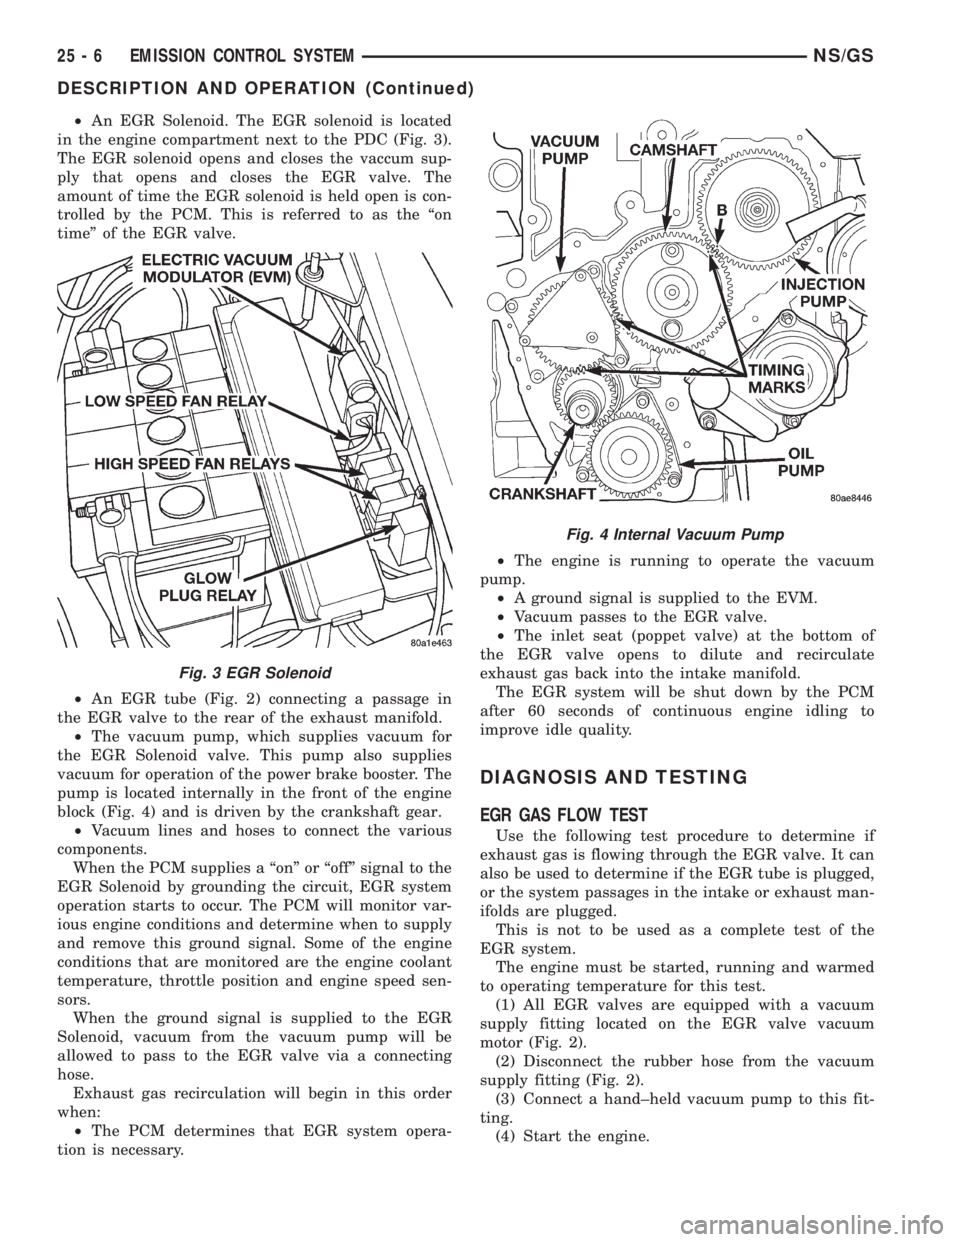
²An EGR Solenoid. The EGR solenoid is located
in the engine compartment next to the PDC (Fig. 3).
The EGR solenoid opens and closes the vaccum sup-
ply that opens and closes the EGR valve. The
amount of time the EGR solenoid is held open is con-
trolled by the PCM. This is referred to as the ªon
timeº of the EGR valve.
²An EGR tube (Fig. 2) connecting a passage in
the EGR valve to the rear of the exhaust manifold.
²The vacuum pump, which supplies vacuum for
the EGR Solenoid valve. This pump also supplies
vacuum for operation of the power brake booster. The
pump is located internally in the front of the engine
block (Fig. 4) and is driven by the crankshaft gear.
²Vacuum lines and hoses to connect the various
components.
When the PCM supplies a ªonº or ªoffº signal to the
EGR Solenoid by grounding the circuit, EGR system
operation starts to occur. The PCM will monitor var-
ious engine conditions and determine when to supply
and remove this ground signal. Some of the engine
conditions that are monitored are the engine coolant
temperature, throttle position and engine speed sen-
sors.
When the ground signal is supplied to the EGR
Solenoid, vacuum from the vacuum pump will be
allowed to pass to the EGR valve via a connecting
hose.
Exhaust gas recirculation will begin in this order
when:
²The PCM determines that EGR system opera-
tion is necessary.²The engine is running to operate the vacuum
pump.
²A ground signal is supplied to the EVM.
²Vacuum passes to the EGR valve.
²The inlet seat (poppet valve) at the bottom of
the EGR valve opens to dilute and recirculate
exhaust gas back into the intake manifold.
The EGR system will be shut down by the PCM
after 60 seconds of continuous engine idling to
improve idle quality.
DIAGNOSIS AND TESTING
EGR GAS FLOW TEST
Use the following test procedure to determine if
exhaust gas is flowing through the EGR valve. It can
also be used to determine if the EGR tube is plugged,
or the system passages in the intake or exhaust man-
ifolds are plugged.
This is not to be used as a complete test of the
EGR system.
The engine must be started, running and warmed
to operating temperature for this test.
(1) All EGR valves are equipped with a vacuum
supply fitting located on the EGR valve vacuum
motor (Fig. 2).
(2) Disconnect the rubber hose from the vacuum
supply fitting (Fig. 2).
(3) Connect a hand±held vacuum pump to this fit-
ting.
(4) Start the engine.
Fig. 3 EGR Solenoid
Fig. 4 Internal Vacuum Pump
25 - 6 EMISSION CONTROL SYSTEMNS/GS
DESCRIPTION AND OPERATION (Continued)
Page 1935 of 1938
(5) Slowly apply 10 inches of vacuum to the fitting
on the EGR valve motor. Vacuum should hold steady
at 10 inches. If not, replace the EGR valve. If vac-
uum holds steady at 10 inches, proceed to next step.
(6) While applying vacuum, and with the engine
running at idle speed, the idle speed should drop, a
rough idle may occur, or the engine may even stall.
This is indicating that exhaust gas is flowing through
the EGR tube between the intake and exhaust man-
ifolds.
(7) If the engine speed did not change, the EGR
valve may be defective, the EGR tube may be
plugged with carbon, or the passages in the intake
and exhaust manifolds may be plugged with carbon.
(a) Remove EGR valve from engine. Refer to
EGR Valve Removal in this group.
(b) Apply vacuum to the vacuum motor fitting
and observe the stem on the EGR valve. If the
stem is moving, it can be assumed that the EGR
valve is functioning correctly. The problem is in
either a plugged EGR tube or plugged passages at
the intake or exhaust manifolds. Refer to step (c).
If the stem will not move, replace the EGR valve.
(c) Remove the EGR tube between the intake
and exhaust manifolds. Check and clean the EGR
tube and its related openings on the manifolds.
Refer to EGR Tube in this group for procedures.
Do not attempt to clean the EGR valve. If the
valve shows evidence of heavy carbon build±up near
the base, replace it.
ELECTRIC VACUUM MODULATOR (EVM) TEST
VACUUM TEST
With the engine running, disconnect the vacuum
supply line at the fitting on the EVM. Minimum vac-
uum should be no less than 20 inches. If vacuum is
lower, check for leaks in vacuum supply line. If leaks
cannot be found, check for low vacuum at vacuum
pump. Refer to Group 5, Brake System for proce-
dures.
REMOVAL AND INSTALLATION
EGR VALVE
REMOVAL
(1) Remove the rubber hose from turbocharger to
metal tube.
(2) Disconnect vacuum line at EGR valve vacuum
supply fitting (Fig. 2).
(3) Loosen the tube fitting at exhaust manifold end
of EGR tube (Fig. 2).
(4) Remove the two bolts retaining the EGR tube
to the side of EGR valve (Fig. 2).(5) Remove the two EGR valve mounting bolts
(Fig. 2) and remove EGR valve.
(6) Discard both of the old EGR mounting gaskets.
INSTALLATION
(1) Clean the intake manifold of any old gasket
material.
(2) Clean the end of EGR tube of any old gasket
material.
(3) Position the EGR valve and new gasket to the
intake manifold.
(4) Install two EGR valve mounting bolts. Do not
tighten bolts at this time.
(5) Position new gasket between EGR valve and
EGR tube.
(6) Install two EGR tube bolts. Tighten all four
mounting bolts to 23 N´m (204 in. lbs.).
(7) Tighten EGR tube fitting at exhaust manifold.
(8) Connect vacuum line to EGR valve.
(9) Install the rubber hose from turbocharger to
metal tube.
EGR TUBE
The EGR tube connects the EGR valve to the rear
of the exhaust manifold (Fig. 2).
REMOVAL
(1) Remove rubber hose from turbocharger to
metal tube.
(2) Remove two EGR tube mounting bolts at EGR
valve end of tube (Fig. 2).
(3) Loosen fitting at exhaust manifold end of tube
(Fig. 2).
(4) Remove EGR tube and discard old gasket.
(5) Clean gasket mating surfaces and EGR tube
flange gasket surfaces.
(6) Check for signs of leakage or cracked surfaces
at both ends of tube, exhaust manifold and EGR
valve.
INSTALLATION
(1) Install a new gasket to EGR valve end of EGR
tube.
(2) Position EGR tube to engine.
(3) Loosely tighten fitting at exhaust manifold end
of tube.
(4) Install 2 mounting bolts at EGR valve end of
tube. Tighten bolts to 23 N´m (204 in. lbs.) torque.
(5) Tighten fitting at exhaust manifold end of tube.
(6) Install hose from turbocharger to metal tube.
ELECTRIC VACUUM MODULATOR (EVM)
The EVM (EGR Duty Cycle Purge Solenoid) is
mounted to the side of the PDC (Fig. 6).
NS/GSEMISSION CONTROL SYSTEM 25 - 7
DIAGNOSIS AND TESTING (Continued)
Page 1937 of 1938
EMISSION CONTROL SYSTEMÐ2.0L ENGINE
INDEX
page page
GENERAL INFORMATION
GENERAL INFORMATION................. 9
POSITIVE CRANKCASE VENTILATION SYSTEM
(PCV) SYSTEMÐ2.0L ENGINE............ 9REMOVAL AND INSTALLATION
EGR TUBE............................ 10
EGRVALVE ............................ 9
TORQUE............................. 10
GENERAL INFORMATION
GENERAL INFORMATION
The emission control system for the 2.0L engine
functions the same as the systems for the 2.4/3.0/3.3/
3.8L engines. Refer to group 25 for more information
about Diagnostic Trouble Codes and other system
features.
POSITIVE CRANKCASE VENTILATION SYSTEM
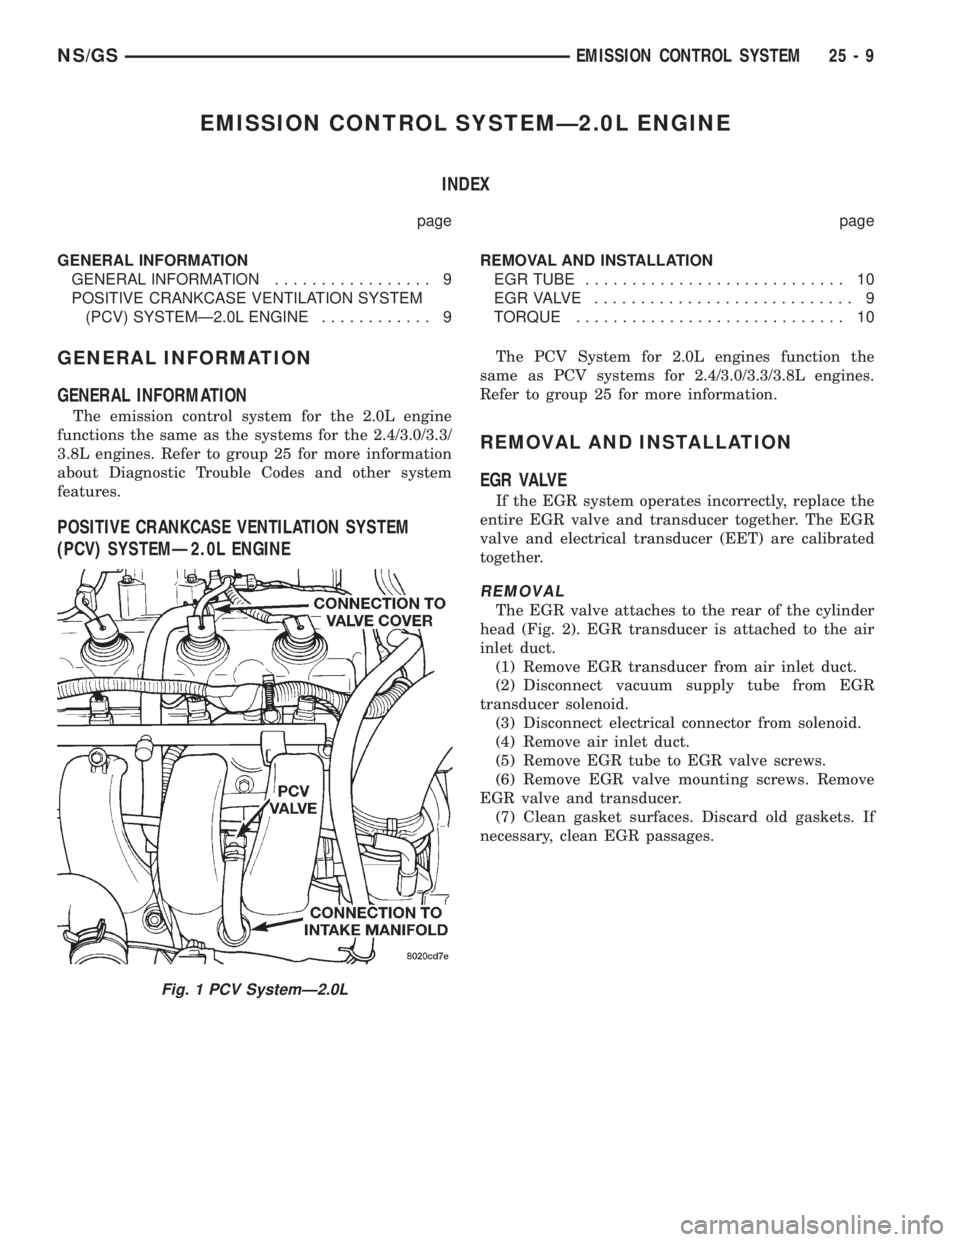
(PCV) SYSTEMÐ2.0L ENGINE
The PCV System for 2.0L engines function the
same as PCV systems for 2.4/3.0/3.3/3.8L engines.
Refer to group 25 for more information.
REMOVAL AND INSTALLATION
EGR VALVE
If the EGR system operates incorrectly, replace the
entire EGR valve and transducer together. The EGR
valve and electrical transducer (EET) are calibrated
together.
REMOVAL
The EGR valve attaches to the rear of the cylinder
head (Fig. 2). EGR transducer is attached to the air
inlet duct.
(1) Remove EGR transducer from air inlet duct.
(2) Disconnect vacuum supply tube from EGR
transducer solenoid.
(3) Disconnect electrical connector from solenoid.
(4) Remove air inlet duct.
(5) Remove EGR tube to EGR valve screws.
(6) Remove EGR valve mounting screws. Remove
EGR valve and transducer.
(7) Clean gasket surfaces. Discard old gaskets. If
necessary, clean EGR passages.
Fig. 1 PCV SystemÐ2.0L
NS/GSEMISSION CONTROL SYSTEM 25 - 9