Page 1534 of 1954

Safety Indicato r Syste m
Brake Ligh t Failur e Senso r Tes t
'96 - 9 8 models :
1 . Firs t mak e sur e th e brak e light s com e o n whe n th e
brak e peda l i s pressed .
• I f al l th e brak e light s com e on , g o t o ste p 2 .
• I f on e o f th e brak e light s doe s no t com e on , chec k
whethe r th e bul b is blown . I f th e bul b is OK , g o to
ste p 2 .
• I f non e o f th e brak e light s com e on , chec k th e
brak e ligh t circui t.
2 . Ope n th e trun k lid .
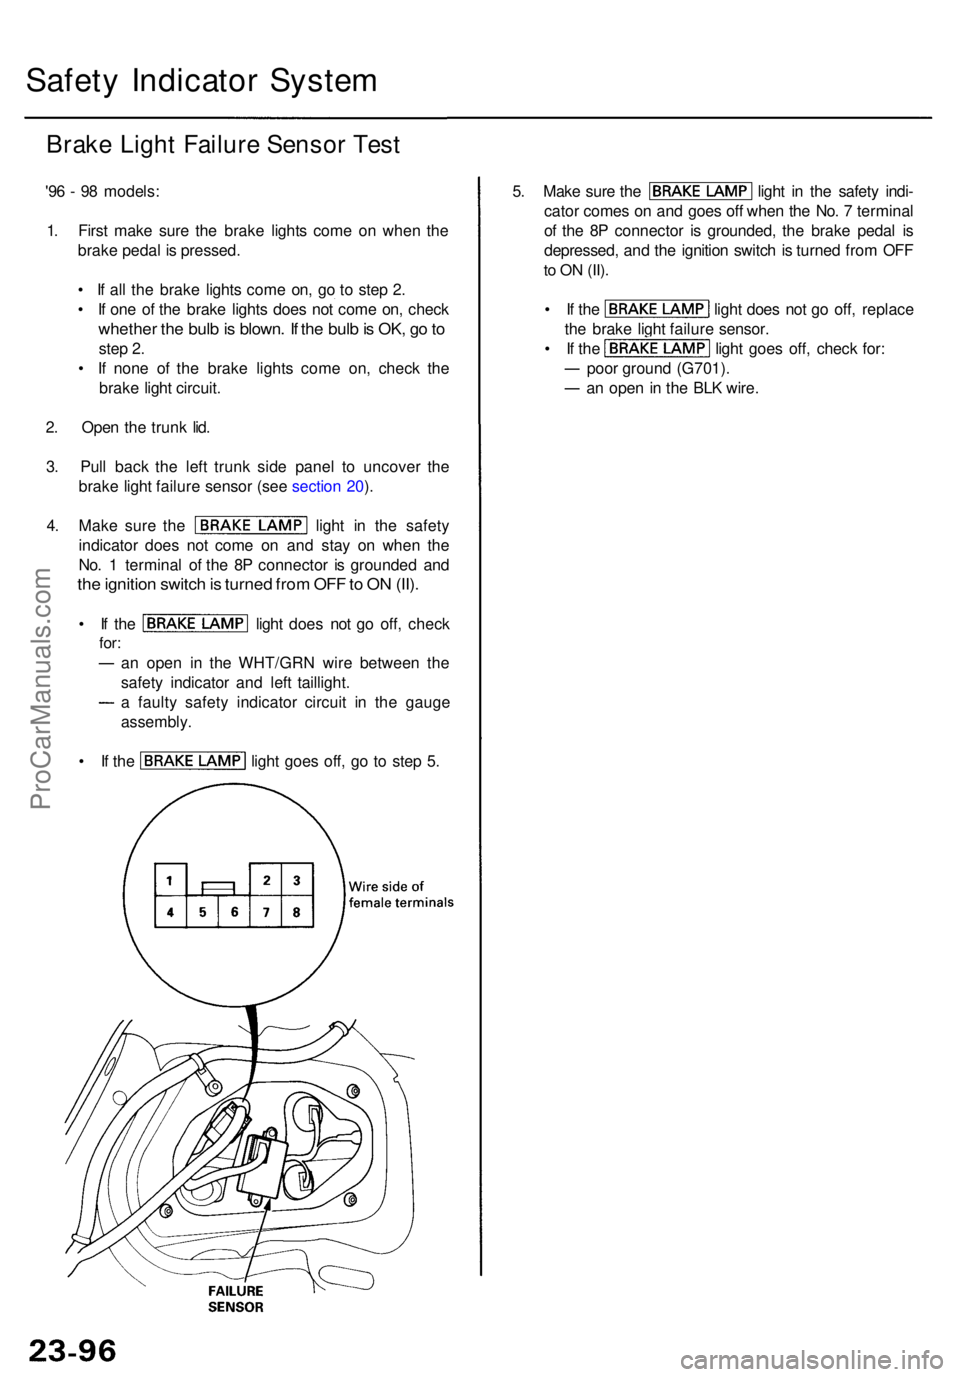
3 . Pul l bac k th e lef t trun k sid e pane l t o uncove r th e
brak e ligh t failur e senso r (se e sectio n 20 ).
4 . Mak e sur e th e ligh t i n th e safet y
indicato r doe s no t com e o n an d sta y o n whe n th e
No . 1 termina l o f th e 8 P connecto r i s grounde d an d
the ignitio n switc h is turne d fro m OF F to O N (II) .
• I f th e ligh t doe s no t g o off , chec k
for:
an ope n i n th e WHT/GR N wir e betwee n th e
safet y indicato r an d lef t taillight .
a fault y safet y indicato r circui t i n th e gaug e
assembly .
• I f th e ligh t goe s off , g o t o ste p 5 .
5. Mak e sur e th e ligh t i n th e safet y indi -
cato r come s o n an d goe s of f whe n th e No . 7 termina l
o f th e 8 P connecto r i s grounded , th e brak e peda l i s
depressed , an d th e ignitio n switc h is turne d fro m OF F
to O N (II) .
• I f th e ligh t doe s no t g o off , replac e
th e brak e ligh t failur e sensor .
• I f th e ligh t goe s off , chec k for :
poo r groun d (G701) .
an ope n i n th e BL K wire .
ProCarManuals.com
Page 1535 of 1954

'99 - 0 1 models :
1 . Firs t mak e sur e th e brak e light s com e o n whe n th e
brak e peda l i s pressed .
• I f al l th e brak e light s com e on , g o t o ste p 2 .
• I f on e o f th e brak e light s doe s no t com e on , chec k
whethe r th e bul b is blown . I f th e bul b is OK , g o to
ste p 2 .
• I f non e o f th e brak e light s com e on , chec k th e
brak e ligh t circui t.
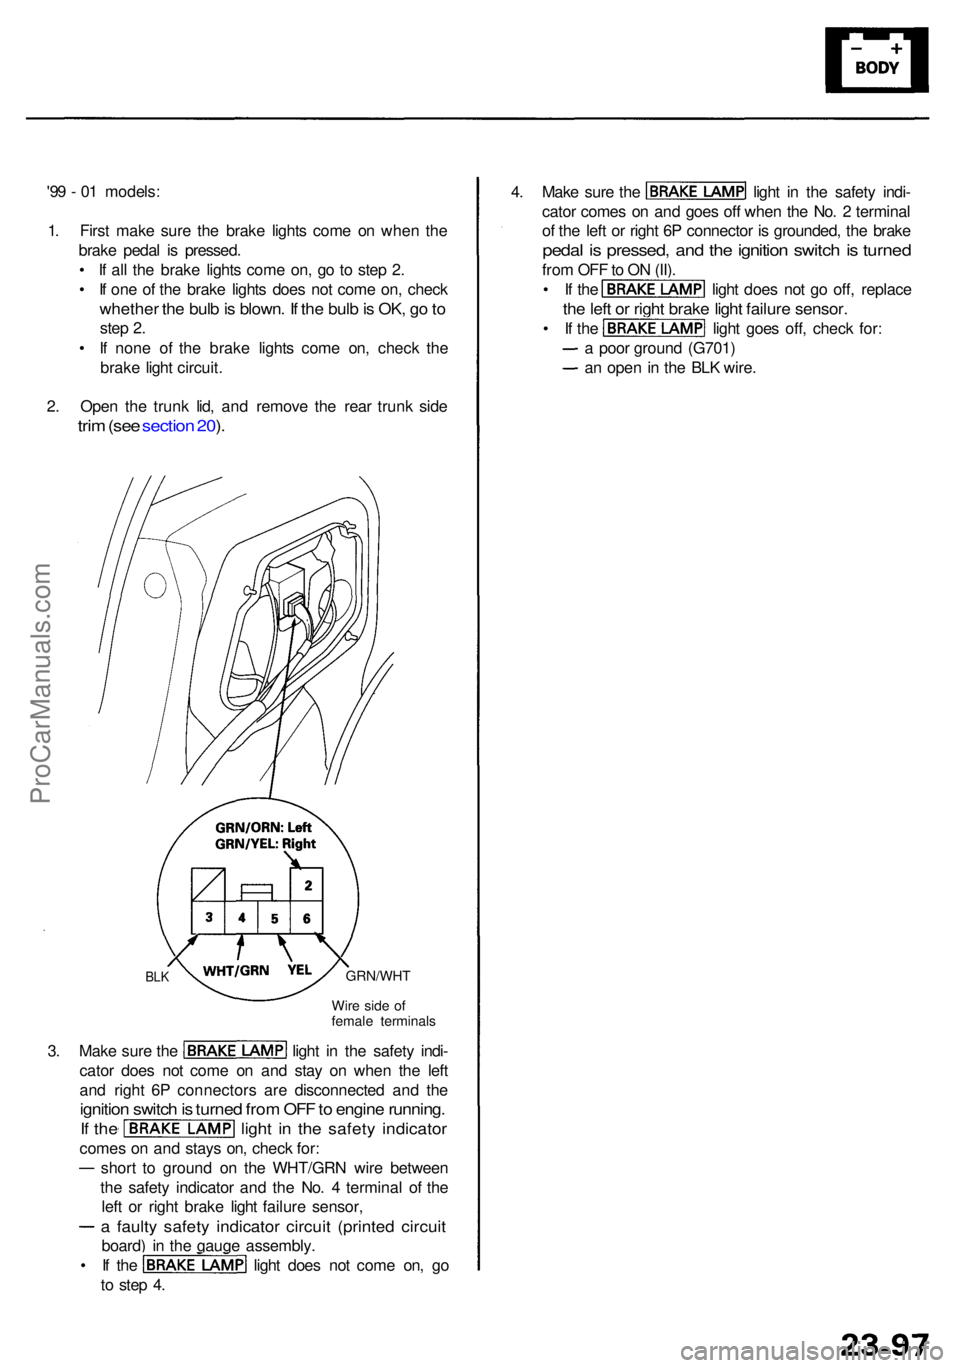
2 . Ope n th e trunk lid, an d remov e th e rea r trunk side
trim (se e sectio n 20 ).
4 . Mak e sur e th e ligh t i n th e safet y indi -
cato r come s o n an d goe s of f whe n th e No . 2 termina l
o f th e lef t o r righ t 6 P connecto r i s grounded , th e brak e
pedal i s pressed , an d th e ignitio n switc h is turne d
from OF F to O N (II) .
• I f th e ligh t doe s no t g o off , replac e
the lef t o r righ t brak e ligh t failur e sensor .
• I f th e ligh t goe s off , chec k for :
a poo r groun d (G701 )
an ope n in th e BL K wire .
Wire sid e o f
femal e terminal s
GRN/WH TBLK
3. Mak e sur e th e ligh t i n th e safet y indi -
cato r doe s no t com e o n an d sta y o n whe n th e lef t
an d righ t 6 P connector s ar e disconnecte d an d th e
ignitio n switc h is turne d fro m OF F to engin e running .
If th e ligh t i n th e safet y indicato r
comes o n an d stay s on , chec k for :
shor t t o groun d o n th e WHT/GR N wir e betwee n
th e safet y indicato r an d th e No . 4 termina l o f th e
lef t o r righ t brak e ligh t failur e sensor ,
a fault y safet y indicato r circui t (printe d circui t
board) i n th e gaug e assembly .
• I f th e ligh t doe s no t com e on , g o
t o ste p 4 .
ProCarManuals.com
Page 1536 of 1954

*: Yo u ca n als o tes t th e switc h b y usin g th e self-diagnosi s functio n (mod e 2) . (Se e pag e 23-252 .)
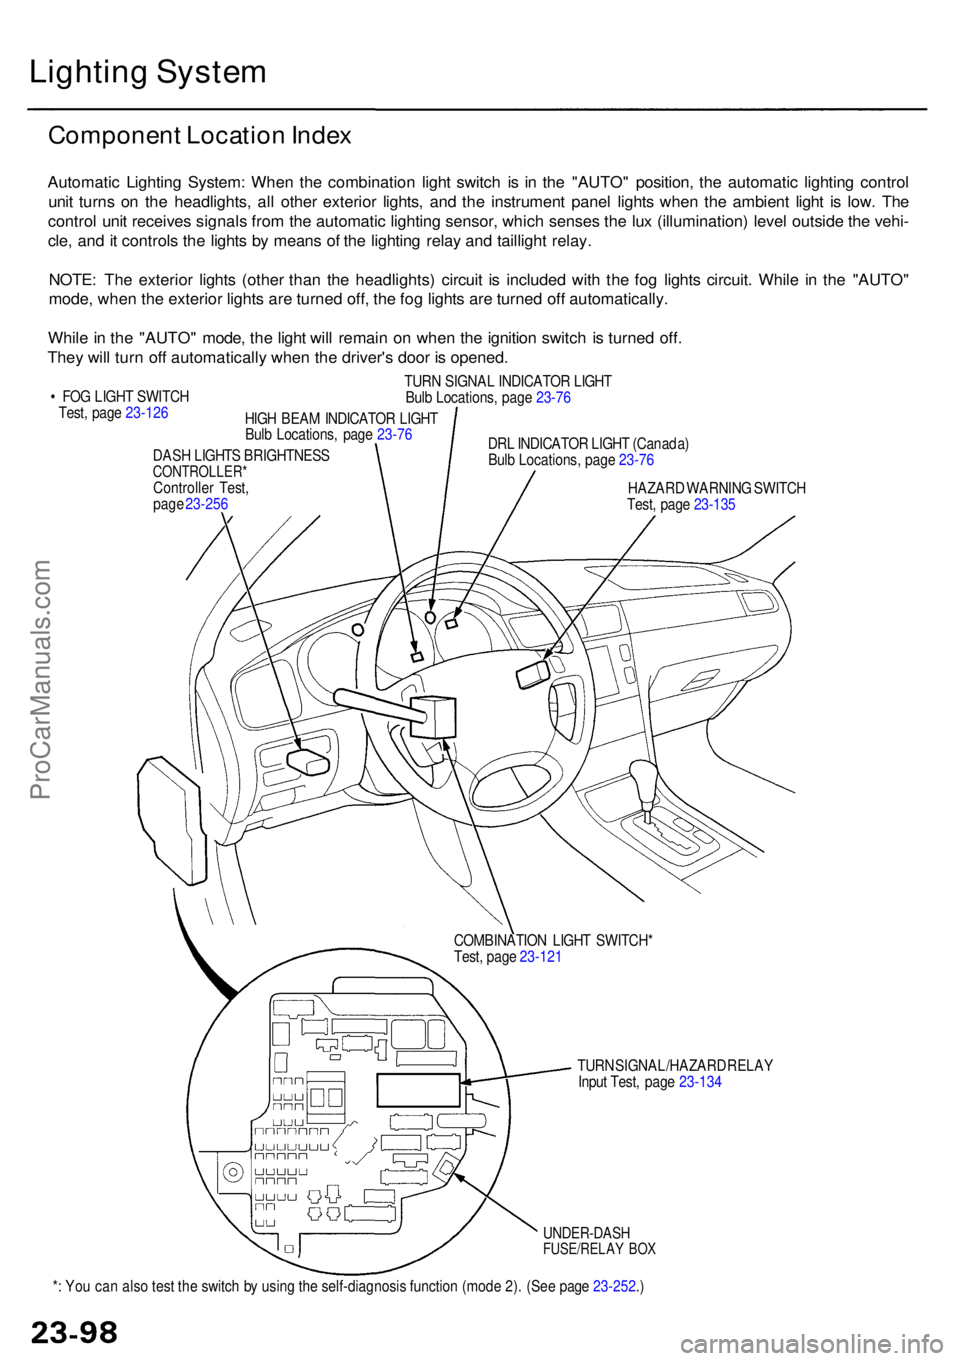
UNDER-DAS HFUSE/RELAY BO X
TUR N SIGNAL/HAZAR D RELA Y
Inpu t Test , pag e 23-13 4
COMBINATIO
N LIGH T SWITCH *
Test , pag e 23-12 1
DAS
H LIGHT S BRIGHTNES S
CONTROLLER *Controller Test ,
pag e 23-25 6
Lightin g Syste m
Componen t Locatio n Inde x
Automati c Lightin g System : Whe n th e combinatio n ligh t switc h i s i n th e "AUTO " position , th e automati c lightin g contro l
uni t turn s o n th e headlights , al l othe r exterio r lights , an d th e instrumen t pane l light s whe n th e ambien t ligh t i s low . Th e
contro l uni t receive s signal s fro m th e automati c lightin g sensor , whic h sense s th e lu x (illumination ) leve l outsid e th e vehi -
cle , an d it control s th e light s b y mean s o f th e lightin g rela y an d tailligh t relay .
NOTE : Th e exterio r light s (othe r tha n th e headlights ) circui t i s include d wit h th e fo g light s circuit . Whil e i n th e "AUTO "
mode , whe n th e exterio r light s ar e turne d off , th e fo g light s ar e turne d of f automatically .
Whil e in th e "AUTO " mode , th e ligh t wil l remai n o n whe n th e ignitio n switc h i s turne d off .
The y wil l tur n of f automaticall y whe n th e driver' s doo r i s opened .
• FO G LIGH T SWITC H
Test , pag e 23-12 6
HIGH BEA M INDICATO R LIGH T
Bul b Locations , pag e 23-7 6
TUR
N SIGNA L INDICATO R LIGH T
Bul b Locations , pag e 23-7 6
DR L INDICATO R LIGH T (Canada )
Bul b Locations , pag e 23-7 6
HAZAR D WARNIN G SWITC H
Test , pag e 23-13 5
ProCarManuals.com
Page 1537 of 1954
'96 - 9 8 models :
• HEADLIGH T
Replacement , pag e 23-12 1
Adjustment , pag e 23-12 4
• TAILLIGH T
Replacement , pag e 23-12 5 AUTOMATI
C
LIGHTIN GSENSOR(USA)
DIMME R RELA Y
Test , pag e 23-6 9
UNDER-HOO D
FUSE/RELA Y BO X
TAILLIGH T RELA YTest, pag e 23-6 8
HIG H MOUN T BRAK E LIGH T
Replacement , pag e 23-13 1
HEADLIGH
T RELA Y
Test , pag e 23-6 7
SIDE MARKE RLIGHT
FRON T TUR N
SIGNA L LIGH T
HEADLIGH
T an d
FRON T PARKIN G LIGH T
• AUTOMATI C LIGHTIN G
CONTRO L UNI T (USA )
Inpu t Test , pag e 23-11 4
• DAYTIM E RUNNIN G LIGHT S
CONTRO L UNI T (Canada )
Inpu t Test , pag e 23-11 6
FO
G LIGH T
Adjustment , pag e
23-12 7
SIDE MARKE RLIGHT
REAR TUR N
SIGNA L LIGH T BACK-U
P LIGH T
TAILLIGHT / Replacement
, pag e 23-12 5
BRAK E LIGH TReplacement , pag e 23-12 5LICENS
E PLAT E LIGHT S
Replacement , pag e 23-12 8
ProCarManuals.com
Page 1538 of 1954
Lighting Syste m
Componen t Locatio n Inde x (cont'd )
'99 - 0 1 models :
• HEADLIGH T
Replacement , pag e 23-12 1
Bul b Removal , pag e 23-12 2
Adjustment , pag e 23-12 3
• TAILLIGH T
Replacement , pag e 23-12 5
• FO G LIGH T
Adjustment , pag e 23-12 7
Replacement , pag e 23-12 7
TAILLIGH T RELA YTest, pag e 23-6 9
UNDER-HOO D RELA Y BO X C
AUTOMATI C
LIGHTIN G
SENSOR(USA)
DIMME R RELA Y
Test , pag e 23-6 9
HEADLIGH T (Hig h beam )
HEADLIGH T (Lo w beam )
FRONT TUR N
SIGNA L
SIDE MARKE RLIGHT
HEADLIGH T LO W BEA M RELA Y
Test , pag e 23-6 8 HEADLIGH
T HIG H BEA M RELA Y
Test , pag e 23-6 7UNDER-HOO
D
FUSE/RELA Y BO X
ProCarManuals.com
Page 1539 of 1954
• AUTOMATI C LIGHTIN G
CONTRO L UNI T (USA )
Inpu t Test , pag e 23-11 4
• DAYTIM E RUNNIN G LIGHT S
CONTRO L UNI T (Canada )
Inpu t Test , pag e 23-11 6 HIG
H MOUN T BRAK E LIGH T
Replacement , pag e 23-13 1
LICENS E PLAT E LIGHT S
Replacement , pag e 23-12 8
BACK-U P LIGH T
Replacement , pag e 23-12 5
TAI L LIGHT /
BRAK E LIGH T
Replacement , pag e 23-12 5
REA
R TUR N
SIGNA L LIGH T
ProCarManuals.com
Page 1540 of 1954
Lighting Syste m
Automati c Lightin g Contro l Uni t Inpu t Tes t (USA )
1. Remov e th e rea r seat-back .
2 . Disconnec t th e 14 P connecto r fro m th e contro l unit .
3 . Inspec t th e connecto r an d socke t terminal s t o b e sur e the y ar e al l makin g goo d contact .
• I f th e terminal s ar e bent , loos e o r corroded , repai r the m a s necessary , an d rechec k th e system .
• I f th e terminal s loo k OK , mak e th e followin g inpu t test s a t th e connector .
I f an y tes t indicate s a problem , fin d an d correc t th e cause , the n rechec k th e system .
If al l th e inpu t tes t prob e OK , th e contro l uni t mus t b e faulty ; replac e it .
14 P CONNECTO R
BLK/YEL
RED/YE L
AUTOMATI C LIGHTIN G
CONTRO L UNI T
Wir e sid e o f
femal e terminal s
BLK BL K
WHT/YE LGRN/YEL
BRN
GRN/BL URED/GR N
YEL/BLKBLU/RE D
YEL/GR N
ProCarManuals.com
Page 1541 of 1954

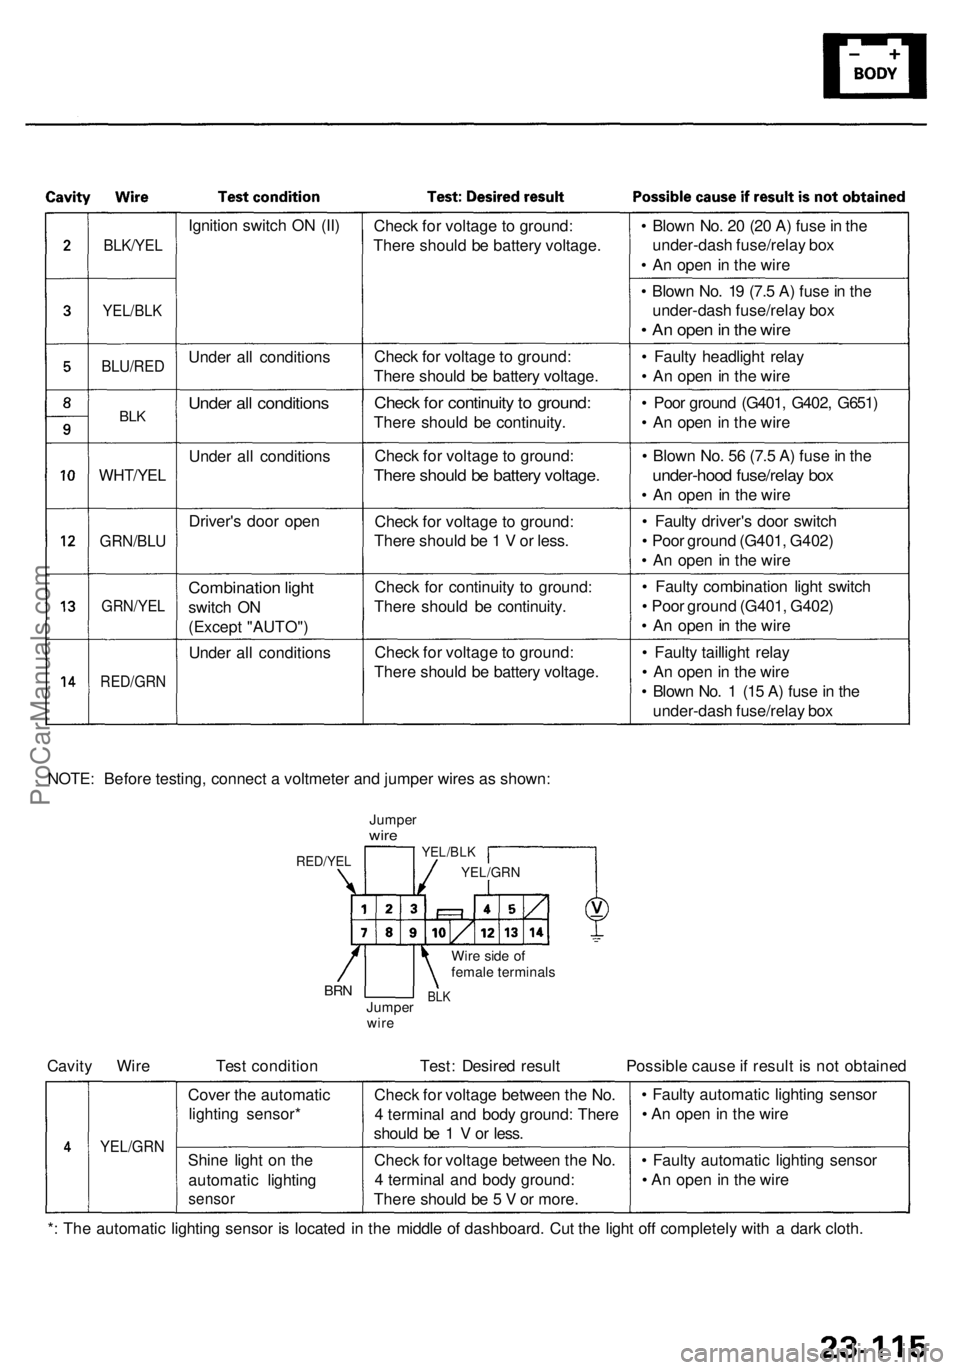
BLK/YEL
YEL/BLK
BLU/RE D
BLK
WHT/YE L
GRN/BLU
GRN/YE L
RED/GR N
Ignition switc h O N (II )
Unde r al l condition s
Under al l condition s
Under al l condition s
Driver' s doo r ope n
Combinatio n ligh t
switc h O N
(Excep t "AUTO" )
Unde r al l condition sChec
k fo r voltag e to ground :
Ther e shoul d b e batter y voltage .
Chec k fo r voltag e to ground:
Ther e shoul d b e batter y voltage .
Check fo r continuit y to ground :
There shoul d b e continuity .
Chec k fo r voltag e to ground :
There shoul d b e batter y voltage .
Check fo r voltag e t o ground :
Ther e shoul d b e 1 V or less .
Chec k fo r continuit y t o ground :
Ther e shoul d b e continuity .
Chec k fo r voltag e to ground :
Ther e shoul d b e batter y voltage .•
Blow n No . 2 0 (2 0 A ) fus e in th e
under-das h fuse/rela y bo x
• A n ope n in th e wir e
• Blow n No . 1 9 (7. 5 A ) fus e in th e
under-das h fuse/rela y bo x
• A n ope n in th e wir e
• Fault y headligh t rela y
• A n ope n in th e wir e
• Poo r groun d (G401 , G402 , G651 )
• A n ope n in th e wir e
• Blow n No . 5 6 (7. 5 A ) fus e in th e
under-hoo d fuse/rela y bo x
• A n ope n in th e wir e
• Fault y driver' s doo r switc h
• Poo r groun d (G401 , G402 )
• A n ope n in th e wir e
• Fault y combinatio n ligh t switc h
• Poo r ground (G401, G402 )
• A n ope n in th e wir e
• Fault y tailligh t rela y
• A n ope n in th e wir e
• Blow n No . 1 (1 5 A ) fus e in th e
under-das h fuse/rela y bo x
NOTE : Befor e testing , connec t a voltmete r an d jumpe r wire s a s shown :
JumperwireYEL/BL K
YEL/GR N
Wire sid e o f
femal e terminal s
BLKJumpe r
wir eBRN
RED/YE L
Cavity Wir e Tes t conditio n Test : Desire d resul t Possibl e caus e if resul t i s no t obtaine d
YEL/GR N
Cover th e automati c
lightin g sensor *
Shin e ligh t o n th e
automati c lightin g
sensor
Check fo r voltag e betwee n th e No .
4 termina l an d bod y ground : Ther e
shoul d b e 1 V or less .
Chec k fo r voltag e betwee n th e No .
4 termina l an d bod y ground :
Ther e shoul d b e 5 V or more . •
Fault y automati c lightin g senso r
• A n ope n in th e wir e
• Fault y automati c lightin g senso r
• A n ope n in th e wir e
* : Th e automati c lightin g senso r i s locate d i n th e middl e o f dashboard . Cu t th e ligh t of f completel y wit h a dar k cloth .
ProCarManuals.com