Page 1869 of 2543
Torque Wrench (30 kgf�cm).
RECOMMENDED TOOLS
EQUIPMENT
������������������������� �
������������������������ �������������������������
Torque wrench������������ �
����������� ������������
SA±84± SUSPENSION AND AXLEREAR SUSPENSION
Page 1871 of 2543

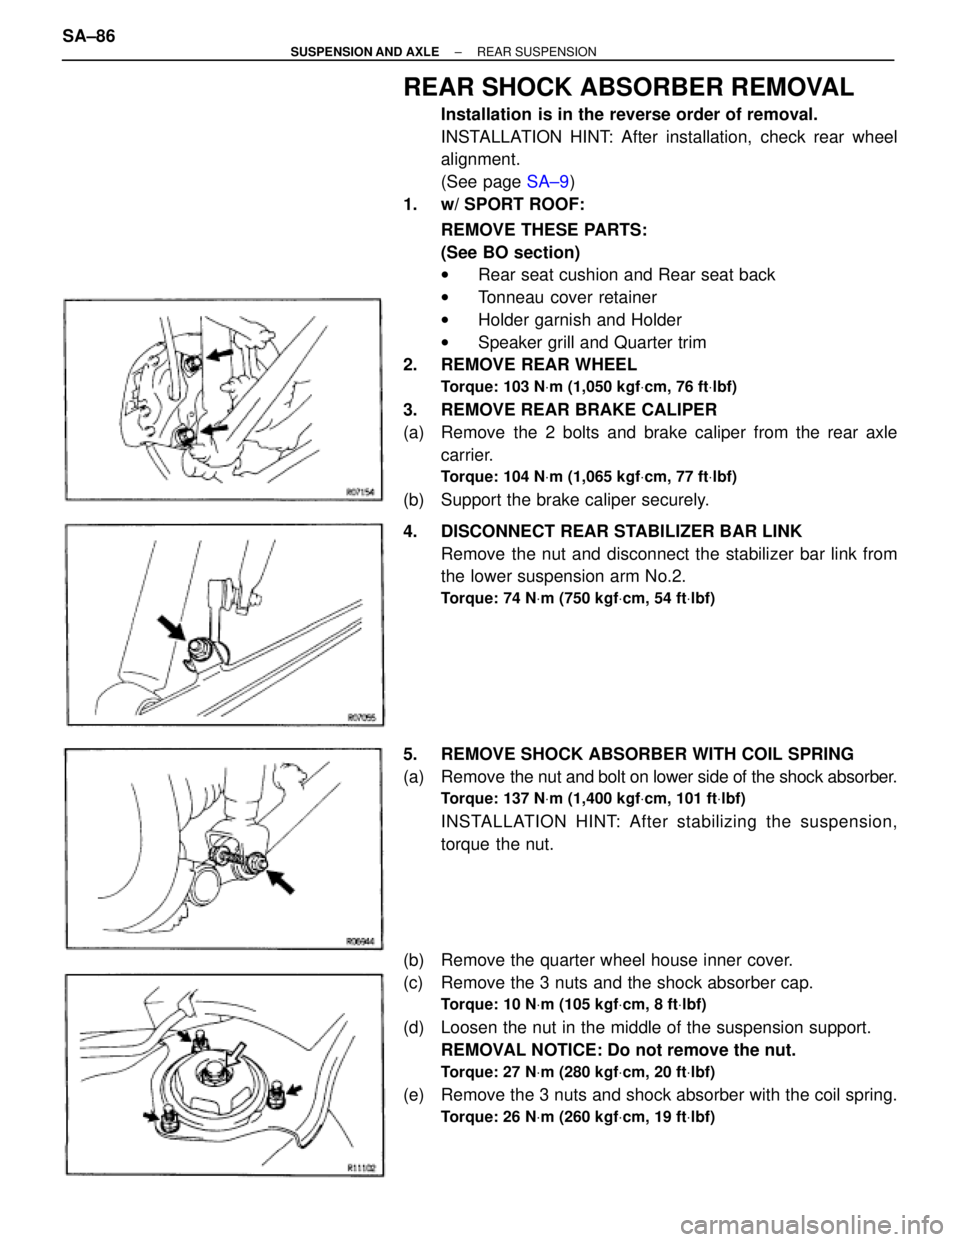
REAR SHOCK ABSORBER REMOVAL
Installation is in the reverse order of removal.
INSTALLATION HINT: After installation, check rear wheel
alignment.
(See page SA±9)
1. w/ SPORT ROOF:
REMOVE THESE PARTS:
(See BO section)
wRear seat cushion and Rear seat back
wTonneau cover retainer
wHolder garnish and Holder
wSpeaker grill and Quarter trim
2. REMOVE REAR WHEEL
Torque: 103 NVm (1,050 kgfVcm, 76 ftVlbf)
3. REMOVE REAR BRAKE CALIPER
(a) Remove the 2 bolts and brake caliper from the rear axle
carrier.
Torque: 104 NVm (1,065 kgfVcm, 77 ftVlbf)
(b) Support the brake caliper securely.
4. DISCONNECT REAR STABILIZER BAR LINK
Remove the nut and disconnect the stabilizer bar link from
the lower suspension arm No.2.
Torque: 74 NVm (750 kgfVcm, 54 ftVlbf)
5. REMOVE SHOCK ABSORBER WITH COIL SPRING
(a) Remove the nut and bolt on lower side of the shock absorber.
Torque: 137 NVm (1,400 kgfVcm, 101 ftVlbf)
INSTALLATION HINT: After stabilizing the suspension,
torque the nut.
(b) Remove the quarter wheel house inner cover.
(c) Remove the 3 nuts and the shock absorber cap.
Torque: 10 NVm (105 kgfVcm, 8 ftVlbf)
(d) Loosen the nut in the middle of the suspension support.
REMOVAL NOTICE: Do not remove the nut.
Torque: 27 NVm (280 kgfVcm, 20 ftVlbf)
(e) Remove the 3 nuts and shock absorber with the coil spring.
Torque: 26 NVm (260 kgfVcm, 19 ftVlbf)
SA±86± SUSPENSION AND AXLEREAR SUSPENSION
Page 1875 of 2543

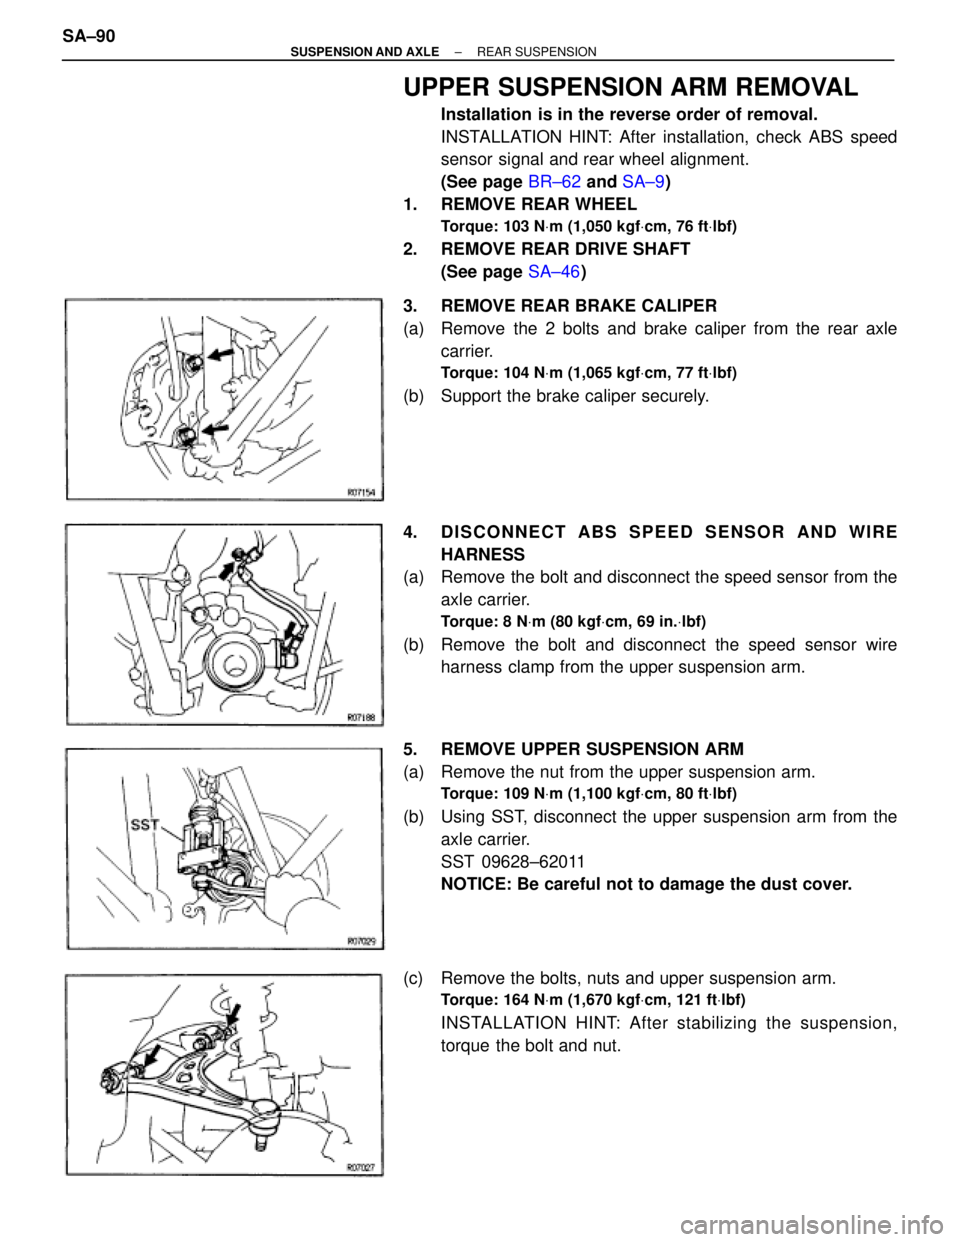
UPPER SUSPENSION ARM REMOVAL
Installation is in the reverse order of removal.
INSTALLATION HINT: After installation, check ABS speed
sensor signal and rear wheel alignment.
(See page BR±62 and SA±9)
1. REMOVE REAR WHEEL
Torque: 103 NVm (1,050 kgfVcm, 76 ftVlbf)
2. REMOVE REAR DRIVE SHAFT
(See page SA±46)
3. REMOVE REAR BRAKE CALIPER
(a) Remove the 2 bolts and brake caliper from the rear axle
carrier.
Torque: 104 NVm (1,065 kgfVcm, 77 ftVlbf)
(b) Support the brake caliper securely.
4. DISCONNECT ABS SPEED SENSOR AND WIRE
HARNESS
(a) Remove the bolt and disconnect the speed sensor from the
axle carrier.
Torque: 8 NVm (80 kgfVcm, 69 in.Vlbf)
(b) Remove the bolt and disconnect the speed sensor wire
harness clamp from the upper suspension arm.
5. REMOVE UPPER SUSPENSION ARM
(a) Remove the nut from the upper suspension arm.
Torque: 109 NVm (1,100 kgfVcm, 80 ftVlbf)
(b) Using SST, disconnect the upper suspension arm from the
axle carrier.
SST 09628±62011
NOTICE: Be careful not to damage the dust cover.
(c) Remove the bolts, nuts and upper suspension arm.
Torque: 164 NVm (1,670 kgfVcm, 121 ftVlbf)
INSTALLATION HINT: After stabilizing the suspension,
torque the bolt and nut. SA±90
± SUSPENSION AND AXLEREAR SUSPENSION
Page 1876 of 2543
INSTALLATION HINT: If replacing the front nut, assemble the
nut and E±ring to the washer with lock protrusion before
installing.
UPPER SUSPENSION ARM BALL JOINT
INSPECTION
INSPECT BALL JOINT FOR ROTATION CONDITION
(a) Flip the ball joint stud back and forth 5 times, as shown in the
illustration, before installing the nut.
(b) Using torque wrench, turn the nut continuously one turn
every 2±4 seconds and take the torque reading on the 5th
turn.
Torque (turning):
1.0±3.4 NVm (10±35 kgfVcm, 9±30 in.Vlbf)
If not with in specification, replace the upper suspension arm.
UPPER SUSPENSION ARM BUSHING
REPLACEMENT
1. REMOVE BUSHING
Using SST, press out the bushing.
SST 09710±26010 (09710±05070),
09710±30020 (09710±03030)
2. INSTALL NEW BUSHING
Using SST, press in a new bushing.
SST 09710±26010 (09710±05050),
09710±30020 (09710±03120)
± SUSPENSION AND AXLEREAR SUSPENSIONSA±91
Page 1878 of 2543

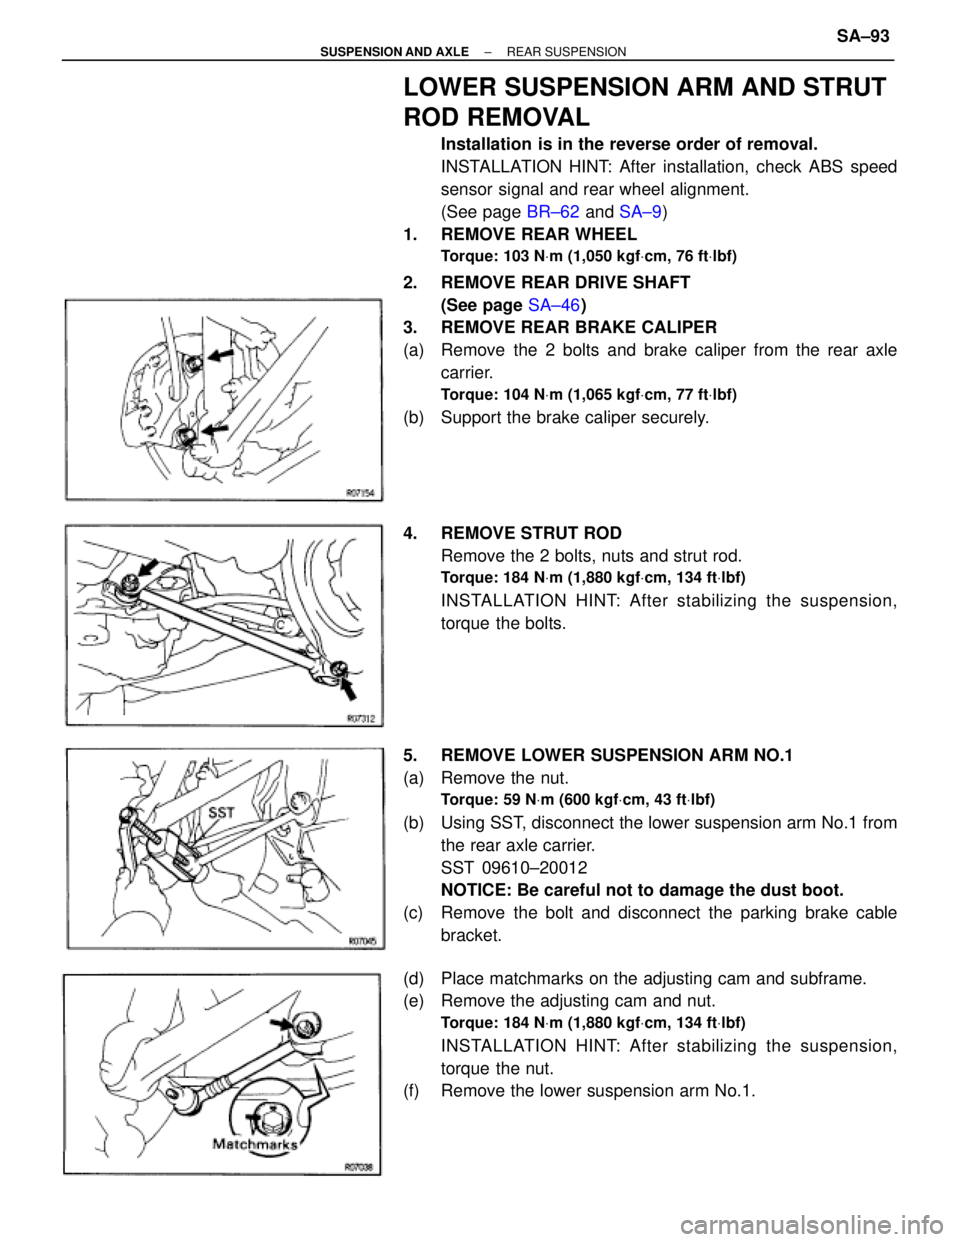
LOWER SUSPENSION ARM AND STRUT
ROD REMOVAL
Installation is in the reverse order of removal.
INSTALLATION HINT: After installation, check ABS speed
sensor signal and rear wheel alignment.
(See page BR±62 and SA±9)
1. REMOVE REAR WHEEL
Torque: 103 NVm (1,050 kgfVcm, 76 ftVlbf)
2. REMOVE REAR DRIVE SHAFT
(See page SA±46)
3. REMOVE REAR BRAKE CALIPER
(a) Remove the 2 bolts and brake caliper from the rear axle
carrier.
Torque: 104 NVm (1,065 kgfVcm, 77 ftVlbf)
(b) Support the brake caliper securely.
4. REMOVE STRUT ROD
Remove the 2 bolts, nuts and strut rod.
Torque: 184 NVm (1,880 kgfVcm, 134 ftVlbf)
INSTALLATION HINT: After stabilizing the suspension,
torque the bolts.
5. REMOVE LOWER SUSPENSION ARM NO.1
(a) Remove the nut.
Torque: 59 NVm (600 kgfVcm, 43 ftVlbf)
(b) Using SST, disconnect the lower suspension arm No.1 from
the rear axle carrier.
SST 09610±20012
NOTICE: Be careful not to damage the dust boot.
(c) Remove the bolt and disconnect the parking brake cable
bracket.
(d) Place matchmarks on the adjusting cam and subframe.
(e) Remove the adjusting cam and nut.
Torque: 184 NVm (1,880 kgfVcm, 134 ftVlbf)
INSTALLATION HINT: After stabilizing the suspension,
torque the nut.
(f) Remove the lower suspension arm No.1.
± SUSPENSION AND AXLEREAR SUSPENSIONSA±93
Page 1879 of 2543
6. REMOVE LOWER SUSPENSION ARM NO.2
(a) Remove the bolt, nut and disconnect the shock absorber
from the lower suspension arm No.2.
Torque: 137 NVm (1,400 kgfVcm, 101 ftVlbf)
INSTALLATION HINT: After stabilizing the suspension,
torque the nuts.
(b) Remove the nut and disconnect the stabilizer bar link from
the lower suspension arm No.2.
Torque: 74 NVm (750 kgfVcm, 54 ftVlbf)
(c) Loosen the nut.
Torque: 150 NVm (1,525 kgfVcm, 110 ftVlbf)
(d) Using SST, disconnect the lower suspension arm No.2 from
the rear axle carrier.
SST 09610±20012
NOTICE: Be careful not to damage the ball joint bolt.
(e) Remove the nut.
(f) Place matchmarks on the adjusting cam and subframe.
(g) Remove the nut, adjusting cam and lower suspension arm
No.2.
Torque: 184 NVm (1,880 kgfVcm, 134 ftVlbf)
INSTALLATION HINT: After stabilizing the suspension,
torque the nut. SA±94
± SUSPENSION AND AXLEREAR SUSPENSION
Page 1880 of 2543
LOWER SUSPENSION ARM NO.1 AND
NO.2 BALL JOINT INSPECTION
INSPECT BALL JOINT FOR ROTATION CONDITION
(a) Flip the ball joint stud back and forth 5 times, before installing
the nut.
(b) Using a torque wrench, turn the nut continuously one turn
every 2±4 seconds and take the torque reading on the 5th
turn.
Torque (turning):
Lower suspension arm No.1
1.0±3.4 NVm (10±35 kgfVcm, 9±30 in.Vlbf)
Lower suspension arm No.2
1.0±3.4 NVm (10±35 kgfVcm, 9±30 in.Vlbf)
If not within specification, replace the lower suspension arm
No.1 or/and No.2.
STRUT ROD BUSHING REPLACEMENT
1. REMOVE BUSHING
Using SST and a deep socket wrench, press out the bushing.
SST 09506±35010
2. INSTALL NEW BUSHING
Using SST and a deep socket wrench, press in a new bush-
ing.
SST 09506±35010
HINT: Do not apply grease or oil to the bushing.
± SUSPENSION AND AXLEREAR SUSPENSIONSA±95
Page 1882 of 2543
STABILIZER BAR REMOVAL
Installation is in the reverse order of removal.
1. DISCONNECT EXHAUST PIPE SUPPORTS
(a) Remove the 2 exhaust pipe support rings.
(b) Support the exhaust pipe securely.
(c) Remove the 2 exhaust pipe support O±rings.
2. REMOVE BOTH STABILIZER BAR LINKS
Remove the 4 nuts and 2 stabilizer bar links.
Torque: 74 NVm (750 kgfVcm, 54 ftVlbf)
3. REMOVE BOTH STABILIZER BAR BRACKETS
Remove the 4 bolts and both stabilizer bar brackets from the
subframe.
Torque: 31 NVm (320 kgfVcm, 23 ftVlbf)
4. REMOVE BOTH CUSHIONS AND BRACKETS
Remove the cushions and brackets from the stabilizer bar.
INSTALLATION HINT: Install the cushion to the outside of the
bush stopper.
± SUSPENSION AND AXLEREAR SUSPENSIONSA±97