Page 1100 of 2543
2. ASSEMBLE SST
SST 09230±01010
(a) Install the claw to the overhaul handle, inserting it in the hole
in part ºAº as shown in the installation.
(b) While gripping the handle, adjust the stopper bolt so that
dimension ºBº shown in the diagram is 0.2±0.5 mm
(0.008±0.020 in.).
NOTICE: If this adjustment is not done, the claw may be dam-
aged.
3. UNCAULK LOCK PLATES
Using SST to release the caulking, squeeze the handle until
stopped by the stopper bolt.
SST 09230±01010
4. REMOVE TANKS AND O±RINGS
(a) Lightly tap the radiator hose inlet (or outlet) with a soft±faced
hammer and remove the tank.
(b) Remove the O±ring.
5. A/T:
REMOVE OIL COOLER FROM LOWER TANK
(a) Remove the inlet pipes.
HINT: Make a note of the direction to face the pipes.
(b) Remove the nuts, plate washers and oil cooler.
(c) Remove the O±rings from the oil cooler.
± ENGINECOOLING SYSTEMEG±349
Page 1101 of 2543
RADIATOR ASSEMBLY
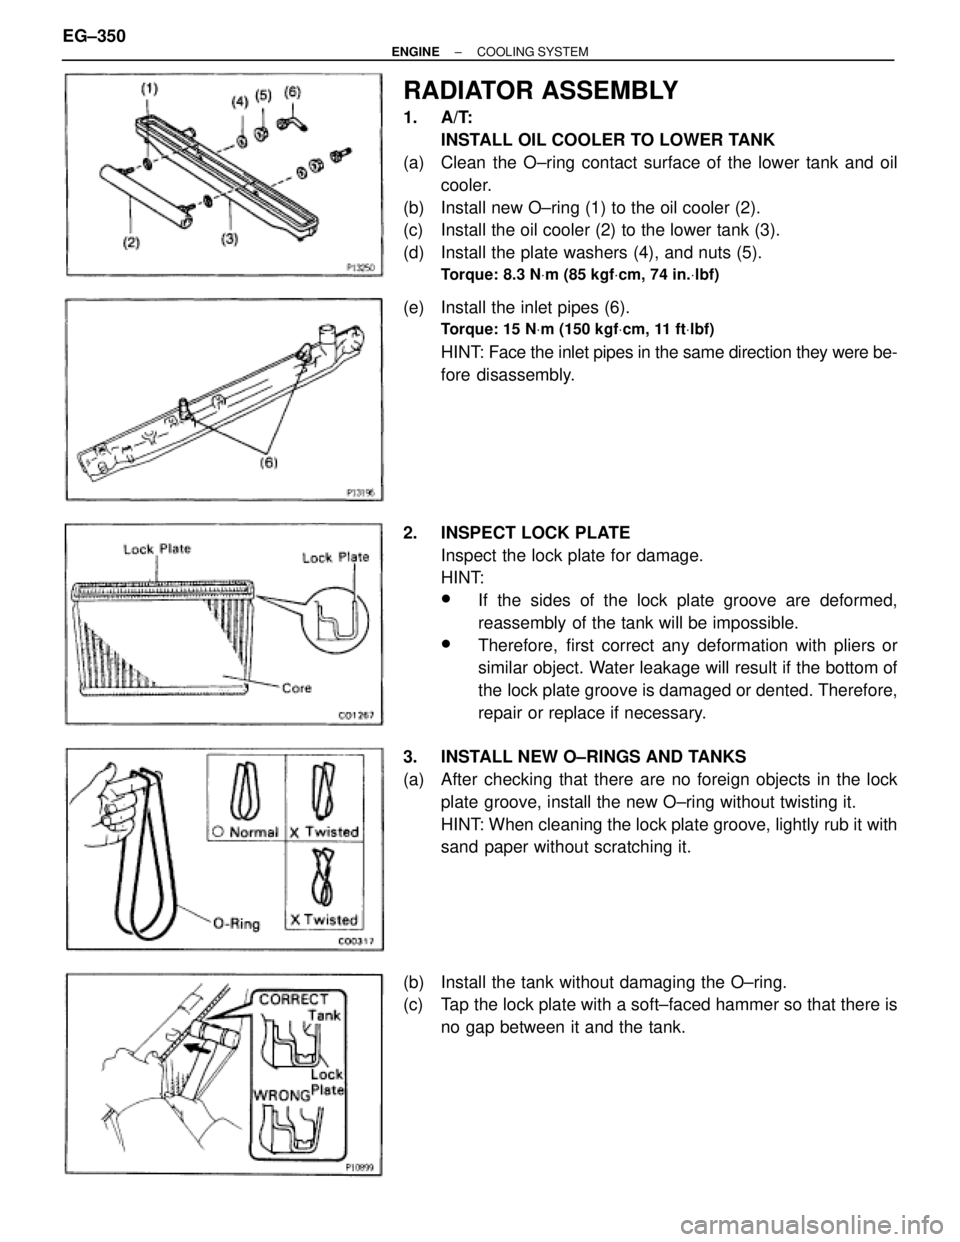
1. A/T:
INSTALL OIL COOLER TO LOWER TANK
(a) Clean the O±ring contact surface of the lower tank and oil
cooler.
(b) Install new O±ring (1) to the oil cooler (2).
(c) Install the oil cooler (2) to the lower tank (3).
(d) Install the plate washers (4), and nuts (5).
Torque: 8.3 NVm (85 kgfVcm, 74 in.Vlbf)
(e) Install the inlet pipes (6).
Torque: 15 NVm (150 kgfVcm, 11 ftVlbf)
HINT: Face the inlet pipes in the same direction they were be-
fore disassembly.
2. INSPECT LOCK PLATE
Inspect the lock plate for damage.
HINT:
wIf the sides of the lock plate groove are deformed,
reassembly of the tank will be impossible.
wTherefore, first correct any deformation with pliers or
similar object. Water leakage will result if the bottom of
the lock plate groove is damaged or dented. Therefore,
repair or replace if necessary.
3. INSTALL NEW O±RINGS AND TANKS
(a) After checking that there are no foreign objects in the lock
plate groove, install the new O±ring without twisting it.
HINT: When cleaning the lock plate groove, lightly rub it with
sand paper without scratching it.
(b) Install the tank without damaging the O±ring.
(c) Tap the lock plate with a soft±faced hammer so that there is
no gap between it and the tank. EG±350
± ENGINECOOLING SYSTEM
Page 1102 of 2543
4. ASSEMBLE SST
SST 09230±01010,
09231±14010 (Punch (2JZ±GE only))
(a) Install the punch assembly to the overhaul handle, inserting
it in the hole in part ºAº as shown in the illustration.
(b) While gripping the handle, adjust the stopper bolt so that
dimension ºBº shown in the diagram.
Dimension ºBº:
2JZ±GE
8.4 mm (0.34 in)
2JZ±GTE
7.7 mm (0.31 in)
5. CAULK LOCK PLATE
(a) Lightly press SST against the lock plate in the order shown
in the illustration. After repeating this a few times, fully caulk
the lock plate by squeezing the handle until stopped by the
stopper plate.
SST 09230±01010
HINT:
wDo not stake the areas protruding around the pipes,
brackets or tank ribs.
wThe points shown in the rib sides and oil cooler near
here cannot be staked with SST. Use a plier or similar
object and be careful not to damage the core plates.
± ENGINECOOLING SYSTEMEG±351
Page 1107 of 2543
Engine Coolant Temperature (ECT)
Switch
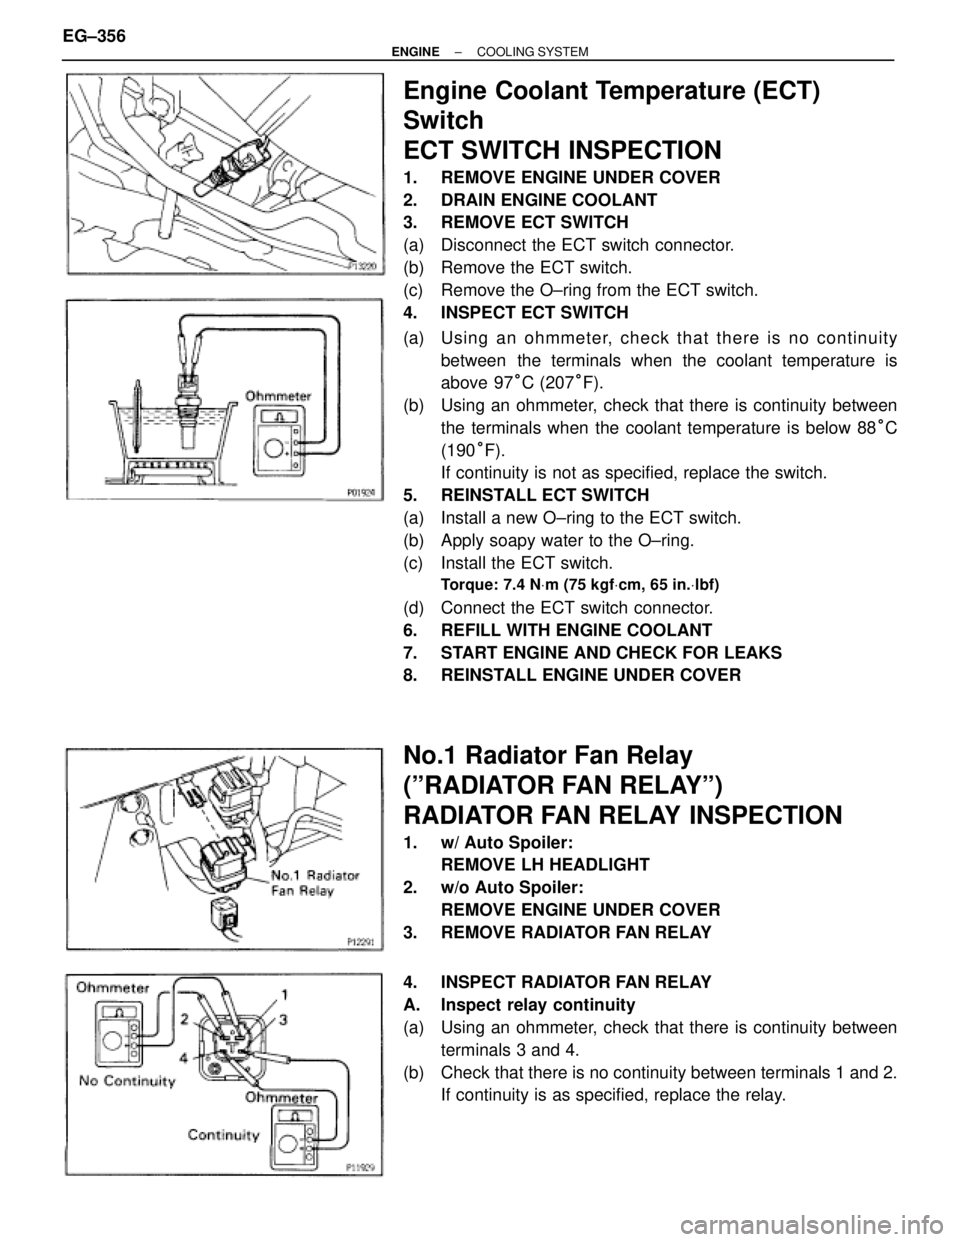
ECT SWITCH INSPECTION
1. REMOVE ENGINE UNDER COVER
2. DRAIN ENGINE COOLANT
3. REMOVE ECT SWITCH
(a) Disconnect the ECT switch connector.
(b) Remove the ECT switch.
(c) Remove the O±ring from the ECT switch.
4. INSPECT ECT SWITCH
(a) Usin g an oh mme te r, ch e ck th a t th e re is no co n tin u ity
between the terminals when the coolant temperature is
above 97°C (207°F).
(b) Using an ohmmeter, check that there is continuity between
the terminals when the coolant temperature is below 88°C
(190°F).
If continuity is not as specified, replace the switch.
5. REINSTALL ECT SWITCH
(a) Install a new O±ring to the ECT switch.
(b) Apply soapy water to the O±ring.
(c) Install the ECT switch.
Torque: 7.4 NVm (75 kgfVcm, 65 in.Vlbf)
(d) Connect the ECT switch connector.
6. REFILL WITH ENGINE COOLANT
7. START ENGINE AND CHECK FOR LEAKS
8. REINSTALL ENGINE UNDER COVER
No.1 Radiator Fan Relay
(ºRADIATOR FAN RELAYº)
RADIATOR FAN RELAY INSPECTION
1. w/ Auto Spoiler:
REMOVE LH HEADLIGHT
2. w/o Auto Spoiler:
REMOVE ENGINE UNDER COVER
3. REMOVE RADIATOR FAN RELAY
4. INSPECT RADIATOR FAN RELAY
A. Inspect relay continuity
(a) Using an ohmmeter, check that there is continuity between
terminals 3 and 4.
(b) Check that there is no continuity between terminals 1 and 2.
If continuity is as specified, replace the relay. EG±356
± ENGINECOOLING SYSTEM
Page 1108 of 2543
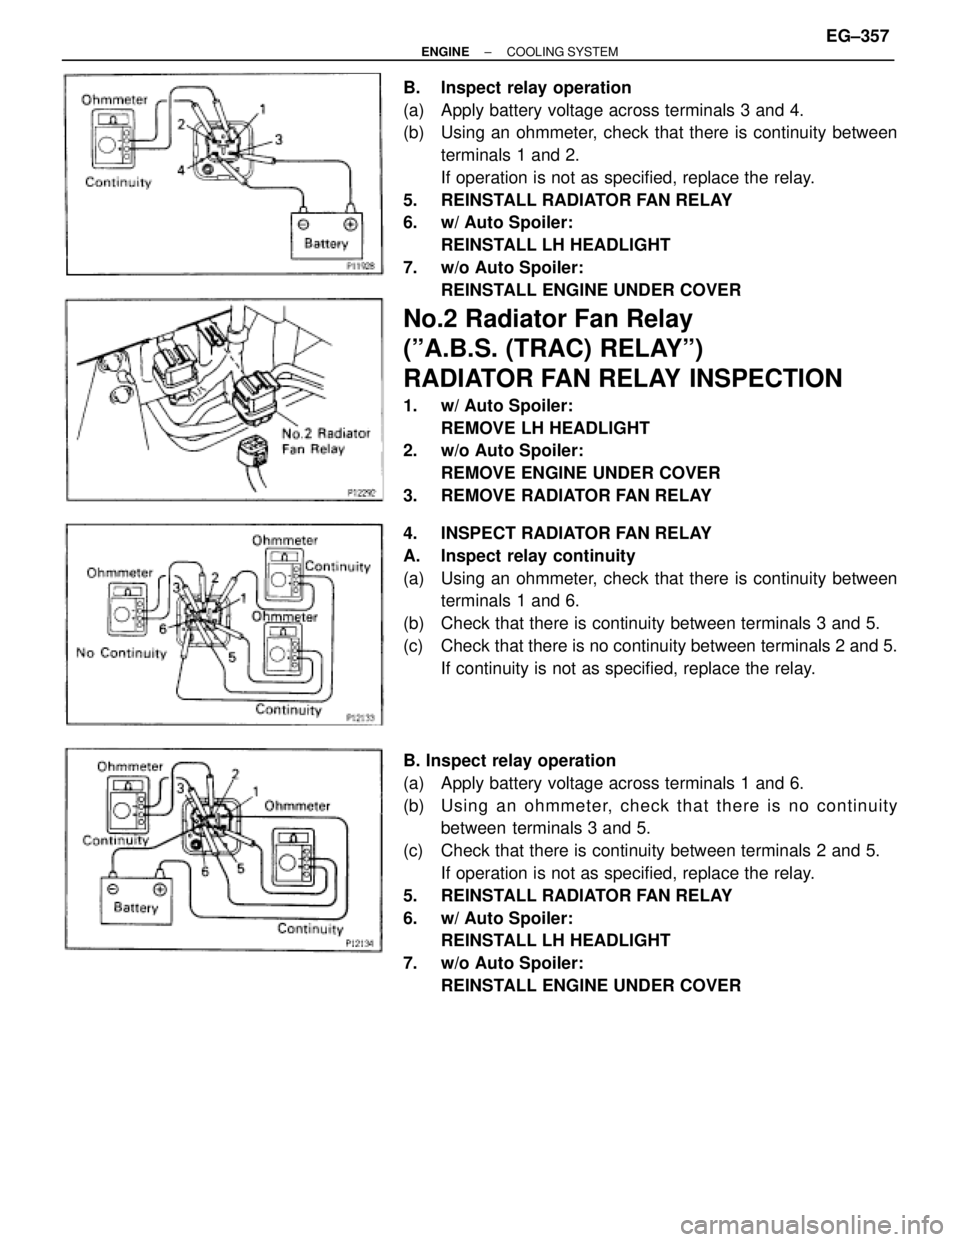
B. Inspect relay operation
(a) Apply battery voltage across terminals 3 and 4.
(b) Using an ohmmeter, check that there is continuity between
terminals 1 and 2.
If operation is not as specified, replace the relay.
5. REINSTALL RADIATOR FAN RELAY
6. w/ Auto Spoiler:
REINSTALL LH HEADLIGHT
7. w/o Auto Spoiler:
REINSTALL ENGINE UNDER COVER
No.2 Radiator Fan Relay
(ºA.B.S. (TRAC) RELAYº)
RADIATOR FAN RELAY INSPECTION
1. w/ Auto Spoiler:
REMOVE LH HEADLIGHT
2. w/o Auto Spoiler:
REMOVE ENGINE UNDER COVER
3. REMOVE RADIATOR FAN RELAY
4. INSPECT RADIATOR FAN RELAY
A. Inspect relay continuity
(a) Using an ohmmeter, check that there is continuity between
terminals 1 and 6.
(b) Check that there is continuity between terminals 3 and 5.
(c) Check that there is no continuity between terminals 2 and 5.
If continuity is not as specified, replace the relay.
B. Inspect relay operation
(a) Apply battery voltage across terminals 1 and 6.
(b) Usin g an oh mme te r, ch e ck th a t th e re is no co n tin u ity
between terminals 3 and 5.
(c) Check that there is continuity between terminals 2 and 5.
If operation is not as specified, replace the relay.
5. REINSTALL RADIATOR FAN RELAY
6. w/ Auto Spoiler:
REINSTALL LH HEADLIGHT
7. w/o Auto Spoiler:
REINSTALL ENGINE UNDER COVER
± ENGINECOOLING SYSTEMEG±357
Page 1109 of 2543
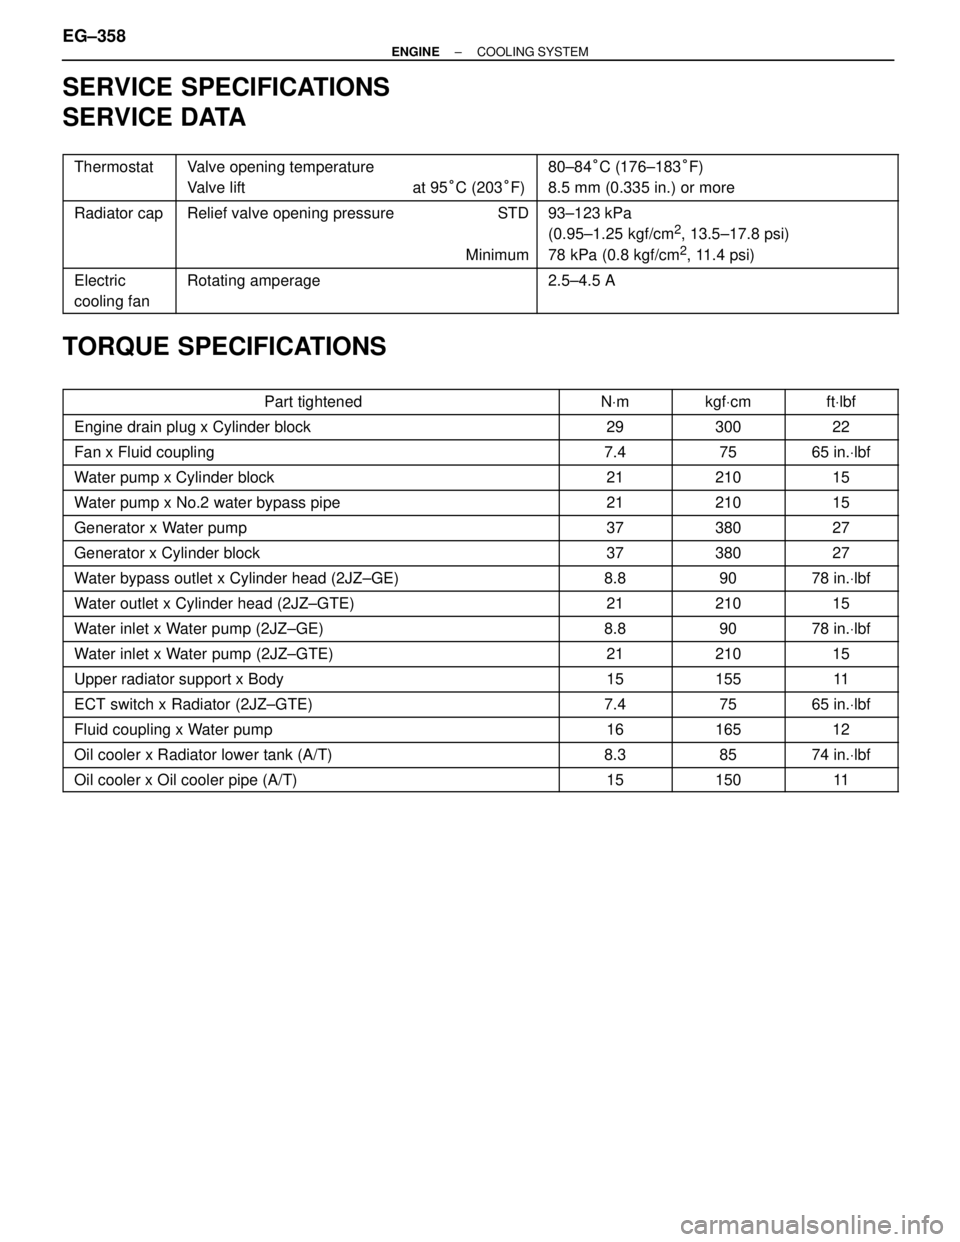
SERVICE SPECIFICATIONS
SERVICE DATA
������ �
����� ������
Thermostat���������������� �
��������������� ����������������
Valve opening temperature
Valve lift at 95°C (203°F)���������������� �
��������������� ����������������
80±84°C (176±183°F)
8.5 mm (0.335 in.) or more
������ �
����� �
����� ������
Radiator cap���������������� �
��������������� �
��������������� ����������������
Relief valve opening pressure STD
Minimum���������������� �
��������������� �
��������������� ����������������
93±123 kPa
(0.95±1.25 kgf/cm2, 13.5±17.8 psi)
78 kPa (0.8 kgf/cm
2, 11.4 psi)
������ �
����� ������
Electric
cooling fan���������������� �
��������������� ����������������
Rotating amperage���������������� �
��������������� ����������������
2.5±4.5 A
TORQUE SPECIFICATIONS
���������������������� ����������������������Part tightened����� �����NVm������ ������kgfVcm������ ������ftVlbf
���������������������� ����������������������Engine drain plug x Cylinder block����� �����29������ ������300������ ������22
���������������������� ����������������������Fan x Fluid coupling����� �����7.4������ ������75������ ������65 in.Vlbf
���������������������� ����������������������Water pump x Cylinder block����� �����21������ ������210������ ������15
���������������������� ����������������������Water pump x No.2 water bypass pipe����� �����21������ ������210������ ������15
���������������������� ����������������������Generator x Water pump����� �����37������ ������380������ ������27
���������������������� ����������������������Generator x Cylinder block����� �����37������ ������380������ ������27
���������������������� ����������������������Water bypass outlet x Cylinder head (2JZ±GE)����� �����8.8������ ������90������ ������78 in.Vlbf
���������������������� ����������������������Water outlet x Cylinder head (2JZ±GTE)����� �����21������ ������210������ ������15
���������������������� ����������������������Water inlet x Water pump (2JZ±GE)����� �����8.8������ ������90������ ������78 in.Vlbf
���������������������� ����������������������Water inlet x Water pump (2JZ±GTE)����� �����21������ ������210������ ������15���������������������� ����������������������Upper radiator support x Body����� �����15������ ������155������ ������11���������������������� ����������������������ECT switch x Radiator (2JZ±GTE)����� �����7.4������ ������75������ ������65 in.Vlbf���������������������� ����������������������Fluid coupling x Water pump����� �����16������ ������165������ ������12���������������������� ����������������������Oil cooler x Radiator lower tank (A/T)����� �����8.3������ ������85������ ������74 in.Vlbf���������������������� ����������������������Oil cooler x Oil cooler pipe (A/T)����� �����15������ ������150������ ������11
EG±358± ENGINECOOLING SYSTEM
Page 1137 of 2543
(2JZ±GE)
PRECAUTION
1. With a tachometer connected to the system, connect the
tester probe of the tachometer to terminal IG� of the
DLC1.
2. As some tachometers are not compatible with this
ignition system, we recommend that you confirm the
compatibility of your unit before use.
3. Never allow the tachometer terminals to touch ground as
it could result in damage to the igniter and/or ignition
coil.
4. Do not disconnect the battery while the engine is
running.
5. Check that the igniter is properly grounded to the body. IG±2
± IGNITION SYSTEM2JZ±GE
Page 1139 of 2543
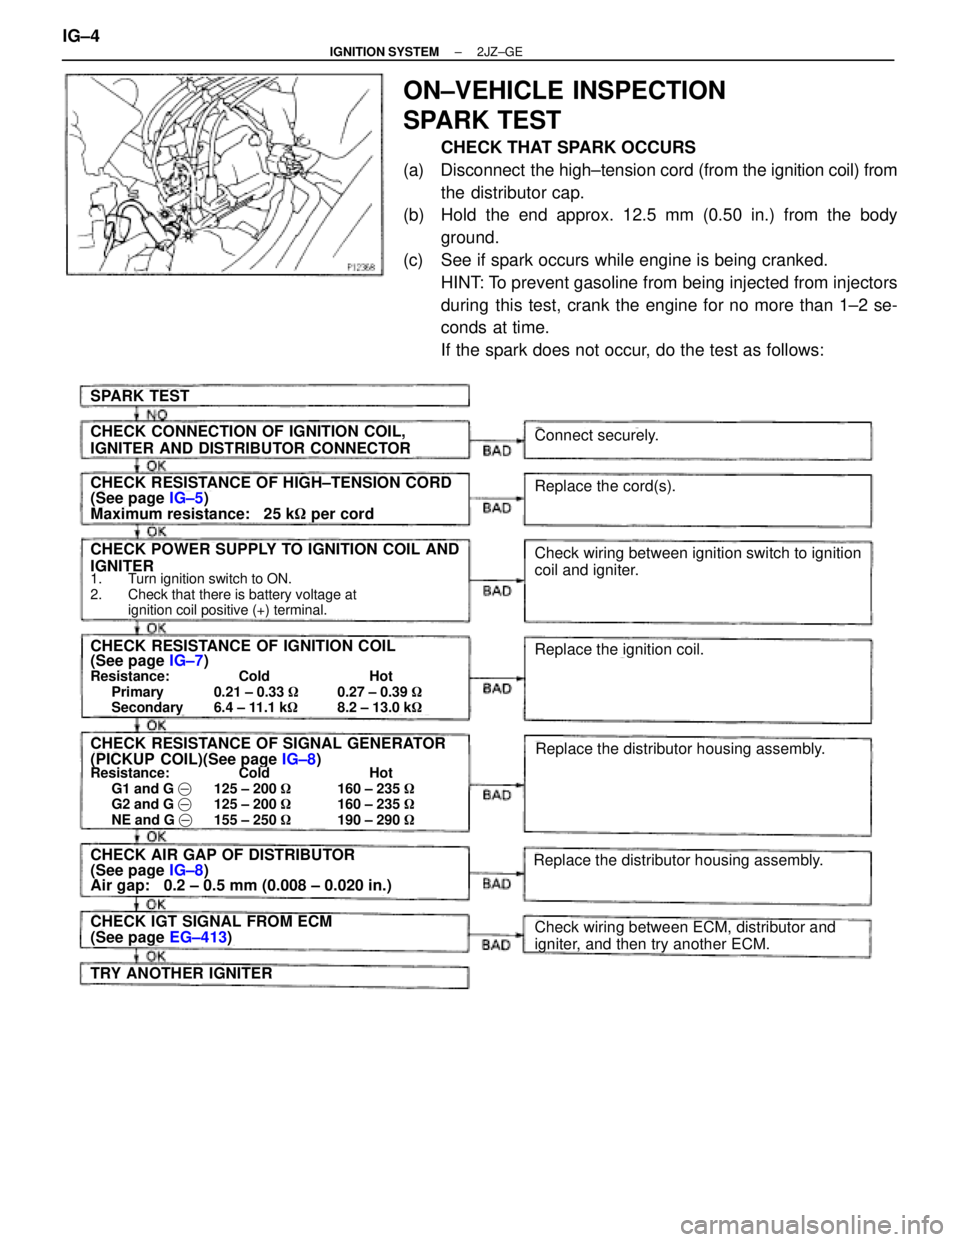
ON±VEHICLE INSPECTION
SPARK TEST
CHECK THAT SPARK OCCURS
(a) Disconnect the high±tension cord (from the ignition coil) from
the distributor cap.
(b) Hold the end approx. 12.5 mm (0.50 in.) from the body
ground.
(c) See if spark occurs while engine is being cranked.
HINT: To prevent gasoline from being injected from injectors
during this test, crank the engine for no more than 1±2 se-
conds at time.
If the spark does not occur, do the test as follows:
SPARK TEST
Connect securely.CHECK CONNECTION OF IGNITION COIL,
IGNITER AND DISTRIBUTOR CONNECTOR
CHECK RESISTANCE OF HIGH±TENSION CORD(See page IG±5)
Maximum resistance: 25 k� per cord
CHECK POWER SUPPLY TO IGNITION COIL AND
IGNITER
1. Turn ignition switch to ON.
2. Check that there is battery voltage at
ignition coil positive (+) terminal.
CHECK RESISTANCE OF IGNITION COIL(See page IG±7)Resistance: Cold Hot
Primary 0.21 ± 0.33 �0.27 ± 0.39 �
Secondary 6.4 ± 11.1 k�8.2 ± 13.0 k�
CHECK RESISTANCE OF SIGNAL GENERATOR
(PICKUP COIL)(See page IG±8)Resistance: Cold Hot
G1 and G �125 ± 200 �160 ± 235 �
G2 and G �125 ± 200 �160 ± 235 �
NE and G �155 ± 250 �190 ± 290 �
CHECK AIR GAP OF DISTRIBUTOR(See page IG±8)Air gap: 0.2 ± 0.5 mm (0.008 ± 0.020 in.)
(See page EG±413)
CHECK IGT SIGNAL FROM ECM
TRY ANOTHER IGNITER
Replace the cord(s).
Check wiring between ignition switch to ignition
coil and igniter.
Replace the ignition coil.
Replace the distributor housing assembly.
Replace the distributor housing assembly.
Check wiring between ECM, distributor and
igniter, and then try another ECM.
IG±4± IGNITION SYSTEM2JZ±GE