Page 1405 of 2543
(d) Disconnect the hook of the tailpipe from the 2 rings.
(e) Disconnect the 2 rings on the exhaust pipe from the exhaust
pipe brackets, and remove the exhaust pipe assembly.
25. REMOVE NO.2 FRONT EXHAUST PIPE
Remove the 3 nuts, front exhaust pipe and gasket.
26. REMOVE EXHAUST PIPE HEAT INSULATOR
Remove the 4 nuts and heat insulator.
27. R E M O V E R E A R C E N T E R F L O O R C R O S S M E M B E R
BRACE
Remove the 4 bolts (Normal roof) or 6 bolts (Sport Roof) and
crossmember brace.
28. REMOVE PROPELLER SHAFT
(See propeller shaft removal in Propeller Shaft)
29. A/T:
DISCONNECT TRANSMISSION CONTROL ROD
Remove the nut, and disconnect the control rod from the shift
lever.
± ENGINEENGINE MECHANICALEG±91
Page 1406 of 2543

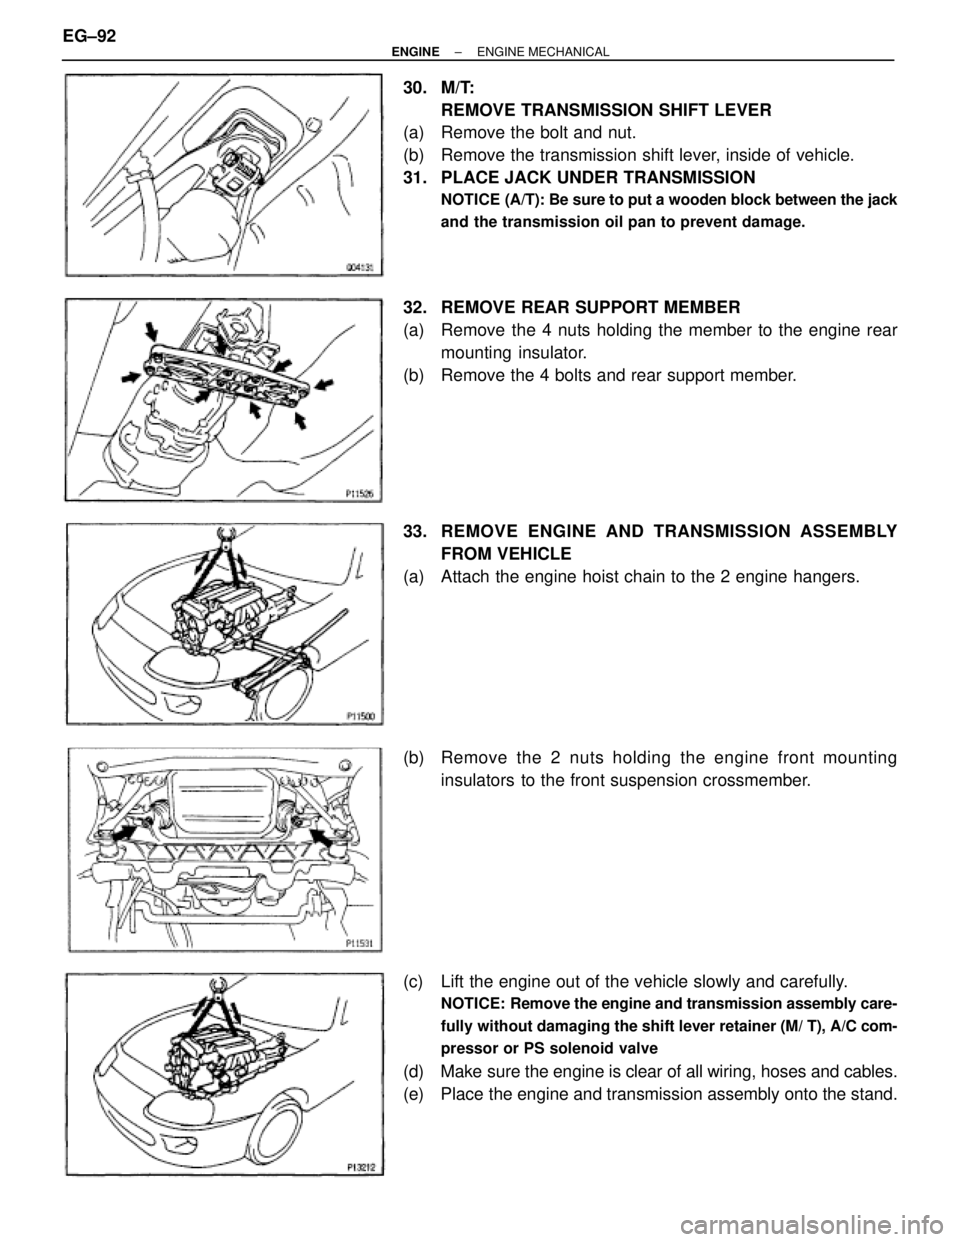
30. M/T:
REMOVE TRANSMISSION SHIFT LEVER
(a) Remove the bolt and nut.
(b) Remove the transmission shift lever, inside of vehicle.
31. PLACE JACK UNDER TRANSMISSION
NOTICE (A/T): Be sure to put a wooden block between the jack
and the transmission oil pan to prevent damage.
32. REMOVE REAR SUPPORT MEMBER
(a) Remove the 4 nuts holding the member to the engine rear
mounting insulator.
(b) Remove the 4 bolts and rear support member.
33. REMOVE ENGINE AND TRANSMISSION ASSEMBLY
FROM VEHICLE
(a) Attach the engine hoist chain to the 2 engine hangers.
(b) Remove the 2 nuts holding the engine front mounting
insulators to the front suspension crossmember.
(c) Lift the engine out of the vehicle slowly and carefully.
NOTICE: Remove the engine and transmission assembly care-
fully without damaging the shift lever retainer (M/ T), A/C com-
pressor or PS solenoid valve
(d) Make sure the engine is clear of all wiring, hoses and cables.
(e) Place the engine and transmission assembly onto the stand. EG±92
± ENGINEENGINE MECHANICAL
Page 1407 of 2543
COMPONENTS FOR ENGINE &
TRANSMISSION SEPERATION AND
ASSEMBLY
± ENGINEENGINE MECHANICALEG±93
Page 1408 of 2543
ENGINE & TRANSMISSION SEPARATION
1. A/T:
REMOVE OIL DIPSTICK GUIDE FOR TRANSMISSION
(a) Remove the bolt.
(b) Pull out the dipstick and guide from the transmission.
(c) Remove the O±ring from the dipstick guide.
2. DISCONNECT ENGINE WIRE FROM TRANSMISSION
(a) Disconnect the connectors.
(b) Disconnect the wire clamps from the brackets.
3. REMOVE STARTER
(a) Disconnect the starter connector.
(b) Remove the 2 bolts, engine wire bracket and starter.
4. 2JZ±GE A/T:
DISCONNECT THROTTLE CABLE
(a) Disconnect the throttle cable from the throttle body.
(b) Disconnect the throttle cable from the cable bracket on the
cylinder head.
5. A/T:
REMOVE OIL COOLER TUBES FOR TRANSMISSION
(a) Remove the 2 hose clamp bolts and tube clamp bolt.
(b) Loosen the 2 union nuts, and remove the oil cooler tubes.
EG±94± ENGINEENGINE MECHANICAL
Page 1409 of 2543
6. 2JZ±GTE M/T:
REMOVE CLUTCH COVER SET BOLTS
(a) Remove the 2 bolts and service hole cover.
(b) Place the matchmarks on the flywheel and clutch cover.
(c) Remove the 6 bolts.
7. A/T:
REMOVE TORQUE CONVERTER CLUTCH MOUNTING
BOLTS
(a) Remove the hole plug.
(b) Turn the crankshaft to gain access to each bolt.
Remove the 6 bolts.
8. SEPARATE ENGINE AND TRANSMISSION
Remove the 6 bolts and transmission.
HINT: The º17º is 17 mm head bolt, and º14º is 14 mm head
bolt.
9. 2JZ±GE M/T:
REMOVE CLUTCH COVER AND DISC
(a) Place matchmarks on the flywheel and clutch cover.
(b) Loosen each bolt one turn at a time until spring tension is
released.
(c) Remove the bolts, and pull off the clutch cover with the clutch
disc.
NOTICE: Do not drop the clutch disc.
± ENGINEENGINE MECHANICALEG±95
Page 1410 of 2543
COMPONENTS FOR CYLINDER BLOCK
DISASSEMBLY AND ASSEMBLY
EG±96± ENGINEENGINE MECHANICAL
Page 1411 of 2543
± ENGINEENGINE MECHANICALEG±97
Page 1412 of 2543
PREPARATION FOR DISASSEMBLY
1. M/T:
REMOVE FLYWHEEL
2. A/T:
REMOVE DRIVE PLATE
3. INSTALL ENGINE TO ENGINE STAND FOR
DISASSEMBLY
4. REMOVE GENERATOR
5. REMOVE TIMING BELT AND PULLEYS
(See timing belt removal)
6. REMOVE CYLINDER HEAD
(See cylinder head removal)
7. REMOVE OIL FILTER
(See oil and filter replacement in Lubrication System)
8. 2JZ±GTE:
REMOVE OIL COOLER
(See oil cooler removal in Lubrication System)
9. REMOVE NO.2 WATER BYPASS PIPE
(a) 2JZ±GE:
Remove the bolt, 2 nuts, water bypass pipe and gasket.
(b) 2JZ±GTE:
Remove the 2 bolts, 2 nuts, water bypass pipe and gasket.
10. REMOVE OIL FILTER BRACKET
Remove the union bolt, gasket, oil filter bracket and O ±ring.
11. REMOVE LH ENGINE MOUNTING BRACKET AND
INSULATOR ASSEMBLY
12. REMOVE FUEL PIPE SUPPORT EG±98
± ENGINEENGINE MECHANICAL